Current SILENT TRAC Manuale utente

1
Change Positions on the Drapery Track (Single)
Change Positions on the Drapery Track (Dual)
Pairing the Remote to the Drapery (FM)
Enable or Disable Smart Assist
Grouping Multiple Drapery Together (Control Box Required)
Master Reset
Statements
..........2
..........4
..........8
..........9
..........10
..........11
..........12
Optional Programming steps for the Drapery Track

2
I. Change Positions on the drapery Track (Single)
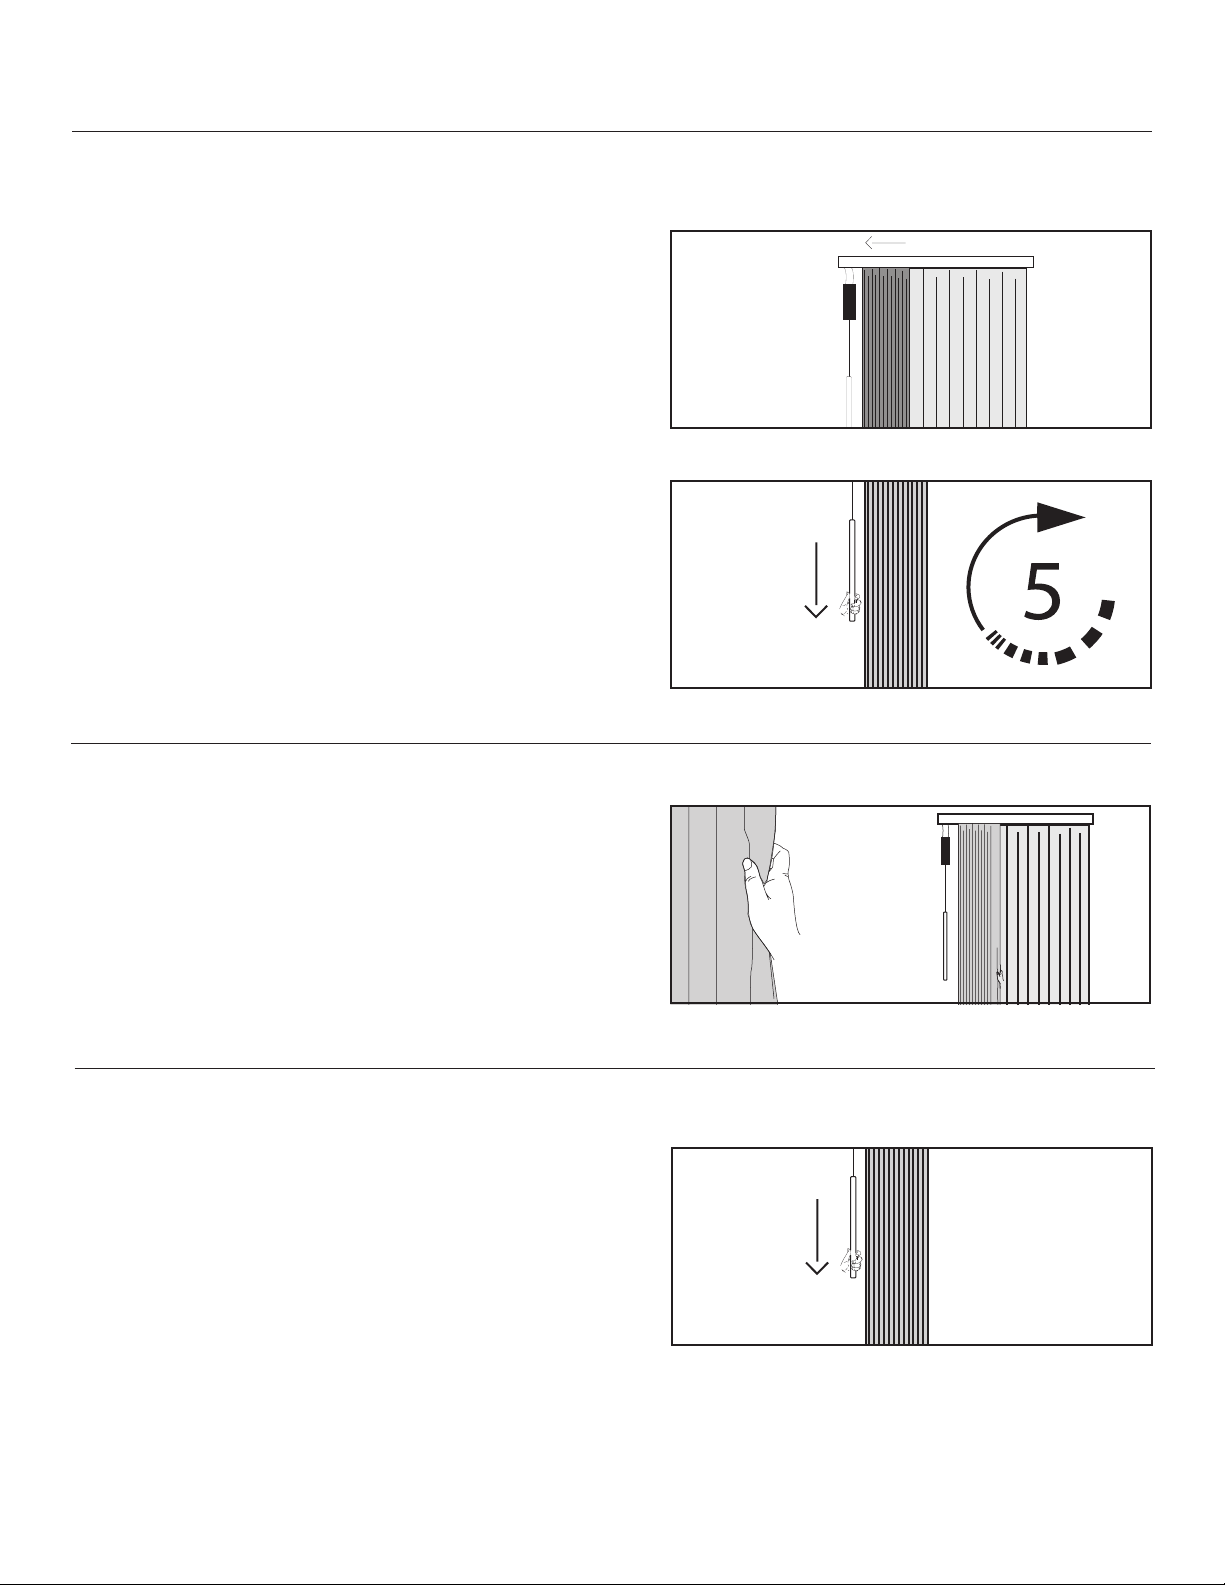
Change the open Position
2. SET THE OPEN POSITION
By hand, pull the drapery until it reaches the desired full open
position. See Figure 3.
3. EXIT LEARN OPEN POSITION MODE
Pull down on the Pendant once to exit learn mode. The drapery will
1. ENTER LEARN OPEN POSITION MODE
Pull down and release the Pendant so the drapery moves towards
the direction you would like to set as the “open” position. See Figure
1.
Figure 1 - Pull down and release the Pendant
Figure 3 - Pull the drapery by hand to the desired full open position
Note: If you have a remote control paired to the device, you can use
it to move the curtain into the desired full open position. A press
and release will move the drapery half an inch in a direction while a
press and hold will move the drapery continuously.
Figure 2 - Pull down and hold the Pendant for 5 seconds, then release
Figure 4 - Pull down and release the Pendant
For additional help during installation of your drapery track, visit www.currentproductscorp.com/support/drapery-track
or call 1-844-307-7435.
After the drapery reaches it’s current open position, it will stop
the drapery jogs. See Figure 2.
Release the Pendant.

3
Change the Close Position
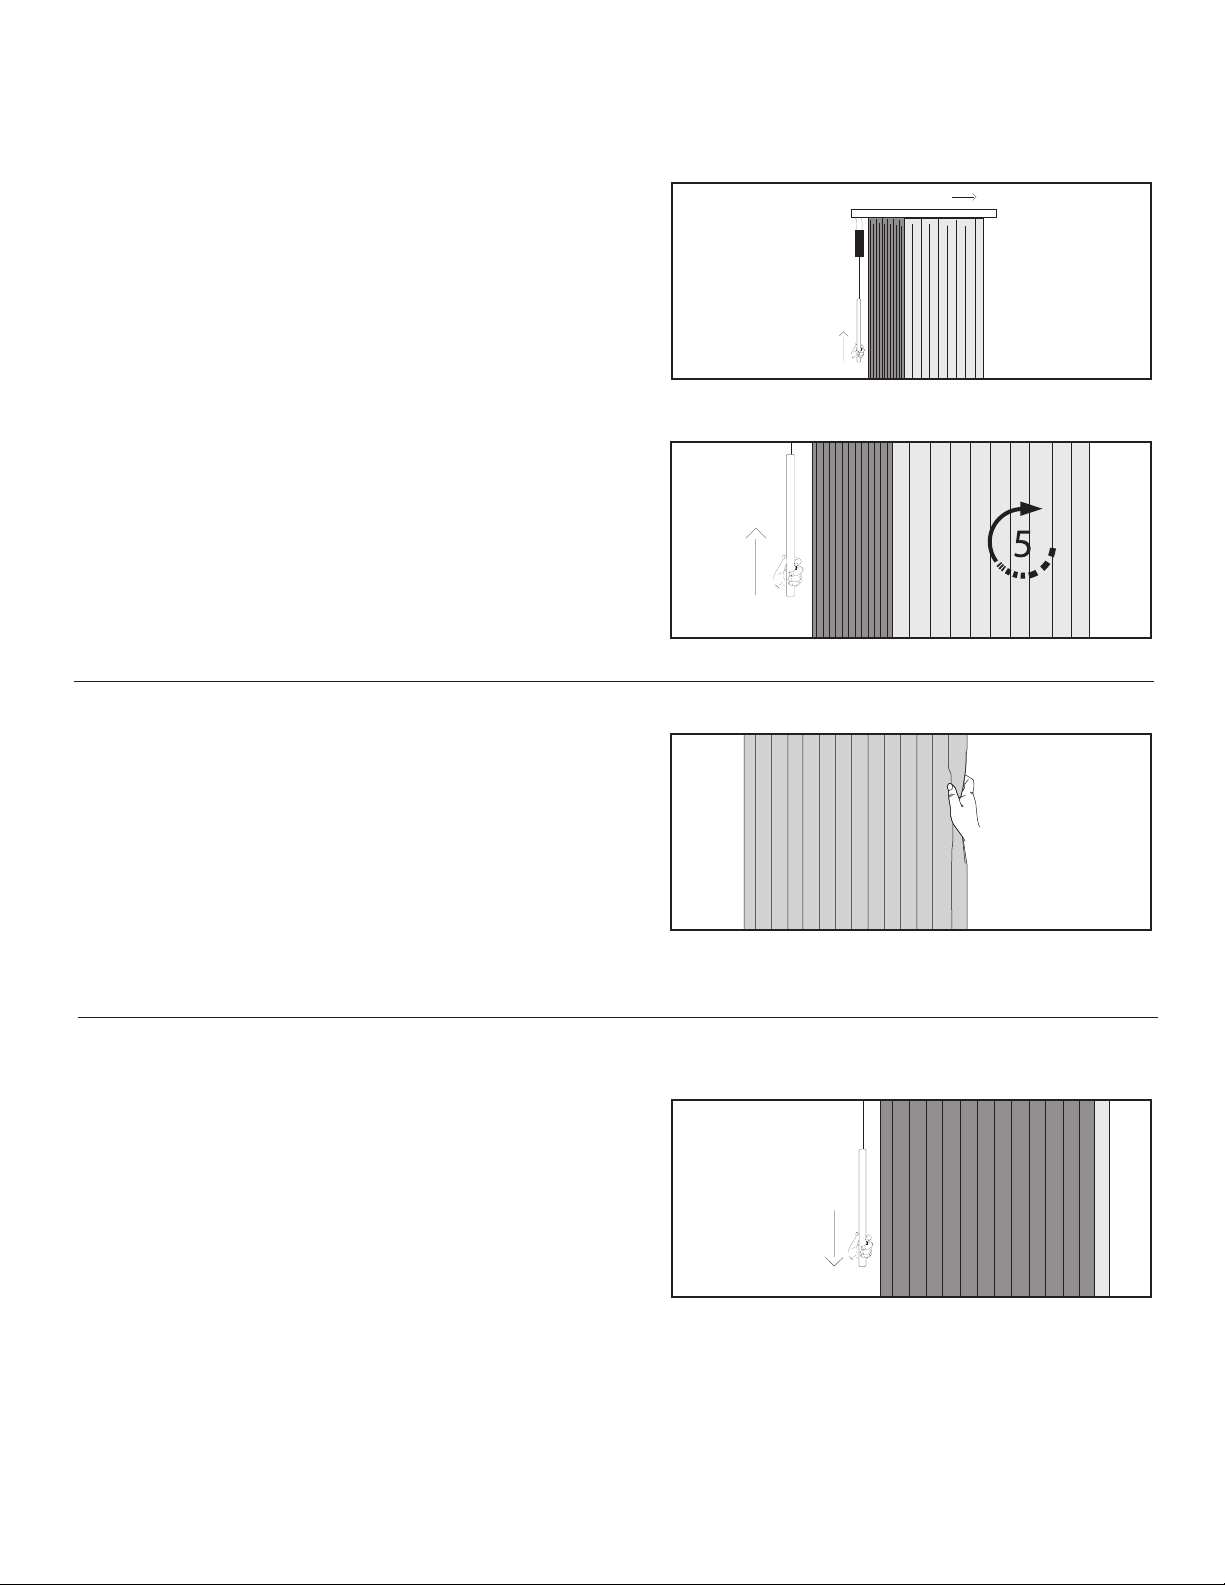
2. SET THE CLOSE POSITION
3. EXIT LEARN CLOSE POSITION MODE
Pull down on the Pendant once to exit learn mode. The drapery will
1. ENTER LEARN CLOSE POSITION MODE
Pull down and release the Pendant so the drapery moves towards
the direction you would like to set as the “close” position. See Figure
5.
Note: If you have a remote control paired to the device, you can use
it to move the curtain into the desired full close position. A press
and release will move the drapery half an inch in a direction while a
press and hold will move the drapery continuously.
By hand, pull the drapery until it reaches the desired full close
position. See Figure 7.
Figure 5 - Pull down and release the Pendant to close drapery
Figure 7 - Pull the drapery by hand to the desired full close position
Figure 6 - Pull down and hold the Pendant for 5 seconds, then release
Figure 8 - Pull down and release the Pendant
After the drapery reaches the position, it will stop moving. Pull
jogs. See Figure 6.
Release the Pendant.
4
Change the open Position for the Room Side drapery (Motor 1)
2. SET THE OPEN POSITION
By hand, pull the curtain until it reaches the desired full open
position. See Figure 11.
3. EXIT LEARN POSITION MODE
Pull down and release the Pendant once to exit learn mode. The
12.
1. ENTER LEARN OPEN POSITION MODE
Pull down and release the Pendant so the room side drapery moves
towards the direction you would like to set as the “open” position.
See Figure 9.
Figure 9 - Pull down Pendant to move room side
drapery to open position
II. Change Positions on the drapery Track (dual)
Figure 10 - Pull down and hold the Pendant for 5 seconds, then release
Figure 11 - Pull the drapery by hand to the desired full open position
Figure 12 - Pull down and release the Pendant
After the drapery reaches the position, it will stop moving. Pull
jogs. See Figure 10.
Release the Pendant.

5
Change the Close Position for the room side drapery (MOTOR 1)
1. ENTER LEARN CLOSE POSITION MODE
Pull down and release the Pendant so the drapery moves towards
the direction you would like to set as the “close” position. See Figure
13.
Figure 14 - Pull down and hold the Pendant for 5 seconds, then release
2. SET THE CLOSE POSITION
By hand, pull the curtain until it reaches the desired full close
position. See Figure 15.
3. EXIT LEARN CLOSE POSITION MODE
Pull down and release the Pendant once to exit learn mode. The
16.
Figure 13 - Pull down Pendant to move room side
drapery to closed position
Figure 15 - Pull the drapery by hand to the desired full closed position
After the drapery reaches the position, it will stop moving. Pull
jogs. See Figure 14.
Release the Pendant.
Figure 16 - Pull down and release the Pendant

6
Change the open Position for the window side drapery (Motor 2)
2. SET THE OPEN POSITION
By hand, pull the drapery until it reaches the desired full open
position. See Figure 19.
3. EXIT LEARN OPEN POSITION MODE
Pull down and release the Pendant once to exit learn mode. The
20.
1. ENTER LEARN OPEN POSITION MODE
Lift up and release the Pendant so the drapery moves towards the
direction you would like to set as the “open” position. See Figure
17.
Figure 18 - Lift up and hold Pendant for 5 seconds, then release
Figure 17 - Lift up and release Pendant to move
drapery to open position
Figure 19 - Pull the drapery to full open position
Figure 20 - Pull down and release Pendant
After the drapery reaches the position, it will stop moving. Lift up
See Figure 18.
Release the Pendant.
7
Change the Close Position for the window side drapery (Motor 2)
2. SET THE CLOSE POSITION
By hand, pull the drapery until it reaches the desired full close
position. See Figure 23.
3. EXIT LEARN CLOSE POSITION MODE
Pull down and release the Pendant once to exit learn mode. The
24.
1. ENTER LEARN CLOSE POSITION MODE
Lift up and release the Pendant so the drapery moves towards the
direction you would like to set as the “close” position. See Figure
21.
Figure 22 - Lift up and hold Pendant for 5 seconds, then release
Figure 23 - Pull drapery to full closed position
Figure 21 - Lift up and release Pendant to move
drapery to closed position
Figure 24 - Pull down and release Pendant
After the drapery reaches the position, it will stop moving. Lift up
See Figure 22.
Release the Pendant.

8
III. Pair the Remote to the drapery (FM)
1. INITIATE LEARN MODE
Pull down and release the Pendant twice to enter learn mode.
tug should stop it. See Figure 25.
2. CONNECT THE REMOTE
On multi-channel remotes, select the channel you wish to pair to
by pressing the Channel button until the LED corresponding with
the appropriate channel is lit. See Figure 26.
2x
Figure 25 - Pull down and release Pendant
Figure 26 - Select channel by pressing channel button
Figure 27 - Depress pairing button on back of remote
Figure 28 - Press and release top left button on remote
Depress the “pairing” button on the back of the remote by pushing
a pen or other object through the hole in the back of the remote.
The LEDs on the front will scroll. See Figure 27.
Press and release the top left button on the remote. The drapery

9
IV. Enable or disable smart assist
Smart Assist allows users to pull the curtain manually and have the movement complete automatically. All drapery tracks come
with Smart Assist enabled.
1. MANUALLY MOVE THE DRAPERY
Begin with the drapery in the full open or full closed position.
Manually move the drapery more than a foot towards the opposite
direction. If Smart Assist is enabled, the drapery will begin to
complete the movement automatically. If Smart Assist is disabled,
the drapery will remain in place. See Figure 29.
2. ENABLE OR DISABLE SMART ASSIST
To disable Smart Assist
seconds or until the drapery jogs, then release. Be sure to pull down
on the Pendant before the drapery reaches its limit. See Figure 30.
3. CONFIRM
Figure 32.
Figure 29 - Manually move the drapery one foot
Figure 30 - Pull down and hold Pendant for 5 seconds
Figure 31 - Pull down and hold Pendant for 5 seconds
Figure 32 - Pull down and release Pendant once
To enable Smart Assist
or until the drapery jogs, then release. See Figure 31.

10
V. Grouping Multiple Drapery Together
2. CONFIRM GROUPING
On a central unit you would like to designate as the ‘Master’, press
and hold all three buttons on the sensor box until all three LEDs
1. ENTER PAIRING MODE
On each drapery you would like to group, press and hold all three
Figure 33.
Figure 34 - Press and hold all 3 buttons
Figure 33 - Press and hold all 3 buttons
The grouping feature is available on all units with a sensor box. Grouping allows users to control multiple units simultaneously
with one manual command. Grouping also allows units to move together simultaneously when any one unit in the group has a
sensor automated command triggered.
Altri manuali per SILENT TRAC
6
Indice
Altri manuali Current Domotica


