
CYP CDPS-4S2HSS Manuale utente

CDPS-4S2HSS
4×2 SDI to HDMI Seamless Splitter with PIP
Operation Manual
Operation Manual

DISCLAIMERS
The information in this manual has been carefully checked and
is believed to be accurate. Cypress Technology assumes no
responsibility for any infringements of patents or other rights of third
parties which may result from its use.
Cypress Technology assumes no responsibility for any inaccuracies
that may be contained in this document. Cypress also makes no
commitment to update or to keep current the information contained
in this document.
Cypress Technology reserves the right to make improvements to this
document and/or product at any time and without notice.
COPYRIGHT NOTICE
No part of this document may be reproduced, transmitted,
transcribed, stored in a retrieval system, or any of its part translated
into any language or computer le, in any form or by any means—
electronic, mechanical, magnetic, optical, chemical, manual, or
otherwise—without express written permission and consent from
Cypress Technology.
© Copyright 2011 by Cypress Technology.
All Rights Reserved.
Version 1.1 August 2011
TRADEMARK ACKNOWLEDGMENTS
All products or service names mentioned in this document may be
trademarks of the companies with which they are associated.
SAFETY PRECAUTIONS
Please read all instructions before attempting to unpack, install or
operate this equipment and before connecting the power supply.
Please keep the following in mind as you unpack and install this
equipment:
• Always follow basic safety precautions to reduce the risk of re,
electrical shock and injury to persons.
• To prevent re or shock hazard, do not expose the unit to rain,
moisture or install this product near water.
• Never spill liquid of any kind on or into this product.
• Never push an object of any kind into this product through any
openings or empty slots in the unit, as you may damage parts
inside the unit.
• Do not attach the power supply cabling to building surfaces.
• Use only the supplied power supply unit (PSU). Do not use the PSU
if it is damaged.
• Do not allow anything to rest on the power cabling or allow any
weight to be placed upon it or any person walk on it.
• To protect the unit from overheating, do not block any vents or
openings in the unit housing that provide ventilation and allow for
sufcient space for air to circulate around the unit.
REVISION HISTORY
VERSION NO. DATE (DD/MM/YY) SUMMARY OF CHANGE
VR0 21/08/15 Preliminary release

CONTENTS
1. Introduction............................................ 1
2. Applications........................................... 1
3. Package Contents ................................ 1
4. System Requirements............................ 1
5. Features.................................................. 2
6. Operation Controls and Functions....... 3
6.1 Front Panel ........................................3
6.2 Rear Panel.........................................4
6.3 Remote Control................................5
6.4 OSD Menu.........................................6
6.5 RS-232 Protocol...............................16
6.6 RS-232 and Telnet Commands .....17
6.7 Software Application.....................24
6.8 Telnet Control .................................25
6.9 WebGUI Control .............................27
6.9.1 Image Adjust .........................27
6.9.2 Output Resolution .................27
6.9.3 Window Setup .......................28
6.9.4 OSD Settings ..........................29
6.9.5 Window Convert...................29
6.9.6 Chromakey Setup.................30
6.9.7 Ethernet..................................30
7. Connection Diagram .......................... 31
8. Specications ...................................... 32
9. Acronyms ............................................. 33

1
1. INTRODUCTION
The 4 by 2 SDI to HDMI Seamless Quad PIP Splitter is a high performance,
high speed zooming/shrinking system that can be easily congure
and control for quad or picture-in-picture video processing. Allowing
4 different SDI input sources to be freely selected and arranged on
to HDMI displays with total of 8 different types of settings. Supporting
resolution up to WUXGA@60RB, 1080p and audio up to 8CH with
sampling rate 48kHz for both inputs and outputs. Screen setting hot
keys, OSD, RS-232 and Telnet allows instant control and switching on
the output displays.
2. APPLICATIONS
• Broadcasting room and control
• Surveillance room and control
• Public advertisement and control
• SDI signal extending
3. PACKAGE CONTENTS
• 1×4 by 2 SDI to HDMI Seamless Splitter
• 1×Remote Control (CR-124)
• 1×12 V/3 A DC Power Adaptor
• 1× Rack Ear Sets
• Operation Manual
4. SYSTEM REQUIREMENTS
Input source equipment such as SNG camera or SDI signal, PC/Laptop
or RS-232 control devices and output HD TV/monitors with connection
cables.

2
5. FEATURES
• Supports SD-SDI (SMPTE 259M-C, at bitrates of 270 Mbit/s) input
signals up to 250M
• Supports HD-SDI (SMPTE 292M, at bitrates of 1.485Gbit/s and
1.485/1.001 Gbit/s) input signals up to 200M
• Supports 3G-SDI (SMPTE 424M/425M-AB, at bitrates of 2.970 Gbit/s
and 2.9701/1.001 Gbit/s) input signals up to 100M
• HDMI output compatible with DVI
• Combine four SDI inputs single into HDMI and output on to two
synchronize HD screen
• Seamless switching between channels and windows
• Zoom and Shrink 4CH input image and or to overlay them
• Supports PIP, POP and multi-windows display
• Supports OSD, RS-232 Remote and on-panel controls
• Fade-In-Out, Chromakey, Mirror and Rotation (90˚ left & right and
180˚ up & down) functions
• 8 Screen setting hot keys and extra 4 customized favorite screen
setting
• Easily to adjust size, position and setting of 4 input images via
WebGUI, only drag and few clicks can achieve output display
format setting
3
6. OPERATION CONTROLS AND FUNCTIONS
6.1 Front Panel
POWERPOWER
WINDOW
1FAV234
ABCDEFGH
CH 1CHANNEL IN CH 2CH 3CH 4FAV SELECT ENTER
MENU
AUDIO
+
-
INFO
720P/60Hz
A
WINDOW CDEFGH
B
1 2 3 5 6 9 10 487
4 5
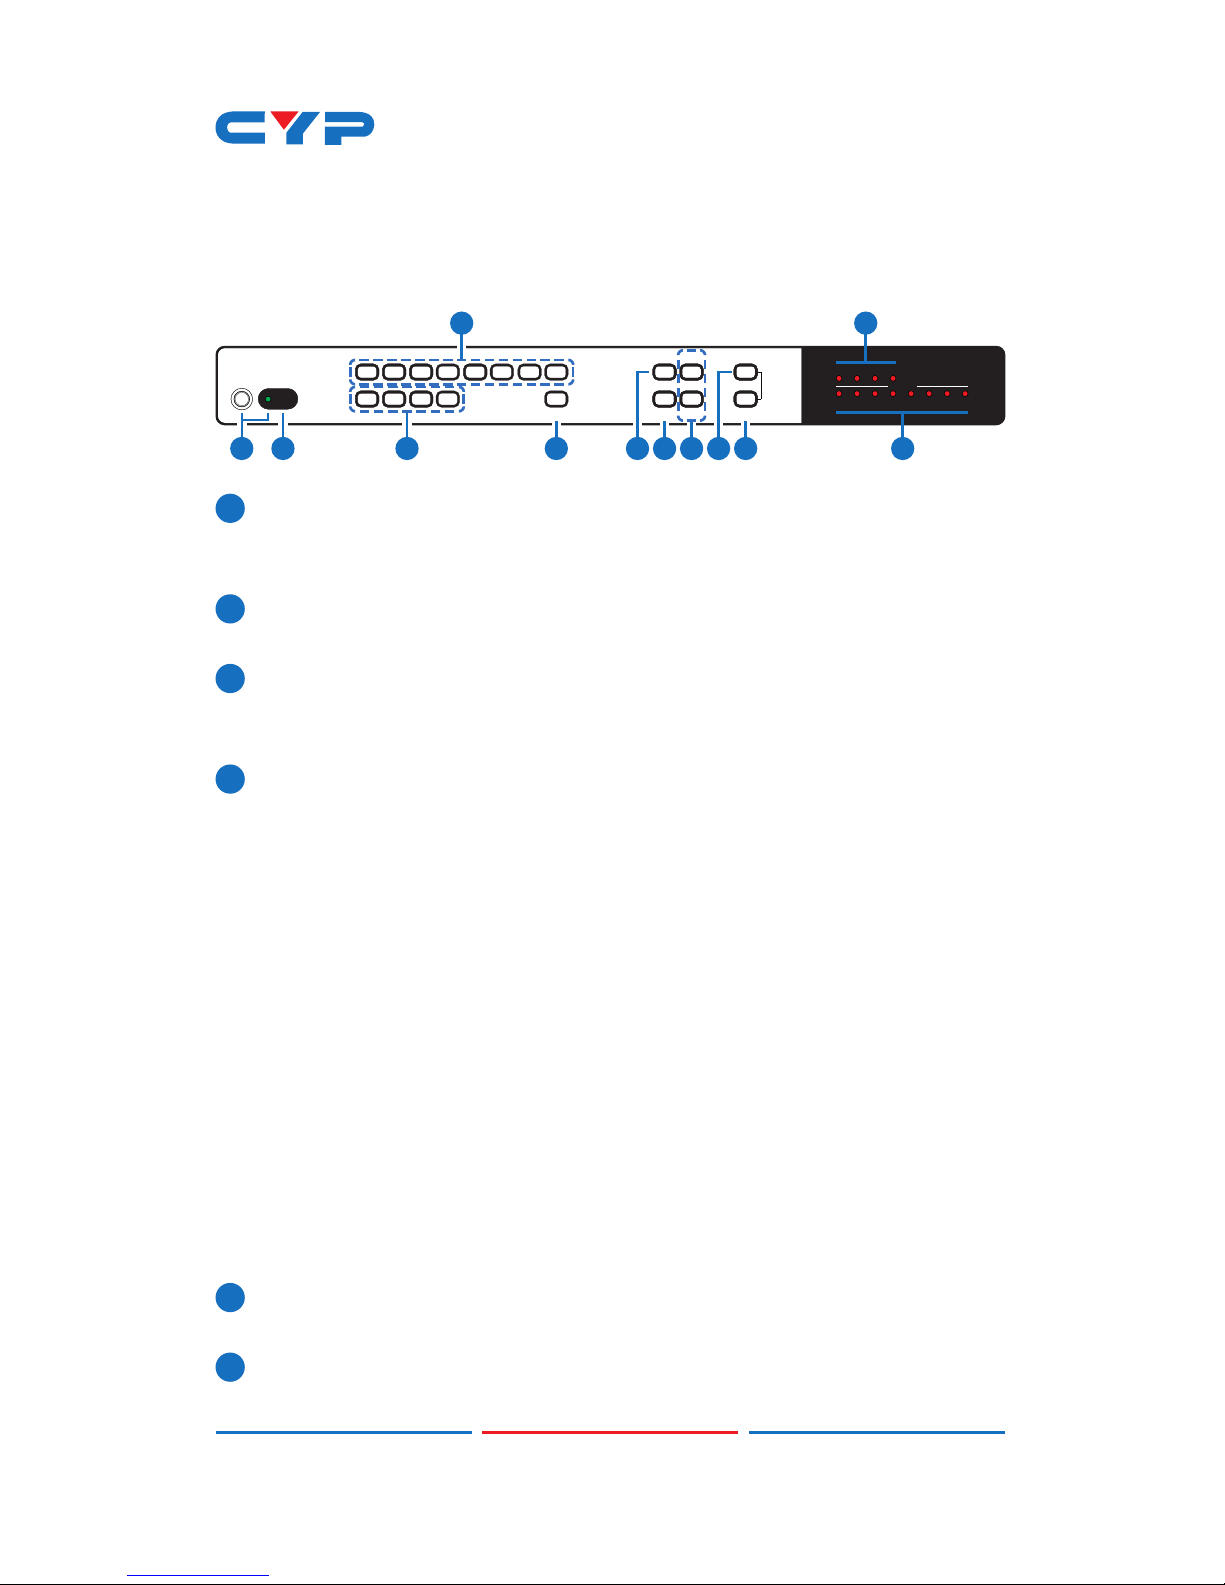
1POWER Button & LED: Press this button to power on the device and
the LED will illuminate in green or set it to standby mode and the
LED will illuminate in Red.
2IR Window: Accept IR signal from the device’s remote control
included in the package only.
3CHANNEL IN 1~4: Press these buttons to rotate SDI 1~4 input source
on each channel to be display on screens. All channels can select
the same input or each channel a different input.
4WINDOW A~H & LEDs: Press these hot keys to select the screen
setting where A~D are display a full screen of each channel and
E~H are a different combination of a full screen setting with all 4
channels.
Windows A~D's channel input selection is corresponding to
channel input no. 1~4. That is, to change window A's input channel
must press channel input 1's button. Channel input 2~4's button
will not activate under window A's selection. Windows E~H's size
are adjustable through the OSD menu setting and only window
G & H is PIP(Picture in Picture) where E & F are POP (Picture out Of
picture) settings.
Under window E~H when the size setting is overlapping one
another, channel display sequence is CH4>CH3>CH2 >CH1. That is,
CH4 will cover CH3 and CH3 will cover CH2 and so on. Under some
display the borderline may have interference, adjusting display's
motion setting may resolve the interference issue.
5FAV SELECT & LEDs: Press this button to recall the favor setting from
1~4 and the LED will illuminate accordingly.
6MENU: Press this button to bring up the OSD menu on screen.
4
7ENTER: Press this button to enter into MENU selection and conrm
the selection.
8-/+ Buttons: Press these buttons to scroll down/up the OSD
selections.
9INFO: Press this button to bring up the information section from the
OSD menu.
10 AUDIO: Press this button to select audio channel.
Note:Press the 'INFO & AUDIO' buttons together to switch output
resolution to 720p@60Hz instantly.
6.2 Rear Panel
SDI IN
4321
BA SERVICE
HDMI OUT CONTROL RS232 DC 12V
1 2 3 4 5 6
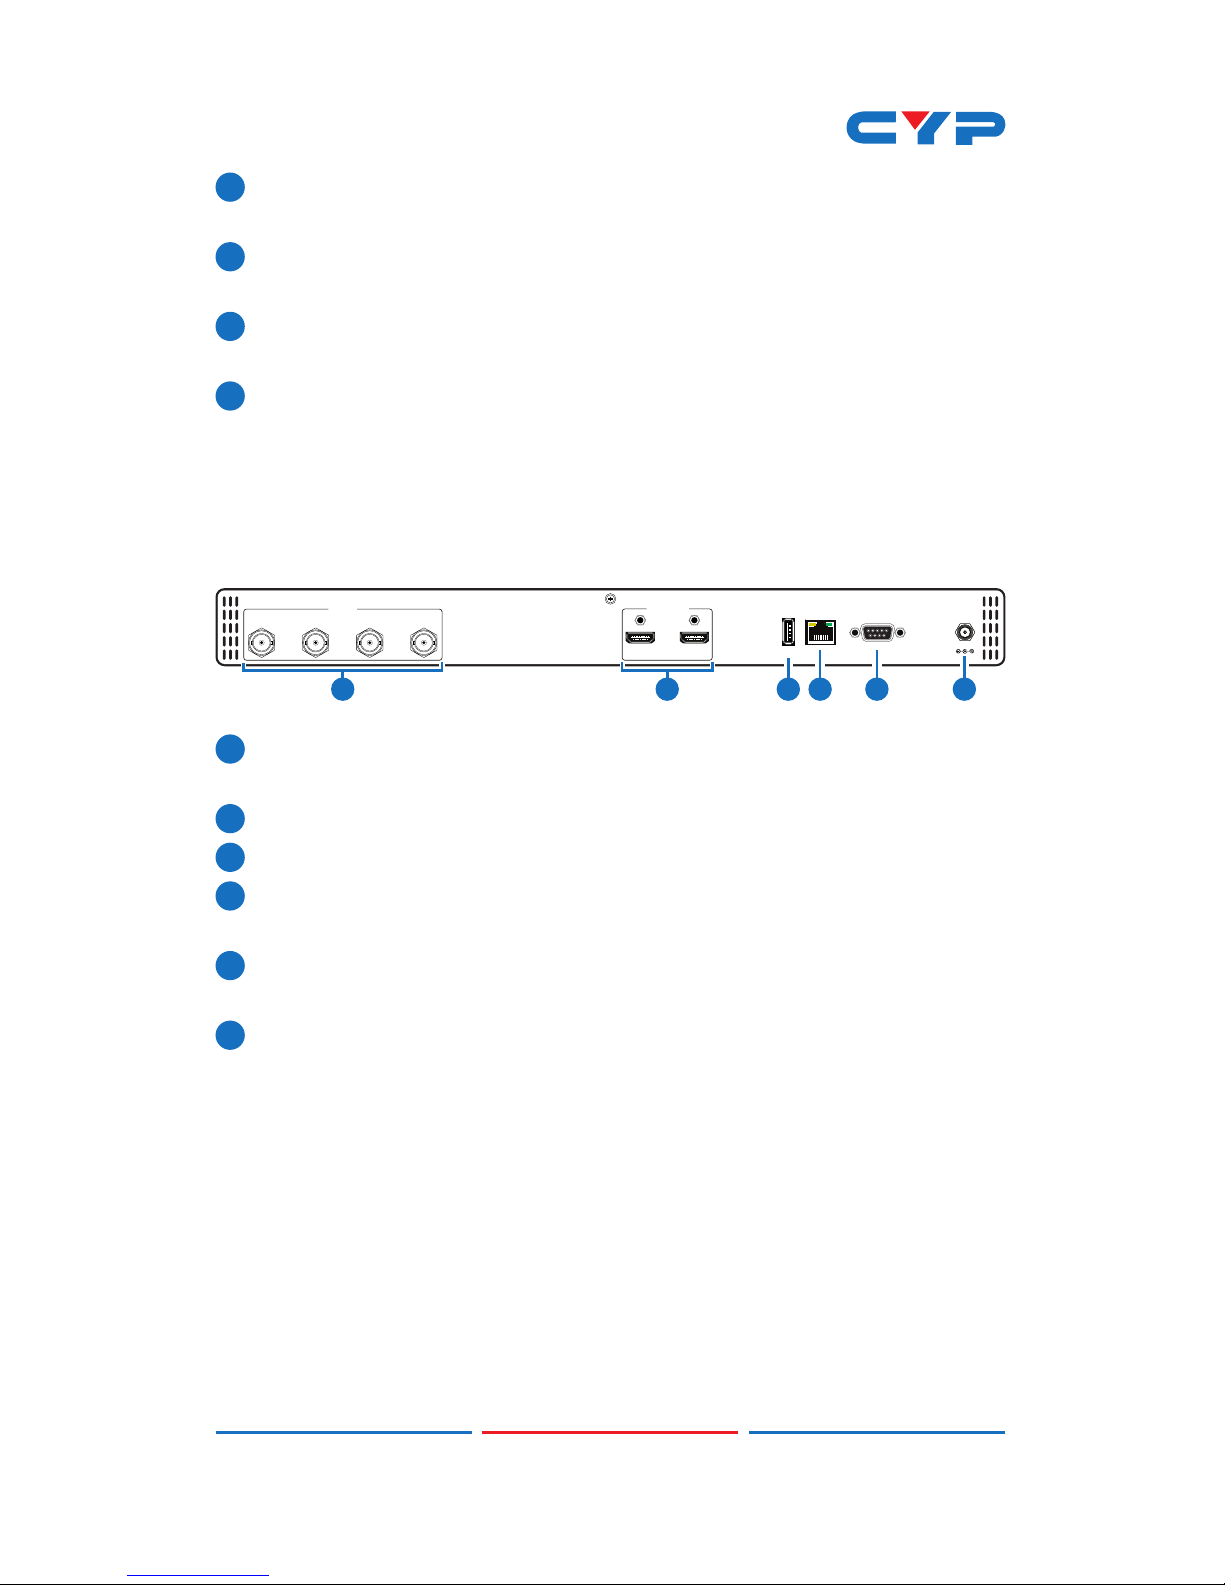
1SDI IN: Connect with source equipment such as SNG camera or
SDI signal devices.
2HDMI OUT: Connect with HD TV/monitor for output image display.
3SERVICE: This slot is reserved for factory use only.
4CONTROL: Connect from PC/Laptop for Telnet control with RJ-45
cable.
5RS-232: Connect from PC/Laptop/RS-232 equipped device with
D-Sub 9pin cable for RS-232 command sending.
6DC 12V: Plug the 12V DC power supply into the unit and connect
the adaptor to an AC outlet.
5
6.3 Remote Control
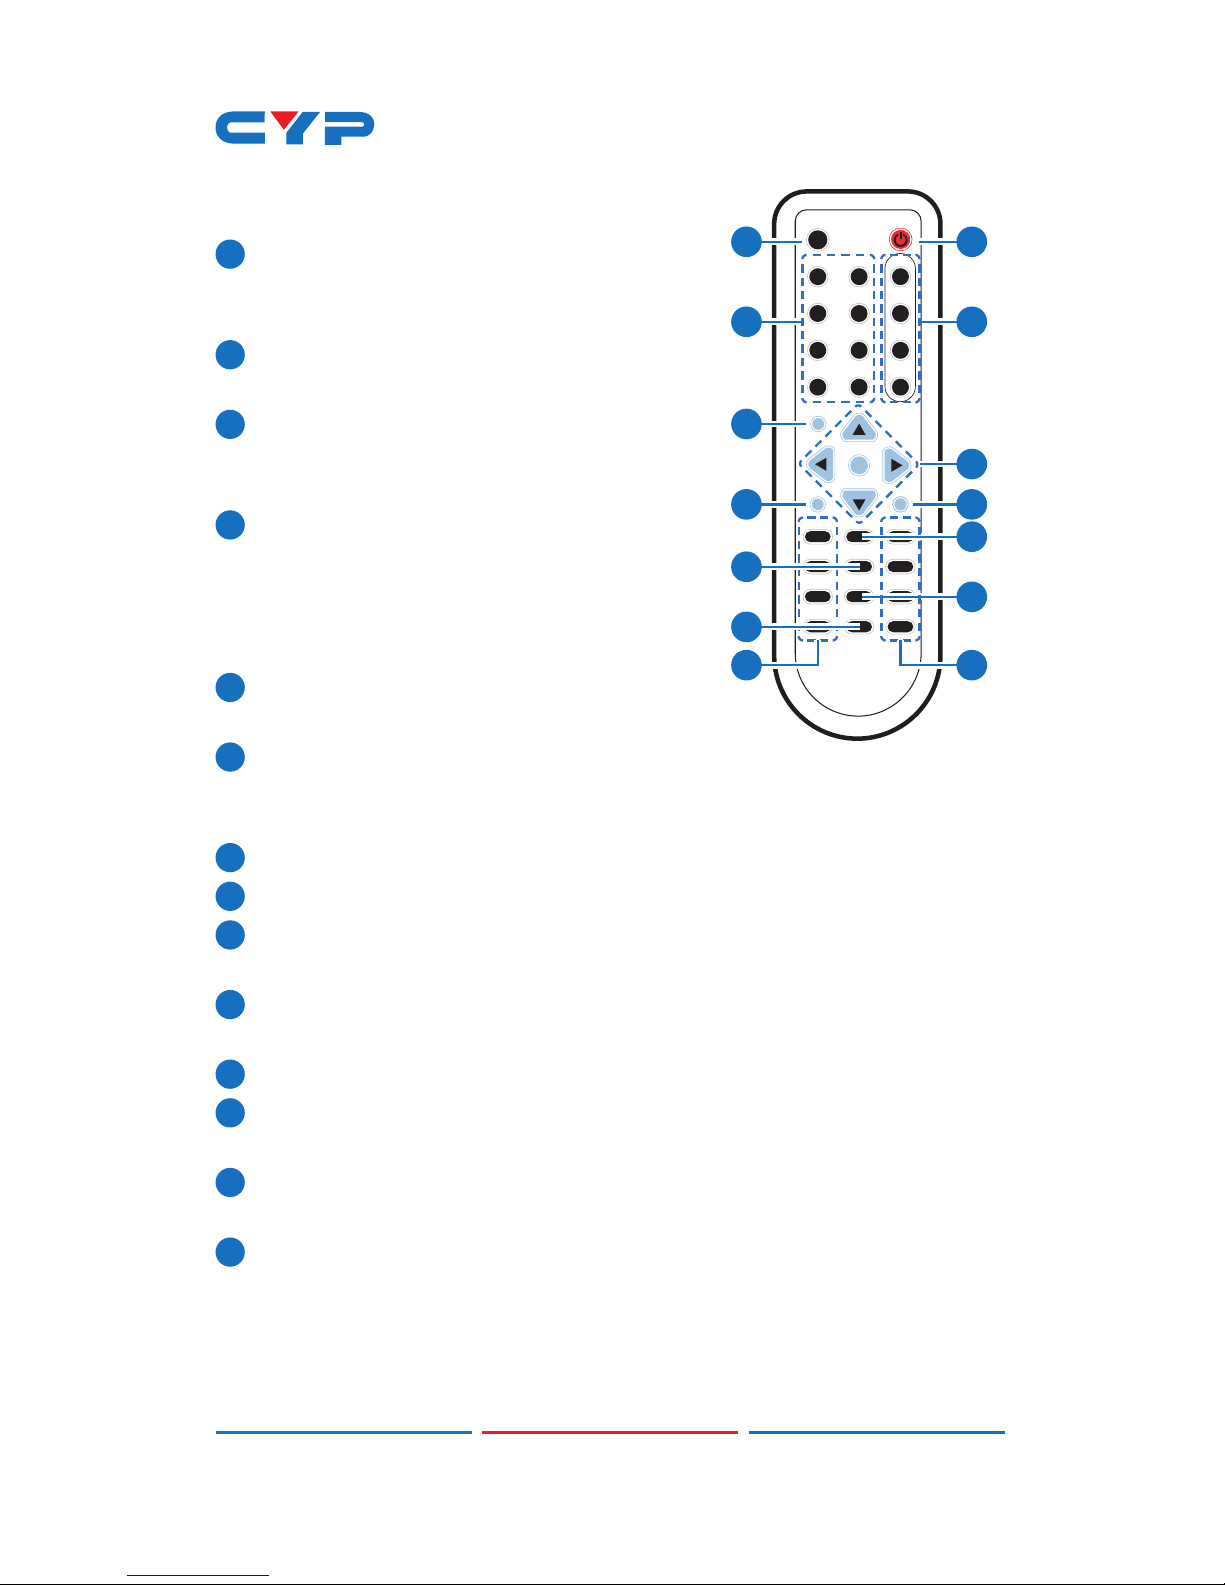
1Power: Press this button to switch on
the device or press it again to set it to
standby mode.
2Info: Press this button to show system
information.
3Input CH 1~4: Press these buttons to
rotate SDI 1~4 input source on each
channel to be display on screen
4WA~WH: Press these hot keys to select
the screen setting where WA~WD are
display a full screen of each channel
and WE~WH are a different combination
of a full screen setting with all 4 channels.
5Mute: Press this button to mute the audio
from HDMI output port.
6 ▲/▼/►/◄ & OK Buttons: Press this
buttons to scroll through the OSD selection and press OK to enter
and conrm the setting.
7Menu: Press this button to enter into the OSD menu.
8Exit: Press this button to exit the OSD menu or the OSD settings.
9Fade-In-Out*: Press this button to switch on or off the Fade-in-out
function.
10 Chromakey*: Press this button to enter into Chroma function where
CH 1 is the background and CH 2 is the top image.
11 Mirror*: Press this button to display the screen in mirror image.
12 Rotation*: Press this button to rotate the image 90˚ left and right or
180˚ upside down.
13 Audio 1~4: Press these buttons to select audio from SDI input
source 1~4.
14 FAV. 1~4: Press these buttons to bring up the customized screen
settings.
Note:*Functions only work under Window A to D. The system will
force to switch to Window A when operate under Window E~H.
WA WE CH 1
WB WF CH 2
WC WG CH 3
WD WH CH 4
InputMute
MenuExit
Audio 1Fade In-Out FAV. 1
Audio 2 ChromakeyFAV. 2
Audio 3MirrorFAV. 3
Audio 4 RotationFAV. 4
Info Power
CR-124
OK
1
3
6
7
9
11
2
4
5
8
14
13
12
10

6
6.4 OSD Menu
MAIN MENU 1ST LAYER 2ND LAYER 3RD LAYER
I/O Setup Output
Resolution
480p60
567p50
720p50
720p60
1080p24
1080p25
1080p30
1080p50
1080p60
1024x768
1280x800
1280x1024
1366x768
1440x900
1600x900
1600x1200
1920x1200
NATIVE1
Menu Back
OSD Setting Info Display On/Off
H Offset 0~20 (5)
V Offset 0~20 (5)
OSD Timeout 5~50/Off (10)
Transparent 0~10 (5)
Menu Back
Menu Exit
Indice
Altri manuali CYP Cavi e connettori

CYP
CYP CPRO-16E Manuale utente

CYP
CYP CPRO-8E Manuale utente

CYP
CYP qu-2-4k22 Manuale utente

CYP
CYP PU-1H3HBTL Manuale utente

CYP
CYP CHDBX-1H1CPL Manuale utente

CYP
CYP DCT-28 Manuale utente

CYP
CYP CLUX-18W Manuale utente

CYP
CYP CHDBT-1H2CE Manuale utente

CYP
CYP QU-4-4K22 Manuale utente

CYP
CYP CLUX-8M Manuale utente

CYP
CYP PU-1H7HBTE Manuale utente

CYP
CYP CDVI-4S Manuale utente

CYP
CYP CSDI-14 Manuale utente

CYP
CYP CLUX-18S Manuale utente

CYP
CYP PUV-1820TX-AVLC Manuale utente

CYP
CYP CDPS-UA1H10HS Manuale utente

CYP
CYP CLUX-18EU Manuale utente

CYP
CYP CHDBT-1H4CPLV Manuale utente

CYP
CYP CLUX-12E Manuale utente

CYP
CYP CPRO-16E Manuale utente


