Cyrus Cyrus DAD7 Manuale utente

UserInstructions
CyrusdAD7

Cyrus DAD7
1English

INTRODUCTION Cyrus DAD7
English 2
Congratulations on the purchase of your Cyrus DAD7 CD
player. This piece of equipment is a precision
manufactured state-of-the-art product, constructed to the
highest standards and specifications. This manual contains
installation and operating instructions to enable the user to
connect up and operate the CD player correctly, thus
ensuring the greatest satisfaction and long term use.
This instruction manual is divided into the following
sections:
•Cautions
•Installation
•Operation
•Remote Control
•Additional Information
•Trouble Shooting
•Specifications
•Guarantee
To enable you to make full use of the comprehensive
facilities of the Cyrus DAD7 we would suggest that you
read these sections which will explain the fundamental
operations of the unit.
CAUTION
POLARISED CONNECTOR (110/120V PRODUCTS ONLY)
CONNECTOR POLARISE (PRODUITS 110/120V SEULEMENT)
To prevent electrical shock, match wide blade of plug to wide
slot and fully insert
Attention: Pour éviter les chocs électriques, introduire la lame la
plus large de la fiche dans la borne correspondante de la prise et
pousser jusqu'au fond.
ATTENTION
(CDN) Canada
This digital apparatus does not exceed the Class B limits for
radio noise emissions from digital apparatus as set out in the
Radio Interference Regulation of the Canadian Department of
Communications
(USA)
This set complies with 21 CFR 1040.10 and with the FCC-
Rules, Part 15.

Cyrus DAD7 CAUTIONS
3English
Your Cyrus DAD7 is factory set to operate from a fixed
mains supply voltage, which is marked on a label at the
rear of the unit. Before connecting, check that this voltage
is the same as your mains supply, i.e.
230V Products Voltage Range 220V-240V
115V Products Voltage Range 110V-120V
100V Products Voltage Range 100V
Always follow the instruction handbook and retain it in a
safe place for future reference. Before proceeding with
installing the Cyrus DAD7, ensure that the following
items are included in the accessory box:
•Instruction Manual
•Power Cable
•Remote Handset
•Disc Clamp
•Guarantee Card
After removing these items, please retain the packing for
future use.
Install the Cyrus DAD7 in a well ventilated location where
it will not be exposed to high temperature or humidity.
Avoid installing the DAD7 in a location which is exposed
to direct rays of sun, or near to hot appliances or radiators.
Placing and using the DAD7 for long periods on heat-
generating sources will affect performance and may
damage the cabinet. Installation in a damp or dusty
environment may result in malfunction or accident.
The Cyrus DAD7 is supplied ready for use in your
location. Care has been taken to ensure that the power
supply requirements are correctly set. Consult your Cyrus
distributor to arrange for conversion of your DAD7 should
you move to another area with a different mains voltage.
It is important not to let any liquid or foreign object fall
into this unit. When routing the power cord avoid running
it over or near sharp objects.
Exercise particular care when the dust cover is open to
avoid any contact with the sensitive optical components.
If the Cyrus DAD7 is not to be used for a long period of
time, unplug the unit from the mains power supply.
This unit contains no user serviceable parts, therefore
never remove any panels from the unit or attempt to
service the unit. In the unlikely event of failure, please
refer to qualified service personnel.
UNPACKING
LOCATION
RE-LOCATING
PRECAUTIONS REGARDING INSTALLATION

INSTALLATION Cyrus DAD7
English 4
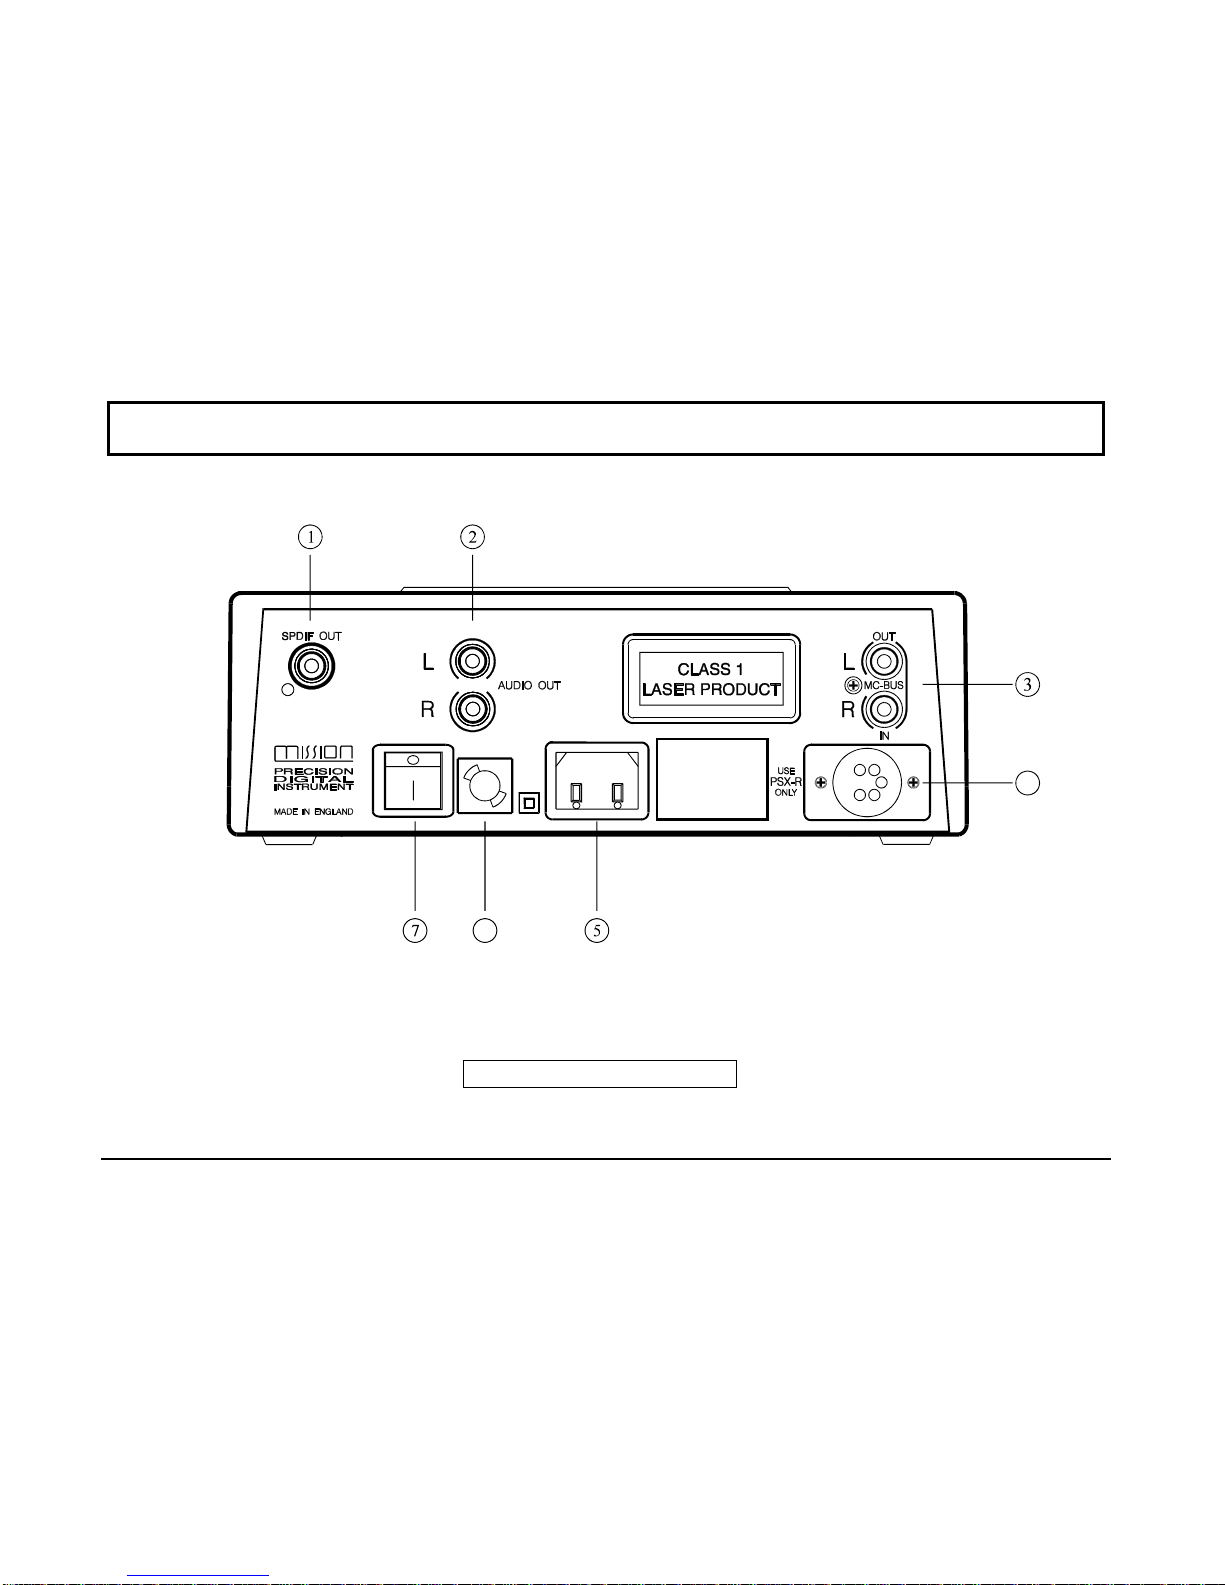
1. Digital Output
2. Audio Outputs
3. MC-BUS System Connection
4. PSX-R Connection
5. Power Inlet
6. Mains Fuse
7. Power Switch
Fig.1 DAD7 (rear view)

Cyrus DAD7 INSTALLATION
5English
The Cyrus DAD7 may be positioned as a free standing
unit or alongside a partnering Cyrus Dacmaster or Cyrus
PSX-R where used. Never stand the unit on top of a power
amplifier, which may generate heat. The DAD7 must
always sit horizontally on a flat firm surface. (A Cyrus
Isoplat is ideal for this purpose).
Ensure that there is enough clearance above the DAD7 to
allow access to the dust cover when fully open.
The Mains Supply
The moulded IEC connector of the mains lead supplied
should be plugged in to the power inlet 5on the rear of
the unit. The mains fuse 6is located on the rear panel
next to the power switch. It must only be replaced with the
following types :
UK/Europe - 230V T100mA/20mm
N.America - 115V T200mA/20mm
Japan - 100V T250mA/20mm
In the U.K., the Cyrus DAD7 comes with the mains plug
fitted. In the unlikely event that the plug fuse should need
replacing ensure that it is only replaced with a 3 Amp
Fuse.
This is an optional connection which enhances and
expands the functional capability of specific Cyrus
products, including your Cyrus DAD7. Through the MC-
BUS and certain ancillary equipment a highly functional
integrated system with full remote control may be set up.
This feature is usable if you also own a Cyrus III
amplifier, Cyrus pre-amplifier, or the Cyrus Systems
Controller.
A pair of quality RCA interconnects are supplied with the
DAD7. Connect one end of each lead to the audio output
sockets of the Cyrus DAD7 2and the other end to the
corresponding input of the amplifier or receiver. Amplifier
inputs that are suitable for this purpose are CD or AUX
inputs. DO NOT connect the DAD7 to the PHONO input
sockets of the amplifier, as this could damage your
amplifier/speakers.
POSITIONING THE UNIT
CONNECTING THE UNIT
MC-BUS System Connection
Connecting to an Amplifier

INSTALLATION Cyrus DAD7
English 6
Upgrading with a Cyrus PSX-R Intelligent Power
Supply (Optional)
When upgrading with a PSX-R Intelligent power supply,
only one connection is necessary to the DAD7. The
Cannon connector fitted to the umbilical cable on the
PSX-R must be securely connected to the socket marked
PSX-R 4on the rear of the DAD7. When correctly fitted,
the connector will latch into place in the socket. Note that
when a PSX-R is in use, both the PSX-R power supply and
the DAD7 will require connection to the mains supply.
Connecting to an External D/A Converter (Optional)
The DAD7 also supplies a digital output signal which can
drive an external D/A converter if desired, such as the
Cyrus Dacmaster. Using a single RCA interconnect
designed for digital signals, connect from the socket
marked SPDIF OUT 1to an input of the D/A converter
(the CD input is recommended for best performance when
using the Cyrus Dacmaster). Ensure that you use a cable
specifically designed for use with digital data, rather than
an audio phono cable. Use of the wrong type of cable may
cause a mismatch between components and degrade sound
quality. Referring now to the D/A converter handbook,
connect the D/A converter audio outputs to a suitable
input of the amplifier.

Cyrus DAD7 OPERATION
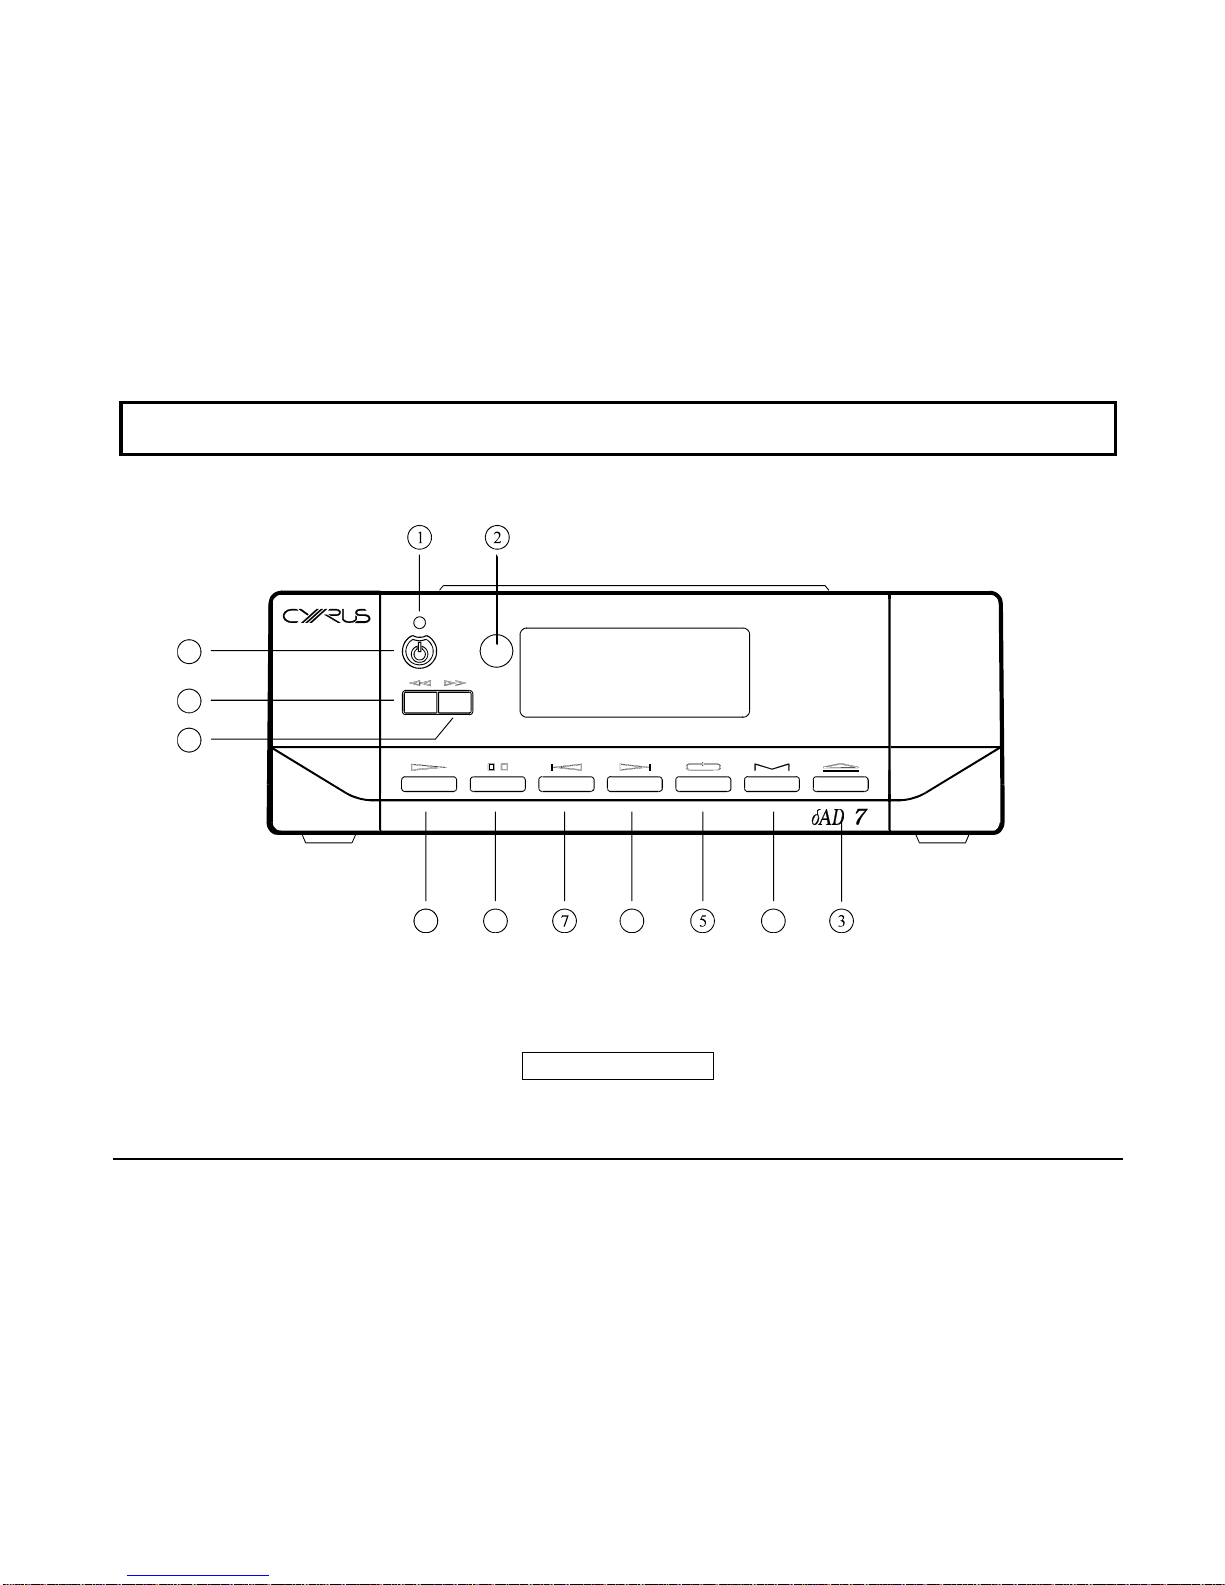
7English
1. Standby Light
2. Remote Eye
3. Stop/Open
4. Memory
5. Repeat
6. Next Track
7. Previous Track
8. Pause
9. Play
10. Search Forward
11. Search Reverse
12. Standby
Fig.2 DAD7 (front view)

OPERATION Cyrus DAD7
English 8
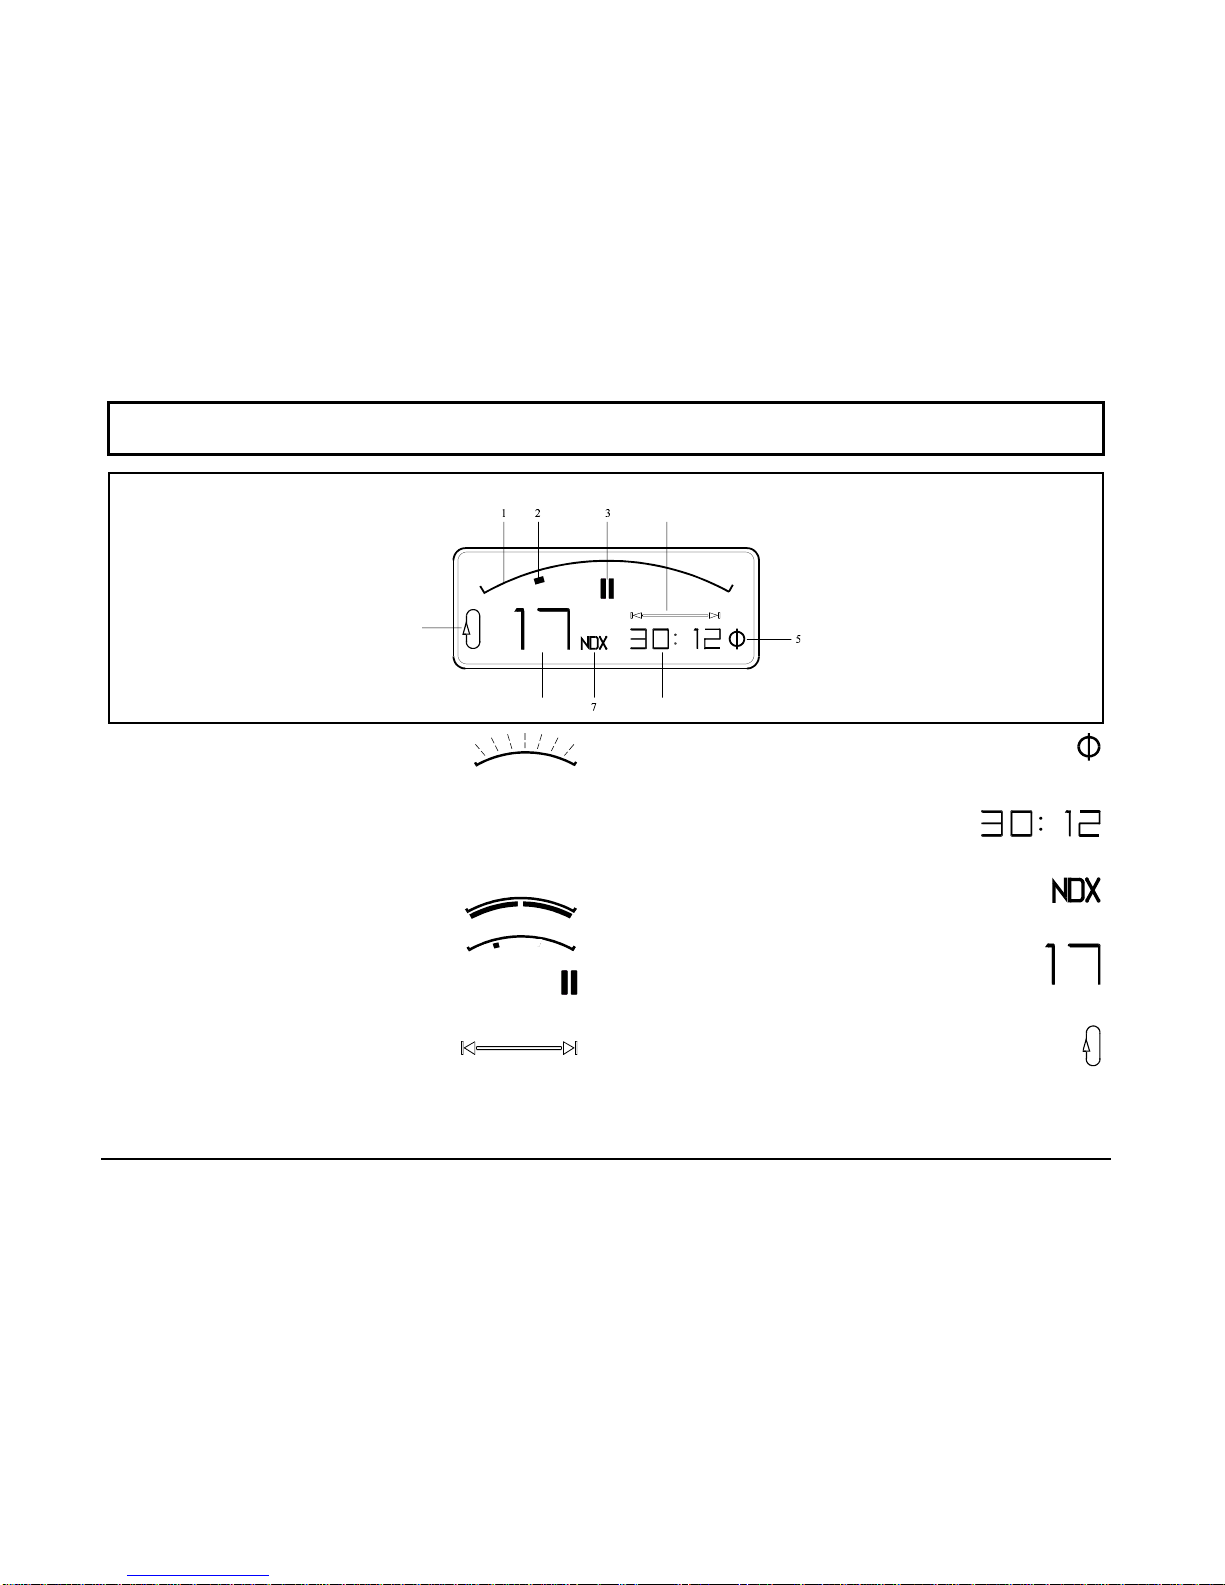
1. Disc Indicator........................................
Flashing slowly indicates that the lid is open. Flashing
rapidly indicates that the DAD7 is reading the Table of
Contents from a disc.
2. Progress Indicator
Indicates time into the track.........................
Indicates time into the disc program............
3. Pause Indicator.....................................................
This symbol indicates that pause is set.
4. Time Display Mode Indicator..........
The time display below this symbol indicates the total
length of the music program.
5. Phase......................................................................
This symbol lights to show phase inversion.
6. Index / Time Display.........................
(Mins : Secs)
7. Index Indicator................................................
The time display now shows index number.
8. Track Display (Two Digit)............................
Track number and error display.
9. Repeat Indicator....................................................
This symbol indicates that repeat is set.
Front Panel Display

Cyrus DAD7 OPERATION
9English
The mains power switch 7is located on the rear panel of
the player (refer to figure 1, rear panel drawing on page
4).
This switch should be left on for normal operation, except
when left unattended for a long period. In this case the
mains power should be switched off or the product
disconnected from the AC supply.
For the following section, refer to the front panel view on
page 7.
When the Cyrus DAD7 is in regular use and power is
permanently applied, the STANDBY key 12 can be used
to switch the unit on and off. The standby light 1will
show red when the player is in standby and green when
operating.
First, press the STOP/OPEN key 3which will raise the
dust cover for a few seconds to allow access for lifting.
Place a thumb under the front edge of the cover and lift
gently until fully open. The cover will latch open.
Remove the disc clamp from the turntable, load a disc
with the label side upward and replace the clamp carefully
over the center of the disc.
Place a finger on the top edge of the cover and pull gently
to release the catch. The cover will now close on its own
accord with a damped action. Do not force the cover to
close as this may damage the internal mechanism.
When the cover is fully closed the disc will spin for a few
seconds, then stop.
Note:
To prevent any damage to the player or your discs, ensure
that the disc clamp is always in place before closing the
dust cover.
To play a disc, press the PLAY key 9on the front panel.
Playback of a disc will always commence from track 1
unless otherwise selected.
Whilst playing, pressing the PLAY key will re-play the
current track. Refer to the front panel display on page 8
for full details of the display information available during
disc play.
POWER CONTROL
LOADING A DISC
PLAYING A DISC
Indice
Altri manuali Cyrus Lettore CD