DAXYS BANDICOOT Manuale utente

USER MANUAL v1.0
Daxys Bandicoot Kickscooter

USER MANUAL
Please read this manual very carefully before using the product. The
manual contains important instructions for the safe use and longevity
of your bike.

1
CONTENTS
Unboxing ..........................................................................................................................................2
Operation ...........................................................................................................................................7
Display
............................................................................................................................. 12
Battery Info ...............................................................................................................................................13
General Safety ...............................................................................................................................
..........
14
Maintenance ................................................................................................................................................15
Troubleshooting ............................................................................................................................... 19
FAQs .............................................................................................................................................22
Warranty ...............................................................................................................................24

2
Warning
Intro
Unbox your scooter
Incorrect assembly, maintenance, or use of your Daxys scooter can cause component or performance failure, loss of
control, serious injury, or death. Even if you’re an experienced scooter rider, you must read and understand the entire
manual and any documentation provided for subcomponents or accessories before riding. In the event of a malfunc-
tion of any of the components during set up or use, please discontinue set up or use and contact our support team. If
you are not sure you have the experience, skills, and tools to correctly perform all assembly steps in the manual,
consult our support team or a local electric scooter shop.
Setting up your scooter right is the single most important step to your safety.
We recommend having the following items ready prior to starting the setup process:
·Box cutters or knife
·Stool or bench
·Air pump
Open the box using the box cutter and fold open the top. Inside you should see protective styrofoam along with the
following contents:
·Daxys Bandicoot electric scooter
·Manual
·Charger and cable
·Allen key
If any of these items are missing, please contact us immediately.
With the help of someone, remove the scooter from the box and place it on a flat surface.
We recommend using a stool or bench as the wheels need to be able to spin freely.
Carefully remove the protective material from the scooter and set it aside. We suggest keeping both the styrofoam
and the box in case you need to ship your scooter back to us. Otherwise recycle the materials wherever possible.
UNBOXING

3
-
Prepare for assembly
Unfolding
1. The first step is to unfold your Daxys Bandicoot Kickscooter. To do so, ensure the hook is not clipped into the
rear foot rest. If it is, push down on the stem and unhook it from the rear foot rest.
2. Unfold the stem by pulling it to a vertical position. Ensure you do so until the stem is completely vertical.
3. Locate the folding latch and bring it up, locking the stem. The latch will require some force to lock fully upright.
4. Lastly, make sure the safety button of the folding mechanism is clipped in the stem. This
safety mechanism prevents the latch from unlocking due to vibration or shock.
1 2
3 4

4
Attach handlebar
1. Connect the male connection cable coming out of the handlebar into the female cable coming out of the front stem.
Make sure the pins are aligned.
2. Make sure the male port and the female port are aligned properly. Insert the handlebar at the top of the front stem
and tighten into place with the hex screw provided.
3. Caution: Be careful not to damage the cable when connecting the handlebar to the front stem.
4. You will find that the latches and buttons on your handlebar are not tight. We deliver this way to avoid damage
during shipping. Before tightening the screws, adjust the left button panel. Twist it upward or downward until it
reaches a comfortable angle, keep in mind that once on a scooter, you will be higher up than you are while setting up
your scooter. When you have found a comfortable position, go ahead and tighten the screws.
5. Repeat the same process for the screws on the right hand side of your handlebar.
1
35
2
4

5
Perform test
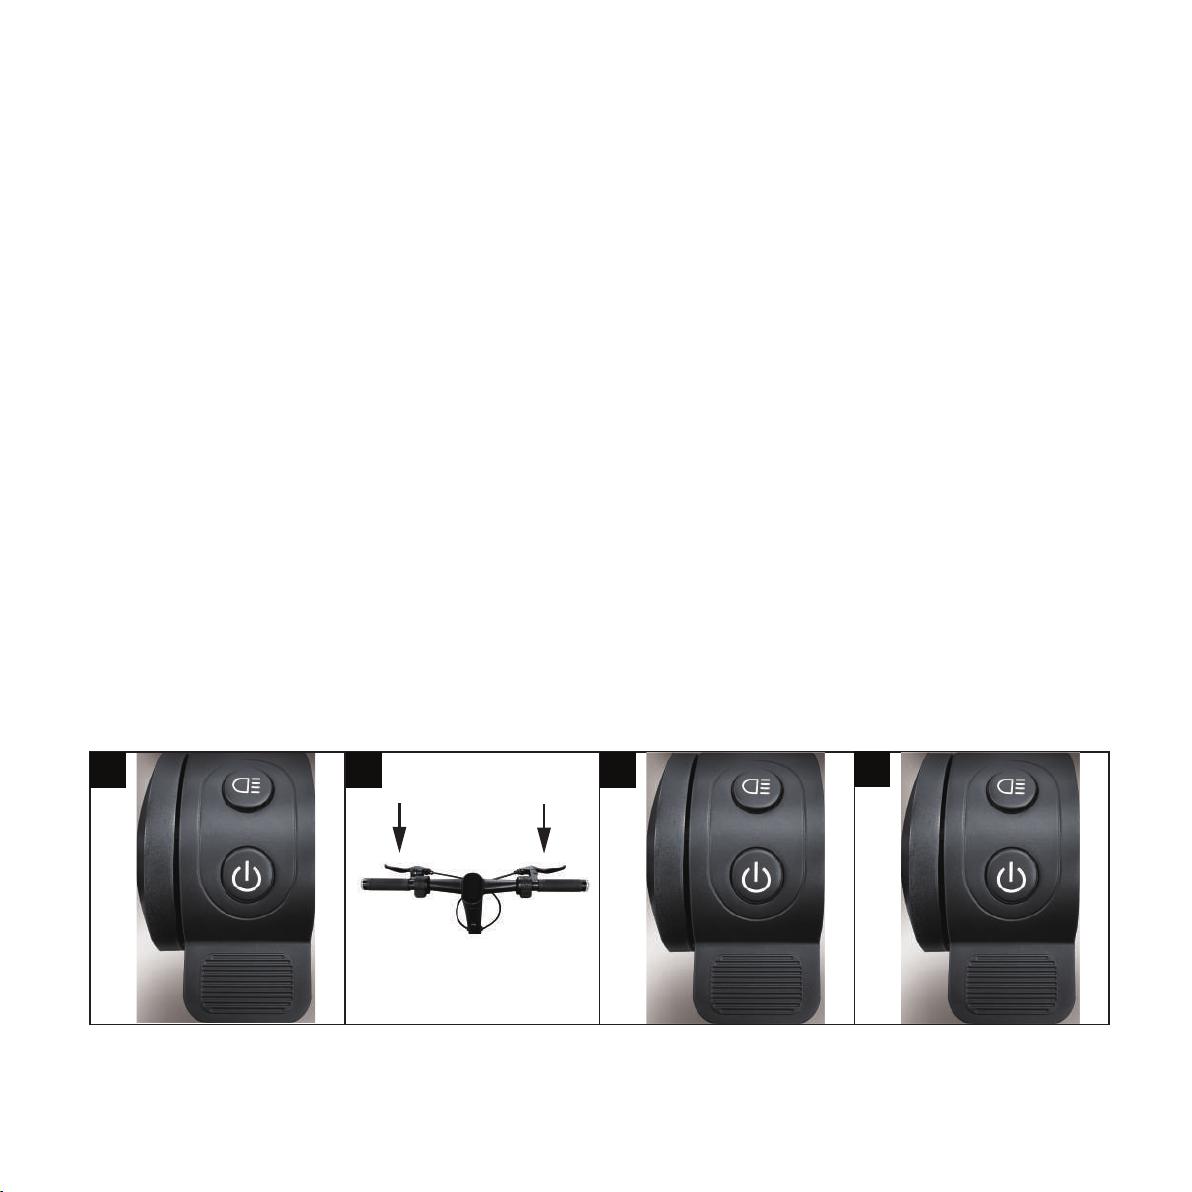
1. Locate the power button on the right side of the handlebar and press it for 3 seconds to power on the scooter. You
should now be able to see the display powered on. Keep the scooter elevated on the stool or bench, as the testing will
involve spinning both wheels.
The scooter should be in Kick to Start mode, to begin testing the motors, spin the rear wheel and then press the
throttle. The wheels should begin to spin normally. You may notice motor emitting a noise at low speeds, this is normal.
The motor is communicating with the controller and identifying its position as well as which direction to roll in. If after
performing this test the wheels are spinning normally, you can now move to step 2.
*If you notice one of the motors is not spinning PLEASE DO NOT ATTEMPT TO OPERATE THE SCOOTER. Contact us immediately.
2. Begin by testing your brakes. Press the throttle on the right side of your handlebar and notice rear wheels start to
accelerate and spin the front wheel with your hand. Continue to accelerate for 5 seconds, then release the throttle and
slam both brakes at the same time. The wheel should stop immediately.
3.Test gear change by pressing the Power Button. A short click will change the speed levels.
·1 click – Eco mode
·2 clicks – Dynamic mode – after a second click you should see a Green "S" on the display.
·3 clicks – Sport mode – another short click should display a Red "S".
*To read more about the speed of each mode, refer to the Diplay section in this manual.
1 2 3 4
4. Next, to turn on the lights press the Light button. Confirm all of the lights power on: headlight and one rear tail light.
*If all of the lights do not power on, DO NOT ATTEMPT TO OPERATE THE SCOOTER. Contact us immediately.

6
5. Test your right and left signals. Start by testing your right signal by pressing the right arrow button on the left side
of your handle bar. Your right signals should turn on. To turn them off, click on the button again.
6. Test your left indicator, press the left arrow button on the left side of the handle bar. Your indicators should turn on. To
turn them off, click on the button again.
7. Next, grab an air pump and locate the air valve on the front tire. Remove the safety cap and attach the pump tube to
the tire valve. Turn on the air pump and read the PSI measure - the ideal tire pressure for the Bandicoot is 45PSI.
8. Inflate or deflate the tire as needed until the pressure is 45PSI. Repeat the step with the rear tire.
Congratulations, you have successfully set up your Daxys Bandicoot Kickscooter.
5 6 7 8

7
Warning
Charging
Incorrect assembly, maintenance, or use of your Daxys scooter can cause component or performance failure, loss of
control, serious injury, or death. Even if you’re an experienced scooter rider, you must read and understand the entire
manual and any documentation provided for subcomponents or accessories before riding. In the event of a malfunc-
tion of any of the components during set up or use, please discontinue set up or use and contact our support team. If
you are not sure you have the experience, skills, and tools to correctly perform all assembly steps in the manual,
consult our support team or a local electric scooter shop.
This section focuses on how to charge your scooter correctly. For information about battery health and best practices,
please review the Battery Information section. The battery pack comes with a built-in battery management system.
This includes overcharging protection amongst other features, allowing your scooter to stay plugged in even after it is
fully charged. Please note that this applies to short periods of overcharging, such as the scooter being plugged in
overnight. Please do not leave the scooter plugged in and charging for extended periods of time as it may result in
battery damage or fire.
OPERATION

8
1. First, ensure the two parts of the charger are connected securely. The wall AC plug should be connected to the
charger box. The connection between the cable and box should feel firm with no wobble or play.
2. Next, locate the charging port cap on your scooter and open it to find the charging port. Locate the round connec-
tor on one end of the charger, this is the end you must insert in the charging port.
3. Gently insert the cable.
4. Proceed to plug the AC plug on the other end of the charger into power outlet. If the battery is 100% full, the
charger light will turn green. If the battery is not fully charged, the charger light will light up red.
1
3
2
4
Altri manuali per BANDICOOT
1
Indice
Altri manuali DAXYS Scooter


