www.dellonda.co.uk 5
• Position the plancha away from ammable
items.
• Ensure the plancha has a minimum of 2m
overhead clearance and has a minimum 2m
clearance from other surrounding items.
• Follow these instructions carefully to avoid
seriously damaging your plancha and causing
injury to yourself and to property.
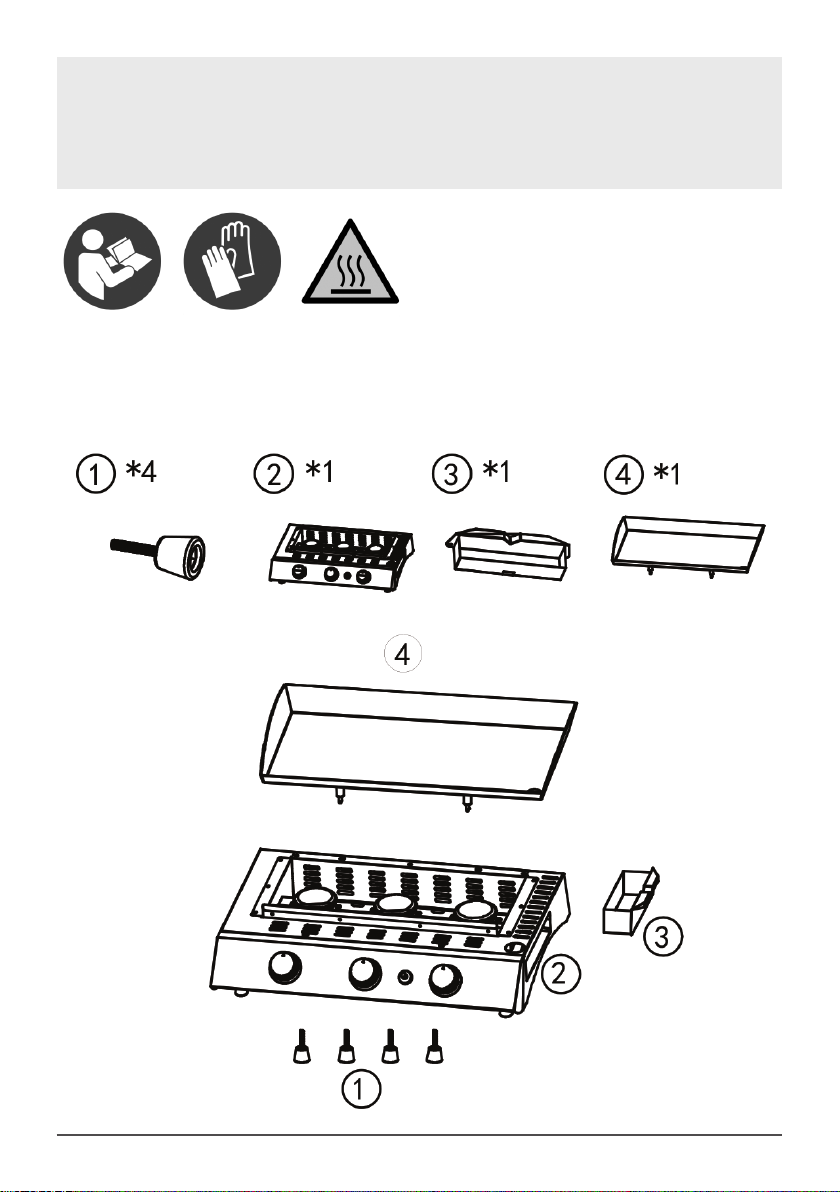
• 1. Assemble the plancha following the
assembly instructions carefully.
• 2. Connect the gas hose to the plancha using
the clips supplied. Connect the regulator to
the hose.
• 3. Connect the regulator to the cylinder valve
following the regulator instructions supplied
with the regulator.
• 4. Turn all of the control knobs to the ‘OFF’
position before turning on the gas supply to
the appliance.
• 5. Operate the regulator in accordance with the
instructions supplied with the regulator.
Lighting The Burners
• 1. Connect the gas cylinder to the plancha
following the instructions supplied with the
regulator.
• 2. Turn all the control knobs to the ‘OFF’
position.
• 3. Turn ‘ON’ the gas supply at the cylinder
or regulator switch following the regulator
connection and operating instructions. Check
with the use of soapy water for any gas
leakage between the bottle and the regulator
and the gas valve. Any leakage will show as
bubbles in the area of the leak. If leak is found
do not use the plancha. Consult your gas or
plancha supplier for advice.
• 4. To light the left hand burner, Push down
the left hand control knob and keep pressing
whilst turning anti-clockwise to the “Full rate”
position whilst press the ignition button sited
between the two knobs up to four times in
rapid succession. This will light the left hand
burner. If not please repeat this process.
• 5. If the burner has not lit after two attempts,
turn ‘OFF’ the gas tap and wait 5 minutes
before retrying the ignition sequence.
• 6. If the burner does not stay alight, please
repeat step 4.
• 7. When the burner is lit, adjust the heat by
turning the knob to the High/Low position.
• 8. To light the right hand burner, push down
the right hand control knob and keep pressing
whilst turning anti-clockwise to the “Full rate”
position whilst press the ignition button sited
between the two knobs up to four times in
rapid succession. This will light the right hand
burner. If not please repeat this process.
• 9. If the burner has not lit after two attempts,
turn ‘OFF’ the gas tap and wait 5 minutes
before retrying the ignition sequence.
• 10. If the burner does not stay alight, please
repeat step 8.
• 11. When the burner is lit. Adjust the heat by
turning the knob to the High/Low position.
• 12. To turn ‘OFF’ the plancha, turn the cylinder
valve or regulator switch to the ‘OFF’ position
by following the regulator instructions, turn
all of the control knobs on the appliance
clockwise to the “OFF” position when the
ame have extinguished.
• WARNING: If any burner fails to ignite, turn
the control knob off (clockwise) and also turn
the cylinder valve off. Wait ve minutes before
attempting to relight with ignition sequence.
• After use, close the gas supply by either
turning ‘OFF’ the switch on the regulator or
turning ‘OFF’ the cylinder valve.
• In the event of light back whilst the appliance
is in use. Turn all the controls, cylinder valve
and regulator switch to the ‘OFF’ position. Wait
5 minutes before attempting to relight the
appliance.
• If the problem persists after relighting, consult
Dellonda, or a qualied gas engineer for
assistance or repair. Never try to rectify the
problem yourself as this could result in serious
injury and/or property damage.
Using The Plancha
• Toss vegetables and rub meat with neutral
oil. Never add oil directly to the surface of the
plancha (it may ignite).
• When plancha is very hot (water dropped
on plancha will bead), use tongs to add
ingredients to plancha in a single layer.
To Check For Leaks
• Never check for leaks with a naked ame,
always use a soapy water solution
• Make 2-3 uid ounces of leak detecting
solution by mixing one part washing up liquid
with 3 parts water.
• Ensure the control valve is “OFF”.
• Connect the regulator to the cylinder and