Detex ADVANTEX 30 Series Manuale utente

INSTALLATION INSTRUCTIONS FOR ADVANTEX MORTISE LOCK 30 & F30 SERIES DEVICE
& "W" (Weatherized) MODELS
104883 Page 1
For device installation videos,
scan code below or
go to www.detex.com/vidoes
Table of Contents
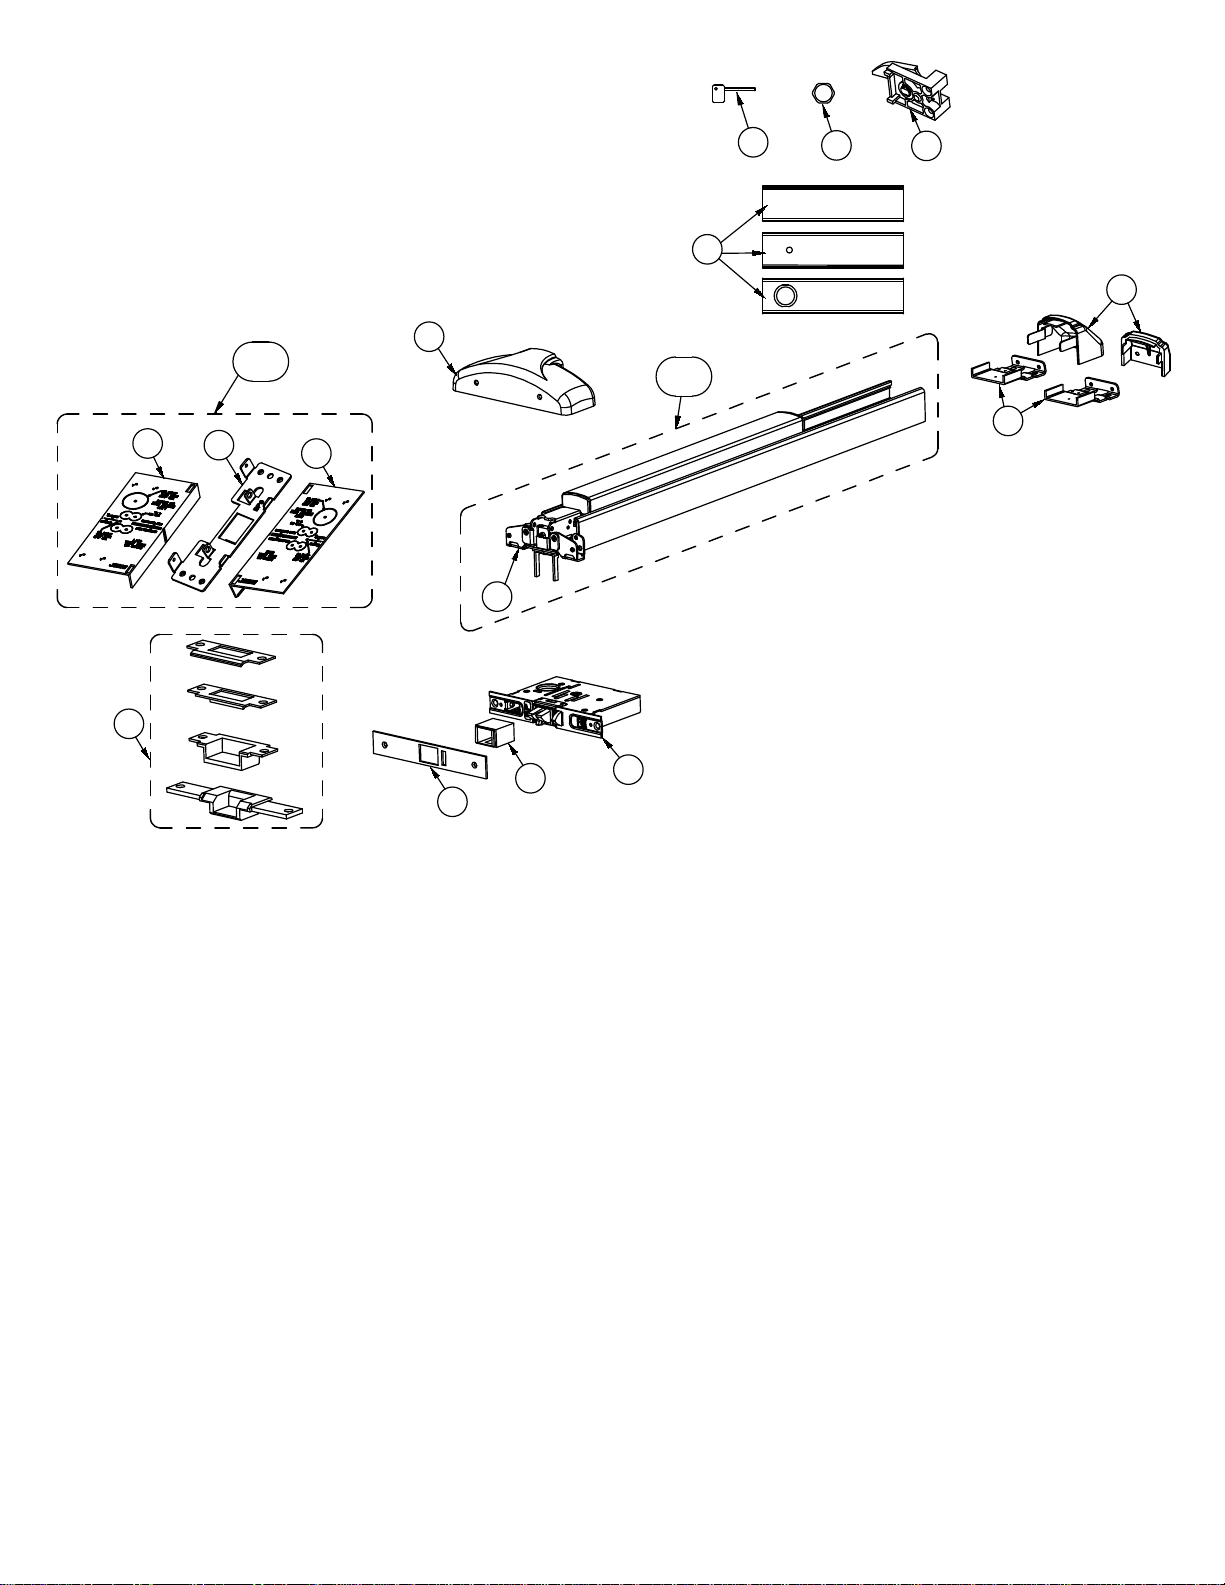
Device parts breakdown view...............................................................
Device parts breakdown list with part numbers....................................
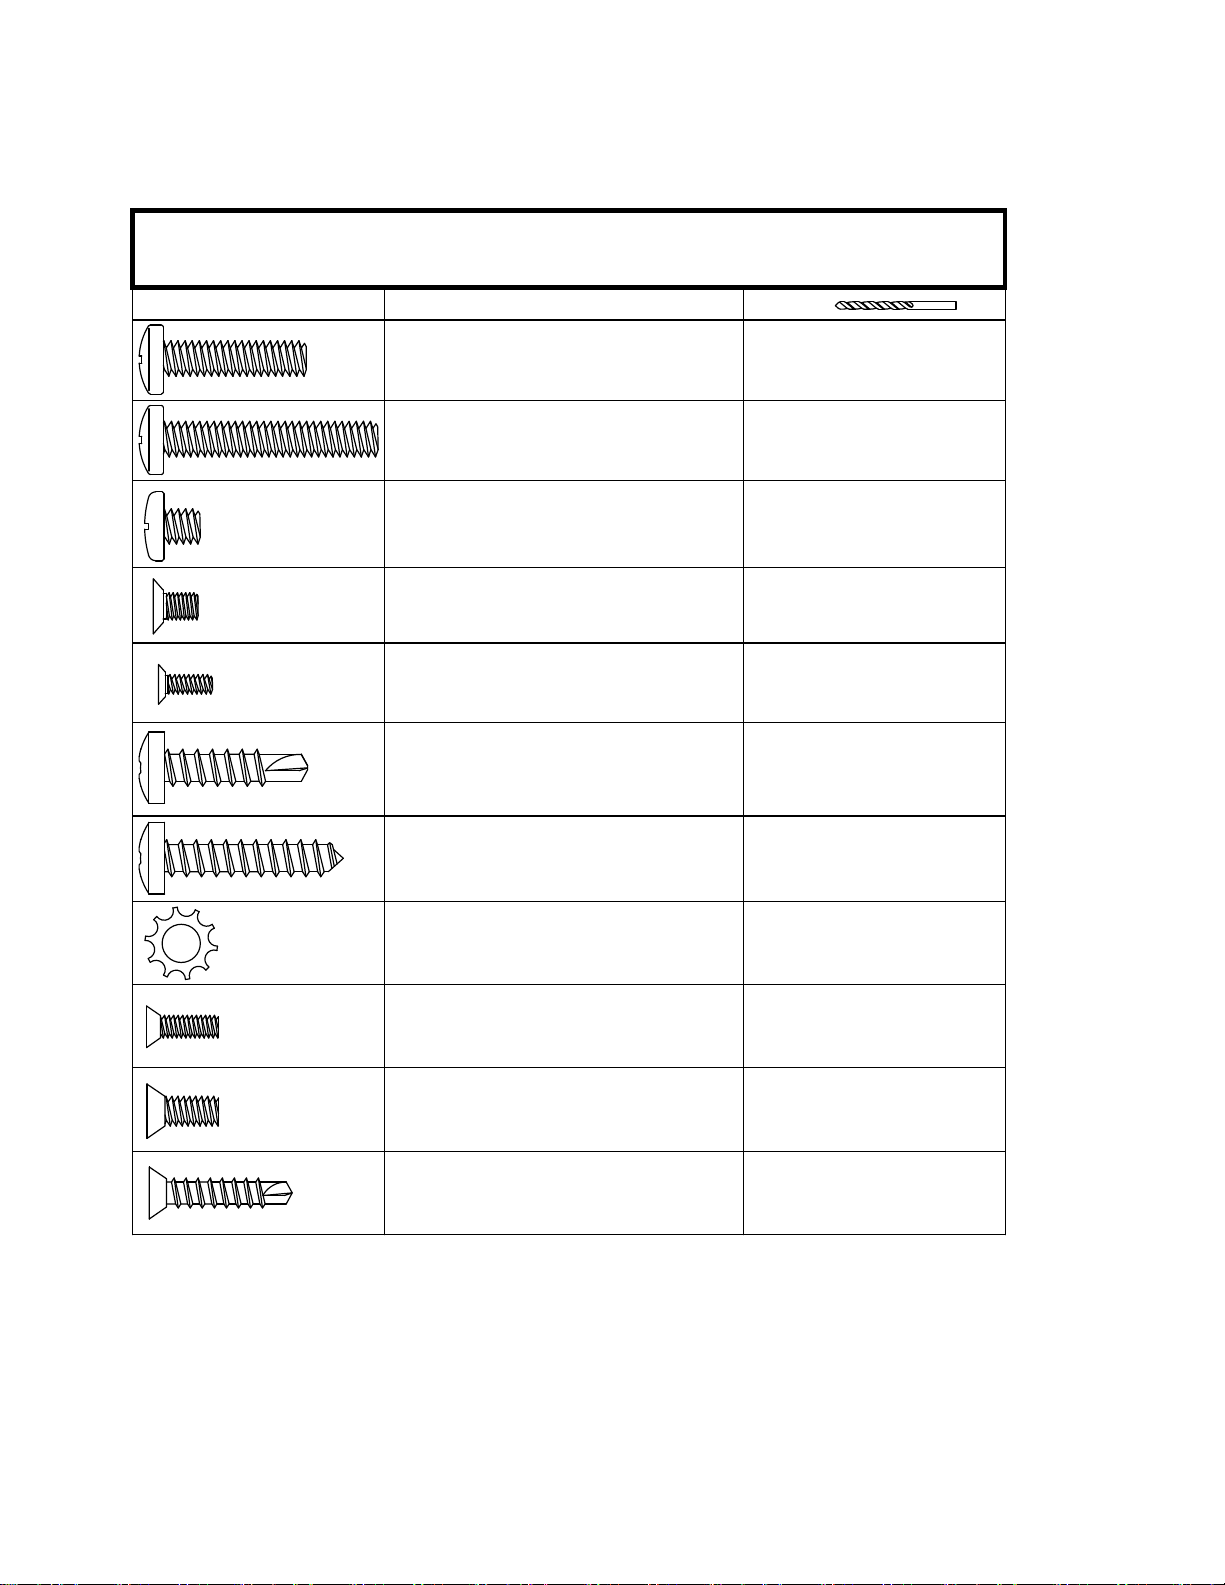
Hardware List with part numbers & tools required................................
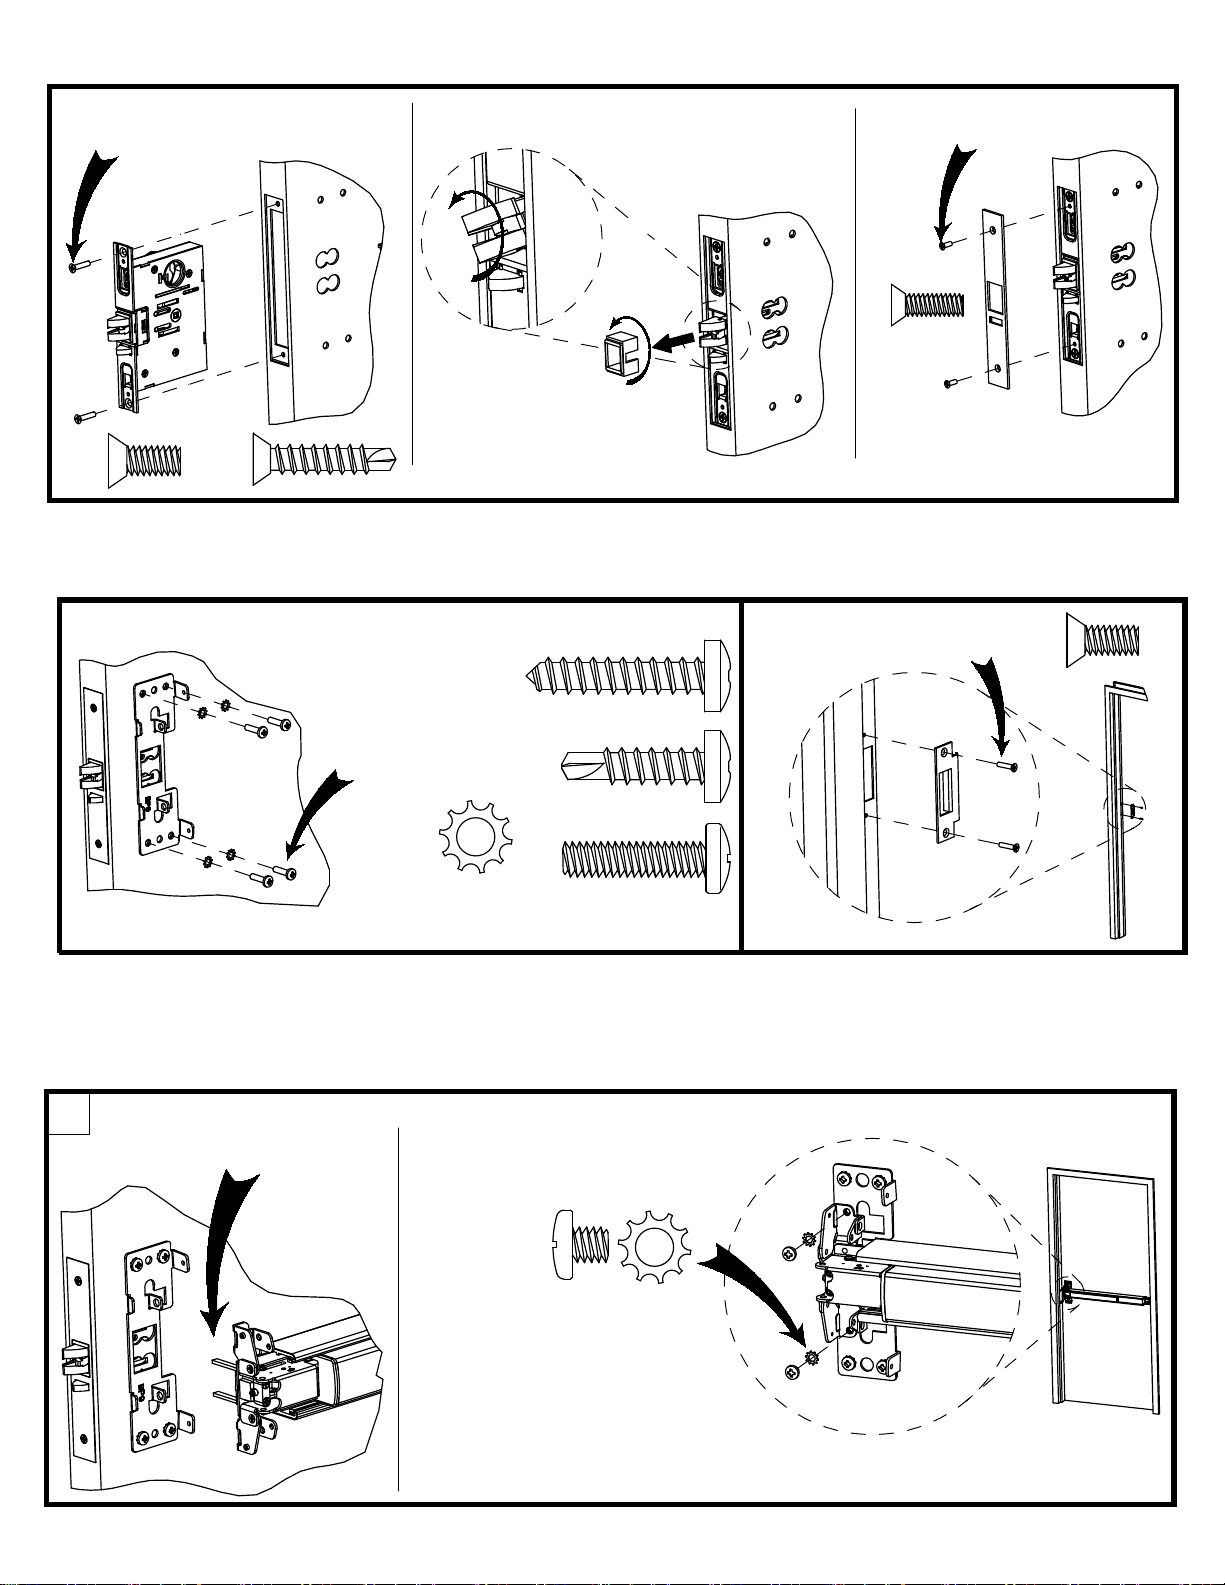
Door prep & OKC installation (if required)............................................
Install Mortise lock, backplate, strike and device..................................
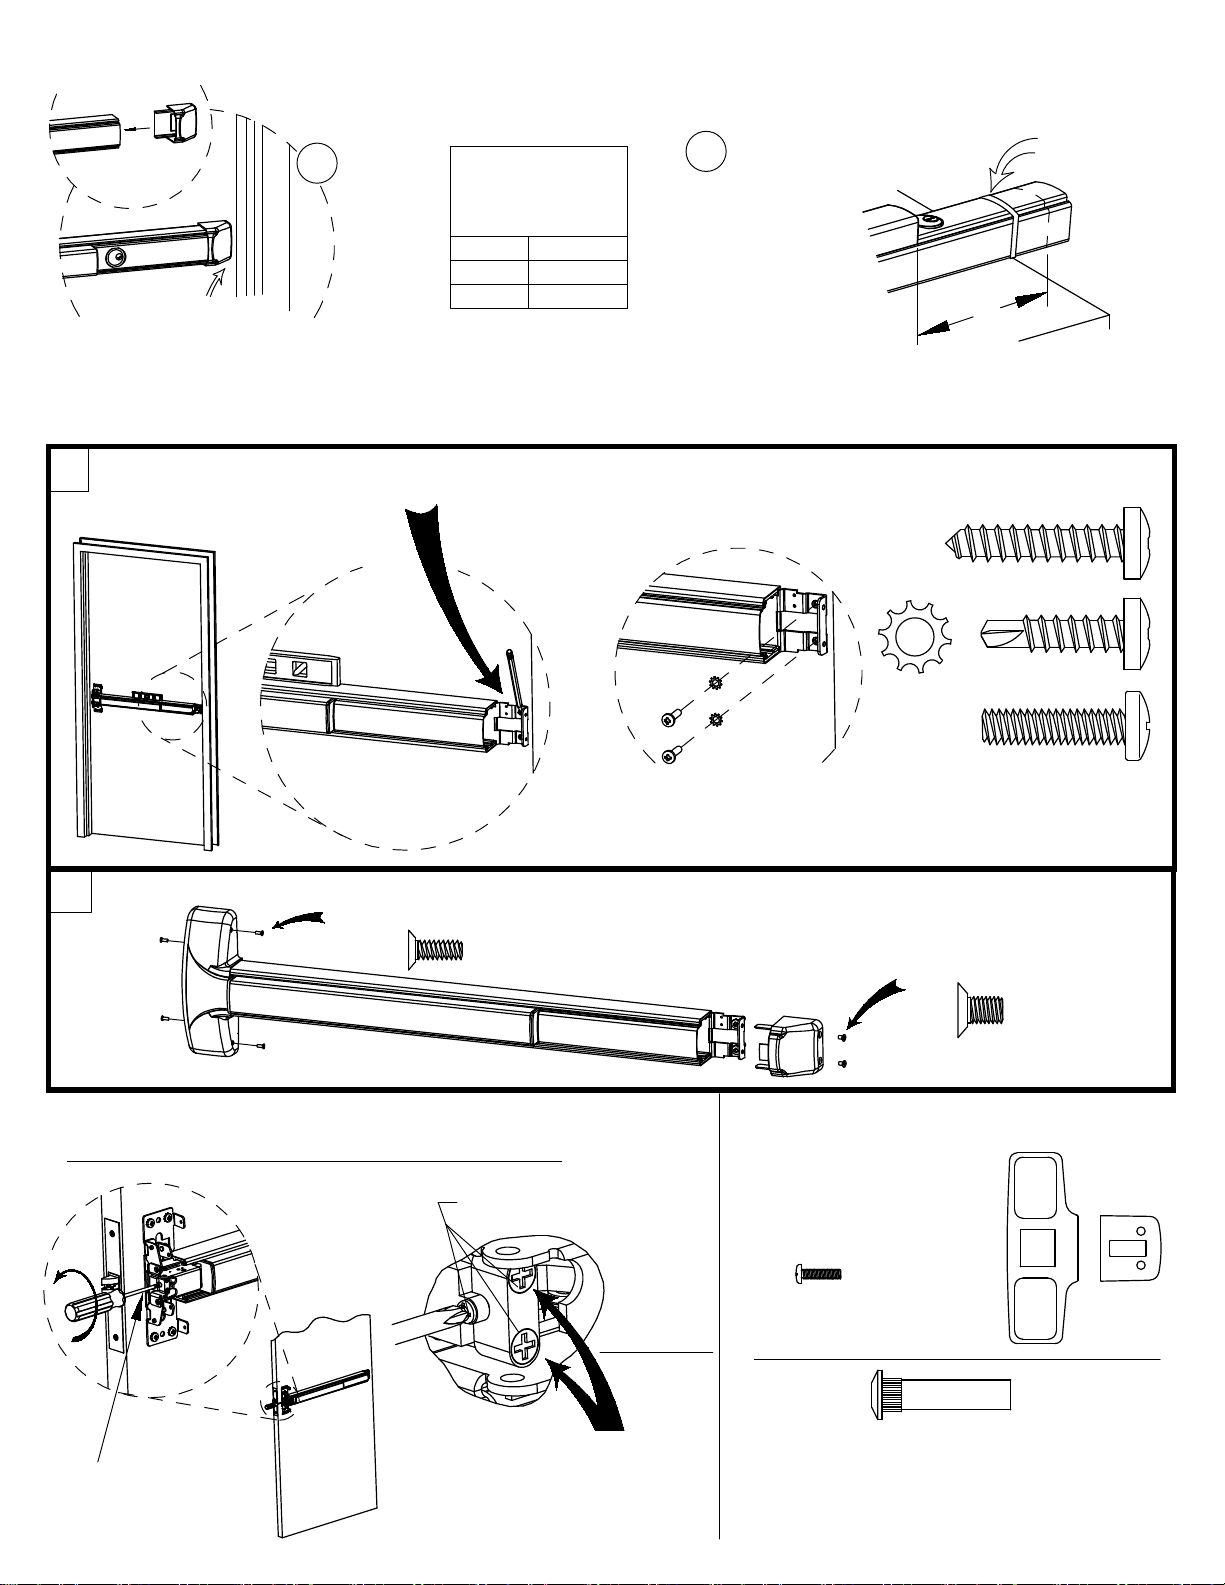
Check for device clearance, level device..............................................
Troubleshooting & optional accessories...............................................
Owner's Copy
Page
2
3
4
5
6
7
7
Detex Corporation, 302 Detex Drive, New Braunfels, Texas 78130-3045
830-629-2900 / 800-729-3839 / Fax 800-653-3839 / Text photos only: 830-481-6433 / INTERNET: www.detex.com
104883 March 18, 2020 B
For WARRANTY information,
scan code below or
go to www.detex.com/warranty
Should you have a Qustion/Problem with your Detex device please call Detex Technical Support
from the job site at 1-800-729-3839 and choose option 2 on our menu. Please do not return the
product to the distributor.
Drawing #: 103200 (SS)
104695 (AL)
R

104883 Page 2
or
1KIT
1A
3
4
5
2KIT
2A
2B 2C
6
789
10 or
or 11
12
13

Your particular part or configuration may not be shown:
Contact Detex technical support at 800-729-3839 (option 2)
Order
Part # DescriptionItem
2B
1A
3
PARTS BREAKDOWN
1KIT
104883 Pg 3
2KIT
2A
4
5
6
7
8
9
10
Centercase/Pushpad SubAssembly (includes 1A)
102353-1
104601-1 Centercase Cover, Stainless Steel, Wide, 10 series, 630
Centercase Cover, Aluminum, Wide, 10 series, 628
100147 Endcap bracket for EC1 (ramped) endcap w/o battery holder
101093
104303
104636
Endcap bracket for EC1 (ramped) endcap w/ battery holder
Endcap bracket for EC2 (flush) endcap w/o battery holder
Endcap bracket for EC2 (flush) endcap w/ battery holder
101642-9 Endcap, EC1 (ramped) Stainless Steel, 630
104304-9 Endcap, EC2 (flush) Stainless Steel, 630
104612-1 Endcap, EC2 (flush) Aluminum, 628
Fillerplate, Subassembly, S&R, Less Dogging, LD, 10 series, 36"
Fillerplate, Subassembly, S&R, Hex Dogging, HD, 10 series, 36"
100450 Hex Key (for Hex Dogging)
100783 Cylinder Nut (for Cylinder Dogging)
102216-2 Hex Dogging Assembly
102216 Cylinder Dogging Assembly
103294-X Strike Kit, ANSI, flat lip (includes hardware)
103285-X Strike Kit, ANSI (includes hardware)
Centercase Assembly, Wide Stile
103284 Template, RHR, Mortise
103285 Template, LHR, Mortise
103806-9 Mounting Plate/Strike Locator Kit, Mortise (includes 2A, 2B & 2C)
103215 Mounting Plate, BP9
2C
105500-X
100698-2
Fillerplate, Subassembly, S&R, Cylinder Dogging,CD, 10 series, 36"
103286-X Strike Kit, Double door, short open back (includes hardware)
103289-X Strike Kit, Double door, long open back (includes hardware)
103203-X Front plate
11 103320-1 Mortise lock, standard
103303-2 Mortise lock, EE
12
103273 Latchbolt block
13

104883 pg 4
P/N: 100980
1/4-20 x 1" PPH
P/N: 103276-63
#14 x 1" PPH self-drilling
#7 or 13/64"
#7 or 13/64"
----------
1/8 pilot hole recommended
for self-drilling screws
Fastener Part No Drill Bit
P/N: PP-5067-25
#14 Lockwasher
Hardware Table for BASIC device mounting.
Additional hardware is provided per the device configuration
Pencil
Hammer
Pliers
1/4-20 Tap
Tools Required:
Phillips & small flat Screw Drivers
Combination Square
Center Punch
Saw for cutting device if necessary (chopsaw preferred)
P/N: 101621-5
1/4-20 x 1/4" PPHMS
P/N: 101632-2
10-32 x 5/16" PFHUMS
(multiple finishes included)
P/N: 100162-106
6-32 x 3/8" PFHUMS
(multiple finishes included)
----------
P/N: PP-5183-110
#14 x 1-1/4" PPH wood screw 1/8 pilot hole recommended
for wood screws
Safety Glasses
Power Drill
Tape Measure
Level
P/N: 100954
1/4-20 x 1-1/2" PPH #7 or 13/64"
P/N: 100156-108
#8-32 x 1/2 "
P/N: PP-5802-118
12-24 x 1/2"
P/N: 103253-52
#12 x 1" self-drilling
----------
----------
----------

Mark mortise
access holes
STEP 1: DOOR PREP (Note: LHR installation shown)
Mark centerline for device
40" above finished floor
L
Align template
with device
centerline
L
C
CTighten screw
nearest cylinder
side of door only
Turn cylinder CW
40"
above
finished
floor
2-3/4" Backset
NOTES:
1) File sharp corners to complete slots where needed.
2) See Trim instructions where applicable for drilling trim holes.
3) See electrical instructions for wiring electrical devices.
104883 Page 5
Door prepared to
ANSI A115.13
See T2000 (metal) and
T2001 (wood) templates
Plastic template P/Ns:
103283 (LHR)
103284 (RHR)
Drill for "A" or "F" screws (4 places)
OR
Use #14 self-drilling "K" screws (4 places)
OR
Drill 5/16" diameter
(For trim option only, 4 places)
AND
3/4" diameter 4 places
STEP 2: INSTALLING OKC (03) FUNCTION (if not required, skip to STEP 3)
Use plastic template to mark and drill hole (Trim side only)
Install lock with (2) screws.
Fasten screws loosely.
CAUTION!
Mortise lock NOT installed for this step
Cylinder and collar
NOT supplied, but can
be ordered separately.
Cylinder P/N: 102281-X
Collar P/N: 103303
Install cylinder AFTER lock
is installed
Continue with Step 3
Device side; reverse template for
TRIM cutouts on opposite side of
door, if required.
C
L
C
L
Mark backplate holes
Use plastic template to mark and drill mortise lock and backplate holes
Drill 1-1/4" dia, one side
Tighten screws
or
Door
Lock
Centerline
LHR Device Side
DEVICE

Install strike with (2) screws
6Align fingers with
mortise lock in door IMPORTANT!
Fasten device to backplate
with (2) screws & lockwashers.
If screws are not installed,
warranty is void.
To change lock HANDING:
Remove block and rotate latchbolt
Install backplate with (4)
screws & lockwashers
Install plate with (2) screws
Reposition block
after handing
Install lock with (2) screws
104883 Page 6
or
NOTE: See Trim instructions where applicable
Install backplate & trim for outside key control Install Strike
STEP 4: INSTALL BACKPLATE STEP 5: INSTALL STRIKE
Install mortise lock
or
or
STEPS 6-8: INSTALL DEVICE
Install device to backplate
Drill for 1/4"-20 or #14 screws or use
#14 self-drilling screws, 4 places
STEP 3: INSTALL MORTISE LOCK

Install endcap bracket
with (2) screws & lockwashers
7
8
Adjust centercase fingers, if latchbolt will not retract fully
Detail G
Loosen (2) screws & turn
center screw CCW for latchbolt
adjustment
See Detail G
Tighten screws after
adjustment
Part No: 103319
Mark & Drill for 1/4"-20 or #14 screws or use #14 self-drilling screws
2 places
104883 Page 7
1
L
2
Check for device and door frame clearance.
If no cut-off needed, proceed to the next page.
Cut fillerplate and extrusion
STRAIGHT & SQUARE to
desired length and deburr
Minimum
Fillerplate
Length
Slide endcap assembly
onto extrusion
Secure with tape
before cutting
CAUTION:
CHECKING FOR DEVICE CLEARANCE
(Cut-Off procedure if required)
Type Length (L)
2-1/2"
LD
3"
HD/CD
For aluminum Advantex finish cutdown applications: After cutting, the baseplate extrusion can be reversed to place the cut end
inside the head cover. To do so, loosen the setscrew inside the aluminum baseplate extrusion and slide extrusion out, reverse, &
slide back in. Tighten setscrew.
The #1/4-20 kit is available in (4) finishes:
Part No: 101616-2 Brushed Brass BHMA 606 Finish
Part No: 101616-5 Oil Rubbed Bronze BHMA 613 Finish
Part No: 101616-7 Brushed Chrome BHMA 626 Finish
Part No: 101616-9 Stainless Steel BHMA 630 Finish
or
or
Level device and install endcap bracket
Install endcap and cover
Install cover with (4) screws
Install endcap with (2) screws
TROUBLESHOOTING Optional Accessories
Glass Bead Kit
#1/4-20 X 1-1/2" Screw
(4) Included
Sex Nut
Questo manuale è adatto per i seguenti modelli
1
Indice
Altri manuali Detex Serratura della porta

Detex
Detex ADVANTEX 82 Series Manuale utente

Detex
Detex ECL-620 Manuale utente

Detex
Detex EAX-500 Manuale utente

Detex
Detex ADVANTEX 87 Series Manuale utente

Detex
Detex ADVANTEX 70 Series Manuale utente

Detex
Detex ADVANTEX 80 Series Manuale utente

Detex
Detex ADVANTEX 62 Series Manuale utente

Detex
Detex ADVANTEX 60 Series Manuale utente

Detex
Detex Advantex 10 Series Manuale di istruzioni