Digital ID View Real-time NETWORK VIDEO RECORDER Manuale utente
1
Real-time
NETWORK VIDEO RECORDER
User’s Manual
12000 Ford Road, Suite 110, Dallas, Texas 75234
Tel: 972-247-1203 Fax: 972-247-1291
www.idview.com

2
Regulatory Information
Safety Precautions
˙To reduce risk of fire or electric shock, do not expose this appliance to rain or moisture.
˙Do not place the appliance near to heaters, other heat sources or under direct solar irradiation.
˙Make sure the ventilation slot on the appliance is not covered during operating.
˙To prevent risk of electric shock, connect only to a proper earth grounded outlet. Do not operate appliance with
other none specified power supplies.
˙Do not attempt to modify or use the supplied AC power cord if it is not the exact type and rating required.
˙Do not attempt to disassemble the appliance. Contact qualified service personnel for maintenance.
˙Handle the appliance with care. Do not strike or shake, which may damage the appliance.
Notice
˙Information in this document is subject to change without notice.
FCC compliance: This equipment has been tested and found to comply with the limits for a digital device, pursuant to part
15 of the FCC Rules. These limits are designed to provide reasonable protection against harmful interference when the
equipment is operated in a commercial environment. This equipment generates, uses, and can radiate radio frequency
energy and, if not installed and used in accordance with the instruction manual, may cause harmful interference to radio
communications. Operation of this equipment in a residential area is likely to cause harmful interference in which case the
user will be required to correct the interference at his own expense.
FCC Conditions This device complies with part 15 of the FCC Rules. Operation is subject to the following two conditions:
1. This device may not cause harmful interference.
2. This device must accept any interference received, including interference that may cause undesired operation.
Attention! This is a class A product which may cause radio interference in domestic environment; in this case, the user
may be urged to take adequate measures.

3
Table of Contents
1 Introduction 7
1.1 Features 7
1.2 Product Specification 8
1.3 Front Panel 10
1.4 Rear Panel 11
1.5 Remote Control (Optional) 12
1.6 Packing Detail and Installation
Error! Bookmark not defined.
2 General Operation 13
2.1 Login 13
2.2 Add IP Cameras to NVR 15
2.2.1 Full Auto Install Mode 15
2.3 Live Viewing 22
2.3.1 Basic Operation 22
2.4 Search and Playback Operation 25
2.4.1 Basic operation 25
2.3.2 Calendar 26
2.3.3 Search operation 26
2.3.4 Playback operation 28
3PTZ Control 29
4 Export Video 30
5Export Player 31
5.1 Player Installation 31
5.2 Starting the Player Program 31

4
6 System Setup Menu 33
6.1 Camera 34
6.1.1 Settings 35
6.1.2 Record Settings 42
6.1.3 Schedule Settings 43
6.2 Network 44
6.2.1 Network Settings 44
6.2.2 Network Service 47
6.2.3 Network Notification 49
6.3 Alarm Settings 51
6.3.1 Alarm Input Settings 51
6.3.2 Exception Management 52
6.4 System Settings 53
6.4.1 Device Setting 53
6.4.2 User Settings 54
6.4.3 Date/Time Settings 55
6.4.4 Display 58
6.4.5 Disk 60
6.4.6 Miscellaneous 62
6.4.7 Configuration 64
6.5 Information 65
6.5.1 General Information 65
6.5.2 Log 66
7 Web Viewer Operation 67
7.1 Connecting to NVR 67
7.2 Login 67

5
7.3 Remote Live View 69
7.4 Remote Search and Playback 71
7.4.1 Search by Time 71
7.4.2 Search by Channel 72
7.4.3 Search by Event 73
7.4.4 Web Viewer Playback Operation 74
7.4.5 Web Viewer Setup Menu 75
7.4.6 Remote Export 76
7.4.7 Remote PTZ Control 78
8 VS Viewer for iOS and Android 81
8.1 Android System 81
8.2 iOS System 85
9 CMS Pro Operation 90
9.1 Begin Installation 90
9.2 Start CMS Pro from the PC 96
9.3 CMS Pro UI Overview 97
9.4 Login 98
9.5 Connect the program with device 99
9.5.1 Add Device Manually 99
9.5.2 Remove or Edit device setting 100
9.5.3 CMS Pro Group Video 101
9.6 Live Video 103
9.7 Playback Video 105
9.7.1 Search for Playback Videos 107
9.7.2 Search operation 107


7
1 Introduction
The compact size standalone 4/8CH Network Video Recorder can operate independently
with local live monitoring, recording, playback and local configuration. It supports up to
H.264 High Profile decoding. The high-efficiency 4/8CH NVR can perform up to 4/8CH
Full HD recording with multiple recording modes, including continuous, manual,
scheduled, alarm and motion recording.
1.1 Features
Local operations and configurations: With local operations and configuration
technology, the complicated network configurations are able to perform locally.
High Resolution local display: It supports live and playback directly from HDMI or
VGA monitors or TV. It supports HDMI interface which is able to connect to HDMI
monitor or TV in full HD (1920x 1080) resolution.
Plug-and-Play installation: It provides users with automatic installation to reduce the
redundancy in operation and maintenance costs.
Linux-embedded, highly reliable standalone NVR.
Megapixel recording (up to 10Mbps per channel): It supports megapixel recording
(up to 10Mbps per channel) from different IP cameras.
Record up to 4/8 channel Full HD video input.
Video search by date and time, event and channel: It supports convenient video
search by date and time, event and channel on the local playback interface.
Digital watermark: It provides the digital watermark utility to verify whether the
videos are original or not.
Digital zoom for live and playback
Remote monitoring of NVRs by Android phones, iPhone and iPad.
CMS: It provides with free bundle CMS to manage 128 channel cameras. Live
monitoring with maximum 32 channels simultaneously and one device playback.
Support 3 internal SATA HDDs, up to 9TB.
Convenient Control of PT cameras: It supports PT (Pan/Tilt) cameras to adjust
directly from the NVR and they can be viewed on the local display.

8
1.2 Product Specification
System
4 Channel
8 Channel
Operating System
Embedded Linux
Operations
Live, Recording,Playback,Backup & Remote access
Control Mode
USB mouse, IR remote control, Webpage, CMS
Video
Decompression
H.264 HP/MP/BP, up to 1080p30
IP Camera Inputs
4 channel; each one is up to 1080p30
8 channel; each one is up to 1080p30
Audio
Input
1 x RCA
Output
1 x RCA
2-way Audio
Support
Display
Display mode
Full screen/Multi-screen/PIP/Sequence
Output
1x HDMI(1920x1080p60),1xVGA(up to 1920x1080, 60Hz)
Sequence
Support
OSD
GUI
Remote View
Via IE Web Viewer, CMS
Mobile Viewing on
Smartphone/Tablet PC
Yes; iOS, Android
Recording
Recording Mode
Continuous, scheduled, alarm, motion
Recording Capability
Up to 120 fps at Full HD(1920x1080)
Up to 240 fps at Full HD(1920x1080)
Pre Recording
5 seconds
Post Recording
300 or above seconds
Playback & Backup
Display mode
Full screen/Multi-screen
Playback capability
4 channel simultaneous playback
8 channel simultaneous playback
Playback control
Play/Pause/Step/Fast forward/Rewind/Fast rewind
Search Control
By Date/Time, Events
Export
Through USB/Webpage/CMS
Internal Storage
up to 3 x SATA Ports

9
Network
Support
TCP/IP,SMTP,DHCP,DDNS,PPPoE,UDP,SSL,RTP,RTSP,NTP
Ethernet
1x10/100Mbps(WAN), 1x10/100/1000Mbps(LAN)
I/O
USB
2; 1 for mouse control and 1 for backup
Alarm
8 Alarm in/ 2 Alarm out
RS485
1; Support Pelco D, Pelco P
Security
Watermark
Yes
User Privilege
3 Levels of User Access Support
Environmental
Power
12V DC
Dimension
355(W) x 63(H) x 265(D) mm
Temperature
0°C ~ 40°C
** The specifications are subject to change without any notice.**

10
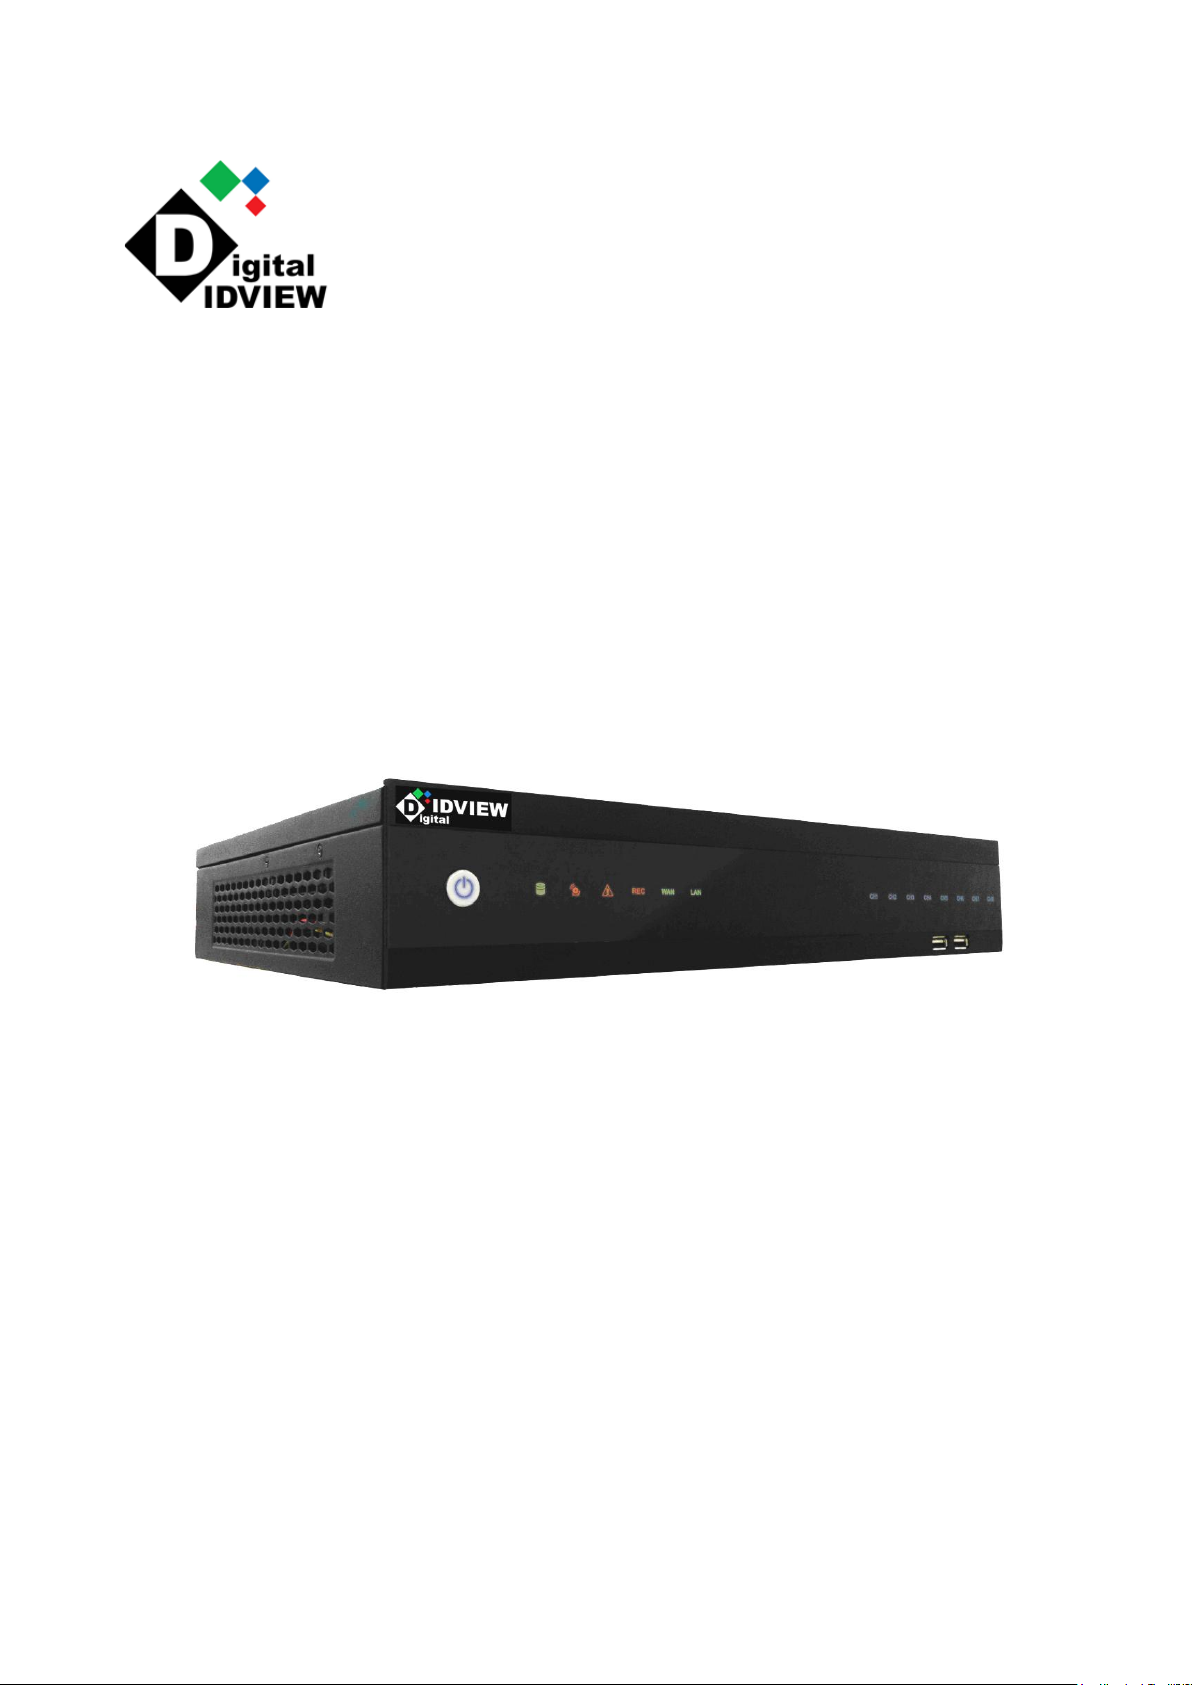
1.3 Front Panel
The front panel includes:
1. Power button: Power On/Off NVR.
2. IR receiver: Receiver for IR remote.
3. Status indicators:
: HDD Indicator turns on when system is accessing hard disk
: Alarm indicator turns on when alarm is detected.
: Exception indicator turns on when system exception alert is detected, such as
disk full, disk error, no disk, network disconnect, illegal login, disk over
temperature, fan fail, network fail, power loss and IP conflict.
: Rec indicator turns on when NVR is recording.
: WAN indicator turns on when NVR is connecting to WAN port.
: LAN indicator turns on when NVR is connecting to LAN port.
4. CH1~CH8 : Indicators turn on when the video is connected to the system.
5. USB port : USB port for connecting devices, such as USB mouse or USB flash
device.
Indice
Altri manuali Digital ID View Registratore digitale

Digital ID View
Digital ID View 960H Series Istruzioni operative

Digital ID View
Digital ID View SV+ Manuale utente

Digital ID View
Digital ID View NW-STA-5016 Manuale utente

Digital ID View
Digital ID View IV-411ECO Manuale utente

Digital ID View
Digital ID View 5700 Series Manuale utente

Digital ID View
Digital ID View IV-MX4POENVR Manuale utente


