digitalview DRR-113 Manuale utente
DRR-103
DAB+/FM Radio Tuner
© 2009-2010 Digitalview Australia
Owner’s Manual

The DRR-103 has been designed and
manufactured to assure personal safety.
Improper use can result in electric shock or
fire hazard. The safeguards incorporated in
this unit will protect you if you observe the
following procedures for installation, use, and
servicing.
This unit does not contain any parts that can
be repaired by the user.
DO NOT REMOVE THE CHASSIS
COVER, OR YOU MAY BE
EXPOSED TO DANGEROUS
VOLTAGES. REFER SERVICING
TO QUALIFIED SERVICE
PERSONNEL ONLY.
1. Read these instructions. - All these
safety and operating instructions should
be read before the product is operated.
2. Keep these instructions. - The safety,
operating and use instructions should be
retained for future reference.
3. Heed all warnings. - All warnings on the
product and in the operating instructions
should be adhered to.
4. Follow all instructions. - All operating
and use instructions should be followed.
5. Do not use this apparatus near
water. – For example: near a bath tub,
wash bowl, kitchen sink, laundry tub, in
a wet basement; near a swimming pool;
etc.
IMPORTANT SAFETY INSTRUCTIONS
CAUTION: PLEASE READ AND OBSERVE ALL WARNINGS AND
INSTRUCTIONS IN THIS OWNERS MANUAL AND THOSE MARKED ON THE
UNIT. RETAIN THIS GUIDE FOR FUTURE REFERENCE.
6. Clean only with dry cloth. – Unplug
this product from the wall outlet before
cleaning. Do not use liquid cleaners.
7. Do not block any ventilation openings.
Install in accordance with these
instructions. Slots and openings in the
cabinet are provided for ventilation, to
ensure reliable operation of the product,
and to protect it from over-heating. The
openings should never be blocked by
placing the product on a bed, sofa, rug or
other similar surface. This product should
not be placed in a built-in installation
such as a bookcase or rack unless proper
ventilation is provided.
8. Do not install near any heat sources such
as radiators, heat registers, stoves, or
other apparatus (including amplifiers) that
produce heat.
9. Protect the power cord from being walked
on or pinched, particularly at plugs,
convenience receptacles, and the point
where they exit from the apparatus.
10. Only use attachments/accessories
specified by Digitalview.
11. Unplug the DRR-103 and antenna lead
during severe lightning storms or when
unused for long periods of time.

Table of Contents
Introduction.....................................................................................................1
Features of the DRR-103................................................................................2
User Convenience Summary ........................................................................ 2
Technical Performance Summary................................................................. 2
Package Contents ..........................................................................................3
Front Panel Overview.....................................................................................4
Front Panel Display........................................................................................5
Standby Button .............................................................................................. 5
Front Panel LCD Display ............................................................................... 5
Transport Controls and Navigation Buttons................................................6
Rear Panel Overview......................................................................................7
Remote Control Unit ......................................................................................8
Button Denitions 1 ....................................................................................... 8
Button Denitions 2 ....................................................................................... 9
Typical Connection Diagram Using the DRR-103......................................10
Connection using a Pre-amplier or Integrated Amplier ....................... 10
Operation....................................................................................................... 11
Selection Of The Antenna............................................................................ 11
Initial Setup................................................................................................... 11
Initial Tuning For DAB Reception ............................................................... 11
Initial Tuning For FM Reception.................................................................. 11
RDS (Radio Data System Operation........................................................... 12
Presets .......................................................................................................... 12
Storing A Preset (DAB) ................................................................................ 12
Storing A Preset FM)................................................................................... 13
Tuning To A Station Using A Stored Preset (DAB & FM) .......................... 13
Tuning To A DAB Station And Not Using The Stored Preset Function ... 13
Recalling/Selecting An FM Station And Not Using The Preset Function 13
Introduction To Live PAUSE ....................................................................... 13
Activating The Live PAUSE Mode............................................................... 14
Live Pause Playback Navigation ................................................................ 14
Factory Default ............................................................................................. 14
Version Number............................................................................................ 14
Troubleshooting ........................................................................................... 14
Intermittent, Distorted DAB Reception ...................................................... 14
Antennas....................................................................................................... 14
Specication .................................................................................................15

Introduction 1
Thank you for purchasing the Digitalview DRR-103 DAB+/FM Radio Tuner. This
manual describes the setup and functional requirements of your DRR-103. Operational
control for the DRR-103 is accessed either by the front panel buttons or the Remote
Control Unit. Note that limited functionality is provided by the front panel buttons.
Please read this manual carefully to gain the most from your DRR-103 Receiver. If
you have any problems with setup or operation which cannot be resolved by referring
to this manual, please call Digitalview support directly.
Introduction
DAB/DAB+, RDS and all other trademarks that may appear in this manual are the property of their
respective owners.
For any on-going improvement of this product, the specification and/or contents are subject to
change without prior notice.
©2010 Control Dynamics Pty. Ltd. / Digitalview Australia. All rights reserved.

2 Introduction
Introduction 3
Features of the DRR-103
User Convenience Summary
Compatibility
Designed specifically for integration into an existing Hi-Fi system.
Station Presets
Twenty user programmable presets for DAB+ and FM for quick radio station selection.
LCD Display
Large auto-scrolling LCD shows comphrensive program information and status
Single Function Remote Control Unit
Full function 32 key Remote Control Unit.
Pause Live Radio
Play, Fast Forward and Rewind for up to 4 Hours
Station and Program Data
DAB+ and FM RDS includes Station, Program and Format information, where applicable.
Control Interface Using 3.5mm IR Interface
IR control port is utilised for interfacing to popular Home Control and Automation Systems.
Standard “Hi-Fi” Component Size
430mm component width to suit most Hi-Fi installations.
Technical Performance Summary
Tuner Implementation
High sensitivity single tuner design for both DAB+ and FM modes.
Digital and Analog Audio Outputs
S/PDIF Optical and Coaxial for digital audio. RCA L&R connections for analog audio.
Low Power Consumption
In accordance with the MEPS recommendations for Standby power of 0.5W.
2 Introduction
Introduction 3
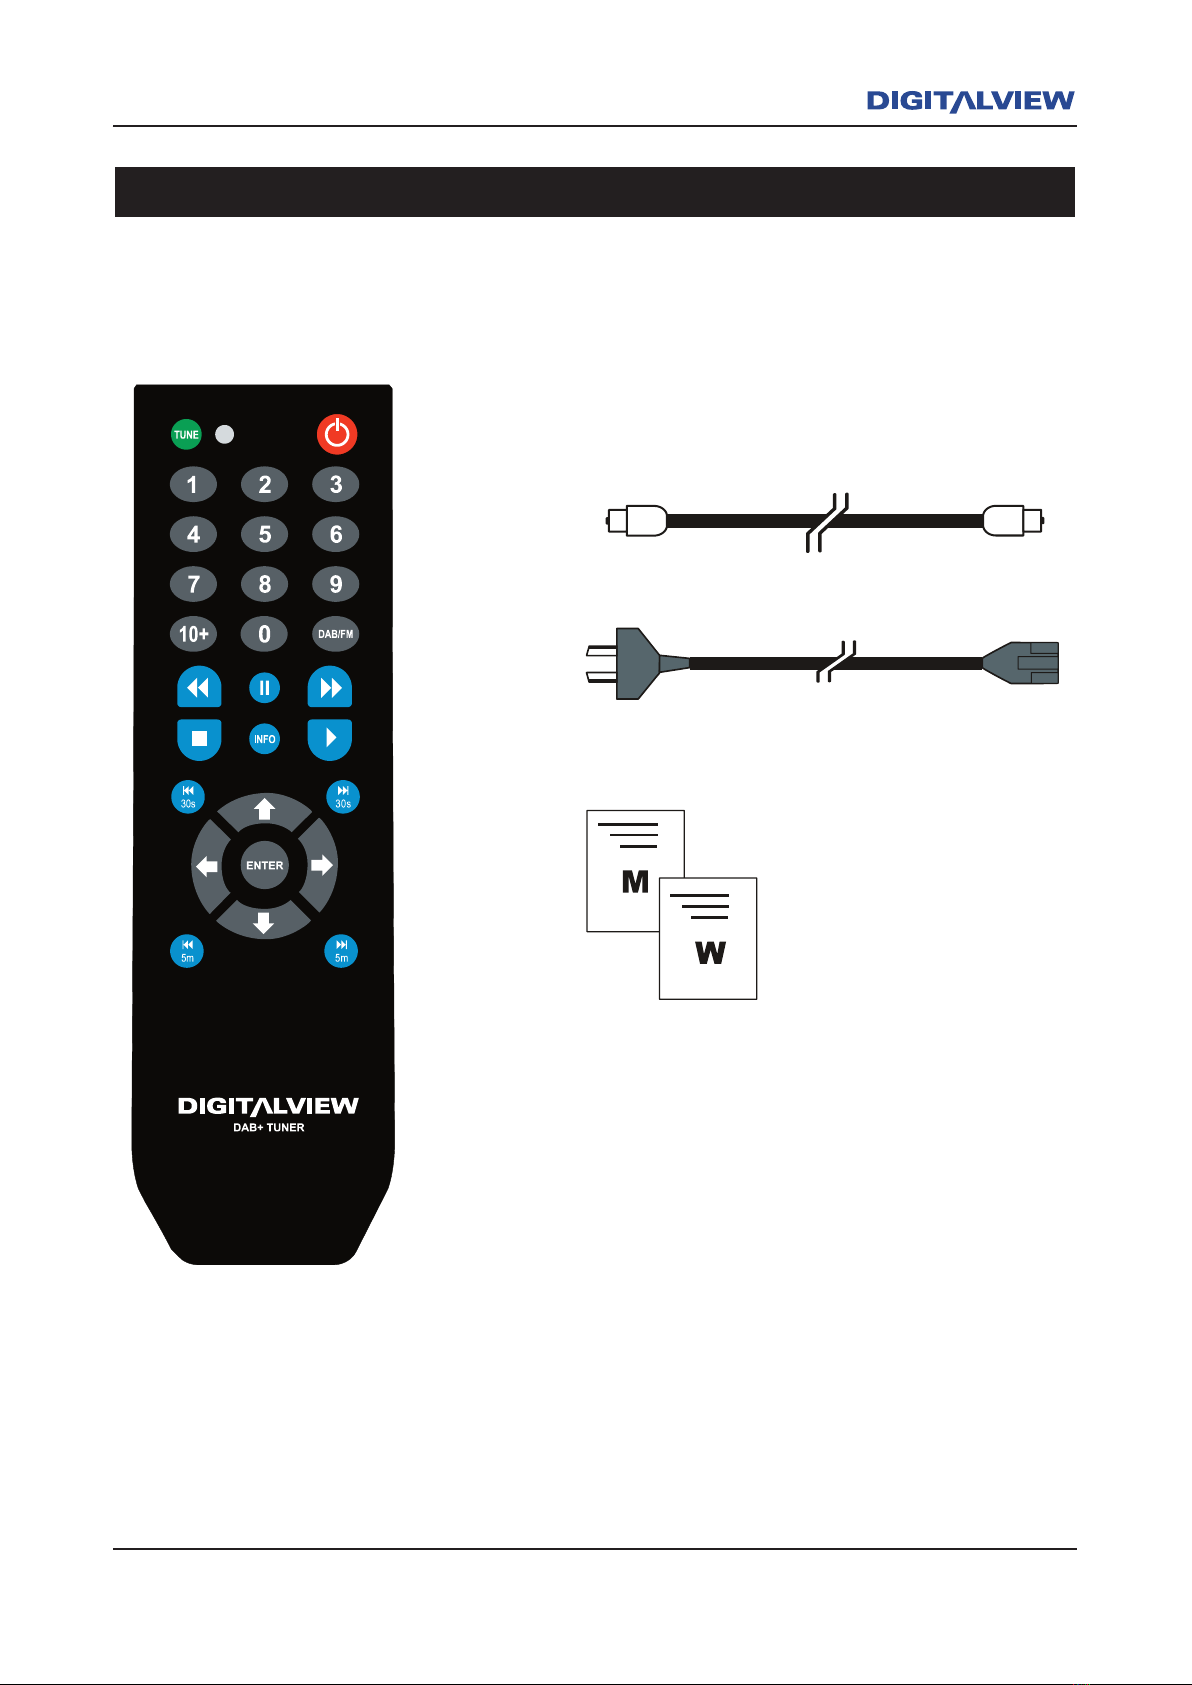
Package Contents
Toslink Optical Cable
Power Cable
Remote Control Unit
Owners Manual
Warranty Registration Card
The following items are included with your DRR-103.
4 DRR-103 Front and Rear Panel
DRR-103 Front and Rear Panel 5
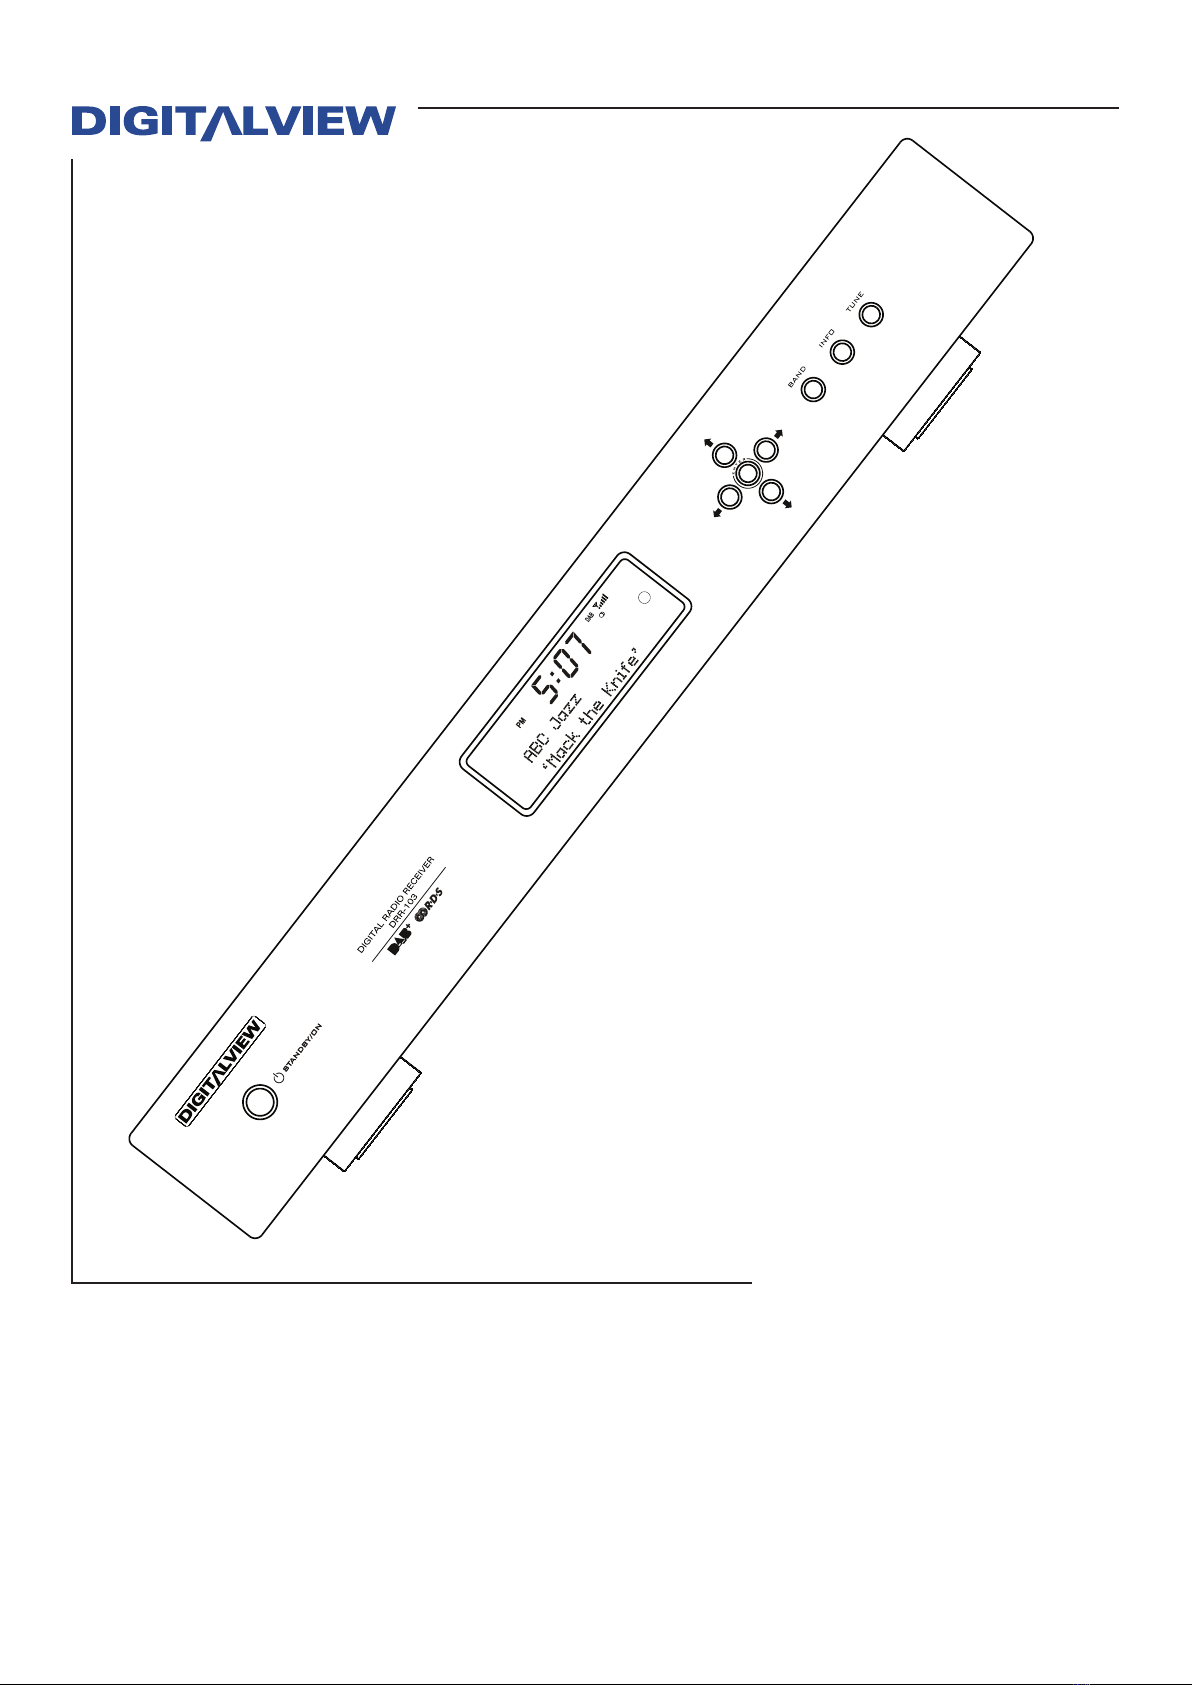
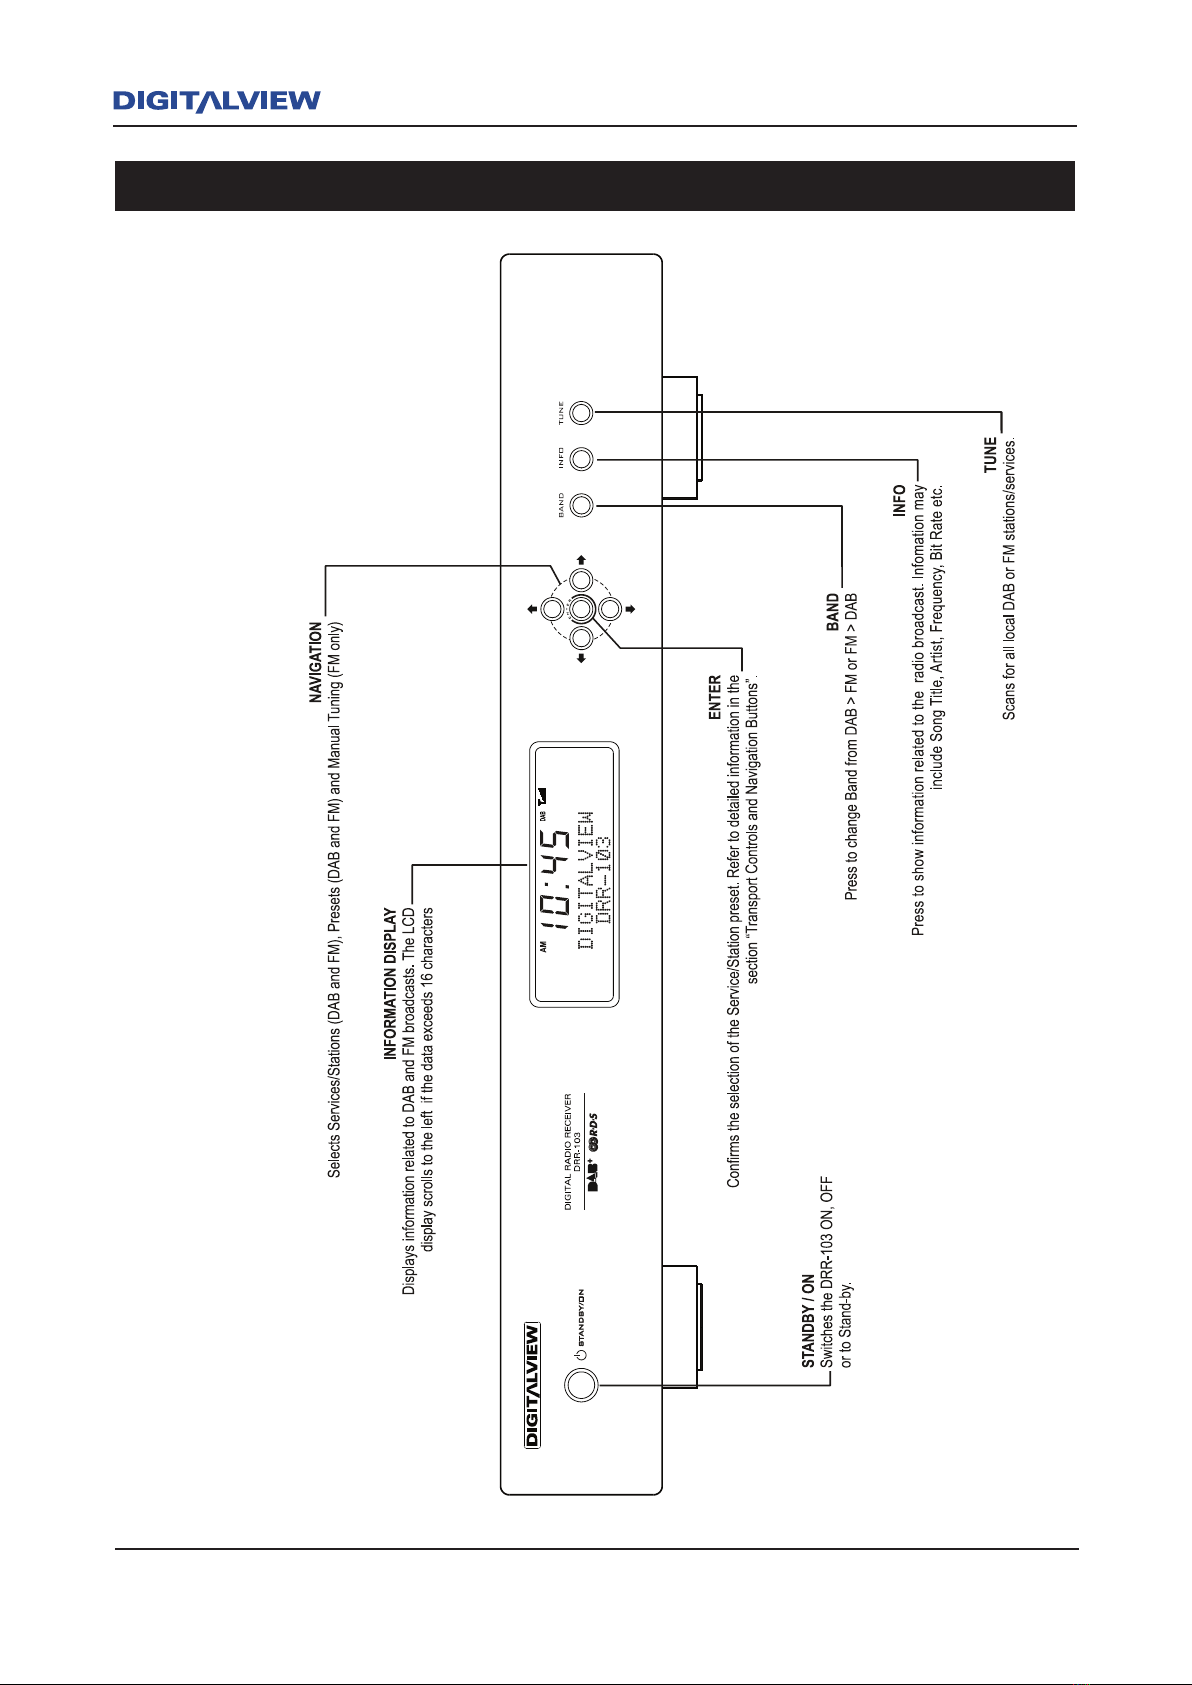
Front Panel Overview
4 DRR-103 Front and Rear Panel
DRR-103 Front and Rear Panel 5
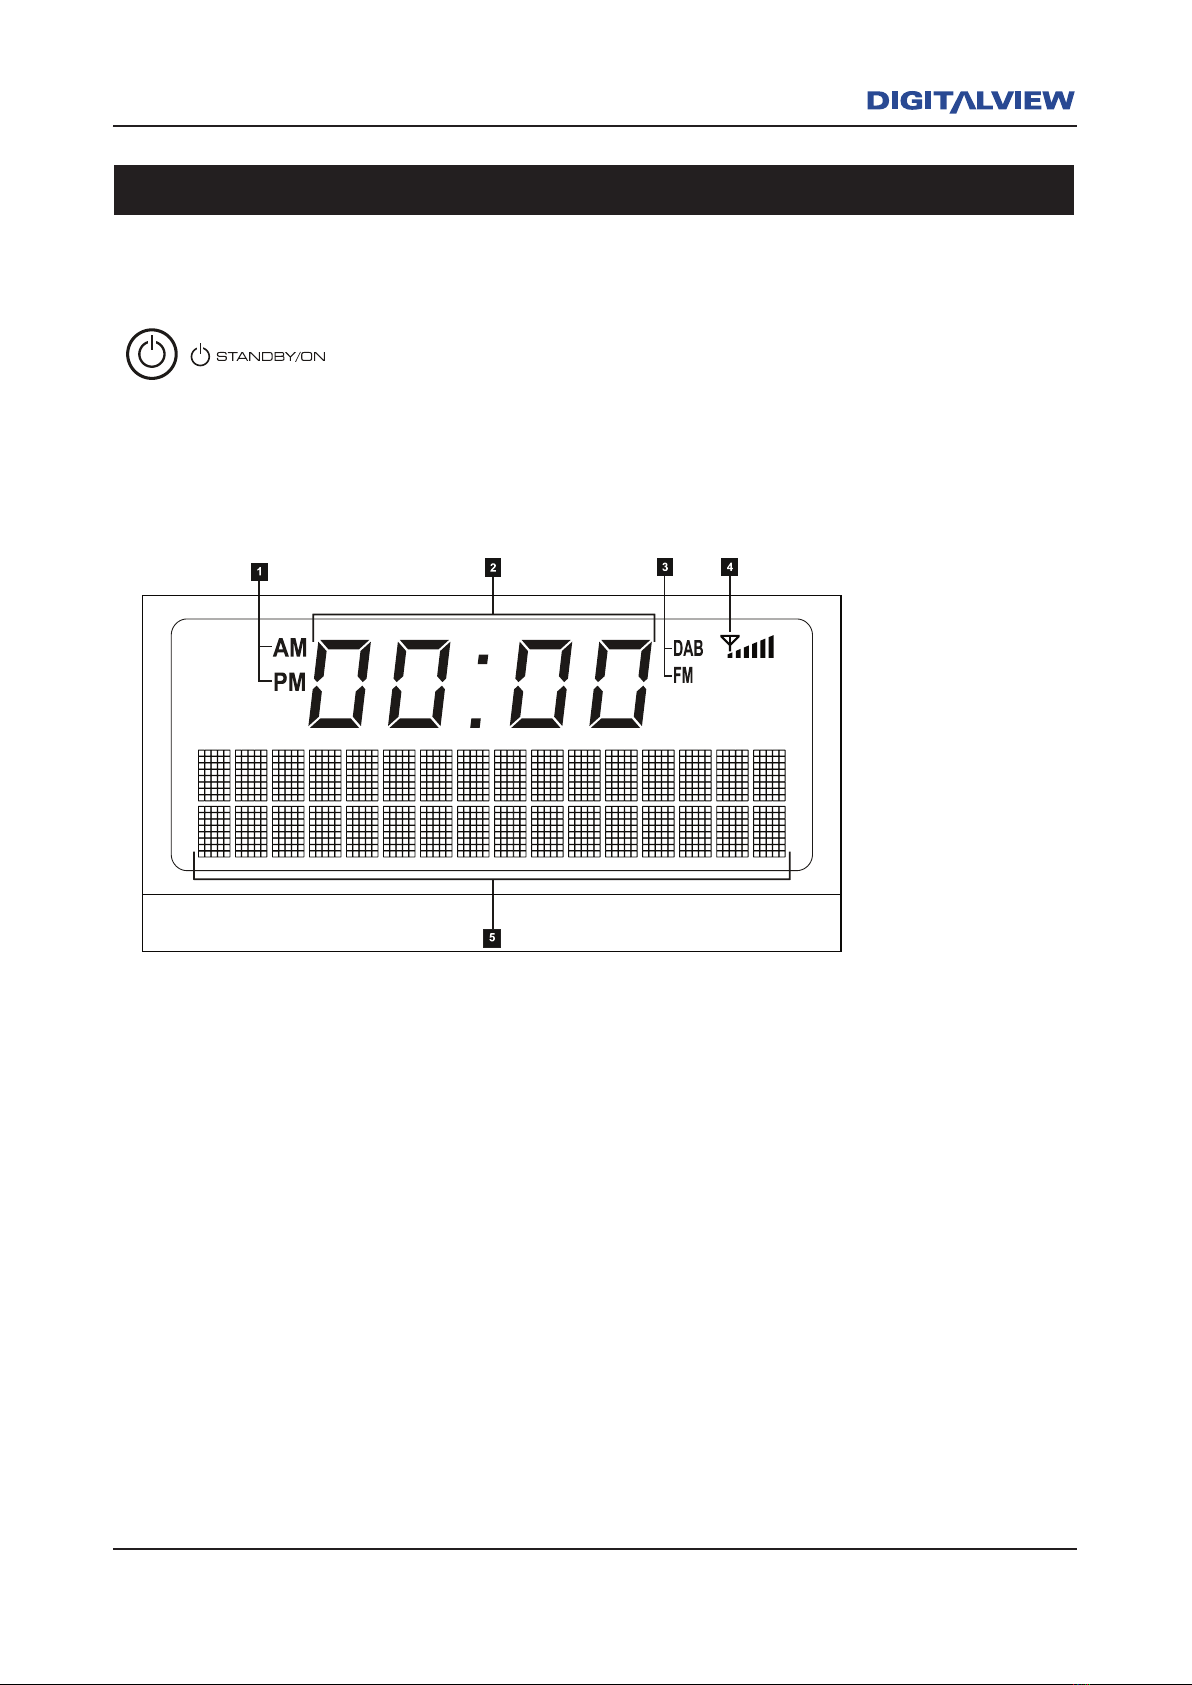
1. AM / PM Indicator.
2. 12 Hour Clock
3. DAB / FM Mode Indicator
4. Signal Strength Indicator
5. Alpha-numeric character display shows information relevant to Digital Radio and FM/RDS
reception including Pause Live Radio functions.
Front Panel Display
When the Standby / ON button is pressed two modes of operation are
possible. Illuminates Blue when switched ON. Illuminates Red when
switched OFF.
Standby Button
Front Panel LCD Display
6 DRR-103 Front and Rear Panel
DRR-103 Front and Rear Panel 7
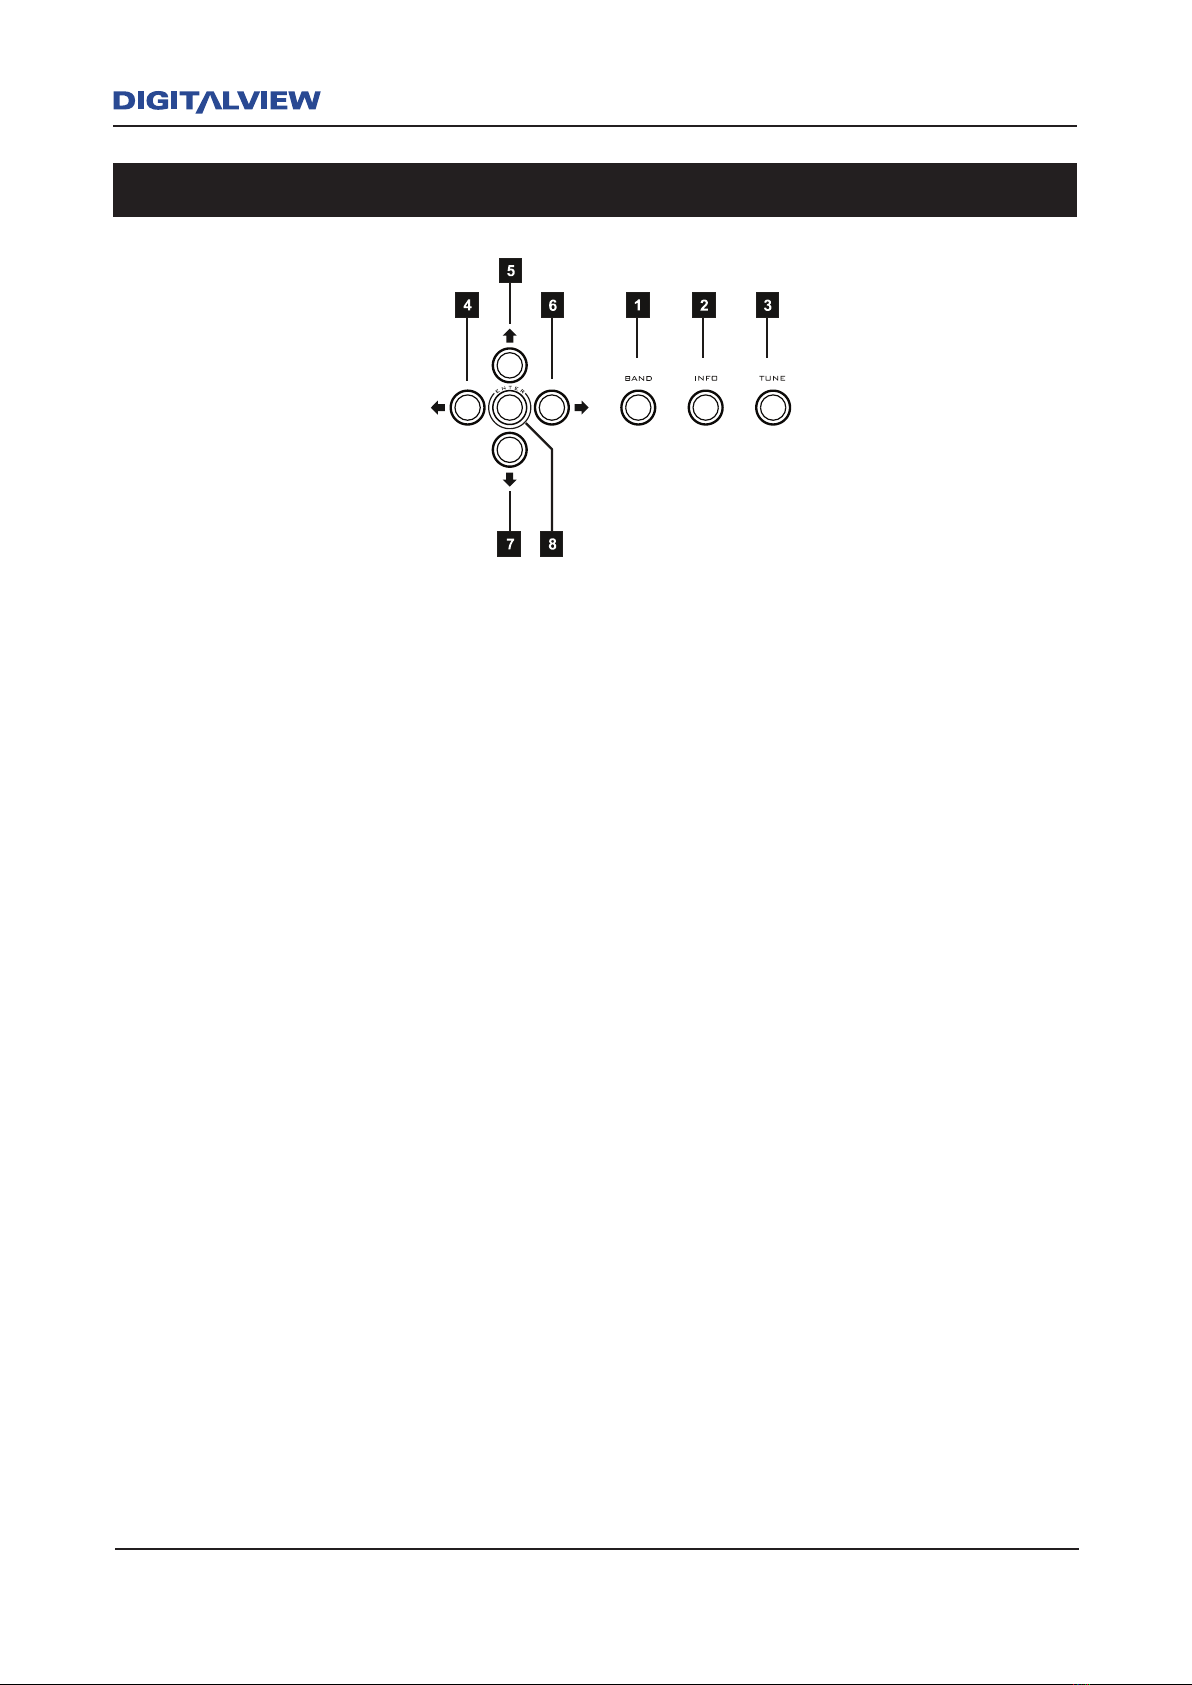
1. BAND - Press to select DAB or FM operation.
2. INFO - Press repeatedly to display Information related to the current broadcast. (Title,
Time, Date, Artist, Stereo, Ensemble, etc.). Pressing and holding the INFO + TUNE
buttons will initially activate the SYSTEM RESET option. Press and hold the INFO button
to display the current Firmware Version Number.
3. TUNE - DAB Mode: When pressed, scans for all DAB stations*.
FM Mode: When pressed, increments the FM frequency until it finds the next valid
station.
* Please Note: The term “station/s” will be used in this manual to dene a specic Service/s
(DAB) or Frequency/Frequencies (FM) and is associated with digital/analog radio broadcasting.
4 & 6 LEFT & RIGHT CURSOR NAVIGATION - DAB & FM mode. The Å or Æ button is used
to select or set one of 20 DAB or FM Preset locations. Presets are used as a quick means
of accessing your favourite stations. Pressing and holding the Å or Æ button quickly
scrolls through all Presets. Pressing the Å or Æ button with a slight pause between
presses, will slowly increment each Preset.
5 & 7 UP & DOWN CURSOR NAVIGATION - The Ç or È buttons are used to select the DAB
or FM station directly. Pressing and holding the Ç or È button will quickly scroll through
all stations. Pressing the Ç or È button with a slight pause between presses will slowly
increment each station. For manual tuning in FM mode, each button press increments the
frequency in 50kHz steps.
8. ENTER - In DAB or FM, the ENTER button is used to store the selected preset. Press and
hold the ENTER button to save the selected station as a Preset.
Transport Controls and Navigation Buttons
6 DRR-103 Front and Rear Panel
DRR-103 Front and Rear Panel 7
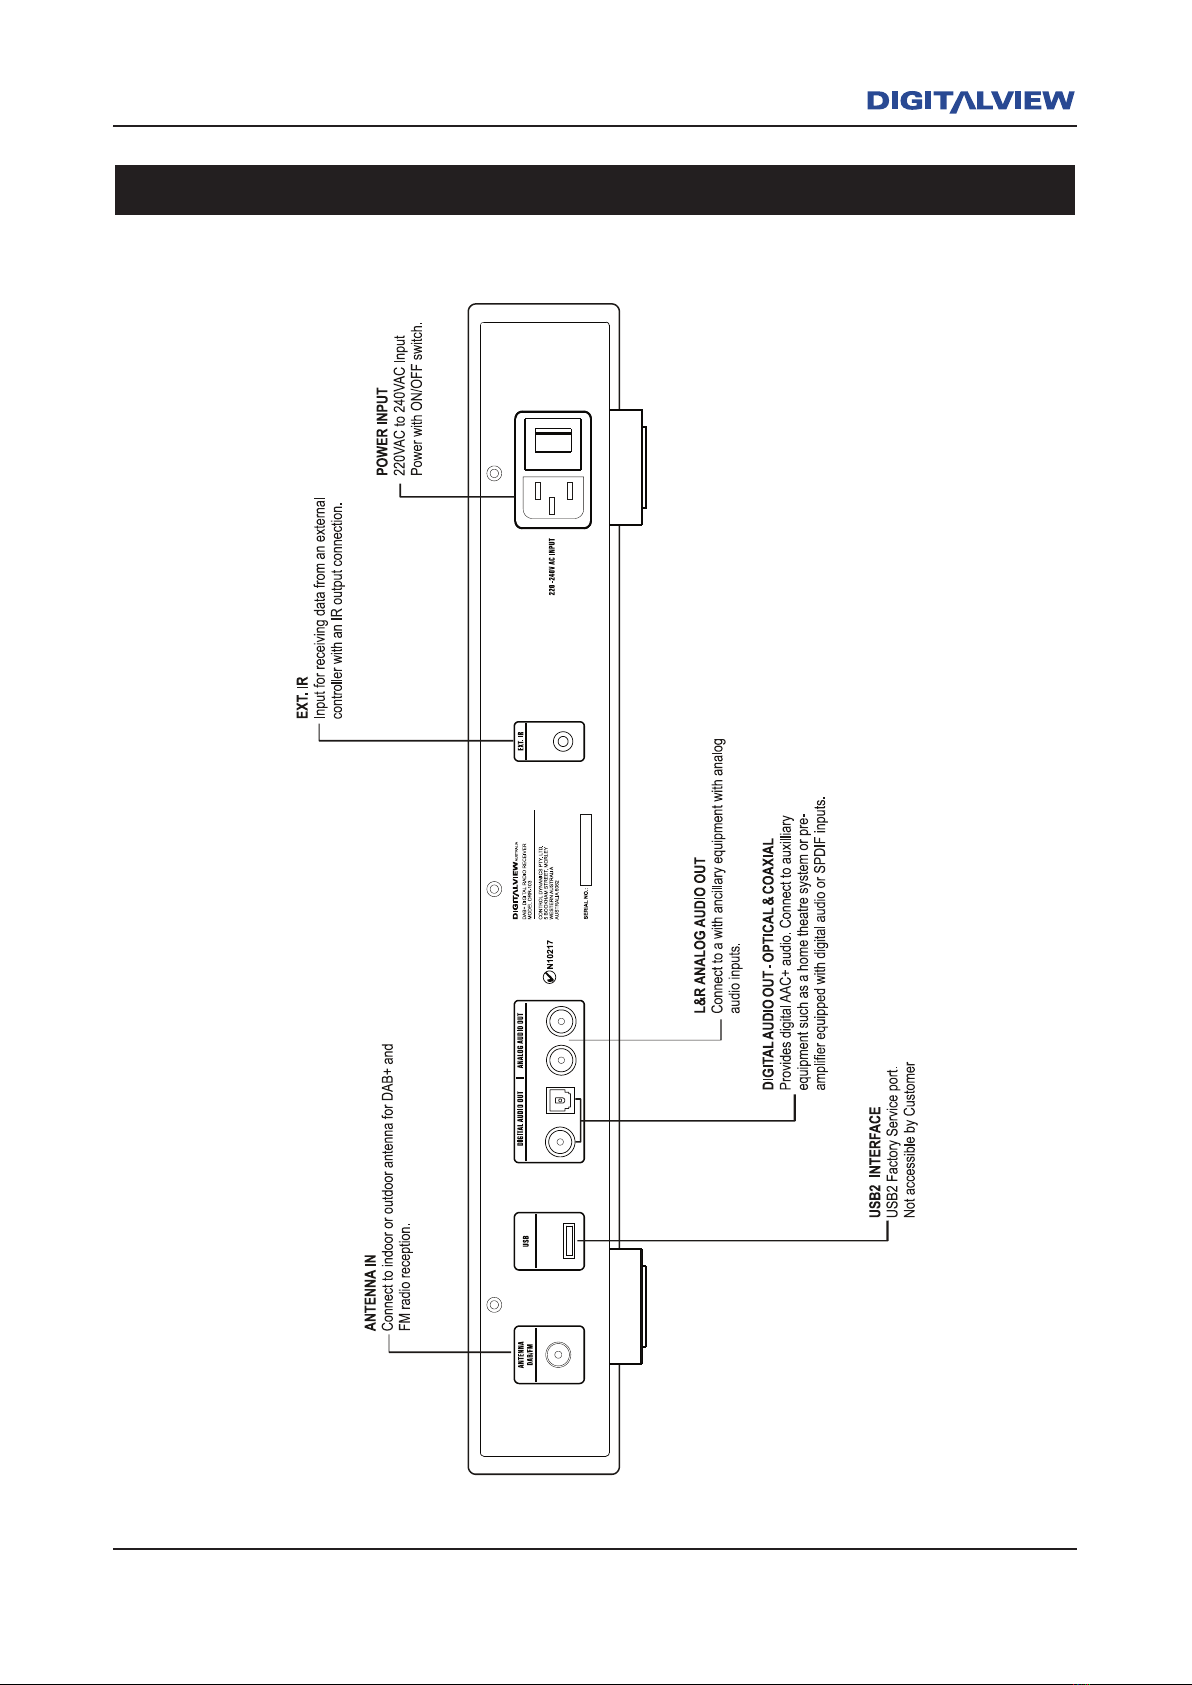
Rear Panel Overview
Indice


