
Disty distyNotruf pro Ascom Manuale utente

distyNotruf pro Ascom
Operating Instructions

Table of contents
Safety instructions.......................................................................................................1
Intended use..........................................................................................................1
Notes on lithium - ion batteries.................................................................................1
Recycling and Disposal...........................................................................................1
General....................................................................................................................2
Application................................................................................................................
ASCOM – Protocol (DECT location service per SMS)......................................................4
Various ways to wear the tag.......................................................................................5
Putting into operation..................................................................................................6
Subscription...............................................................................................................6
ASCOM system/multi - cell system............................................................................7
Configuration............................................................................................................7
Unsubscription...........................................................................................................8
Factory setting...........................................................................................................8
Requesting/Setting parameters & Functions...................................................................9
Performance characteristics (features)..........................................................................12
Emergency call (default: disabled)..........................................................................12
Announcement (Call).............................................................................................12
Volumes..............................................................................................................12
DECT Activity (default: disabled).............................................................................1
Shock sensor/Motion alarm (default: disabled)........................................................1
Announcement tone off (ring tone, default: disabled).................................................14
Performance characteristics “Hospital” (default: disabled)..........................................15
Call setup (with OAPT – interface)..........................................................................16
Setting through DTMF............................................................................................16
Configuration via microphone................................................................................17
Battery warning as SMS (default: disabled).............................................................17
Personal Alarm (default: disabled)..........................................................................17
Special Location Alarm (default: disabled)...............................................................17
SMS - messages (@ OAPT, 2011-12-05).....................................................................18
Charging................................................................................................................21
Operating display....................................................................................................21
Package list.............................................................................................................22
Technical Data.........................................................................................................2
Product approval/ mark............................................................................................2

DistyNotruf pro Ascom, operating instructions
Safety instructions
Intended use
This unit is foreseen for communication in a DECT - provided installation.
The user must be instructed on the use of this device.
Do not use the device under extreme environmental conditions.
Use only accessories and replacement parts supplied by us.
Use the charger only with the supplied power supply (see also section 'Charging').
WARNING!
Keep t is unit away from your ear!
T e sound pressure of t e speaker can affect t e user's earing.
Notes on lithium - ion batteries
The device is powered by a lithium - ion battery. For handling with this type of energy
source note the following:
•Charge the battery on a regular basis and as completely as possible. Do not leave
the battery for a long time in a discharged state.
•Keep the battery away from heat sources such as Heaters and open flames such as
Candles. Danger of explosion!
•Do not use charging devices that are damaged in any way.
•Do not disassemble or deform the battery. Your hands and fingers may be injured, or
battery fluid may get into your eyes or on your skin. If this happens, rinse the area
with a large quantity of water and inform your doctor immediately.
Recycling and Disposal
Your device is delivered in a package. This serves to protect against damage during
transportation/storage. Packaging is made from materials that can be disposed of
environmentally friendly and supplied to a proper recycling.
Take neither the device nor its accessories, at the end of its life cycle in the normal
household waste! Enquire about the options for environmentally- friendly disposal.
Page 1 of 24
DistyNotruf pro Ascom, operating instructions
General
To maintain an overview over the position of a stranger or staff in a difficult or dangerous
environment at all times, the DECT installation is complemented by a localization function.
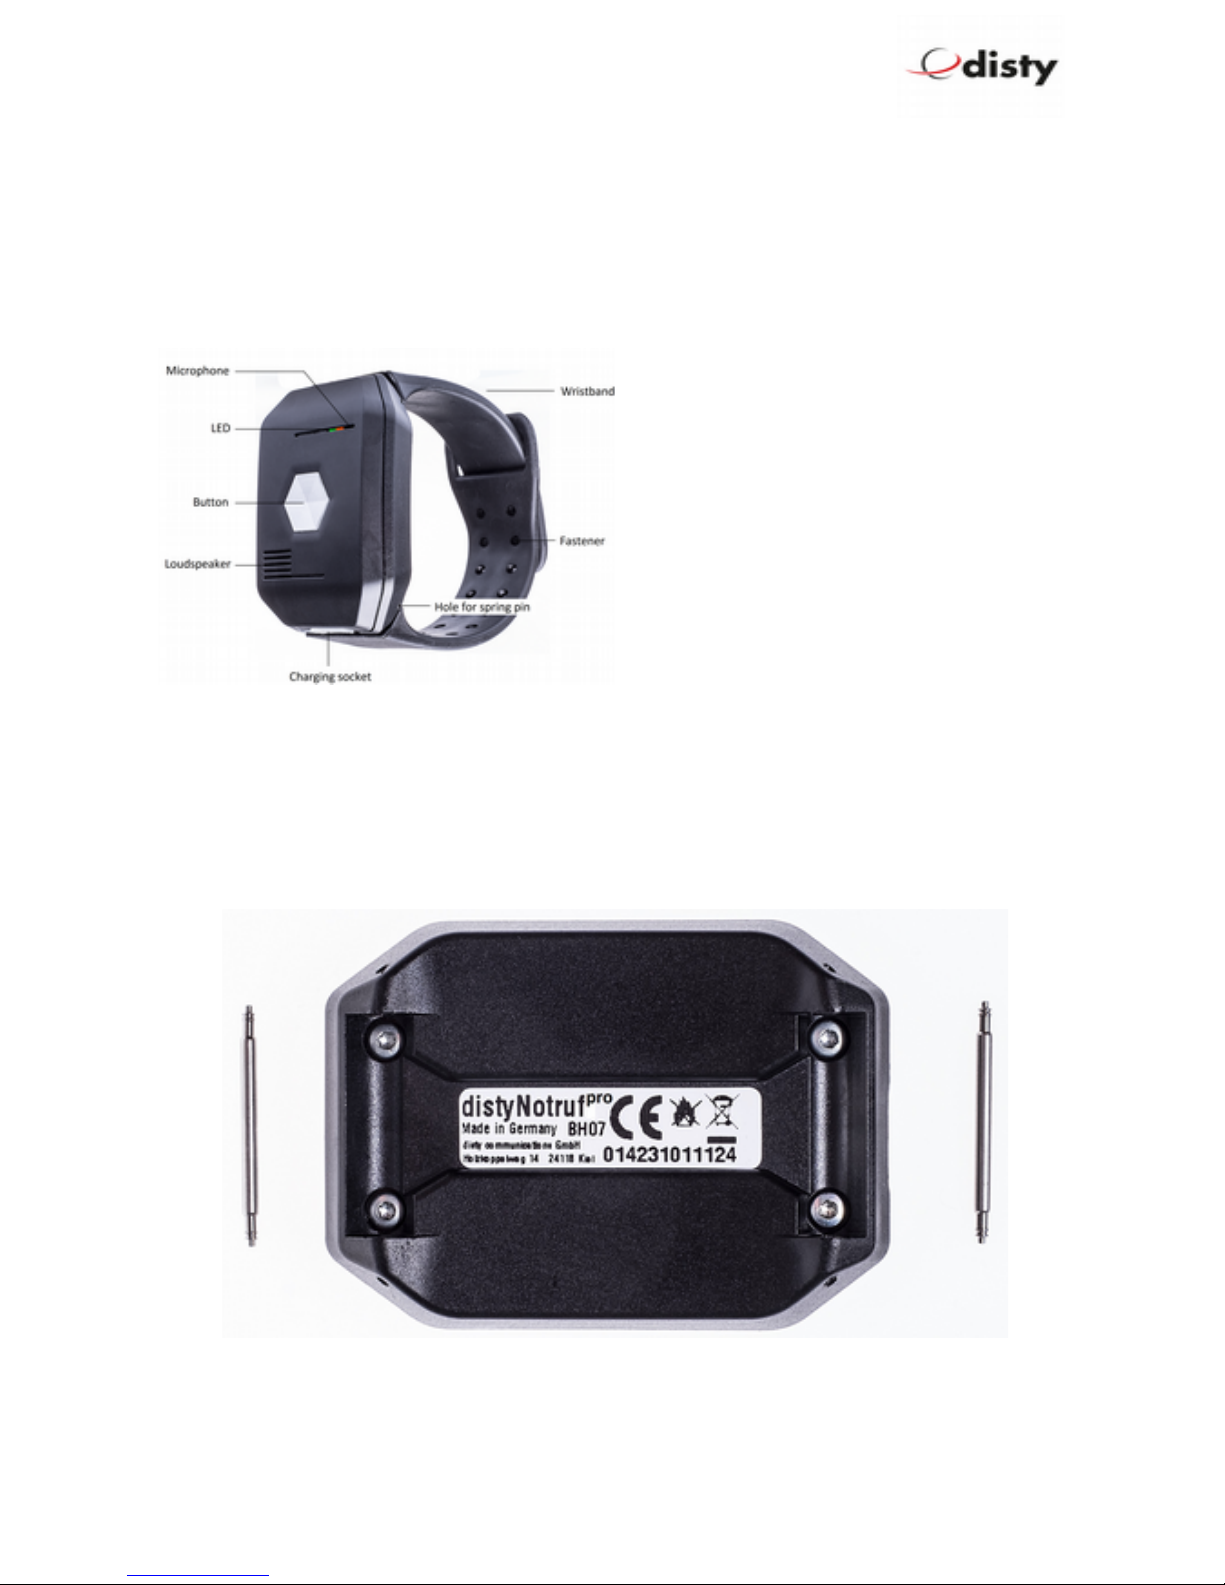
This requires a mobile unit distyNotruf pro that is fastened e.g. to the wrist, belt or the
protective helmet.
The control center can initiate a request
through a central server in respect of any staff
that is equipped with this device. The server
will then establish contact with the
distyNotruf pro; it reports back the current
field strength of the base stations whose
signals are most strongly received and if
necessary, additional information through
Beacon service (ASCOM 9LD Locator). The
server calculates the position using such
transmitted information and shows it in a
layout plan at the control center.
This Operating Manual is meant for the administrator of the facility who is well informed
about the DECT technology and has the duty of setting and managing this special terminal
device.
The device is supplied in a cardboard box along with a User’s Manual.
The IPEI is indicated on the label (= 0142 1011124).
Page 2 of 24

DistyNotruf pro Ascom, operating instructions
Application
Page of 24

DistyNotruf pro Ascom, operating instructions
ASCOM – Protocol (DECT location service per SMS)
Page 4 of 24
ASCOM - Beacon - service
DistyNotruf pro Ascom, operating instructions
Various ways to wear t e tag
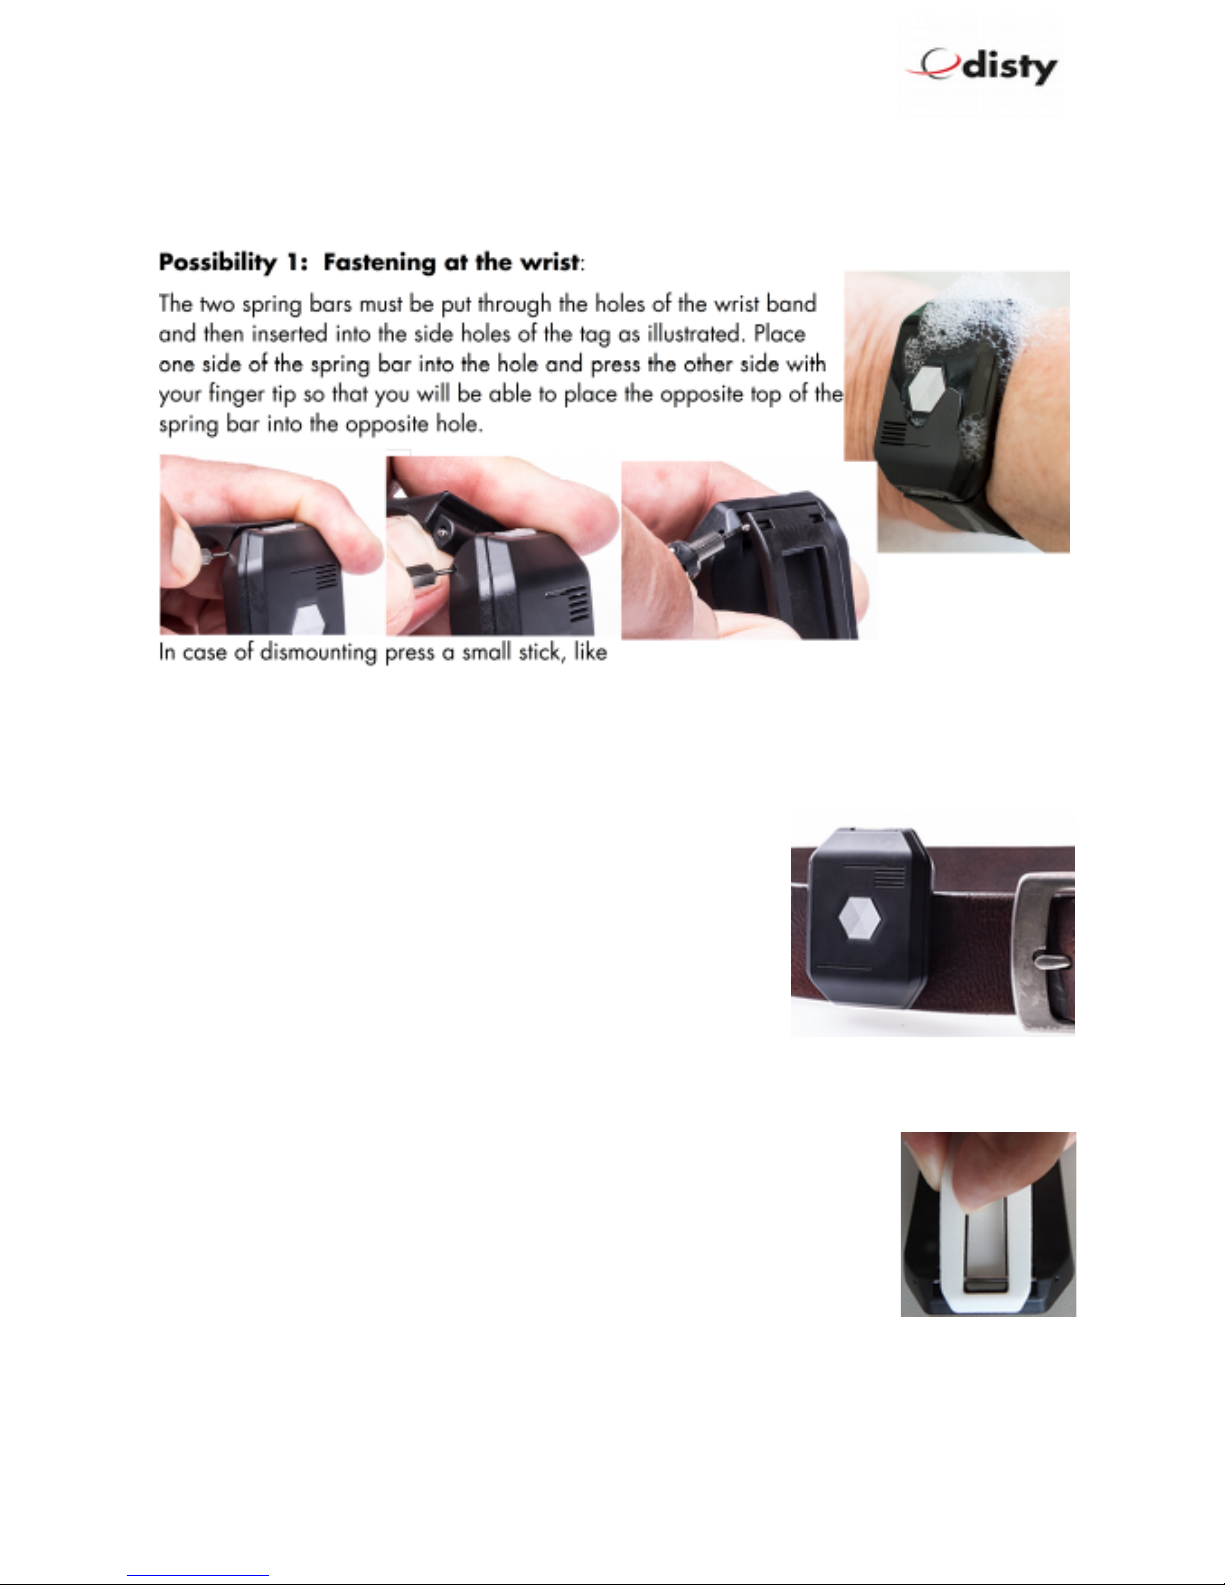
The distyNotruf pro can be worn or fastened to your body in three different ways.
a paper clip, into the outside of the hole from the tag so that the spring bar can be
removed.
Possibility 2: Fastening wit t e belt clip
To mount the belt clip, the bracelet has to be dismounted as
described above. Remove the spring pins from the bracelet and
insert one spring pin on the side of the charging plug. Press the
middle tab of the clip through the clamp and push it under the
mounted spring bar. Insert the second spring pin into the
opposite end of the clip. Move the clip to the approximate end
position, as shown above. Insert the one side of the spring bar into the hole provided for this
purpose. Press the other side of the spring pin towards the clip, locking the clip into the final
position.
The belt clip is designed in such a way that, when the clamp is pulled too
strong, the tab slips out of its mounting.
This prevents breakage or damage to the belt clip! To restore the function,
lift the clamp and insert the tab under the spring pin again.
Page 5 of 24

DistyNotruf pro Ascom, operating instructions
Possibility 3: Fastening wit t e Neckband
Mount the belt clip as described above and connect the
snap hook through the hole of the clip. Close the lock and it
should now look like the picture on right hand side.
The lock will open automatically, if the neckband is pulled
with too much force. This will prevent the user from being
hurt, should the device accidentally stick to an obstacle.
Putting into operation
Charge the distyNotruf pro by using the power supply until the red LED turns off.
Subscription
There is an in-built algorithm to accelerate the login process in such a way that the
distyNotruf pro begins by searching for the strongest base station. It is therefore of
paramount importance to ensure that the terminal device is logged-in in the proximity of a
base station!
The preset authentication code ( AC ) is 0000.
The distyNotruf pro is prepared through the following procedure. The process functions
only if the device is not subscribed. See chapter on “Factory setting”.
The device is plugged into the CS. Press the key within the next 5 seconds and wait 10 sec
for the green LED to light up. Now let go off the key.
The function has now been activated. The green LED begins to flash. This indicates that the
distyNotruf pro is searching for the base station that is ready for subscription.
The DECT base station is activated for the subscription process. Ensure that no other base
station / DECT system has activated subscription readiness.
You will hear a “Beep” after successful subscription and the device will restart to accept the
data. The subscription process is thus completed and the distyNotruf pro can be removed
from the charger station. The device begins to search for the base station and register itself.
It switches to the “Stand-by state” ( = idle locked ) after successful synchronization.
The green LED will now flash up briefly once in every 10 seconds.
Page 6 of 24

DistyNotruf pro Ascom, operating instructions
ASCOM system/multi - cell system
Normally, the distyNotruf pro is subscribed as described in the previous chapter. The
system has already been activated for subscription. The system administrator enters the new
terminal device into the system.
Is the distyNotruf pro required to function in a specific facility? If yes, please follow the
following instructions.
Subscription using PARK
RFPI/ PARI ( = Channel element / Base station ) is the default on which subscription is
performed. This information can be found in ASCOM as System Administrator under DECT/
Radio/ RFPI 9014BC1008 ( <- Example! ).
The process is described as follows. This is performed with the help of the programming
station ( Function ‘set PARK’, manual entry ).
•c_31_9014_bc10_08 Set the RFPI of the channel element that is
to be used for subscription.
( Please observe hexadecimal entry! )
The distyNotruf pro is subscribed as described above.
Subscription using SARI
In case of huge systems (integrated systems), affiliation is regulated through a SARI. This
number will be disclosed to the system administrator and the new terminal device set-up in
the system.
The system is activated for subscription; the administrator has disclosed the SARI used ( e.g.
111111111115 ) and the new terminal device set-up in the system. The SARI is entered in
the device through the programming station ( PS, see chapter on “Requesting / Setting
parameters and functions” ) ( Function 14 ). Subscription is now performed as described
above.
Configuration
Some settings were made in the device during production, which shall be adapted to the
respective purpose of application. For this purpose, see the section on “Requesting / Setting
parameters” as well as “Configuration ata”.
It is necessary to configure the device accordingly depending on application. This is easiest
when done with the aid of the programming adapter and programming software..
It is advisable to restart the distyNotruf pro after changing parameters.
Page 7 of 24

DistyNotruf pro Ascom, operating instructions
Unsubscription
The logical disconnection of the distyNotruf pro and the DECT base station is done by
deleting the DECT subscriber in the base station. This process also includes the removal of
relevant data in the distyNotruf pro through the DECT protocol as long as the function is
supported by the base station.
Process: see “Factory setting”.
This is the last step required by the system administrator to delete the
subscription data of the distyNotruf pro from the system and thus
unsubscribe the device.
Subscription data are deleted also by resetting to the default status ( Factory
setting ).
After a maximum of minutes, the distyNotruf pro switches to the sleeping
mode: no LED lights up, DECT activity is halted.
Factory setting
The following operating procedure is performed to reset to delivery status
factory setting (default), which will work only when the device is subscribed.
•Set distyNotruf pro to CS. Red LED illuminates as confirmation and
acoustic “beep” signal is heard.
•Press the alarm key latest after 5 seconds and hold for 10 seconds
•Green LED illuminates
•Let go of alarm key before LED switches off (2 seconds time)
•A (450 Hz) tone is heard and red LED illuminates
•Remove distyNotruf pro from charging cable
•distyNotruf pro switches to power down (every function switches off)
All values return to basic setting. The device is now ready for subscription again.
C aracteristic Factory setting Personal setting
Emergency call Not active1
Ring tone volume
DECT radio activity Not active
1 Stored number will not be erased during factory reset.
Page 8 of 24
Indice
Altri manuali Disty Telefono IP


