DOUXE DXM2 Manuale utente

English
Instruction Manual
DXM2 - Monitor stand

222
UNPACKING INFORMATION
Carefully open the carton packaging minding the paper cuts the packaging can possibly
cause. Remove the contents and lay them out, so it will be easy to find the parts during
the installation. To be sure every part is delivered, please check the contents of the
package against the supplied parts list on page 3., to ensure that all components are
received and undamaged. Do not use damaged or defective parts. Lastly please
carefully read all instructions before attempting installation.
SAFETY INFORMATION
•Please do not begin installation until you have thoroughly read and understood
these instructions.
•Do not exceed the maximum load capacity for this product.
•Improper installation may cause property damage and/or personal injury
•This product contains small parts that may constitute choking hazards. Please
keep these items as well as the product packaging away from children.
•Please make use of proper safety equipment during installation.
•To enable proper support and handling, it is recommended that two people perform
this installation.
•Please consult a qualified contractor or installation specialist in the case of any
uncertainty or ambiguity.
Do not use this product for any purpose or any configuration not explicitly specified in
this instruction. We hereby disclaim any and all liability for injury or damage arising from
incorrect assembly, incorrect mounting, or incorrect use of this product.
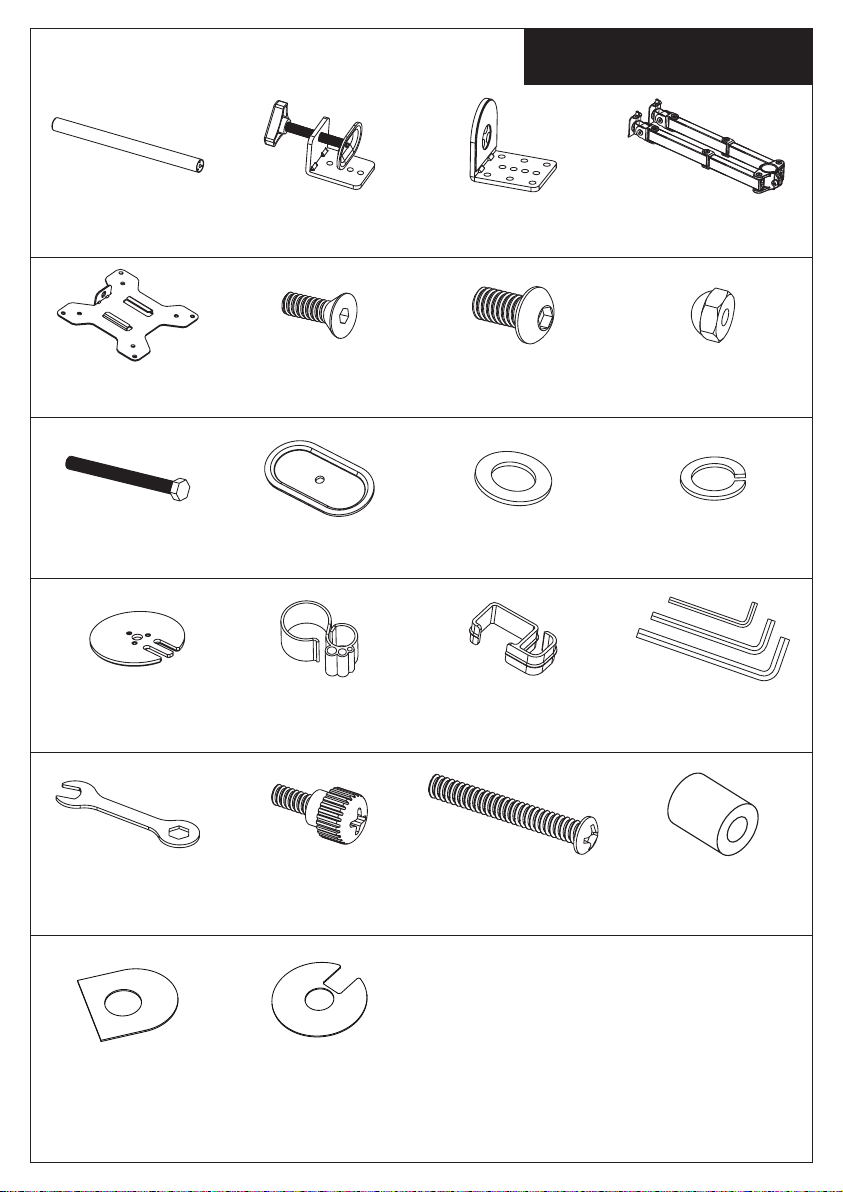
Supplied Parts List
“” “”
3

4
Step 1 Install the Pole to the Desktop
1.Install the “C” Clamp Brace(c) to the
Pole (a) using 3pcs M5x14 Bolts(f), and
tighten using the Allen Key(o),see
Figure 1.
2. Attach Soft Pad(t1) to the “C” Clamp
Brace(c), see Figure 2.
3. Install the “C” Clamp(b) to the pole
assembly according to the thickness of
the desktop. The thickness can be
changed to three positions. Connect it
using 2pcs M8x12 Bolts(g), and tighten
using the Allen Key(o). Tighten the
“C” Clamp to the desktop using the
plastic knob, see Figure 3. g
o
b
Plastic Knob
t1
Figure 2
a
c
f
Figure 1
Figure 3
Option A: Desk Clamp Install
j
i
k
l
a
m
f
Figure 4
Figure 6
Option B: Grommet Base Install
t2 Figure 5
If the existing grommet hole comes with a
plastic protector, remove it to ensure a flat
surface before installing the desk mount.
1.Install the Grommet Base Plate(m) to the
Pole(a) using 3pcs M5x14 Bolts(f), and
tighten using the Allen Key(o), see Figure 4.
2. Attach Soft Pad(t2) to the Grommet Base
Plate(m), see Figure 5.
3. Position the Pole(a) on the mounting
surface and secure using the Support Plate
(j), M10 Washer(k), Spring Washer(l) and
M10 Bolt(i). Fasten the M10 Bolt using
provided Wrench(p), see Figure 6.
Existing Grommet Hole Installation

Install the Pole to the Desktop
Install Arm to the Pole
Install Swivel Arm(d) to the
Pole(a). Fasten the bolt with
supplied Allen Key(o). Attach the
Wire Clip(n1,n2) to the Pole(a)
and Swivel Arm(d).
j
i
k
l
a
m
f
Figure 7
Figure 9
Option C: Grommet Base Install
t2 Figure 8
1.Position the Pole(a) on the mounting
surface and mark the center hole. Drill a 3/8"
(10mm) diameter hole at the marked
position through the mounting surface.
2. Install the Grommet Base Plate(m) to the
Pole(a) using 3pcs M5x14 Bolts(f), and
tighten using the Allen Key(o), see Figure 7.
3. Attach Soft Pad(t2) to the Grommet Base
Plate(m), see Figure 8.
4. Position the Pole(a) on the mounting
surface and secure using the Support Plate
(j), M10 Washer(k), Spring Washer(l) and
M10 Bolt(i). Fasten the M10 Bolt using
provided Wrench(p), see Figure 9.
Self Drilled Grommet Hole Installation
5
Step 1
Step 2
d
o
n1
n2

Attach the VESA Plate to the Monitor
6
s
r
h
q
Step 3
Slide the Monitor onto the Head of Swivel Arm
Step 4
For Monitor with Flat Back For Monitor with Curved or
Recessed Back
Slide the monitor onto the head of
Swivel Arm(d) as shown in the above
diagram.
Install the security Nut(h). Make sure the
security nut is installed before you rotate
the monitor.

Tighten the bolt with the supplied Allen
Key(o) to fix the tilt angle.
Use the supplied Allen Key(o) to make the
necessary adjustments.
Manage the wires and store the Allen
keys(o) in Wire Clip(n1) for future use.
If one monitor is lower, remove the Nut(h)
and turn the bolt counter-clockwise with
supplied Allen key(o) to raise the monitor.
Install the Nut(h) after the adjustment.
7
o
Make the Necessary Adjustments
Step 5
Manage the Wires and Store the Allen Keys on Wire Clip
Step 6
Fix the tilt angle Ignore this step if
monitors are level
o
o
n1

8
SERVICE AND WARANTY
Douxe provides a 2-year warranty on its products. To get service during the warranty
period, the product needs to be returned with a proof of purchase. Product defects must
be reported within 2 years from the date of purchase. This warranty does not
cover: damages caused by misuse or incorrect repair; parts subject to wear; defects
that the customer was aware of at the time of purchase; damages or defects
caused by customer neglect; damages or defects caused by third parties.
DISPOSAL - RECYCLE
Contribute to a cleaner living environment! Do not dispose of the Monitor stand with the
household waste. For proper recycling, please contact your local authority or your
household waste disposal service for further details on your nearest designated
collection point.
DISCLAIMER
Changes reserved; specifications are subject to change without stating grounds
for doing so.
Douxe B.V.
Koperstraat 26
3067GL Rotterdam
The Netherlands
KVK: 77900308
Contact: [email protected]
Website: www.douxe.net

9
INFORMATIE OVER HET UITPAKKEN
Open voorzichtig de kartonnen verpakking en let op de papier sneden die de verpakking
kan veroorzaken. Verwijder de inhoud en leg deze neer, zodat u de onderdelen tijdens
de installatie gemakkelijk kunt terugvinden. Om er zeker van te zijn dat elk onderdeel
geleverd is, controleert u de inhoud van de verpakking aan de hand van de bijgeleverde
onderdelenlijst op pagina 3., om er zeker van te zijn dat alle onderdelen ontvangen en
onbeschadigd zijn. Gebruik geen beschadigde of defecte onderdelen. Lees tot slot alle
instructies zorgvuldig door alvorens met de installatie te beginnen.
VEILIGHEIDSINFORMATIE
•Begin niet met de installatie voordat u deze instructies grondig hebt gelezen en
begrepen.
•Overschrijd het maximale draagvermogen van dit product niet.
•Onjuiste installatie kan materiële schade en/of persoonlijk letsel veroorzaken.
•Dit product bevat kleine onderdelen die verstikkingsgevaar kunnen opleveren.
Houd deze onderdelen en de verpakking van het product uit de buurt van kinderen.
•Maak tijdens de installatie gebruik van de juiste veiligheidsuitrusting.
•Om een goede ondersteuning en hantering mogelijk te maken, is het aanbevolen
dat twee personen deze installatie uitvoeren.
•Raadpleeg een gekwalificeerde aannemer of installatiespecialist in geval van
onduidelijkheden of onduidelijkheden.
Gebruik dit product niet voor enig doel of enige configuratie die niet uitdrukkelijk in deze
instructie is vermeld. Wij wijzen hierbij alle aansprakelijkheid af voor letsel of schade als
gevolg van onjuiste montage, onjuiste installatie of onjuist gebruik van dit product.
Nederlands

Lijst van geleverde onderdelen
10
(1) Zwenkarm-d
(1) ''C'' Klem-b
(1) Paal-A (1) Klembeugel-c
(2) VESA Plaat-e (3) M5x14 Bout-f (2) M8x12 Bout-g (2) Moer-h
(1) M10 Bout-i (1) Steunplaat-j (1) M10 Sluitring-k (1) Veer sluitring-l
(1) Onderplaat-m (1) Kabelklem-n1 (4) Kabelklem-n2 (1) Inbussleutel-o
(1) Moersleutel-p (8) M4x12
Duimbout-q
(8) M4x30 Bout-r
(1) Soft pad-t1 (1) Softpad-t2
Indice
Lingue:
Altri manuali DOUXE Supporto TV


