
DSI LIGHTING HD6153A1 Manuale utente

USE AND CARE GUIDE
Item # 0000 000 000
Model # HD6153A1
Questions, problems, missing parts? Before returning to the store,
call Design Solutions International Customer Service
Mon-Fri 9:30 am to 3:00 pm EST
1-800-388-6141 ext. 216
For customer service support and the fastest response, please email us at
1
LED WALL SCONCE

Table of Contents
Safety Information
Warranty
READ AND SAVE THESE INSTRUCTIONS.
Table of Contents ........................................................... 2
Safety Information ......................................................... 2
Warranty ......................................................................... 2
Three (3) Year Warranty ............................................................. 2
What is Covered ....................................................................... 2
What is Not Covered ................................................................. 2
Pre-Installation .............................................................. 3
Planning Installation ................................................................ 3
Tools Required ......................................................................... 3
Hardware Included .................................................................... 3
Package Contents ..................................................................... 4
Plug in installation.......................................................... 5
Hardwire installation...................................................... 6
Care and Cleaning ......................................................... 7
Troubleshooting ............................................................. 7
FCC Statement ...............................................................8
Service Parts .................................................................. 8
2
□
□
□
□
□
THREE (3) YEAR WARRANTY
WHAT IS COVERED
WHAT IS NOT COVERED
For your protection and safety, carefully read and understand
the information provided in this manual completely before
attempting to assemble, install, or operate this product. Failure
to do so could lead to electrical shock, re, or other injuries
that could be hazardous or even fatal.
The manufacturer warrants this xture to be free from defects in materials and workmanship for a period of three (3) years from the date of
purchase. This warranty applies only to the original consumer purchaser and only to products used in normal use and service. If this product
is found to be defective, the manufacturer’s only obligation and your exclusive remedy, is the repair or replacement of the product at the
manufacturer’s discretion, provided that the product has not been damaged through misuse, abuse, accident, modications, alteration,
neglect, or mishandling. This warranty shall not apply to any product that is found to have been improperly installed, set up, or used in any
way not in accordance with the instructions supplied with the product. This warranty shall not apply to a failure of the product as a result of
an accident, misuse, abuse, negligence, alteration, faulty installation, or any other failure not relating to faulty material or workmanship.
This warranty shall not apply to the nish on any portion of the product, such as surface and/or weathering, as this is considered normal
wear and tear
The manufacturer does not warrant and specically disclaims any warranty, whether expressed or implied, of tness for a particular
purpose, other than the warranty contained herein. The manufacturer specically disclaims any liability and shall not be liable for any
consequential or incidental loss or damage, including but not limited to any labor/expense costs involved in the replacement or repair of said
product
Contact the Customer Service Team at 1-800-388-6141 ext 216 Eastern Time, Mon-Fri 9:30 am to 3:00 pm EST. For customer service
DANGER: Before starting installation of this xture
or removal of a previous xture, disconnect the power
by turning off the circuit breaker, removing the fuse at
the fuse box, or tripping the breaker that controls that
circuit. Tape a sign to the panel warning others to
leave the circuit alone while you work.
CAUTION: CONSULT A QUALIFIED ELECTRICIAN IF YOU
HAVE ANY ELECTRICAL QUESTIONS. If you have any
non-electrical questions about this xture, please
call our Customer Service Team at 1-800-388-6141 ext
216. Please reference item (0000 000 000) or UPC
(802513198126).
Before touching any wire, use a voltage tester to make sure it
is not live.
When replacing fuses, turn off the main power rst. Make sure
your hands and feet are dry, and place one hand behind your
back to prevent electricity from making a complete circuit
through your chest. Touch the plug fuse only by its insulated
rim. Remove the cartridge fuses with a fuse puller.
Use tools with insulated handles and ladders made of wood or
berglass.
To protect children, place a safety cover over any unused
outlets.
Pre-Installation
PLANNING INSTALLATION
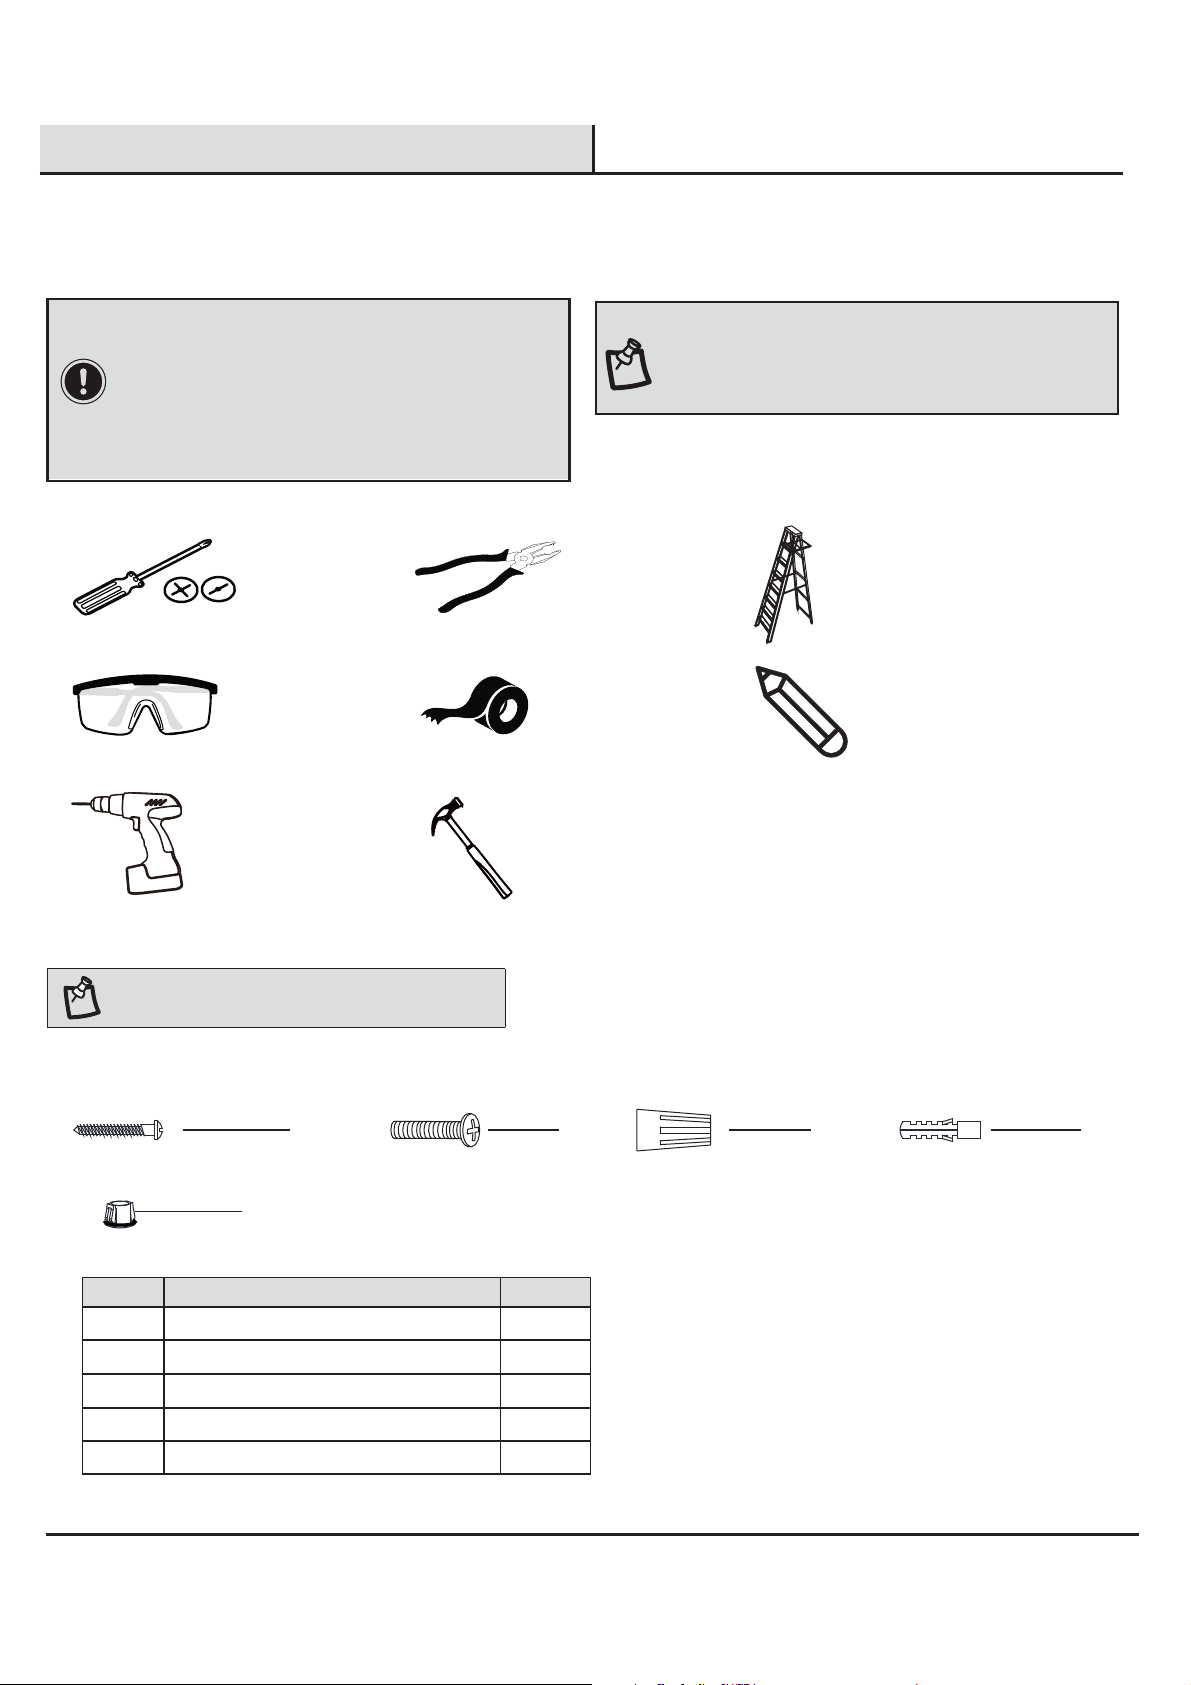
Screwdriver
Safety
Goggles
Electrical
Tape
Pliers
TOOLS RECOMMENDED (NOT INCLUDED)
HARDWARE INCLUDED
3
IMPORTANT: Inspect the wire insulation for any cuts,
abrasions, or exposed copper that may have occurred
during shipping. If there is a defect in the wire, do not
attempt installation. Please call the Customer Service
Team at 1-800-388-6141 ext 216. For customer service
support and the fastest response, please email us at
NOTE: Hardware is not shown to actual size.
AA
2
BB
2
3
CC
DD
2
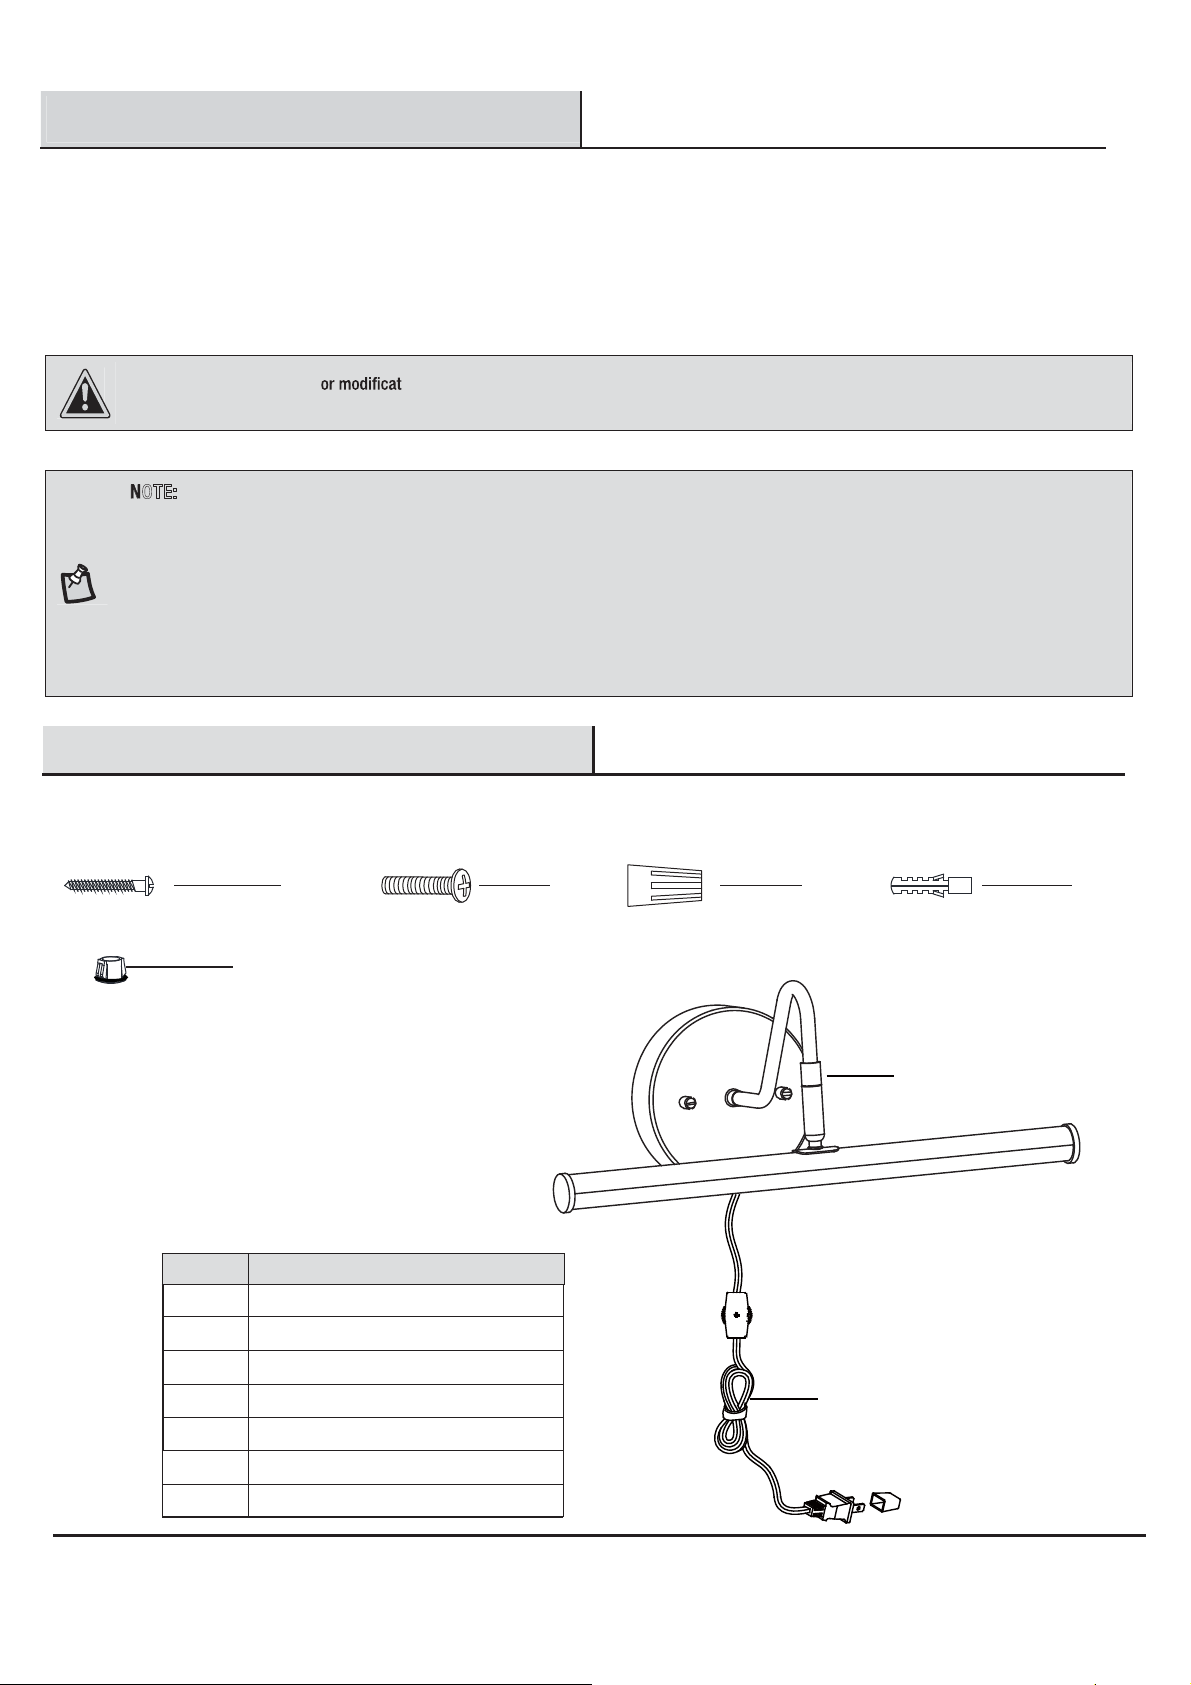
Part Description Quantity
□
□
Read all instructions before installing.
To avoid damaging this product, place it on a soft, non-abrasive surface, such as carpet or cardboard.
Ladder
NOTE: The LED has been permanently installed in this
lamp. The LED does not need to be replaced. Do not
attempt to remove or replace the LED. Do not touch the
LED or electrical connection directly with hands.
AA CC DD
EE
BB
Outlet box screw
Wire connector
Plastic anchor
1
EE Bushing with Rubber Washer
Wood screw
Drill Hammer
Pencil

Pre-Installation (continued)
PACKAGE CONTENTS
A
4
B
Part Description Quantity
A Fixture body 1
B1
Power cord

Plug in installation
5
Installing the xture body
DD AA
AA
DD 1
2
A
□
□
□
□
□
□
□
Measure the distance between the two key holes on the crossbar assembly (1).
Mark the location of the two key holes on the wall with a pencil (not provided), making sure the holes line up horizontally in the
correct position.
Drill a small hole (6 mm) on each mark and nail the plastic anchors (DD) into the wall using a hammer.
Insert the two wood screws (AA) in the plastic anchors (DD) as shown.
Place the two key holes on the xture body's (A) crossbar assembly (1) onto the two wood screws (AA). Make sure the two key
holes are secure on the two wood screws (AA) before letting go of the xture body (A).
Adjust the shade (2) on the xture body (A) to your desired location.
Plug the power cord (B) into the outlet, then turn on the switch and enjoy.
Wall
1
Switch
1
2

□
□
□
□
4Making the electrical connections
Hardwire installation
6
* Use wire connectors (CC) to connect the wires.
Ground Wire:
1. Wrap the supply ground wire around the green ground screw
on the crossbar assembly (1), no less than 2 in. from the end of
the wire. Tighten the ground screw.
2. Connect the xture ground wire to the supply ground wire
with a wire connector (CC).
Supply Wire:
1. Connect the supply white wire to the white xture supply
wire with a wire connector (CC).
2. Connect the supply black (or red) wire to the black xture
supply wire with a wire connector (CC).
3. Wrap each connection with approved electrical tape and
carefully insert all of the connected wires into the outlet box.
1A
3
4
B
A
56
EE
□
Installing the crossbar assembly
1
4BB
2
Remove the power cord
3
Secure the crossbar assembly (1) to the outlet box (not
included) with the outlet box screws (BB) as shown. Tighten
until snug.
NOTE: Use screwdriver (not provided) to remove
the iron sheet (4) from the mounting holes on the
crossbar assembly (1) as shown.
NOTE: Prior to installation, close or cover the sink
drain and/or any vents near the installation site to
prevent loss of mounting hardware if dropped.
Preparing the crossbar assembly
1
□
□
Unscrew the two mounting balls (3) from the xture body (A).
Remove the crossbar assembly (1) from the xture body (A) and
keep the crossbar assembly (1) and two mounting balls (3) for
later use.
Unscrew the two wire connectors (4) and remove the power
cord (B), the bushing (6) and the insulatingbushing (5) from
the xture body (A). (Refer to image 1)
Insert the bushing with rubber washer (EE) in the hole (DD) on
the backplate on the xture body (A). (Refer to image 2)
1
CC
Green ground screw
1
2

Hardwire installation (continued)
Care and Cleaning
Troubleshooting
□
□
Do not use any cleaners with chemicals, solvents, or harsh abrasives. Use only a dry, soft cloth to dust or wipe carefully.
To clean the xture, disconnect power by turning off the circuit breaker or by removing the fuse at the fuse box, and use a dry or
slightly dampened, clean cloth to wipe the exterior surface of the xture.
Discontinue use of the lamp. Check the wire connections.
Contact a qualied electrician or call the Customer Care
Service Team at 1-800-388-6141 ext 216. For customer
service support and the fastest response, please email us
Problem Possible Cause Solution
The power is off. Ensure the power supply is turned on.
There is a faulty switch. Test or replace the switch.
Check the wiring.
There is a faulty wire connection.
The fuse blows, or the circuit breaker
trips, when the light is turned on.
There are crossed wires, or the power
wire is grounding out.
The LED light(s) will not light. The LED is burned out. Discontinue the use of the lamp.
7
3
A
A2
1
□
□
□
5Installing the xture body to the outlet box
Reattach the backplate on the xture body (A) to the crossbar assembly (1).
Secure with the previously removed mounting balls (3).
Adjust the shade (2) on the xture body (A) to your desired location.
1 2
8
Service Parts
MODEL: HD6153A1
A
B
AA CC DD
EE
BB
Part Description
A Fixture body
B
AA
BB
CC
DD
Outlet box screw
Wire connector
Plastic anchor
EE Bushing with Rubber Washer
Wood screw
Power cord
FCC Statement
This device complies with part 15 of the FCC Rules. Operation is subject to the following two conditions:
Design Solutions International Inc.
Model: HD6153A1
Address: 6 Corporate Parkway Goose Creek SC 29445
Telephone: 800-388-6141
(1) This device may not cause harmful interference, and
(2) this device must accept any interference received, including interference that may cause undesired operation.
CAUTION: Any changes ions not expressly approved by the party responsible for compliance could void the user’s authority to
operate the equipment.
NOTE: This equipment has been tested and found to comply with the limits for a Class B digital device, pursuant to part 15 of the FCC Rules.
These limits are designed to provide reasonable protection against harmful interference in a residential installation. This equipment generates,
uses and can radiate radio frequency energy and, if not installed and used in accordance with the instructions, may cause harmful interference
to radio communications. However, there is no guarantee that interference will not occur in a particular installation. If this equipment does cause
harmful interference to radio or television reception, which can be determined by turning the equipment off and on, the user is encouraged to try
to correct the interference by one or more of the following measures:
Reorient or relocate the receiving antenna.
Increase the separation between the equipment and the receiver.
Connect the equipment into an outlet on a circuit different from that to which the receiver is connected.
Consult the dealer or an experienced radio/TV technician for help.
Questions, problems, missing parts? Before returning to the store,
call Design Solutions International Customer Service
Mon-Fri 9:30 am to 3:00 pm EST
1-800-388-6141 ext. 216
For customer service support and the fastest response, please email us at
Retain this manual for future use.
9
GUÍA DE USO Y MANTENIMIENTO
1
Artículo # 0000 000 000
Modelo # HD6153A1
¿Tiene alguna pregunta o algún problema? ¿Le faltan piezas?
Antes de volver a la tienda, llame al Servicio de atención al cliente de
Design Solutions International De lunes a viernes, de 9:30 a 15:00 EST.
1-800-388-6141 ext. 216
Para obtener ayuda de nuestro Servicio de atención al cliente y la respuesta más rápida,
envíenos un correo electrónico a
2 LUCES DE MONTAJE AL RAS
Indice
Lingue:


