
Duux Twist DXFH01 Manuale utente
1
user manual | gebruikershandleiding
manuel d’utilisation | manual de usuario
Twist
ceramic heater

2
Thank you for
choosing Duux!
Thank you for choosing Duux. You should read the manual for your new Duux ceramic heater before using
it. Many users skip the manual and start using the appliance straight away. However, studies have shown
that people who read the manual first can get up and running faster and more efficiently than people who
just go for it.
At Duux, we believe everyone should be able to enjoy a comfortable and healthy living environment.
Improving ones indoor climate with attractive, functional and eective products is what drives us on a daily
basis. With our range of innovative air treatment products, we strive to provide you with the best possible
air quality.
Meet the surprisingly eective ceramic heater, which is very powerful for its compact size due to its double
DC fan. As a result of the increased air ow, the heat produced by the ceramic plate can be distributed
further into the room when compared to heaters of comparable size with only one fan.
Read the manual carefully to get the most out of your Twist ceramic heater.

3
4
6
7
9
10
1. Important safety instructions
2. Product overview
3. Installation
4. Disposal instructions
5. Technical specifications
6. Frequently asked questions 11
Table of contents
EN

4
1. Important safety instructions
When using electronic equipment, the standard
safety warnings must be taken into consideration
at all times, including the following safety
instructions:
1To become familiar with the controls,
safety features and use of the ceramic heater,
we recommend you carefully read all the
instructions before using it.
2 Do not insert any objects into the air inlet or air
outlet.
3Provide careful supervision when this
appliance is used in the presence of children,
incapacitated persons or pets. Do not allow
children to play with the appliance. This
appliance is not suitable for use by children
or persons with physical, sensory or mental
impairments or by persons without knowledge
of, or experience with, this appliance.
4Cleaning and user maintenance must not be
carried out by children without supervision.
5 Switch off the ceramic heater via the control panel,
then wait for the fan heater to cool down;
switch o the appliance using the on/o button
at the back, and then remove the plug from the
wall socket before carrying out the following
operations:
•Clean the ceramic heater.
•Carry out maintenance on the ceramic heater.
•Move the ceramic heater.
6Unwind the power cable completely before
plugging the power cable into the wall socket,
and make sure the cable does not come into
contact with the fan heater or become exposed
to heat. Do not route the cable under carpet,
do not cover it with mats, runners or suchlike,
and lay the cable in such a way that it does
not constitute a trip hazard. Ensure the cable
cannot be stepped on and that no furniture is
put on it. Do not route the cable around sharp
corners, and do not wind it up too tightly after
use.
7To prevent overheating, the heater must never
be covered.
8Do not use the ceramic heater outdoors.

5
9Please do not extend the power cable
yourself. The use of an extension cable is not
recommended; this may cause overheating
and/or re. If the use of an extension cable is
unavoidable, ensure it is an undamaged and
approved extension cable with a minimum
diameter of 3 x 2.5 mm² and an authorised
power rating of at least 2,000 Watt/10 Amp.
Always unwind the cable completely to prevent
overheating.
10 Remove the plug from the wall socket by
pulling it by the plug. Never pull on the cable to
remove the plug from the wall socket.
11 If the power cable gets damaged, it must be
replaced by certified personnel.
12 Do not use the heater in places that are not
used or visited for long periods of time.
13 Do not use accessories on the fan heater that
have not been recommended by DUUX.
14 Loose connections between the heater plug
and the electrical outlet can cause the plug to
overheat.
15 To avoid overload and burnt-out fuses, do not
connect other appliances to the same wall
socket.
16 The ceramic heater is only intended for indoor use.
Only use the appliance for supplementary
heating.
17 The heater should not be placed directly
under, near, or directed towards, a wall socket.
18 This heater is not suitable for use in wet or
damp areas such as bathrooms, washrooms,
etc. Do not place it near a tap, bath, shower,
swimming pool, fountain or suchlike. Make
sure the appliance can never fall into water
and prevent water from entering the heater.
Should the heater come into contact with
water, take the plug out of the wall socket rst.
A heater with wet internal parts can no longer
be used; the appliance must be sent for repair
rst. Never immerse the heater, cable or plug
in water or other liquids, and never touch the
heater with wet hands.
EN
6
2. Product overview
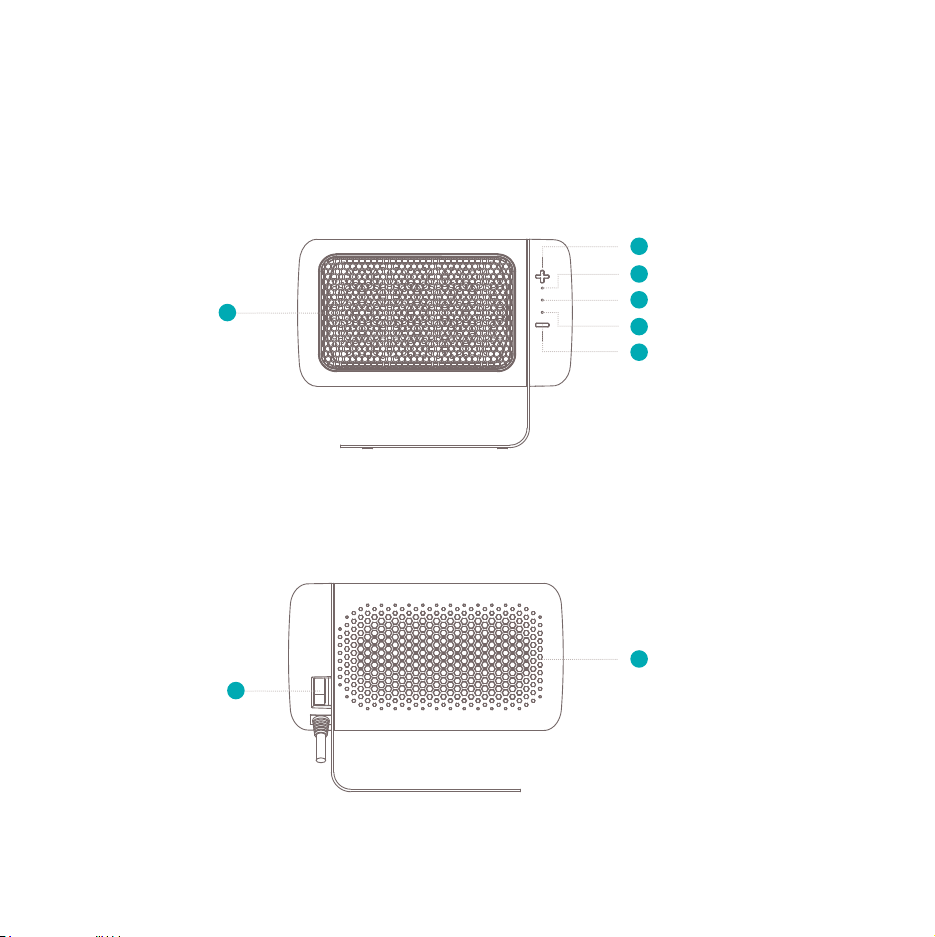
Front
Back
Air outlet
On/o switch
Change heat setting
Air intake
Indicator position II, 1.550W
Indicator position I, 1.000W
Indicator ventilator position -
Change heat setting
1
7
2
3
4
8
5
6
7
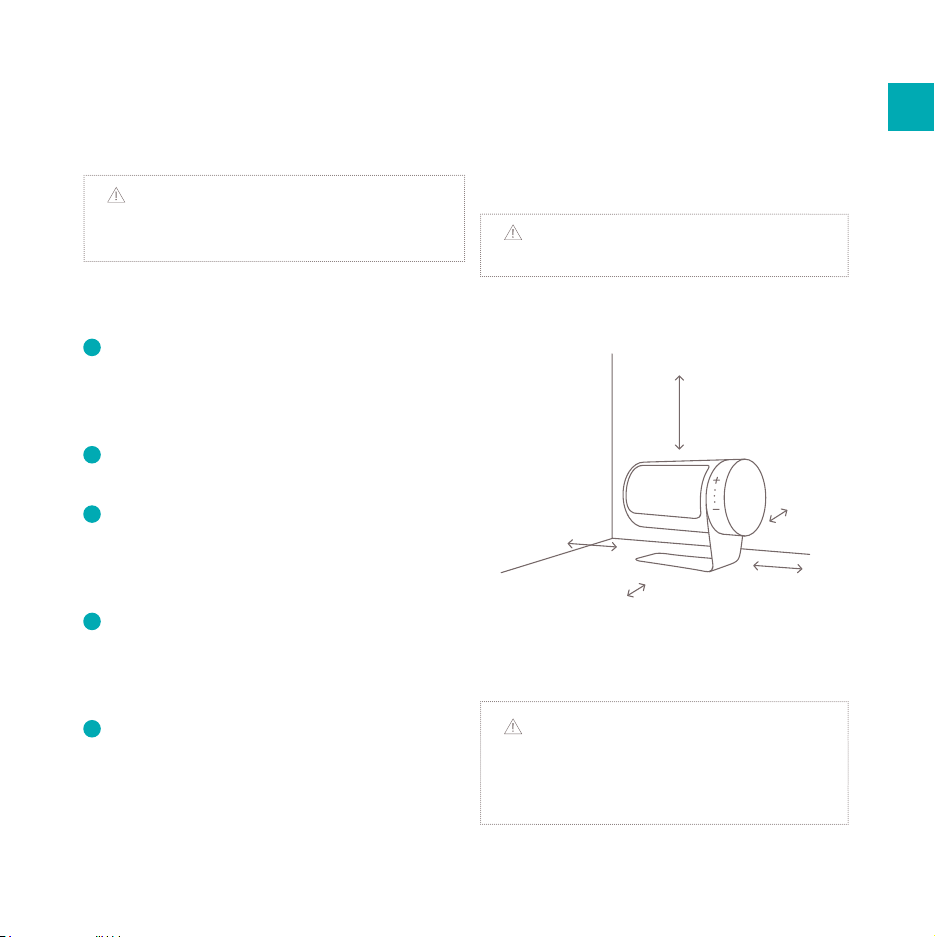
Positioning:
Note: Do not place the appliance
near walls, windows or furniture.
Note: Even if the appliance is placed at an
appropriate distance from walls and furniture,
dust may gather over time. We recommend
regular dusting to maintain the appliance.
Above:
at least 100 cm
Rear:
at least 50 cm
Side:
at least 50 cm
Side:
at least 50 cm
Front:
at least 50 cm
3. Installation
Note: Carefully read the instructions below
and the enclosed warning sheet before using the
product.
Installation
1Do not position the appliance in a place where
the heated air can come into contact with
curtains, furniture, plants or doors. This can
cause stains or damage.
2 Place the product on a stable, horizontal
surface.
3Do not install the appliance within the reach of
children. This can lead to accidents or cause the
appliance to break down if it is knocked over or
climbed on.
4Do not position the appliance in a place where
things may fall on it from above. This can cause
the appliance to break down or experience a
fault.
5Do not place the appliance near other
appliances that are not suitable for exposure
to hot air, such as PCs or smartphones. This
can cause the appliance to break down or
experience a fault.
EN
8
Getting started
Note: See Chapter 2 for the product
overview and references
1Insert the plug into the wall socket.
2 Position the heater on a hard flat surface
at least 50cm away from the wall or any other
objects.
3 Turn the on/o switch on the back of the
appliance to the “on position”, the fan heater is
now in stand-by mode
4Press the “+ button” to turn on the appliance.
The fan will turn on and the position I
indicator will illuminate. The product does
not produce heat in this position.
5Pressing the “+ button” again will set the fan
heater to the lowest setting. The
position II indicator will illuminate.
6Pressing the “+ button” again activates the
highest heat setting, and the position III
indicator will illuminate.
7Pressing the “- button” will reset the heat
setting.
8 To switch o the appliance, the “- button” must
be pressed up to 3 times (depending on the
starting position) until no indicators are
illuminated.
9 After switching o the heating setting, the fan
will remain on for ± 10 seconds to cool down
the heating element. After this, the appliance
automatically returns to the stand-by mode.
10 The air ow can be manually adjusted to the
desired angle. The appliance is tiltable by up
to 50 degrees. Turn the appliance by grasping
both sides and turning the appliance through
the left side. Do not touch the safety grid,
otherwise you may get burned.
11 If the appliance is not to be used for a long
period of time, we advise to switch the on/off
switch to position 0 and remove the plug
from the wall socket.

9
The European Directive 2012/19/EC on Waste
Electrical and Electronic Equipment (WEEE), states
that old electrical household appliances must not
be disposed of in the normal municipal, unsorted
waste stream. Old appliances must be collected
separately in order to optimise recycling and reuse
of the materials they contain and to mitigate any
consequences to the environment and public
health. The symbol with the crossed-out wheelie
bin on the product reminds you of your obligation
to ensure the appliance is collected separately
for disposal. Consumers must contact their local
authority or vendor for information regarding
proper disposal of their old appliance.
4. Disposal instructions
EN
10
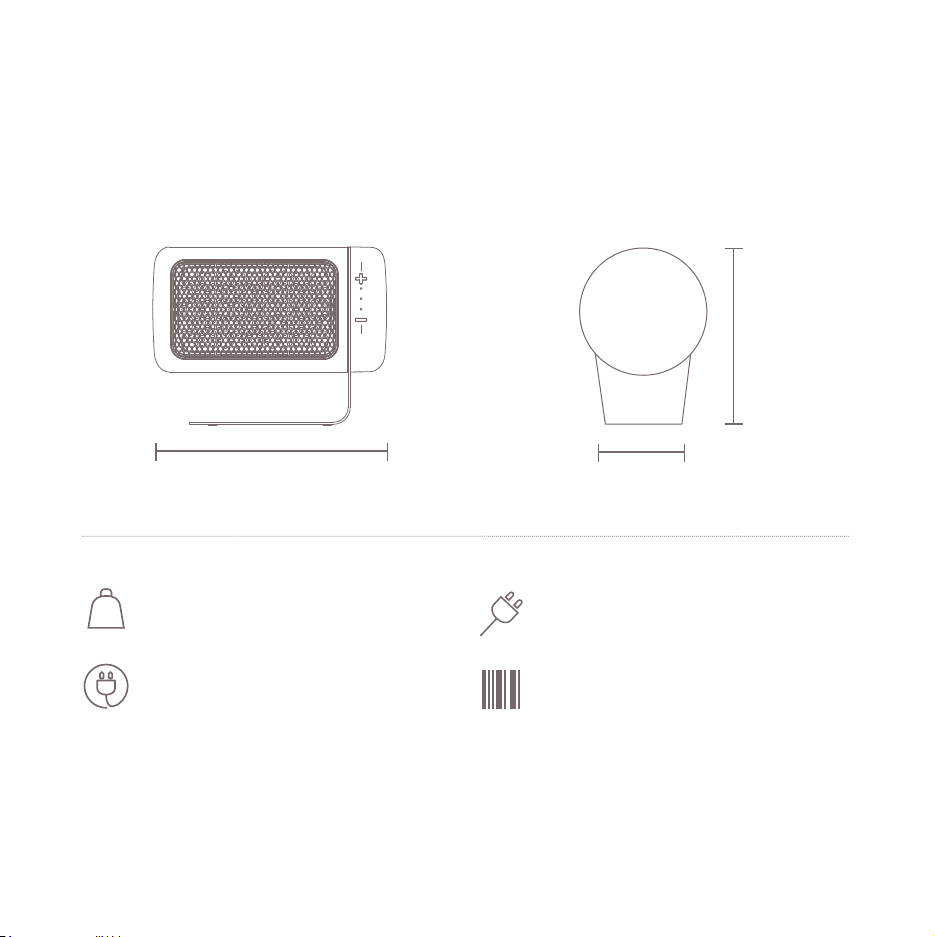
5. Technical specications
Supply voltage::
220 – 240 Volt / 50Hz
Weight:
1.380 g
Max. power:
1.550 Watt
Model nr.:
DXFH01/DXFH02
225 mm 125 mm
170 mm
Questo manuale è adatto per i seguenti modelli
1
Indice
Lingue:
Altri manuali Duux Stufa


Manuali Stufa popolari di altre marche


Empire Heating Systems
Empire Heating Systems WCC65 Manuale utente

Wetekom
Wetekom 92 86 43 Manuale utente

Desa
Desa SPC170-F Manuale utente

Watlow
Watlow Watrod Electric Tubular Heaters Manuale utente

Haverland
Haverland ECO-DRY GPS Series Manuale elenco delle parti

Stelpro
Stelpro ASILVC2060 Series Manuale utente