e-ImageData Microfilm ScanPro 1000 Manuale
1
Desktop Compact
Film Scanner
Operator’s Guide
Microfi lm ScanProTM 1000
2/2007
ScanPro 1000 shown with optional combination fi che,
aperture card, motorized 16/35mm roll fi lm carrier

2
Contents
3 LIMITED WARRANTY
4 UNBOXING INSTRUCTIONS
5 PRECAUTIONS AND SUGGESTIONS
5 Keep the MICROFILM SCANNER well ventilated.
5 COMPUTER FIREWIRE PORT
5 COMPUTER TO ScanPro1000 CABLE
5 CONNECTING TO A LAPTOP
6 EQUIPMENT OVERVIEW
7 PC SYSTEM REQUIREMENTS
8 CONNECTING THE SCANNER TO THE COMPUTER
8 INSTALLING THE PowerScan SOFTWARE and DRIVER
9 PowerScan SETUP MENU
9 SETUP Window PASSWORD is 1234
9 Toolbar:
10 SCAN to Drive #1 or Drive #2:
10 Prefix:
10 Format:
10 Options:
10 ROLL FILM CONTROL
10 SAVE AS
10 INCHES or MILLIMETERS
10 Fit to page size:
11 Print Offset:
12 GRAPHIC BUTTON CONTROLS
12 FILM TYPE
12 FILM TYPE-micro opaque option
12 FILM IMAGE ORIENTATION
12 ROTATE OPTICAL
12 ROTATE DIGITAL
12 ZOOM
12 MIRROR
13 BRIGHTNESS
13 FOCUS
13 MAGNIFIER
14 RESOLUTION
14 SCAN TYPE
15 LIVE
15 SCAN SIZE
15 SCAN to Drive #1
15 SCAN to Drive #2
16 PRINT
16 MOTORIZED ROLL FILM CONTROL
17 SAVE SETTINGS
18 RESTORE SETTINGS
18 PROCEDURE to remove the Save Settings button from the toolbar.
19 SPECIFICATIONS

3
LIMITED WARRANTY
LIMITED WARRANTY. The manufacturer warrants to the original purchaser that this product is
free from defects in material and workmanship, under normal use, providing that service and
maintenance is in accordance with the manufacturer’s instructions. The period of warranty time
shall be as follows:
- Microfilm ScanPro 1000: One year from the date of shipment from the manufacturer’s factory or
warehouse.
- Roll film attachments, and other accessories: Ninety (90) days from the date of shipment from
the manufacturer’s factory or warehouse.
- Products and items resold by the manufacturer are warranted by the original supplier. The war-
ranty terms and warranty registration materials are included with each item. It is the respon-
sibility of the end user to complete the documentation and to contact the supplier for follow-up
service and support. Products included in this warranty category include but are not limited to
computers, computer accessories, laser printers, and monitors.
The manufacturer’s sole obligation shall be, at the discretion of the manufacturer, limited to the
repair or replacement of parts or products manufactured by manufacturer, and which are deter-
mined by the manufacturer to be defective within the applicable warranty period. Such defective
items must be returned to the manufacturer, after return authorization is obtained from the manu-
facturer, with shipping and handling charges prepaid.
All items and products returned to the manufacturer for warranty claims require a RETURN AU-
THORIZATION NUMBER (RA number) to be issued by the manufacturer’s customer service. The
RA number must appear legibly on all return cartons. Failure to obtain an RA number or to pack-
age the item properly may result in a loss or reduction of credit.
THE LIMITED WARRANTIES CONTAINED IN THIS AGREEMENT ARE IN LIEU OF ALL OTHER
WARRANTIES, EXPRESSED OR IMPLIED, INCLUDING ANY REGARDING MERCHANTABIL-
ITY OR FITNESS FOR A PARTICULAR PURPOSE, RELATING TO THE USE OR PERFOR-
MANCE OF THE PRODUCTS. THE MANUFACTURER WILL NOT BE LIABLE FOR PERSONAL
INJURY OR PROPERTY DAMAGE (UNLESS CAUSED SOLELY BY THE MANUFACTURER’S
NEGLIGENCE) LOSS OF PROFIT OR OTHER INCIDENTAL OR CONSEQUENTIAL DAMAGES
ARISING OUT OF THE USE OR INABILITY TO USE THE PRODUCTS.
This limited warranty does not extend to any product which has been subject to misuse, neglect
or accident, damage caused by the use of supplies or parts not technically satisfactory, repairs
or modifications not approved by the manufacturer. This Limited Warranty does not apply to the
following: damage caused in shipping, glass breakage, lamps or supplies which requires periodic
replacement due to normal use or wear. The manufacturer does not assume responsibility for
consequential damages of any nature and shall not be liable for damages resulting from malfunc-
tions or interruptions in the operation or function of the manufacturer’s products.
FOR ALL WARRANTY CLAIMS, THE USER/CUSTOMER SHOULD CONTACT THE SELLING
DEALER/DISTRIBUTOR SALES OFFICE. THE DEALER/DISTRIBUTOR SHOULD CONTACT
MANUFACTURER’S TECHNICAL SERVICE DEPARTMENT.
7/2006
4
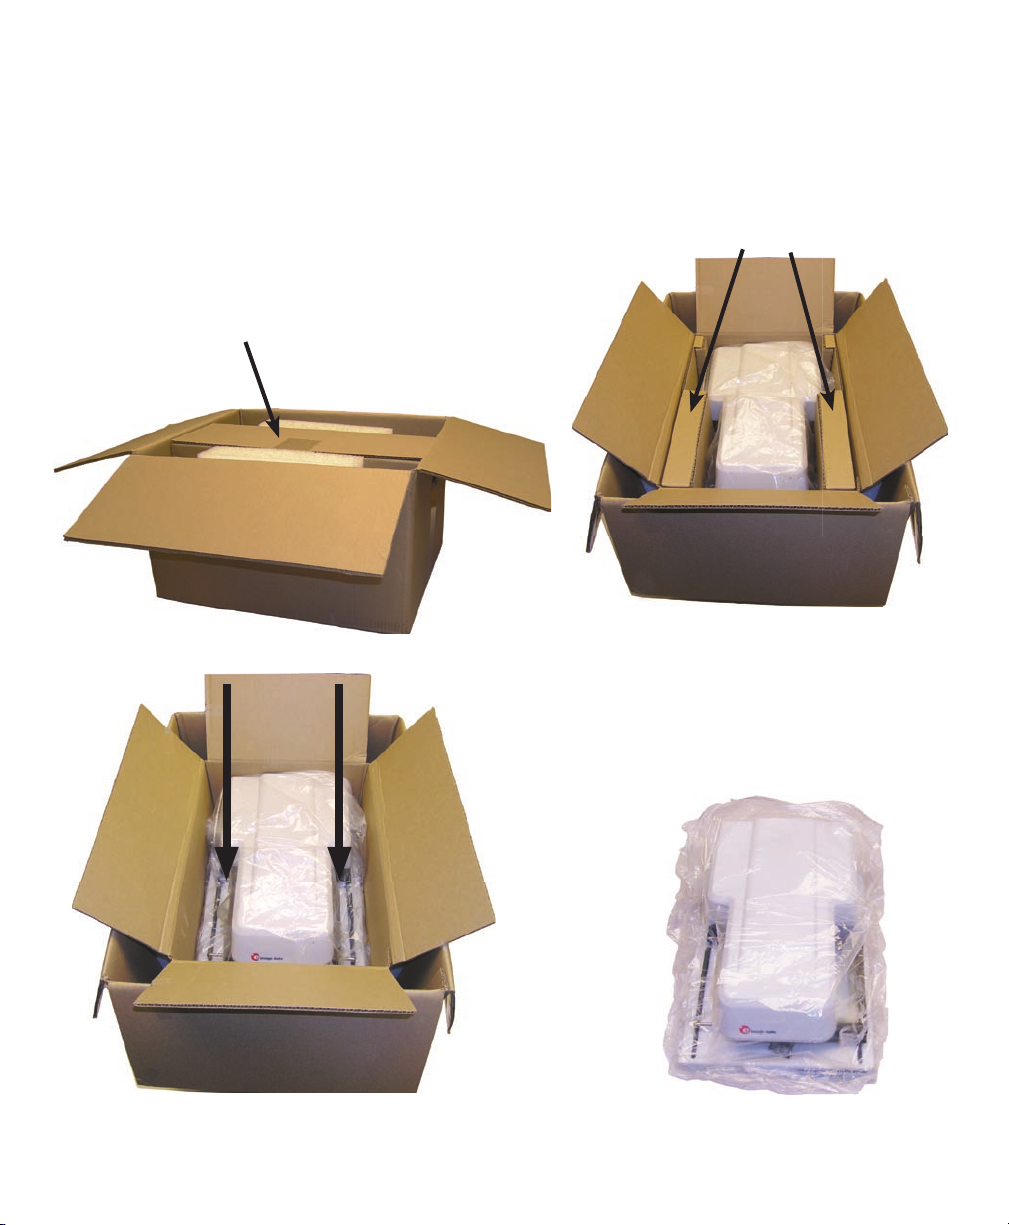
UNBOXING INSTRUCTIONS
UNBOXING THE SCANPRO 1000 FROM THE SHIPPING CARTON.
A. Slit tape and open outer box fl aps, Fig 1.
B. Remove ACCESSORIES BOX and REMOVE ALL ITEMS that are inside, Fig1.
C. Slit tape and open inner box fl aps, Fig 2
D. Remove LEFT and RIGHT INSERTS, Fig 2
ACCESSORIES BOX
remove before removing ScanPro
Save all packing materials in case you need to move or ship your SCANNER
INSERTS
Fig 1
Fig 2
Fig 3 Fig 4
GRASP HERE FIRMLY
E. GRASP Scanner as shown in Fig 3 with fi n-
gers extending under top cover and LIFT out
of inner shipping box.
F. PLACE the Scanner on a sturdy level surface,
Fig 4, and remove the protective plastic bag,
the retaining tape on the FICHE CARRIER,
and foam pad between glass.

5
PRECAUTIONS AND SUGGESTIONS
Keep the MICROFILM SCANNER well ventilated.
Do not block fan ventilation holes at the bottom of the unit. Avoid installation in dusty places.
NOTE: PLACE ON FLAT, EVEN, HARD STURDY SURFACE (NOT CARPETED).
COMPUTER FIREWIRE PORT
We have included a FireWire card with your purchase, we highly recommend that you use this
card. The Microfilm Scanner connects to your computer FireWire port using the cable included
with your Microfilm Scanner.
COMPUTER TO ScanPro1000 CABLE
A FireWire (IEEE 1394) cable is included with your scanner purchase. This cable meets all of
the specifications for connecting your microfilm scanner to a computer. Use this cable to connect
your microfilm scanner to your computer.
CONNECTING TO A LAPTOP
If you are connecting the ScanPro1000 to a laptop computer, you will need a power adaptor that
can supply 12VDC 1.0A to the firewire cable (this is needed because a laptop firewire connection
does not supply power to devices). A laptop power adaptor is available from e-Image Data, part
number 9852500.
6
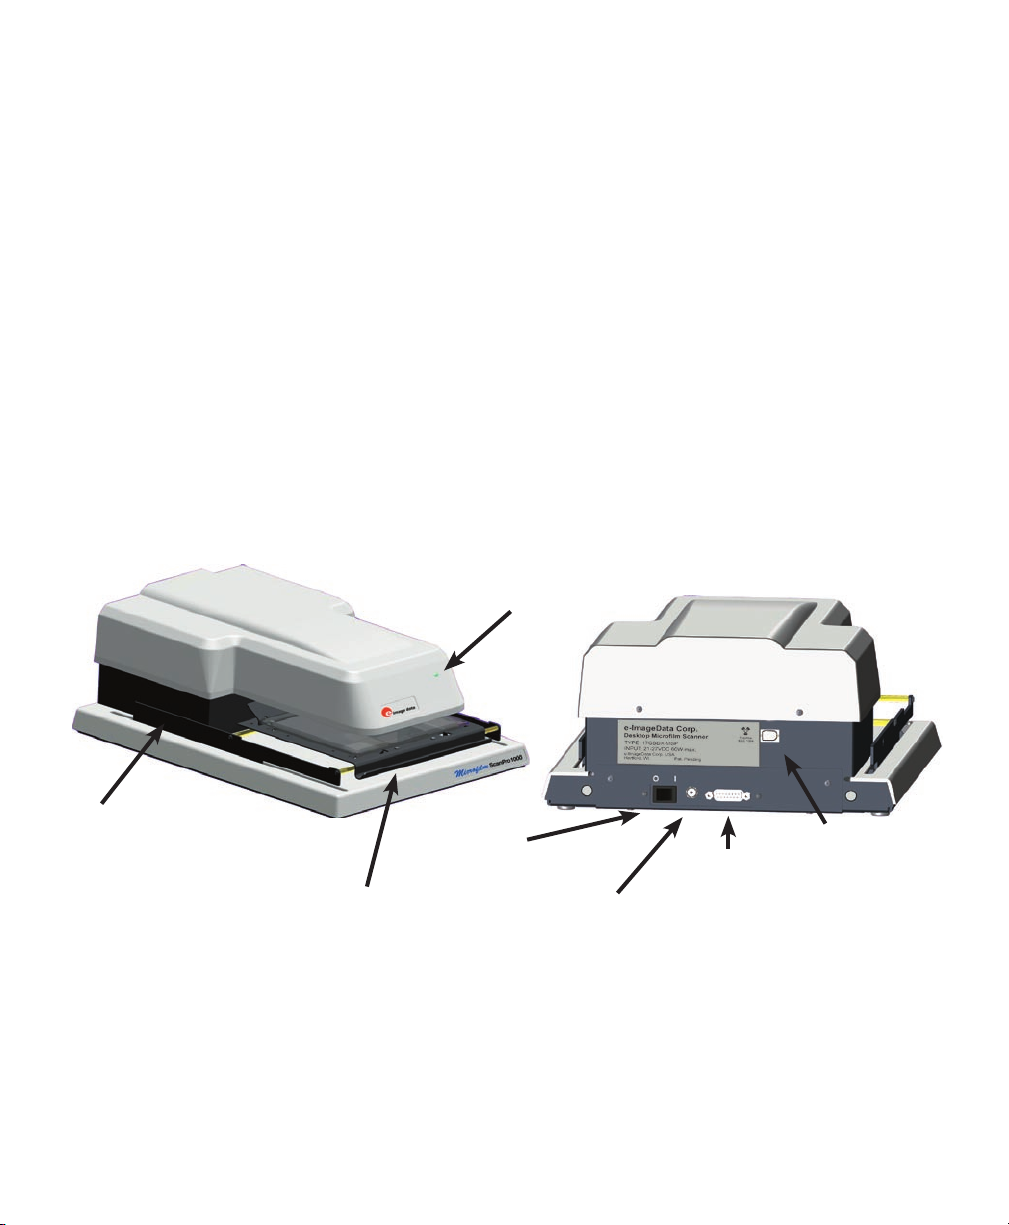
EQUIPMENT OVERVIEW
COMPACT DESKTOP, MICROFILM SCANNER
The ScanPro 1000 microfi lm scanner (optional micro opaque capability) uses the latest digital
technologies to bring you an exceptional compact viewer/scanner/printer that is sturdy and built
for public use applications. This scanner provides many unique options and features that make it
easy and effi cient to work with all types of microfi lm
OPTICAL ZOOM LENS
Your ScanPro 1000 is equipped with a 7X to 54X ZOOM LENS system. This lens is factory in-
stalled
OPTIONAL ROLL FILM CARRIER
If you have ordered a roll fi lm carrier with your purchase, it is shipped in its own carton. Follow
the instructions sent with the roll fi lm carrier to install it onto your scanner.
Power Switch ON/OFF
Input Power Jack
+24V DC
FireWire Connector
Roll Film Carrier Connector
Fiche Carrier Handle
Power Indicator Light
Roll Film Carrier (optional
equipment) Locking Pin At-
taches into Guide

7
PC SYSTEM REQUIREMENTS
Scanners are capable of inputting large amounts of data in relatively short periods of time. This
can push your computer system to the limits of its capabilities. This means that you will need to
evaluate the systems capabilities based on your intended scanning requirements. Your evaluation
of system capability will need to consider processing speed, computer memory (RAM), and hard
disk storage. Major factors to consider are scan type and resolution. High resolution gray scale
scans are much more demanding than Half-Tone scans for both processing speed and memory.
Minimum System Requirements when used with Windows 2000 and XP:
Microfilm ScanPro 1000 Recommended
2GHZ Pentium, or AMD Higher
Windows 2000, XP same
1GB Memory Higher
100 GB available hard disk space Higher
SVGA/XSVGA monitor (Minimum Screen Resolution Setting 1028 x 600 dpi) same
CD ROM reader same
We have included a FireWire card with your purchase, we highly recommend that you use this
card. The Microfilm Scanner connects to your computer FireWire port using the cable included
with your Microfilm Scanner.
8
It has been our experience that NOT all computer FireWire ports and NOT all fi rewire cards oper-
ate the same way. It is strongly recommended that you use the FireWire card supplied with your
purchase.
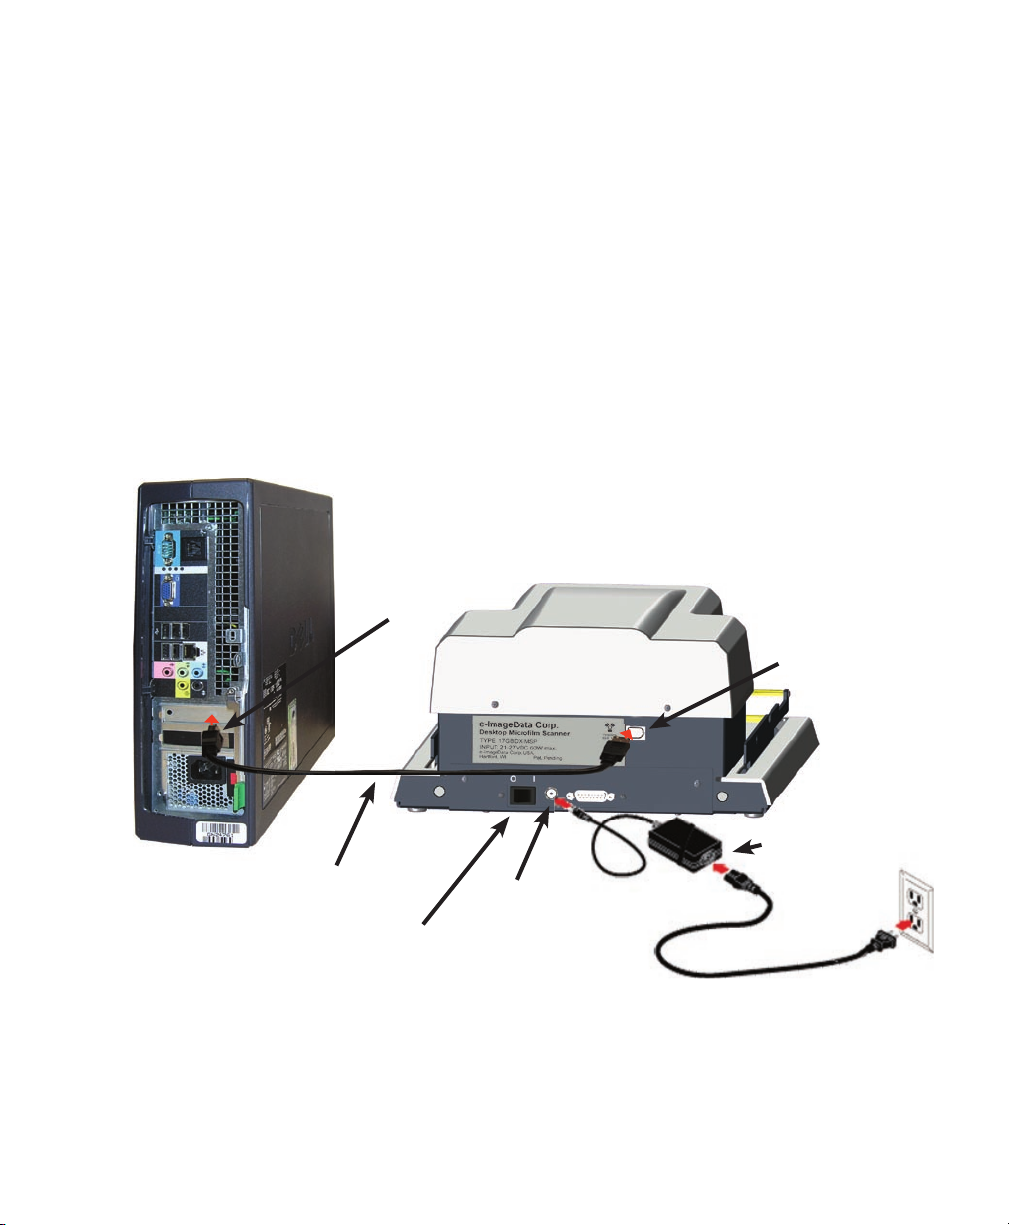
Connect your MICROFILM SCANNER to the COMPUTER using the FireWire CABLE shipped
with your fi lm scanner Fig1. This cable meets all of the specifi cations for this type of connection
and it is strongly recommended that you use only this cable.
Connect the AC/DC Power Inverter to the Scanner and to your local AC power source shown
below, Fig 1.
CONNECTING THE SCANNER TO THE COMPUTER
Power Switch ON/OFF
FireWire Cable Connection
Scanner to Computer Power Jack
FireWire Connector
Local AC
AC/DC Power Inverter
FireWire Connector
ScanPro 1000
Computer
Fig 1
INSTALLING THE PowerScan SOFTWARE and DRIVER
You can download the latest PowerScan software and the ScanPro1000 SOFTWARE and DRIV-
ER installation instruction sheet from this web page: http://e-imagedata.com/DRIVERS
9
SETUP Window PASSWORD is 1234
The password protected SETUP Window provides control over the following features:
1. Specify which control BUTTONS are available on the PowerScan TOOLBAR.
2. Specify the ORDER of the BUTTONS on the PowerScan TOOLBAR.
3. Specify the save-to location of SCANS (DRIVE #1 and DRIVE #2).
4. Specify the fi le name PREFIX.
5. Specify the fi le FORMAT that is used when a scan is made.
6. SHOW or HIDE the ROLL FILM CONTROL for motorized fi lm carrier.
7. SHOW or HIDE the SAVE AS Window when scanning.
8. Specifi es INCHES or MILLIMETERS.
9. Specify FIT TO PAGE size.
10. ENABLE or DISABLE Print Offset.
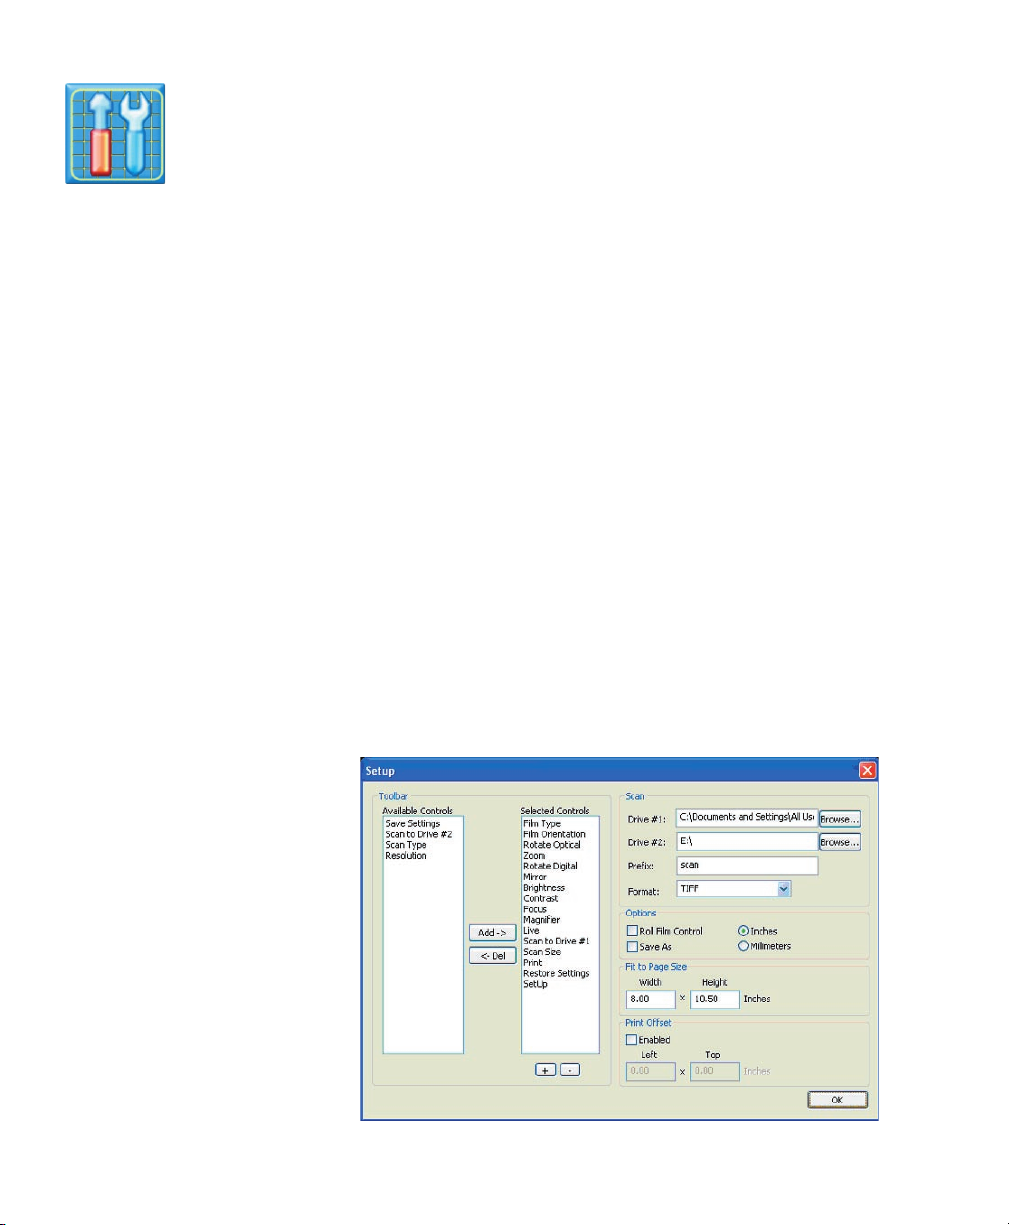
Toolbar:
Specifying which control BUTTONS appear on the PowerScan Toolbar.
The control button names are listed in two columns titled AVAILABLE CONTROLS and SELECT-
ED CONTROLS as shown on the SETUP Window, Fig 2. The SELECTED CONTROLS list speci-
fi es which controls are shown on the PowerScan TOOLBAR. The AVAILABLE CONTROLS list
specifi es which control buttons are NOT shown on the PowerScan TOOLBAR
A. To add a control button to the PowerScan Toolbar, highlight the control button name on the
AVAILABLE CONTROLS list by clicking on it and then CLICK the ADD button located between
the AVAILABLE CONTROLS list and SELECTED CONTROLS list.
B. To delete a control button from the PowerScan Toolbar, highlight the control button name on
the SELECTED CONTROLS list by clicking on it and then CLICK the DELETE button located
between the AVAILABLE CONTROLS list and SELECTED CONTROLS list.
The order of the control buttons on the PowerScan toolbar is determined by the order
of the control button names
shown on the SELECTED
CONTROLS list. To change
this order, highlight a control
button name and CLICK the
“+” or “-” below the SELECTED
CONTROLS list.
PowerScan SETUP MENU
Fig 2
10
SCAN to Drive #1 or Drive #2:
When a scan is made it will be saved to the specified location.
The path in the window next to Drive #1 and Drive #2 specifies the “save to” location for scans.
When you install the PowerScan software, a default folder is placed on your DESKTOP and is
labeled My Scans. Scan to Drive #1 will save scans to that folder. The Scan to Drive #2 will save
scans to drive E. You can change the destination at any time by using the BROWSE button to
specify a new path.
Prefix:
Specifying the FILENAME PREFIX for scans
Scans will be given a default filename if the SAVE AS box is unchecked. The default filename
consists of a PREFIX name and a sequential number that is added to the PREFIX. The PREFIX
name can be set in the SETUP Window by typing a name in the field titled “Prefix”.
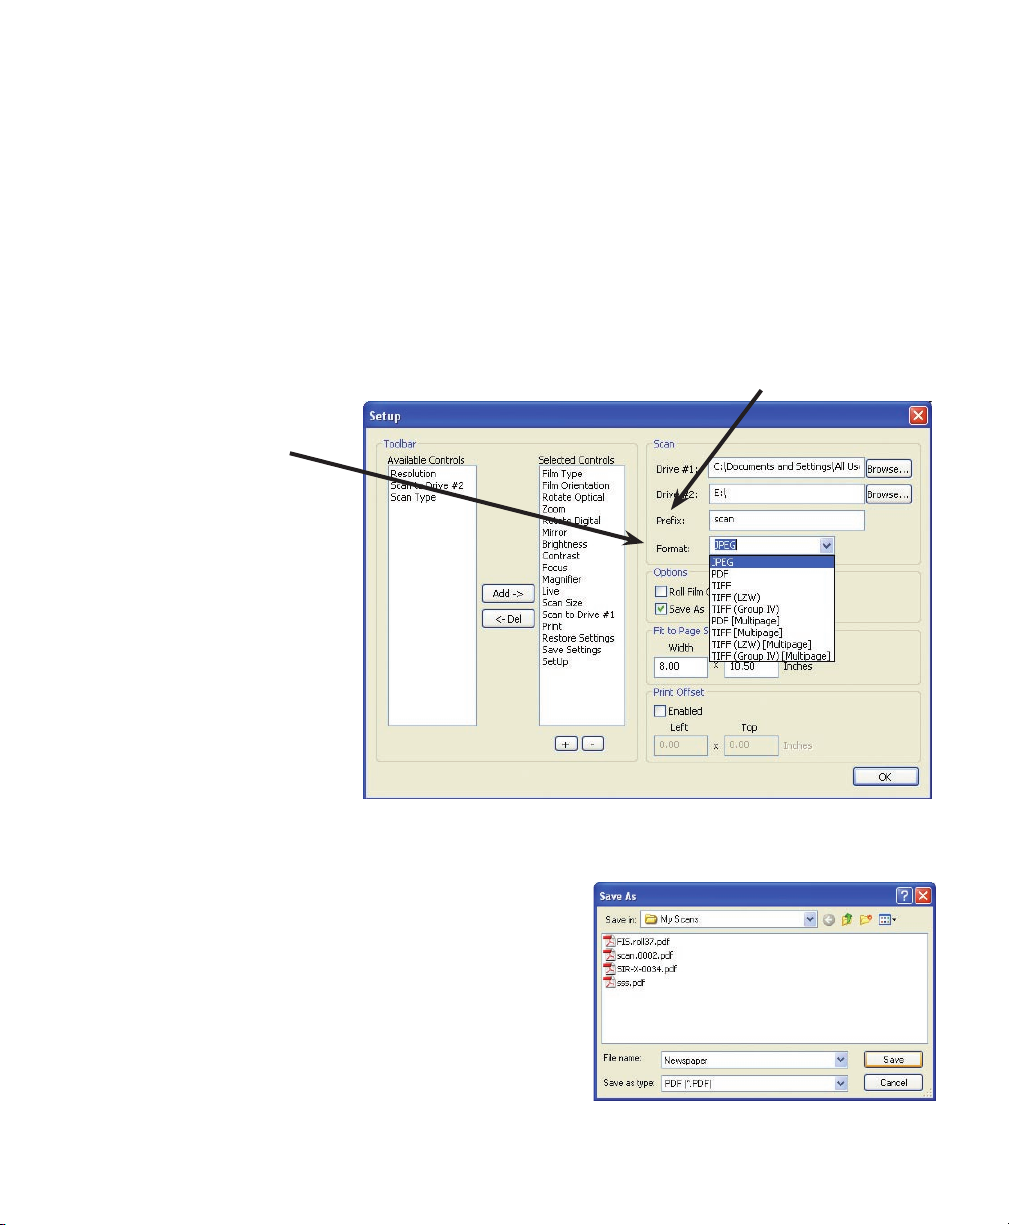
Format:
Specifies the file format
if the SAVE AS box is un-
checked. SPECIFY the file for-
mat using the pull down menu
in the “Format” field (JPEG,
PDF, TIFF (LZW), TIFF (Group
4), PDF (Multipage), TIFF (Mul-
tipage), TIFF (LZW Multipage),
TIFF (Group 4 Multipage).
Options:
ROLL FILM CONTROL
When checked, PowerScan
will display the motorized
roll film control. You can move
the CONTROL by CLICKING and DRAGGING the title bar
SAVE AS
HIDE or SHOW the Save As dialog. When SAVE AS is
checked, the SAVE AS window is shown for each scan
allowing you to specify scan NAME, SAVE-to-LOCATION,
and FILE FORMAT.
INCHES or MILLIMETERS
CLICK to select.
Fit to page size:
Specifies the page size limit that will be used when the “FIT-TO-PAGE” button is selected.
Indice
Altri manuali e-ImageData Scanner


