E Star LEDTV24D2T2 Manuale utente

1
www.estar.eu
EN
USER MANUAL
LEDTV
IMPORTANT
Please read this manual carefully before installing
and operating the TV.
Keep this manual handy for further reference

2
www.estar.eu
EN
Preparations Guide
Safety Information 3
Important Safety Precautions 4
Installed And Connected TV
TV Bracket assemble 5
TV Buttons And Terminal Interface 6
External device connection diagram 7
Install And Connect TV 8
TV Stand installation Instructions 8
TV Menu
First Time Installation 9
Channel Menu 10
Picture Menu 14
Sound Menu 16
Time Menu 17
Lock Menu 18
Hotel Mode 19
Setup Menu 20
PC Menu
Screen Menu 22
Media Menu
Media Operation 23
Photo Menu 24
Music Menu 25
Movie Menu 26
Text Menu 27
Other Information
Help 28
Specications 29
Remote Controller 30
Table Of Contents
This user manual for reference only

3
www.estar.eu
EN
Safety Information
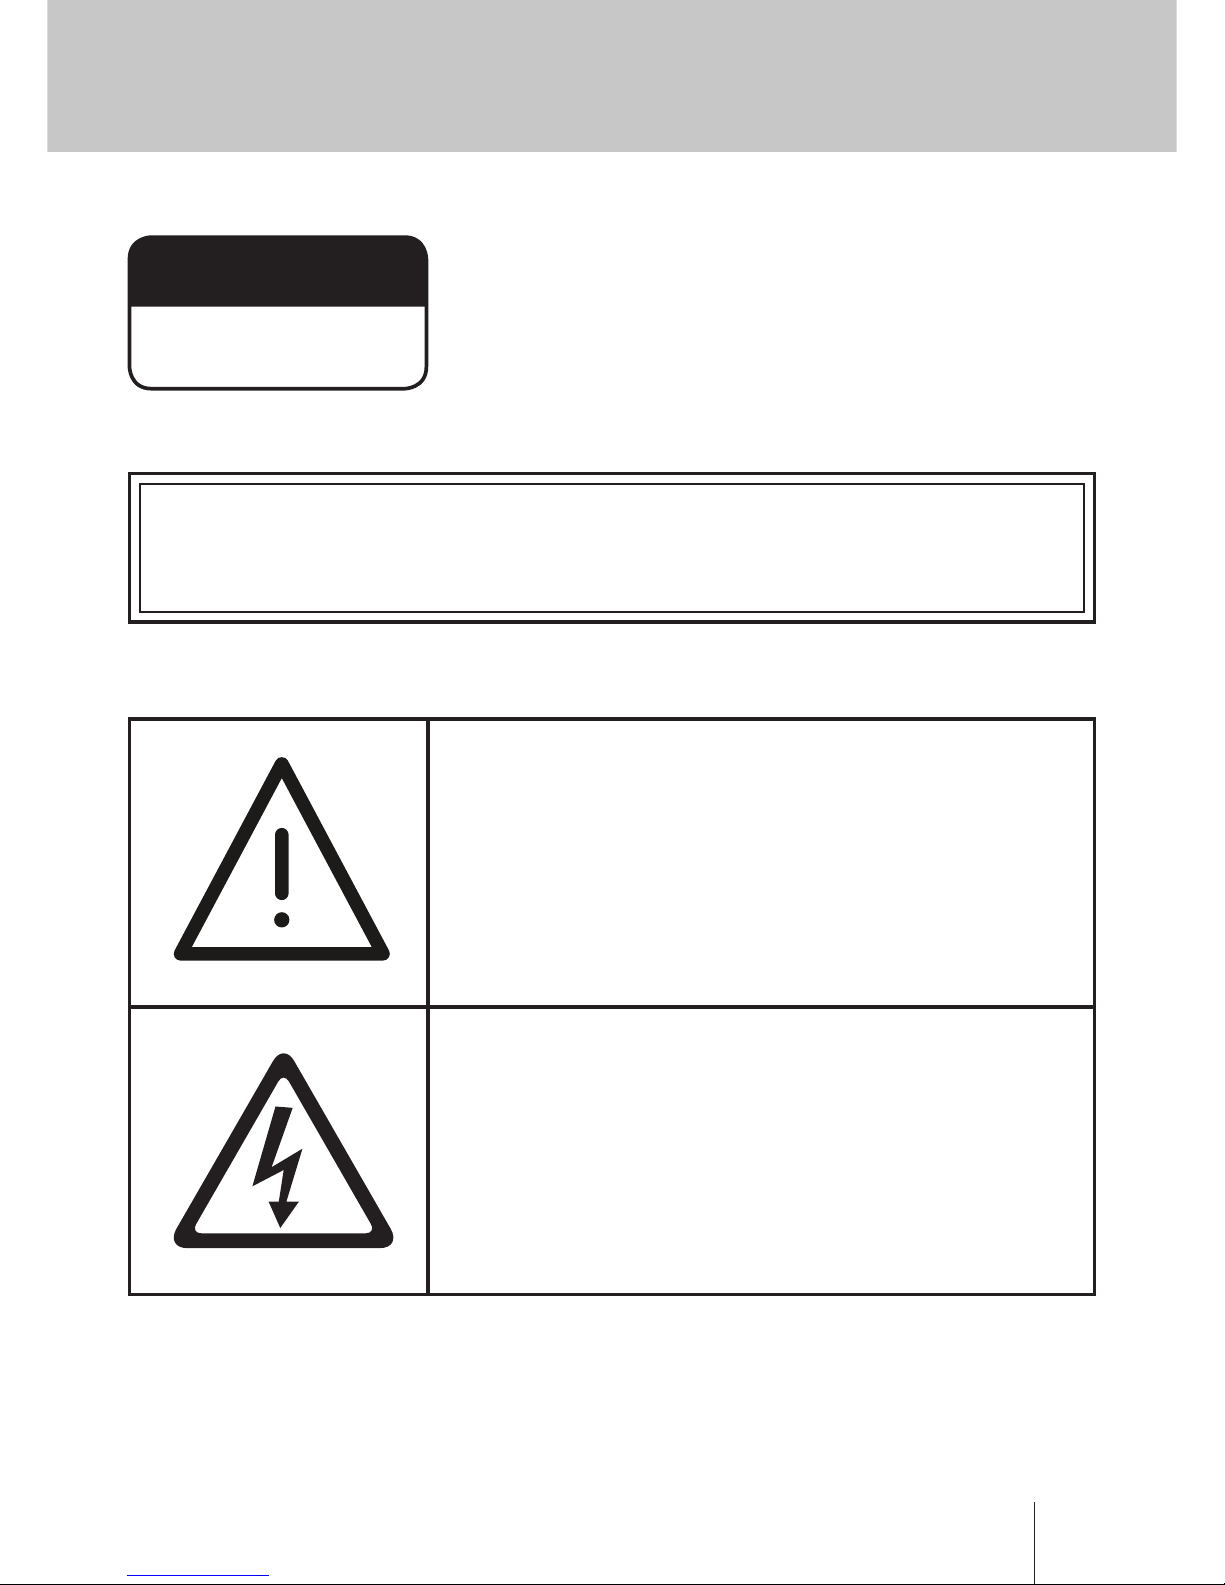
CAUTION
RISK OF ELECTRIC SHOCK
DO NOT OPEN
High voltages are used in the operation of this product.to
reduce the risk of electric shock, do not remove cover of the
cabinet, refer servicing to qualied service personal.
If the TV any changes or coarse adjustment, electric shocks to be hurt, do not
attempt to open a machine-maintenance, customer contact centers needed
overhaul.
The exclamation point within an equilateral triangle
is intended to alert the user to the presence of
important operating in the literature accompanying
the appliance.
Warning
The lightning ash with arrowhead symbol within
an equilateral triangle, is intended to alert the user
to the presence of uninsulated dangerous voltage
within the products enclosure that may be of
sucient magnitude to constitute a risk of electric
shock to persons.

4
www.estar.eu
EN
Important Safety Precautions
1. Read these instructions.
2. Keep these instructions.
3. Heed all warnings.
4. Follow all instructions.
5. Do not use this apparatus near water.
6. Clean only with dry cloth.
7. Do not block any ventilation openings. Install in accordance with the manufacturer’s instructions.
8. Do not install near any heat sources such as radiators, heat registers, stoves, or other apparatus
(including ampliers) that produce heat.
9. Do not defeat the safety purpose of the polarized or grounding-type plug. A polarized plug has two
blades with one wider than the other. A grounding type plug has two blades and a third grounding
prong. The wide blade or the third prong are provided for your safety, If the provided plug does not t
into your outlet, consult an electrician for replacement of the obsolete outlet.
10. Protect the power cord from being walked on or pinched particularly at Plugs, convenience
receptacles, and the point where they exit from the apparatus.
11. Only use attachments /accessories specied by the manufacturer.
12. Use only with the cart, stand, tripod, bracket, or table specied by the manufacturer, or sold with the
apparatus. When a cart is used caution when moving the cart/apparatus combination to avoid injury
tip-over.
13. Unplug this apparatus during lightning storms or when unused for long periods of time.
14. Caution:
15. To reduce the risk of re or electric shock, do not expose this apparatus to rain or moisture.
16. The mains plug is used as disconnect device, the disconnect device shall remain readily operable.
17. The socket-out shall be installed near the equipment and shall be easily accessible.
18. This product should never be placed in a built-in installation such as a bookcase or rack unless proper
ventilation is provided or the manufacture’s instructions have been adhered to.
19. The apparatus shall not be exposed to dripping or splashing and that no objects lled with liquid,
such as vases, shall be placed on the apparatus.
20. Do not place any sources of danger on the apparatus (e.g. liquid lled objects, lighted candles).
21. Wall or Ceiling Mounting - The appliance should be mounted to a wall or ceiling only as
recommended by the manufacturer.
22. Never place the TV, remote control or batteries near naked ames or other heat
23. I ilk I sources, including direct sunlight. To prevent the spread of re, keep candles or other
ames away from the TV, remote control and batteries at all times.
24. The USB terminal should be loaded with 0.5 A under normal operation.
25. These servicing instructions are for use by qualied service personnel only. To reduce the risk of
electric shock do not perform any servicing other than that contained in the operating instructions.
26. unless you are qualied to do so.
27. The battery shall not be exposed to excessive heat such as sunshine, re or the like.
28. This equipment is a Class II or double insulated electrical appliance. It has been designed in such a
way that it does not require a safety connection to electrical earth
29. The maximum using environment temperature is 45 degrees.
30. The Maximum using altitude is 2000 meters.

5
www.estar.eu
EN
TV Bracket assemble
Fix the TV on the wall
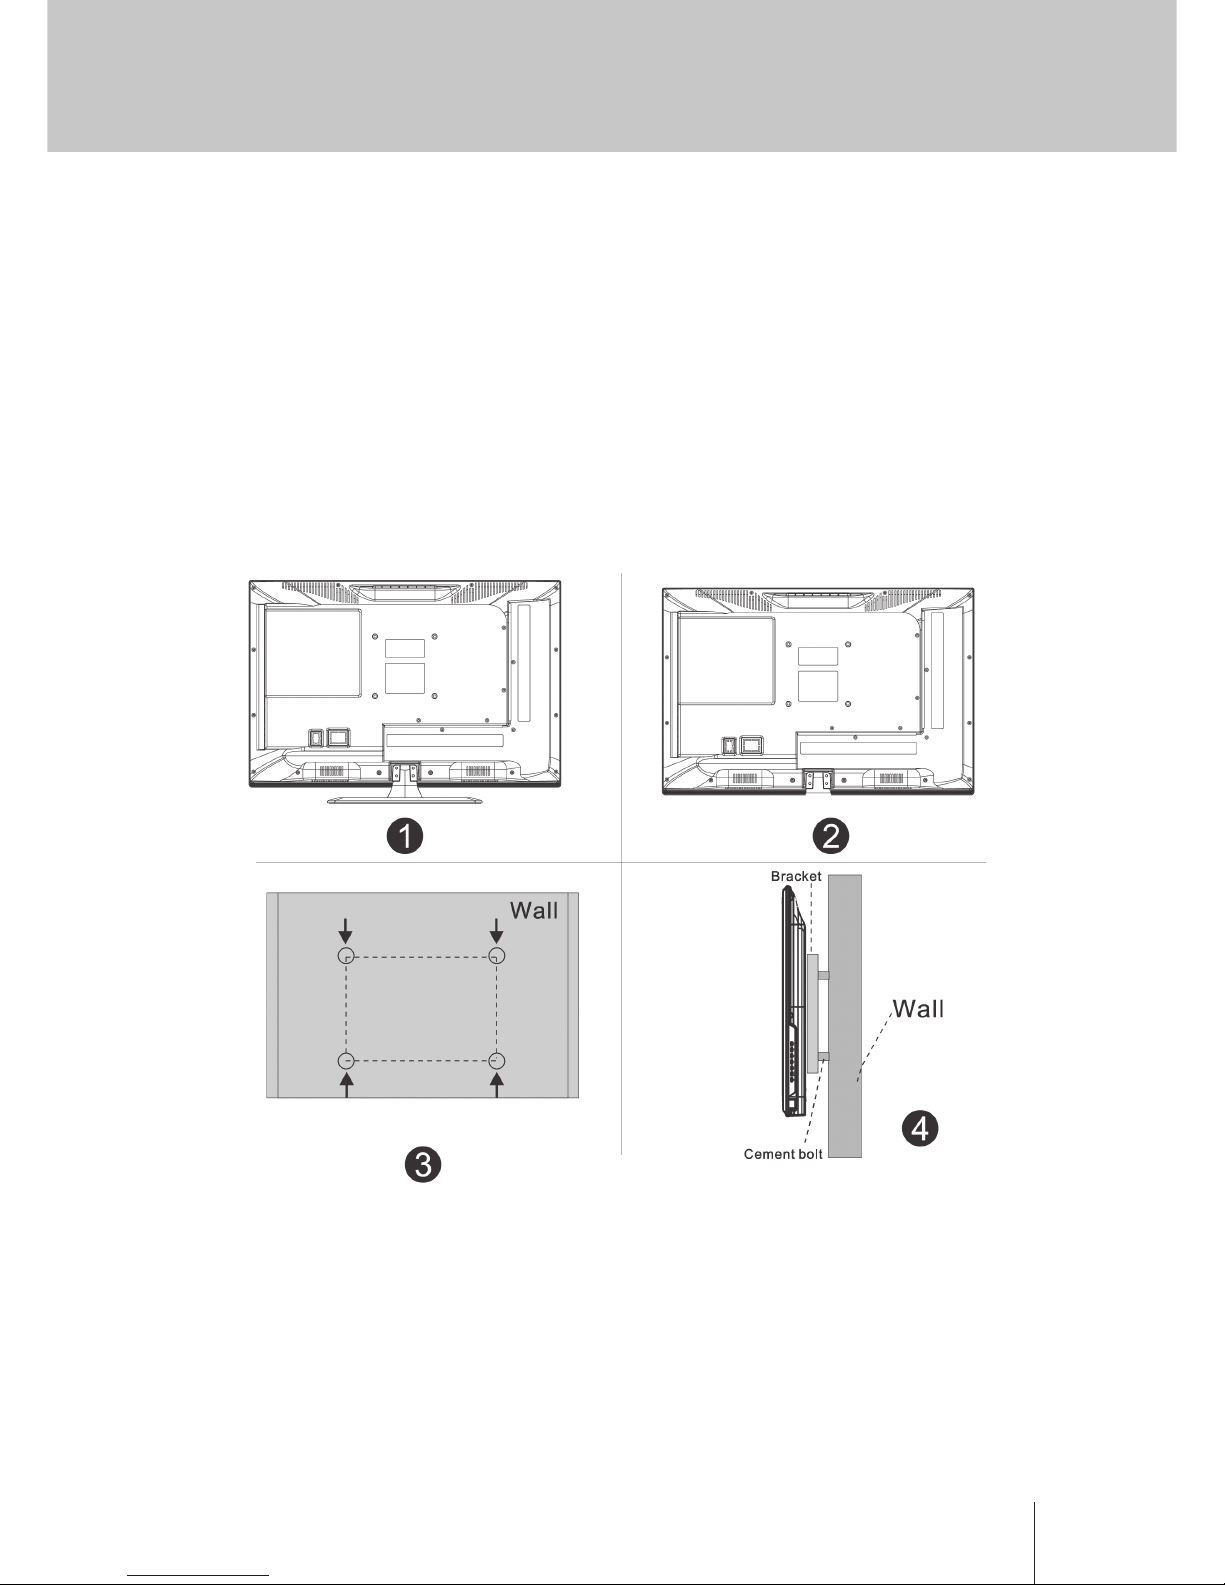
1. First, put the TV on the table smoothly and put some soft cloth on the table to avoid scratching the
screen.
2. User the screw driver to take o the screws which are xed on the bottom stand (the direction of the
arrow, refer to the ptoto1).And take o the bottom stand (please take o the screws and bottom
stand carefully).
3. Make one bracket which can x on the wall according to the size of arrow direction of photo2 and
photo3.
4. Drill four holes properly on the wall (the size only for reference) and put into four screws.(optional
parts) Drill four holes properly on the wall (the size only for reference) and put into four screws.
(optional parts)
5. According to the step 4,use the screwdriver to lock the screw on the back of the TV. then hang the TV
on the wall.
Note:
1. The bracket xed on the wall is optional part.
2. when you assemble the TV, there should be no other articles on the around and front and please keep
the distance from other articles.
3. When assemble the TV, please ask the career man to x in order to avoid the danger.
4. The xing picture is only for reference.
5. Please follow the use manual about bracket assemble to x the TV.
6. Attach the mounting bracket from the VESA compatible wall mounting kit.

6
www.estar.eu
EN
TV Buttons And Terminal Interface
TV Buttons
Note: The following is only functional schematic, And the actual position and arrangement of dierent
models may be dierent.
Terminal Interface
Note: The following are the various terminal interface, the actual position and arrangement, the number
of dierent models may be dierent.
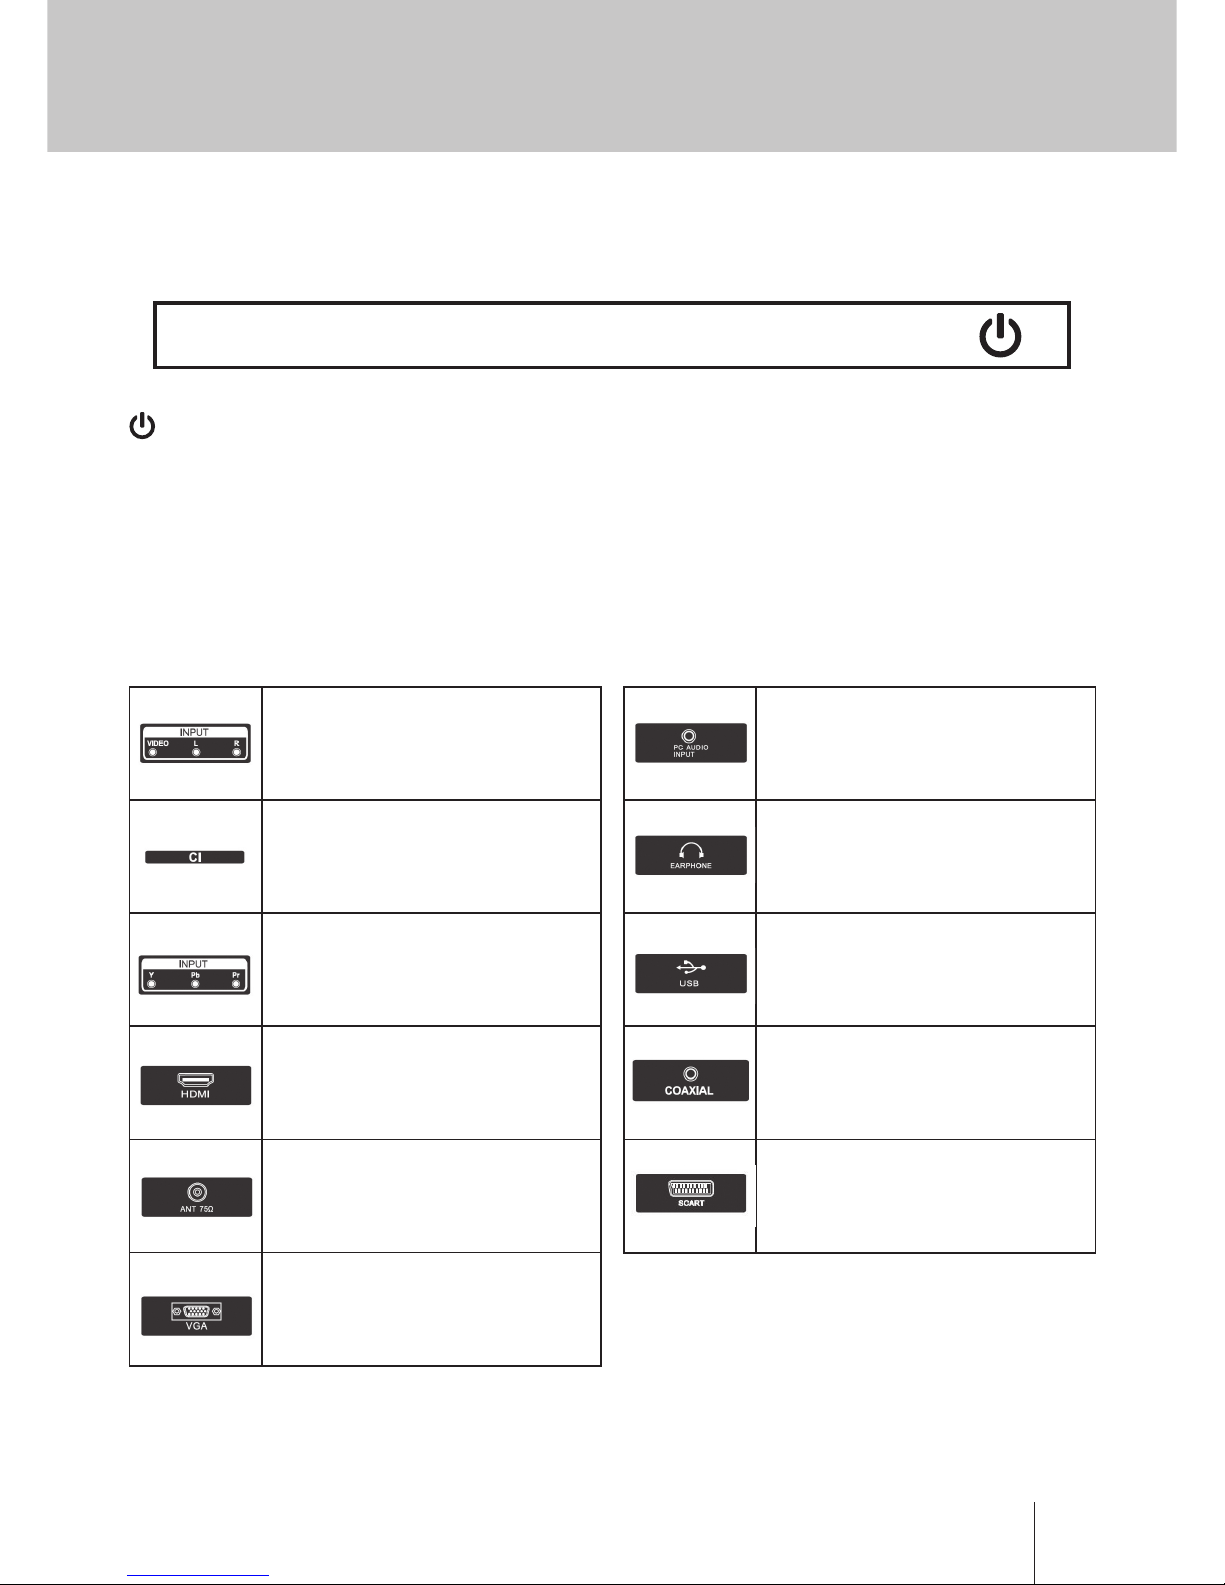
AV input
External AV Signal Input And Relevant
Right/Left Sound Channel
EARPHONE output
When earphones are plugged in,
speakers are disabled
VOL+ VOL- CH+ CH- MENU SOURCE
Turn ON/OFF Power.
SOURCE: External Signal Input Selection.
MENU: Display Main MENU And Conrm MENU Item Selection.
CH+/-: Selecting Channel.
VOL+/-: Adjusting Volume.
Cl SLOT
The card reader input CI (common
interface) this requires CAM (conditional
access module) used for pay TV.
USB input
Connect a USB device here to play its
media les or to record programs via
the PVR function.
Y Pb Pr input
Connect to the composite terminal of
your DVD/VCR (Some models without this
interface)
COAXIAL
Connect the SPDIF receiver.
HDMI input
Digital signal input from HDMI video
connector.
SCART Input
standard, it supports composite and RGB
signal input.lt is a connection for european
(Some models without this interface)
ANT 75
Connect the antennal/cable tv input
(75/VHF/UHF)
VGA input
PC analog signal input
PC AUDIO INPUT
VGA input and audio input
when VGA input

7
www.estar.eu
EN
External device connection diagram

8
www.estar.eu
EN
Install And Connect TV
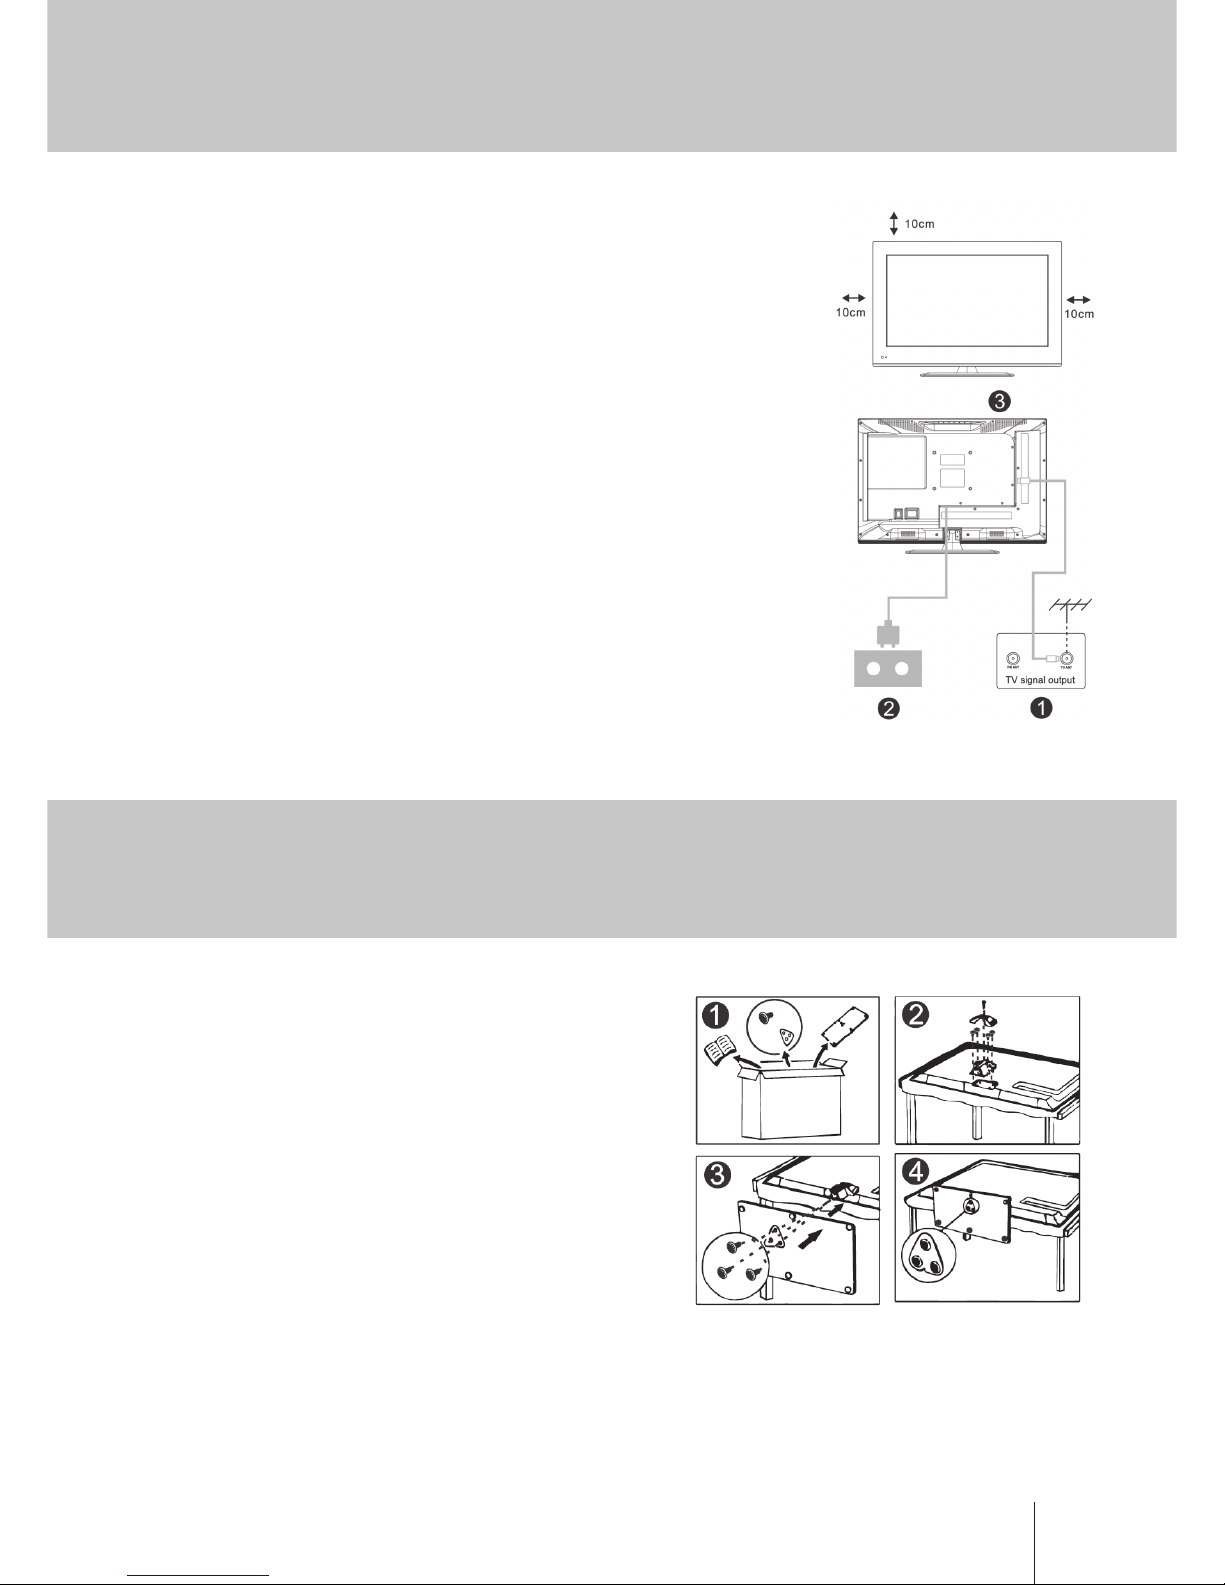
Set your TV
To put your TV in a rm place which can bear the weight of the TV.
To avoid danger, please don’t expose the TV near water or heating place
(such as light, candle, heating machine),do not block the ventilation at
the back of TV.
Connect antenna and power
1. Connect the antenna cable to the antenna socket on the back
of the TV.
2. To plug the power cord of TV (AC 100¬240V- 50/60Hz).
Turn on TV
3. Press the power button of the TV the indication light will turn to
green, if it is on standby mode (the light is red), press the power
button on the remote control to turn on the TV.
Note: Picture for reference purposes only.
1. Open the carton and remove the TV and scattered
accessories and base (some models without base).
2. to avoid the injury of the TV, covered with a soft
mattress, put it on the table, face down on a soft
mattress, the base of the neck is xed on the TV with
screws.
3. screw the base and connected to the TV.
4. the installation is complete.
Note:
Picture for reference purposes only.
Please prevail in kind
TV Stand Installation Instructions

9
www.estar.eu
EN
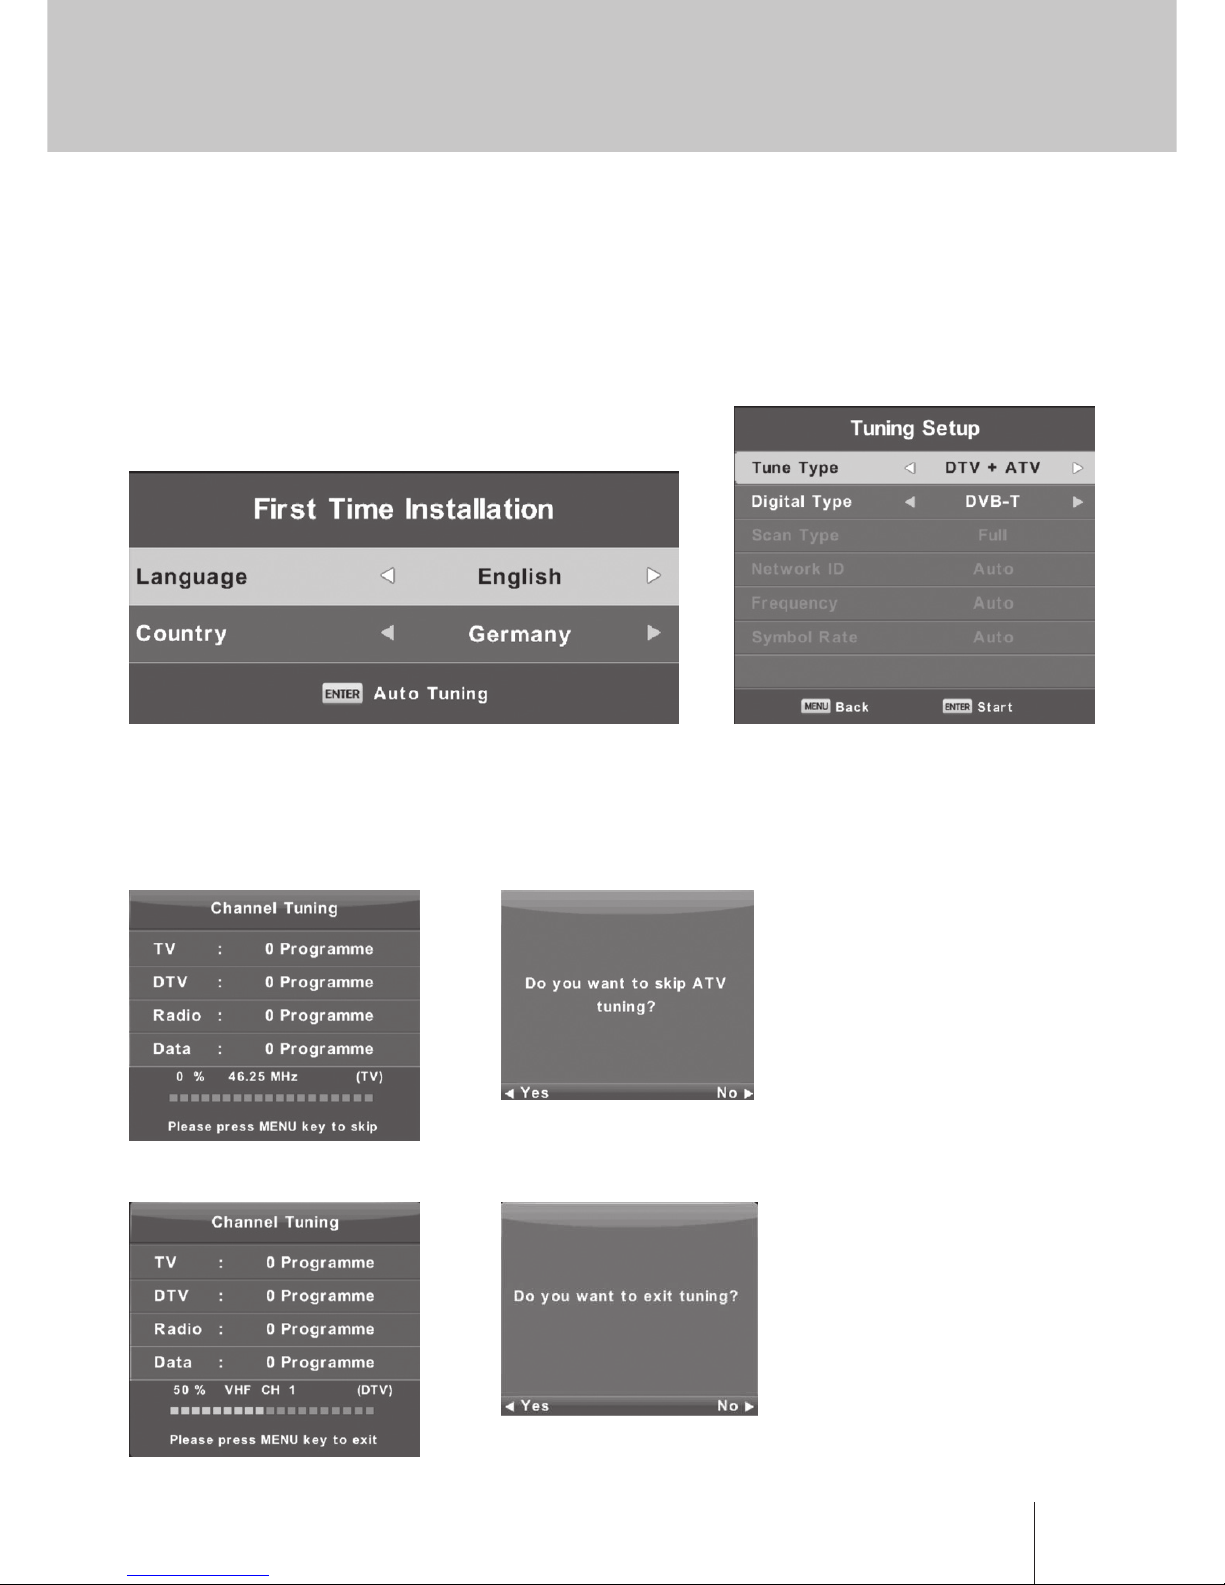
First Time Installation
Connect an RF cable from the Tv’s input called “RF-In”and to your TV Aerial socket.
Select Language
Press ◄/ ►button to select the language to be used for menus and message.
Select Country
Press ▼/ ▲button to highlight country menu.
Press ◄/ ►button to select the country you want to.
Auto Tuning
First tuning ATV, press Menu and left arrow button to skip ATV tuning,
Second tuning DTV, press Menu and left arrow button to skip DTV tuning.
1.
3.
5.
4.
6.
2.

10
www.estar.eu
EN
Main Menu Operation
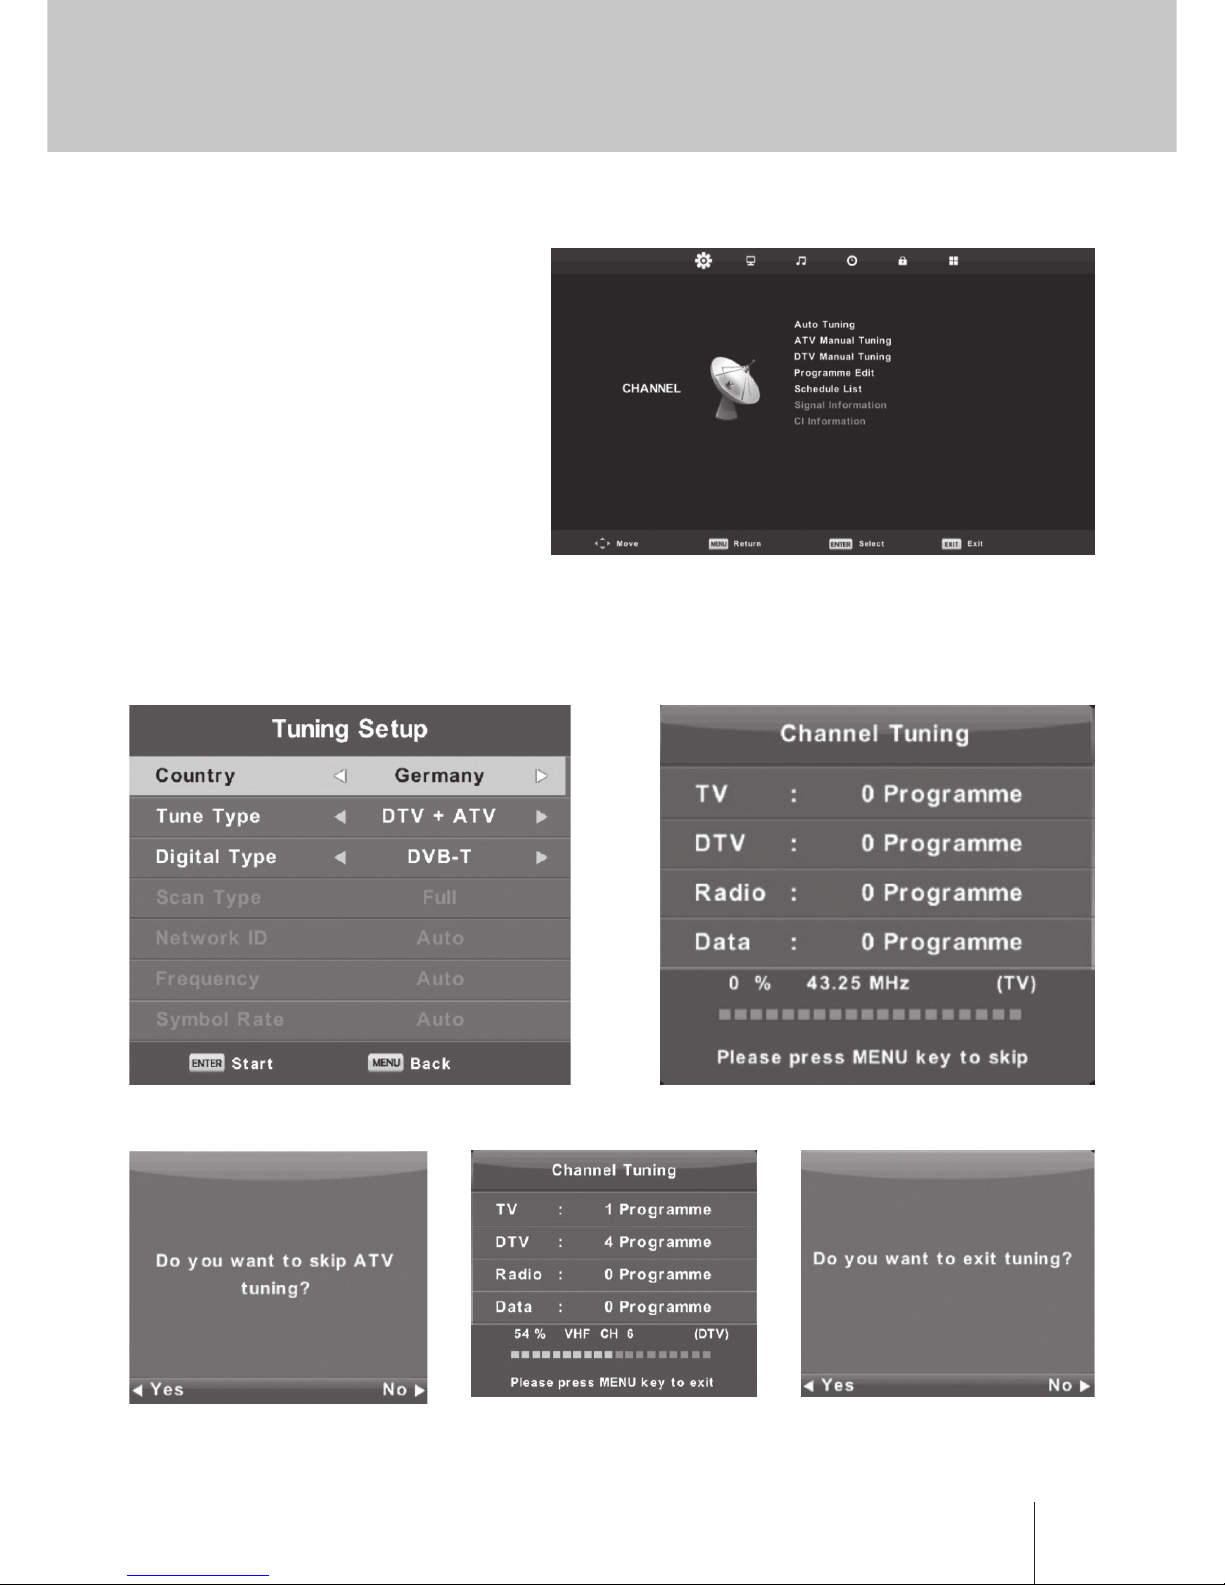
Channel Menu
Press MENU button to display the main
menu.
Press ◄/ ►button to select CHANNEL in
the main menu.
1. Press ▼/ ▲button to select the option
that you want to adjust in the CHANNEL
menu.
2. Press Enter button to adjust.
3. After nishing your adjustment, Press
Enter button to save and return to the
previous menu.
Auto Tuning
Press▼/ ▲button to select Auto Tuning, then press Enter / ►button to enter.
Indice
Lingue:
Altri manuali E Star TV LED