
EAGLE I EG-228 Manuale utente

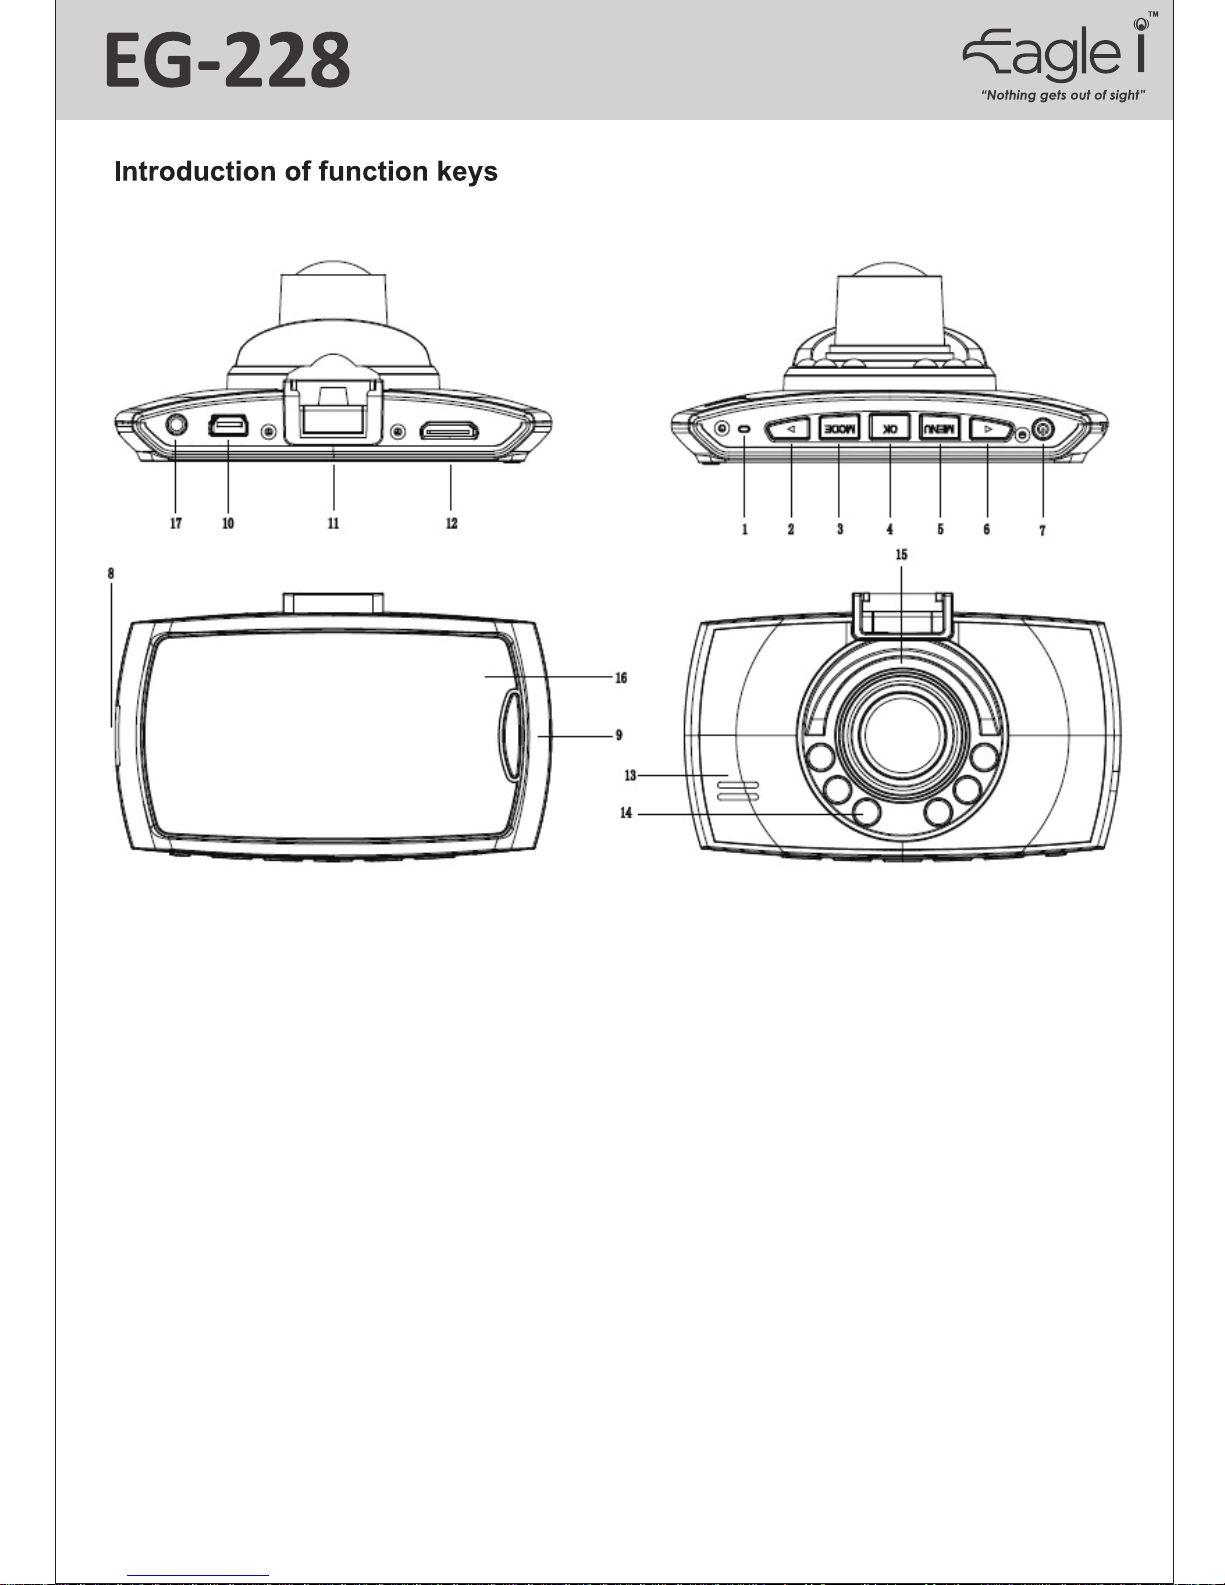
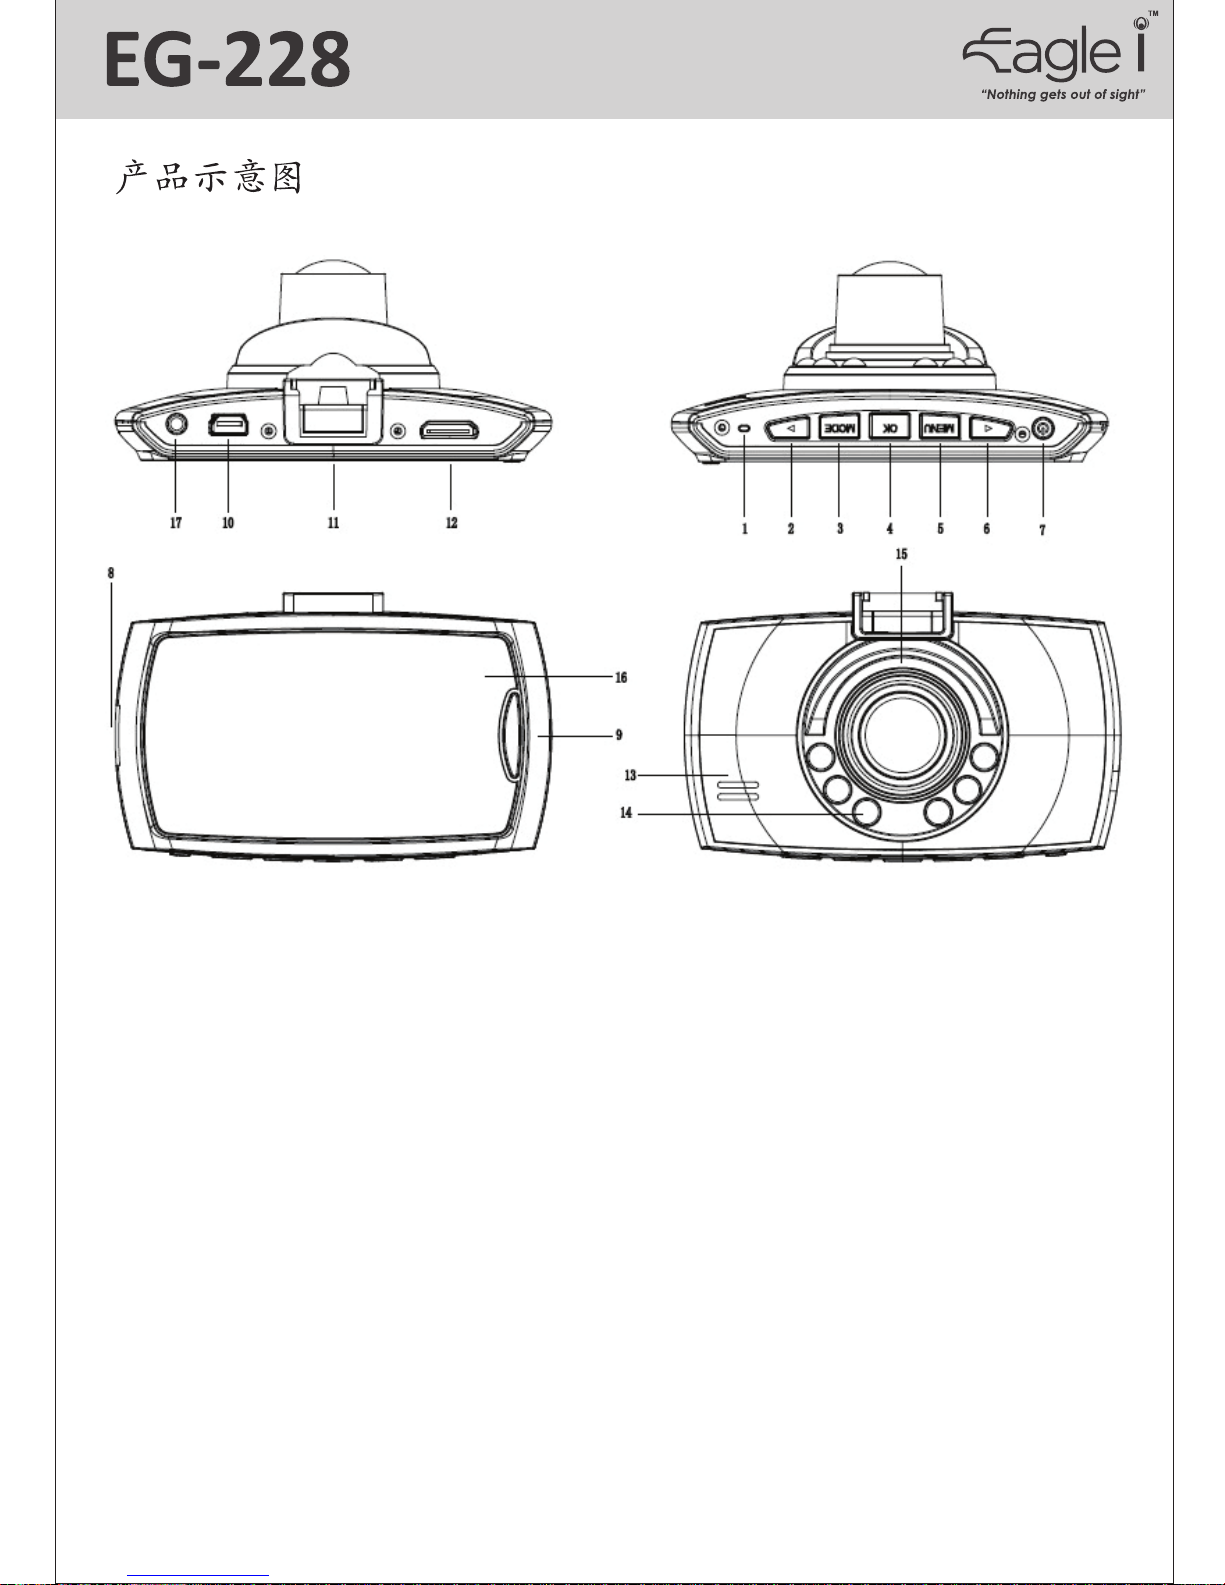
1. Reset 8. SD card slot 15. Lens
2. Up 9. LOCK 16. 2.7inch LCD
3. Mode 10. USB port 17. AVOUT
4. OK 11. Bracket hole
5. Menu 12. HDMI Port
6. Down 13. MIC
7. Power 14. Infrared LED
Accessories
User manual, USB cable, USB car charger (input DC 12V-24V, output DC 5V
adapter), AV cable, 8GB Micro SD Card, Windscreen Mount
Installaon
The car CVR is easy to be installed. The device needs to be cling onto the
windscreen and connect the USB car charger to the car power.

Charge the Baery:
A. Charge the Li-ion baery
(1) Connect the CVR to USB car charger
(2) Connect the CVR to computer by USB cable
NOTE: Red light will on unl the CVR is fully charged.
B. Connect to DC12V-24V car charger
CVR will start recording automacally once the car engine is started and turned off
by itself and save the recorded files aer 15 seconds once the car engine is off.
Aenon: The power must be supported with DC12V-24V input. Press and hold
the POWER Buon (7) for few seconds and off the CVR once the car engine is off.
*Time & Date Seng
Press the POWER Buon (7) to switch on the CVR, press OK (4) to stop recording,
then press MENU (5) to enter setup menu interface, press MENU (5) again and
use the Arrow Key (2&6) to select Set Date/Time and press OK (4). Press MENU
(5) and OK (4) to return to the recording mode.
Setup Guide
*Language Seng
Press the POWER Buon (7) to switch on the CVR, press OK (4) to stop recording,
then press MENU (5) to enter setup menu interface, press MENU (5) again and
use the Arrow Key (2&6) to select the Language Tab, select the language you
preferred and press OK (4). Press MENU (5) and OK (4) to return to the recording
mode.
*Auto Power Off
Press the POWER Buon (7) to switch on the CVR, press OK (4) to stop recording,
then press MENU (5) to enter setup menu interface, press MENU (5) again and
use the Arrow Key (2&6) to select Auto Power Off, select Off/1 min/3 min and
press OK (4). Press MENU (5) and OK (4) to return to the recording mode.
*Video Resoluon Seng
Press the POWER Buon (7) to switch on the CVR, press OK (4) to stop recording,
then press MENU (5) to enter video menu interface, use the Arrow Key (2&6) to
select Resoluon, select your preferred resoluon. (the higher resoluon, the
more opmal video quality). Press MENU (5) and OK (4) to return to the recording
mode.
*Loop Recording Seng
Press the POWER Buon (7) to switch on the CVR, press OK (4) to stop recording,
then press MENU (5) to enter video menu interface, use the Arrow Key (2&6) to
select Loop Recording, select Off/1 min/ 3 min (users are advised not to turn the
loop recording off). Press MENU (5) and OK (4) to return to the recording mode.
*Screen Saver Seng
Press the POWER Buon (7) to switch on the CVR, press OK (4) to stop recording,
then press MENU (5) to enter setup menu interface, press MENU (5) again and use
the Arrow Key (2&6) to select Screen Saver, select Off/1 min/ 3 min (CVR screen
will shut down within the selected duraon). Press MENU (5) and OK (4) to return
to the recording mode.
*EV Seng (Exposure Value)
Press the POWER Buon (7) to switch on the CVR, press OK (4) to stop recording,
then press MENU (5) to enter video menu interface, use the Arrow Key (2&6) to
select EV, select your preferred Exposure Value (higher value, brighter image while
lower value, dimmer image). Press MENU (5) and OK (4) to return to the recording
mode.
*Moon Detecon Seng
Press the POWER Buon (7) to switch on the CVR, press OK (4) to stop recording,
then press MENU (5) to enter video menu interface, use the Arrow Key (2&6) to
select Moon Detecon, turn it On or Off. Moon Detecon allowed CVR to
resume recording automacally while there is object moving in front of the
camera. Press MENU (5) and OK (4) to return to the recording mode.
*Audio Seng (Mic Seng)
Press the POWER Buon (7) to switch on the CVR, press OK (4) to stop recording,
then press MENU (5) to enter video menu interface, use the Arrow Key (2&6) to
select Audio, turn it On or Off. Press MENU (5) and OK (4) to return to the
recording mode.
*Date Stamp Seng
Press the POWER Buon (7) to switch on the CVR, press OK (4) to stop recording,
then press MENU (5) to enter video menu interface, use the Arrow Key (2&6) to
select Date Stamp, turn it On or Off. Turn the Date Stamp ON to show the
recording date on the video clip. Press MENU (5) and OK (4) to return to the
recording mode.
*G-Sensor Seng
Press the POWER Buon (7) to switch on the CVR, press OK (4) to stop recording,
then press MENU (5) to enter video menu interface, use the Arrow Key (2&6) to
select G Sensor, select your preferred level Off/Low/Medium/High. The higher
level the higher sensiveness, G-sensor helps to lock the file automacally when
the CVR has been in collision, the file will not be deleted or overwrien during the
loop-recording. Press MENU (5) and OK (4) to return to the recording mode.
*Mute Seng
Press the POWER Buon (7) to switch on the CVR, press MENU (5) to mute the mic.
*Operaon
*Recording mode (Please insert the SD card first)
CVR will start recording aer switched on. A blue light will blinking to ensure the
recording files are saving into the SD card automacally.
*Emergency lock
While recording, press the LOCK buon (9) to lock the present file and it will be
saved and named beginning with SOS, the video file will not be deleted during
loop-recording.
*Photo mode
Press POWER (7) to switch on the CVR, press OK (4) to stop recording, then press
MODE (3) to enter photo taking mode. Press OK (4) to capture the image.
*Night vision funcon
Under recording or photo taking mode, Press POWER (7) rapidly to acvate or
deacvate the night vision funcon.
*View and delete files
Press the POWER Buon (7) to switch on the CVR, press OK (4) to stop recording,
then press MODE (3) twice to enter playback mode. Use the Arrow key (2&6) to
select the file then press OK (4) to view the file. Press MENU (5) to delete or
protect the file. Press MODE (3) and OK (4) to return to the recording mode.
*USB mode
Connect the CVR to computer by a USB cable and press POWER (7) to switch on
the CVR to enter the menu.
There are TWO opons:
1. USB-Disk
Transfer files to the PC
2. PC-Camera
USB video device will popup automacally for photos or video chat funcon.
*AVOUT output
Connect the CVR to TV by an AV cable, the CVR screen will shut down yet the
image is displayed on the TV screen.
*HDMI output
Connect the CVR to TV by a HDMI cable, the CVR screen will shut down yet the
image is displayed on the TV screen.

Reminder:
1. Please insert the SD card to the device before recording
2. Please use the USB charger provided, do not aempt to connect the CVR to any
charger that over DC 5V, overvoltage supply will cause damage to the CVR.
3. Please reconfirm the Date & Time of the CVR upon startup your vehicle.
Specificaon:
Video format
Video compression way
Video resoluon
Photo resoluon
Video output
Video output format
Seamless video
Turn on automac recording
G-sensor
Manual Lock
Language
Loop recording me
Audio recording
Version number
Night vision
Memory card
Memory card capacity
USB port
Operaon system
Baery
Power consumpon
Power supply
Storage temperature
AVI
M-JPEG
1920x1080P(24fps)1440*1080/1280*720/848*480//320*240(30fps)
4032*3024, 3648*2736, 3264*2448, 2592*1944, 2048*1536,
1920*1080, 1280*960, 640*480
AVOUT video output, HDMI video output
PAL/NTSC
Yes
Support
When car impact, save the video file urgently,and it will not be
deleted when cycle recording
When recording, short press Lock key to lock the present file, and it
will not be deleted
Russian,Japanese,French,Italian,Germany,Spanish,Portuguese,
Engligh,Simple Chinese, Tradional Chinese, Korean
1mins/3mins/5mins(oponal)
Built-in microphone, can choose opening or closing the audio
recording funcon
Show the soware version number and Soware release date
6pcs IR LED
SD Card
1GB--32GB
Mini5Pin USB2.0
Windows 2000, Windows XP, Windows 7 & etc.
3.7V polymer baery
Standby200MAH Recording250MAH-315MAH
Car power 5V/1A
-10℃ ~ 70℃
-10℃ ~ 60℃
Loop recording me
1. 复位键 8. SD卡槽 15. 摄像头
2. 上翻键 9. 锁定键 16. 2.7寸显示屏
3. 模式键 10. USB插口 17. AVOUT
4. 确认键 11. 支架孔
5. 菜单键 12. HDMI
6. 下翻键 13. 喇叭
7. 电源键 14. 夜视灯
配件
说明书 USB线 USB车充(内置12V转5V适配器)
*功能操作
安装
此DVR安装简便,通过支架将机器固定到挡风玻璃前即可。点烟器连接上
USB车充,把线材隐藏起便可。

充电:
A.使用可充电锂电池供电
充电方式(1)连接USB车充 (2)用USB连接电脑
充电过程中,绿色指示灯亮,当DVR充满后,绿色指示灯会自动熄灭。
B. 连接12V车充
当汽车启动,DVR会自动开始录影。断电后15秒,DVR会自动关机并自
动保存前面录制的文件。
注:只能使用输出电压为5V的车载电源并且在使用车充供电时,
需要长按电源键或者断电才能关闭DVR。
录像模式
短按电源键或者连接USB车充,DVR会自动进入录影模式。(请先插入SD
卡)此时,蓝色指示灯会闪烁,文件会自动保存于SD卡中。当拔掉USB车充
或者长按电源键关闭DVR后,蓝色指示灯将停止闪烁。
重力感应
汽车发生碰撞时,将当前视频文件保存为EVE开头文件,此文件在循环录像
时,不被删除。
紧急锁定
正在录像时,短按锁定键,手动锁定当前文件,文件保存为SOS开头文件,
循环录像过程中,该文件不会被删除。
拍照模式
短按电源键开启DVR并按确认键停止录影,然后短按模式键进入拍照模式,
按确认键拍照。
夜视功能
在录像和拍照模式下,短按电源键,打开或者关闭红外夜视灯。
浏览和删除文件
开启DVR并按确认键停止录像,短按两次模式键进入回放模式。按上翻键选
择录制的文件并按确认键播放或者预览。如果要删除文件,停止播放后按菜
单键进入删除模式。按下翻选择删除或者格式化。继续按菜单键退出操作。
菜单功能设定
开启DVR并停止录影,按菜单键,进入设置菜单界面。按向上键或向下键选
择具体参数,最后按确认键确认操作。当所有设置完成后,继续按菜单键退
出设置界面。
USB模式
将USB线与电脑连接,按开机键后,行车记录仪将自动弹出USB菜单。
有以下二种模式可供选择:

1:USB-Disk
在此模式下可进行视频文件或者照片文件的存取;
2: PC-Camera
选择此模式将弹出USB视频设备,可进行实时拍照或者视频聊天;
AVOUT输出
用AV线连接DVR和电视机,DVR显示屏会熄灭,图像会显示在电视机上。
HDMI输出
用HDMI线连接DVR和电视机,DVR显示屏会熄灭,图像会显示在电视机上。
注意事项
1.请在录影前先插入SD卡。
2.请使用附带的USB车充为DVR供电,此车充内含12V转5V适配器。如果输出电
压大于5V,将会烧毁DVR。
Indice
Lingue:


