
Ecotric FAT26S900 Manuale utente


- 1 -
TABLE OF CONTENTS
Carton Contents................................................................................................................................................................- 1 -
WARNING..........................................................................................................................................................................- 3 -
Assembling Instruction..................................................................................................................................................... - 4 -
Front Wheel Installation...........................................................................................................................................- 4 -
Handle Bar,Display and Front Reflector Installation................................................................................................ - 6 -
Seat Post Installation................................................................................................................................................ - 7 -
Pedals Installation.....................................................................................................................................................- 8 -
Battery Installation & Removing & Charging........................................................................................................... - 9 -
Testing The Bike...................................................................................................................................................... - 10 -
Display Instrument Setting............................................................................................................................................. - 12 -
Presentation of Screen........................................................................................................................................... - 12 -
Display Setting........................................................................................................................................................ - 12 -
Display Advanced Setting....................................................................................................................................... - 13 -
Troubleshooting..............................................................................................................................................................- 14 -
The display can not be lighted up.......................................................................................................................... - 14 -
The throttle does not work.................................................................................................................................... - 15 -
Error Codes............................................................................................................................................................. - 16 -
Warranty Information.....................................................................................................................................................- 17 -
Situations that is not covered by warranty............................................................................................................ - 17 -
18 months Limited Warranty Components............................................................................................................- 17 -
Consumables.......................................................................................................................................................... - 17 -
Return Policy...................................................................................................................................................................- 18 -
FAQ..................................................................................................................................................................................- 19 -
Q: How does after-sale customer service/ warranty work?..................................................................................- 19 -
Q: I'm tech inclined and think I can fix it myself,does that void the warranty if I do?..........................................- 19 -
Q:Why the charger is hot?......................................................................................................................................- 19 -
Q:What is the range of this bike?...........................................................................................................................- 19 -
Q: Can I ride the bike in rain?.................................................................................................................................- 19 -
Q: What is the most important thing for maintaining battery.............................................................................. - 19 -
Q: Do you have spare keys for the E-bike?.............................................................................................................- 19 -
Battery And Charger Care...............................................................................................................................................- 20 -
Simple Maintenance Tips............................................................................................................................................... - 21 -
Safety.............................................................................................................................................................................. - 22 -
General Warning.............................................................................................................................................................- 23 -
The Universal Wiring Diagram........................................................................................................................................- 24 -
Recording Your Ecotric Bike Info.....................................................................................................................................- 24 -
Carton Contents
(x1) ECOTRIC Bike
(x1) Lithium Ion Battery
(x1) Battery Charger
(x1) Kit Box
(x2) Pedals
(x1) Saddle
(x2) Keys
(x1) Tool Kit
(x1) Reflector
(x1) Owner’s user Manual

- 2 -
First of all, we would like to thank you for choosing the ECOTRIC electric bike. We
believe this technology, with the benefits of electric propulsion, provides you with the
perfect vehicle to increase your personal mobility.
Our brush-less electric hub motor allows you to run errands
or commute to work while saving money on gas and reducing your environmental
impact on our world. It also gives you the opportunity to pedal if you want to get
exercise along the way.
All this and it is just plain fun to ride!
If you have any concerns, questions or suggestions about the ECOTRIC electric bike,
please contact us at the website where you bought the bike,we will always do our
best to serve you. Again, thanks for choosing ECOTRIC.
PLEASE NOTE:
THIS MANUAL IS NOT INTENDED AS A DETAILED USER, SERVICE, REPAIR OR
MAINTENANCE MANUAL. PLEASE SEEK ASSISTANCE FROM A QUALIFIED
TECHNICIAN FOR SERVICE, REPAIRS OR MAINTENANCE.

- 3 -
WARNING
Electric Bikes can be dangerous to use. The user or consumer assumes
all risk of personal injuries, damage, or failure of the bicycle or system and all other
losses or damages to themselves and others and to any property arising as a result of
using the bicycle.
As with all mechanical components, the bicycle is subjected to wear and high
stresses. Different materials and components may react to
wear or stress fatigue in different ways. If the design life of a component has been
exceeded, it may suddenly fail possibly causing injuries to the rider. Any form of crack,
scratches or change of coloring in highly stressed areas indicate that the life of the
component has been reached and it should be replaced.
For replacement parts, technical information and warranty assistance, please feel
free contact us.
YOUR INSURANCE POLICIES MAY NOT PROVIDE
COVERAGE FOR ACCIDENTS INVOLVING THE USE OF
THIS BICYCLE. TO DETERMINE IF COVERAGE IS
PROVIDED YOU SHOULD CONTACT YOUR INSURANCE
COMPANY OR AGENT.

- 4 -
Assembling Instruction
Front Wheel Installation
CAUTION: Your Electric bike is equipped with a front disk brake. Be careful not to damage the disk,
caliper or brake pads when reinserting the disk into the caliper. Never activate a disk brake’s control
lever unless the disk is correctly inserted in the caliper.
(1) Carefully take your bike out of the carton and gently rest it in place with the kickstand
down(Figure.1-1).
(2) Remove all of the inside cardboard protection and bubble wrap on the bike.
(3) Please locate and set aside the kit box containing the battery charger, pedals, and tool kit etc.
(4) Remove the rubber pad and metal block from the front wheel and front fork(Figure.1-2)
(5) The fork is curved,please make sure the concave of the fork facing forward(Figure.1-3)

- 5 -
(6) With the steering fork facing forward, insert the front wheel between the fork blades so that
the axle seats firmly at the top of the fork dropouts. (Figure. 1-4)
(7) While pushing the wheel firmly to the top of the slots in the fork dropouts, and at the same
time centering the wheel rim in the fork.
(8) With a cam action system, move the cam lever upwards and swing it into the CLOSED position
(Figure. 1-5). The lever should now be parallel to the fork blade and curved toward the front wheel.
To apply enough clamping force, you should have to wrap your fingers around the fork blade for
leverage, and the lever should leave a clear imprint in the palm of your hand.
Please Note: If, on a traditional cam action system, the lever cannot be pushed all the way to a
position parallel to the fork blade, return the lever to the OPEN position. Then turn the tension
adjusting nut counterclockwise one quarter turn and try tightening the lever again.
WARNING: Securely clamping the wheel with a cam action retention device takes considerable
force. If you can fully close the cam lever without wrapping your fingers around the fork blade for
leverage, the lever does not leave a clear imprint in the palm of your hand, and the serrations on
the wheel fastener do not emboss the surfaces of the dropouts, the tension is insufficient. Open
the lever; turn the tension adjusting nut clockwise a quarter turn; then try again.
Spin the wheel to make sure that it is centered in the frame and clears the brake pads; then
squeeze the brake lever and make sure that the brakes are operating correctly.

- 6 -
Handle Bar,Display and Front Reflector Installation
1. Loose the bolt on top of the stem,then Rotate the stem through 90 degrees(Figure.2-1)
2. Unscrew the 4 screws in front of the stem with 5mm hexagonal spanner,place the handle
bar on the stem,tighten the 4 screws slightly and position the handlebars to your desired
comfort level,then tighten four bolts in turn until full tightened (Figure. 2-2)
Please Note: Before installing the handle bar,please pay attention to the wires harness that
connect to it,please make sure the wire harness are not twined together. (Figure.
2-3)
3. Once the handlebars are aligned and the top bolt is slightly secured, tighten the 2 side bolts on
the stem with 6mm hexagonal spanner firmly(Figure. 2-4). After tightening the 2 side bolts,tighten
the top bolt with 5mm hexagonal spanner firmly (Figure. 2-5). After all 3 bolts have been securely
fastened, make sure there is no play in the headset.
4. Unscrew the 2 screws on the display,then install the display on the center of the handle
bar(Figure 2-6);unscrew the bolt on the front of the fork,then install front reflector
Install instruction on YouTube: https://youtu.be/AdTEu5iVJZA
WARNING:
Do not over tighten the stem bolt. Over tightening the stem bolt can damage the steering
system and cause loss of control.

- 7 -
Seat Post Installation
1. Please pay attention to the vertical lines on the seat post,it is the minimum insert line or safety
line,please make sure the post is installed into the frame deeper than the minimum insertion line.it is
at the bottom of the seat post(Figure. 3-1)
Warning: It could break the seat tube during riding if the seat post does not installing correctly.It is not
covered by warranty.
2. Un-clamp the clamp on the seat tube,insert the seat post into the seat tube,adjusting the seat to a
comfortable height,tighten the tension adjusting nut,then press the clamp lever inward toward the seat
tube(Figure. 3-2).
Please Note: If necessary, tighten the clamp by twisting the clamp handle clockwise while in the
un-clamped position. Then, fold the handle in toward the seat post. This should require a fair
amount of force to ensure the seat post is held tight. If necessary, the clamp can be further
tightened with a 5 mm Allen wrench while in the clamped position.

- 8 -
Pedals Installation
1. Identify left vs right pedal
There is a “L” or "R” stamped into the axle (threaded part that looks like a screw) (Figure. 4-1)
Please Note: They are not the same!! Apply a small amount of grease if possible
2. Install the left hand pedal firstly
You will have to screw it in counter-clockwise because the threading is the reverse of a normal
screw.Do this by slowly pedaling the cranks backwards.If the pedal feels stiff stop and then re-try, it
should feel like a smooth motion.Do not use the wrench until you are ready to tighten it for the
final few turns. Tighten it down until you can't anymore.(Figure. 4-2)
Please Note: Hand tight is not sufficient. Use a tool. If after riding,the threads on your crank is
stripped.you have not followed these instructions. Your crank needs replacing (this is NOT covered
by warranty).
3. Install the right hand pedal
this one threads in clockwise, like a normal screw. Follow the same principals as discussed in step 2
for the left pedal.(Figure. 4-3)
4. Wipe off any excess grease from around the crank.
TORQUE SPECIFICATIONS
- 9 -
Battery Installation & Removing & Charging
1. Battery Installation
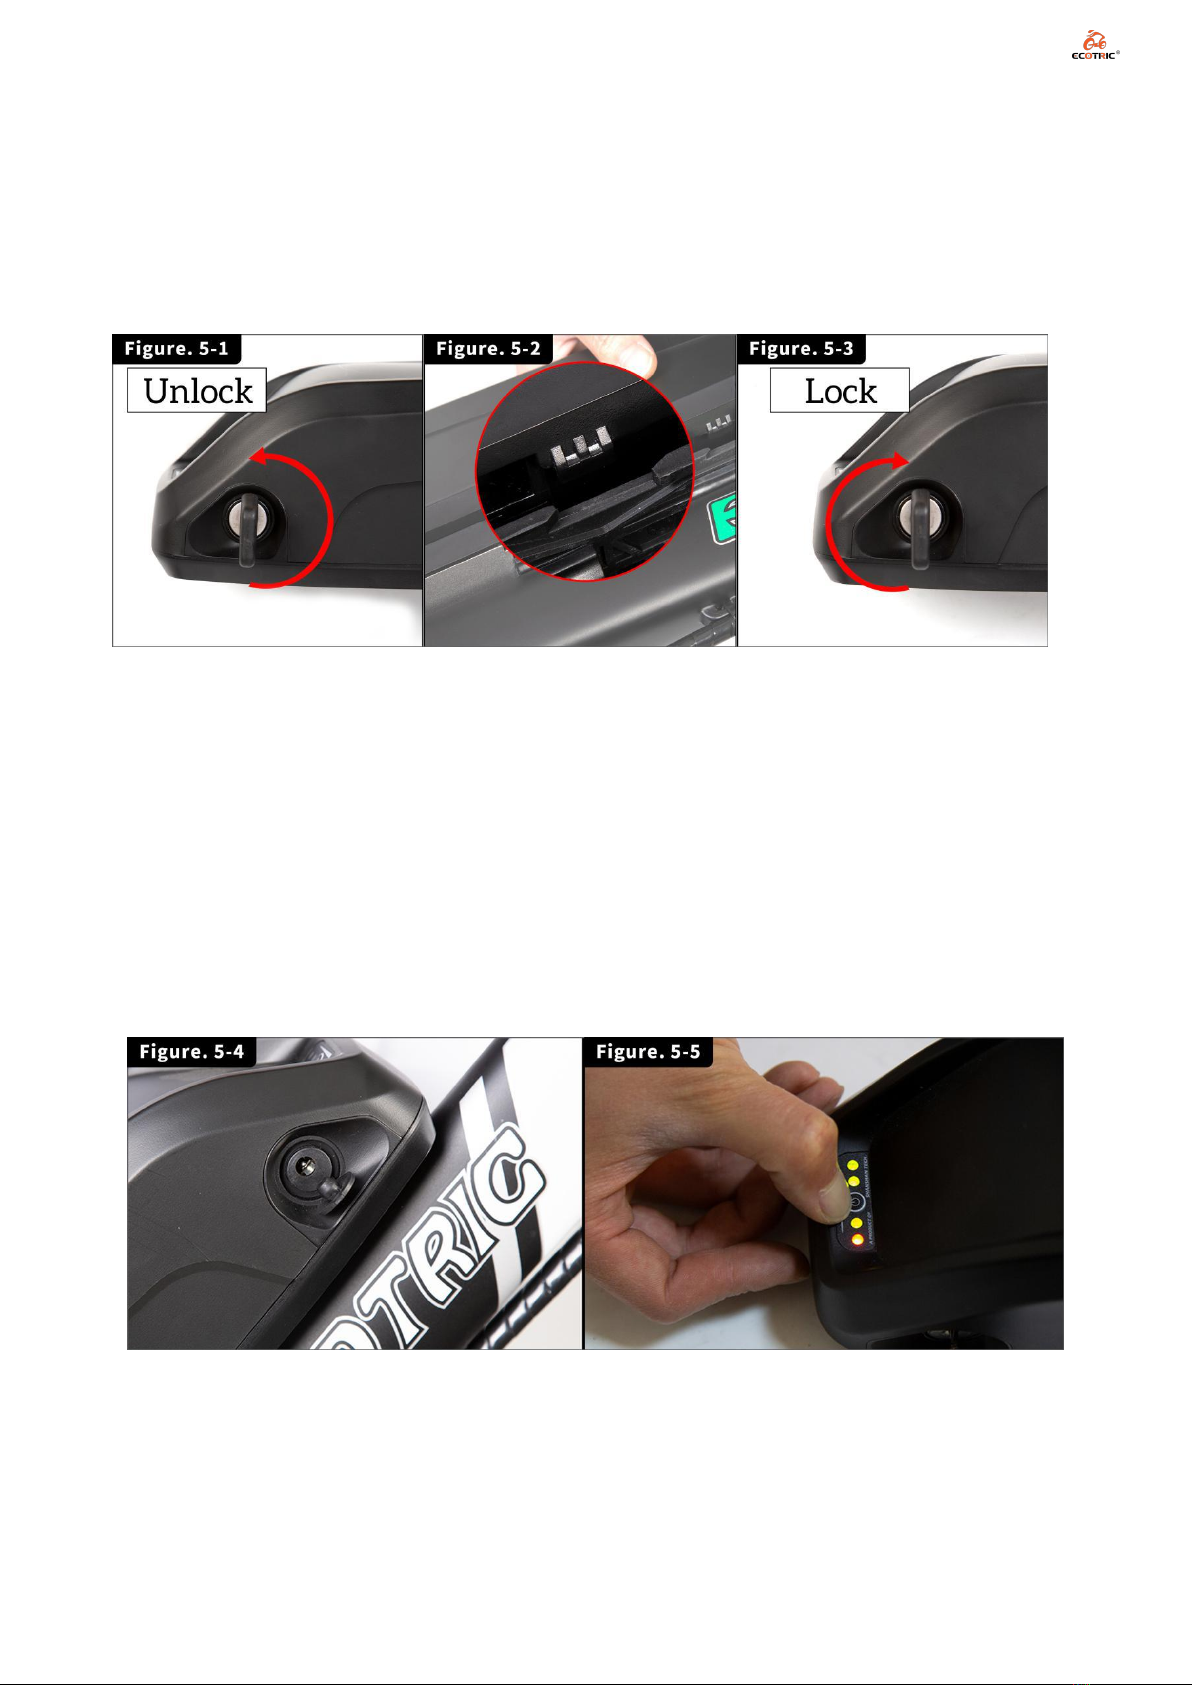
Turn the key(normally the keys are tied on the clamp of seat tube) to unlock position (Figure.
5-1 ),Line up the grooves on the battery and battery holder(Figure. 5-2),then slide the battery
down,turn the key to lock position(Figure. 5-3) and remove the key.
Please Note: the function of lock is used to for locking the battery on frame only
2. Battery Removing
Do the same thing when installing but in inverse order.
3. Battery Charging
Finding the charging port on the battery (Figure. 5-4),connect the charger’s plug to the battery
charging port ,then connect the other side plug to the AC outlet(110v-240v).The LED on the
charger is red color when charging,it will turn to green color when the battery is full charged. it will
be 6-8 hours for full charging the battery. Remember to full charging the battery before first riding.
Please Note: There is a small button on the battery,press and hold the small button,you can see
the remaining capacity of the battery (It is 1 red light + 3 green lights when full charged) (Figure.
5-5).
Altri manuali per FAT26S900
1
Questo manuale è adatto per i seguenti modelli
1
Indice
Altri manuali Ecotric Bicicletta


