
Edge Products Juice Manuale utente

installation Instructions
installation Instructions
Dodge Juice
Dodge Juice
**read important safety information in this manual**
**read important safety information in this manual**

TABLE OF CONTENTS Installation Instructions
2
Dodge Juice
TABLEOFCONTENTS INTRODUCTION INSTALLATION OPERATINGINSTRUCTIONS APPENDIX
TABLEOFCONTENTS INTRODUCTION INSTALLATION OPERATINGINSTRUCTIONS APPENDIX
Table Of Contents
INTRODUCTION ........................................ 4
PRODUCT REGISTRATION ............................................. 4
IMPORTANT NOTES ...................................................... 5
ABOUT THE JUICE ....................................................... 6
INSTALLATION.......................................... 8
1998.5 - 2002 5.9L (24V) .......................................... 8
CONNECTING TO CONSTANT POWER .............................. 9
CONNECTING TO GROUND ........................................... 10
CONNECTING TO KEY-ON POWER .................................. 10
CONNECTING TO MAP SENSOR ..................................... 11
CONNECTING TO DATA LINK ......................................... 11
CONNECTING TO INJECTION PUMP................................ 12
BOOST ELBOW INSTALLATION ...................................... 13
“LIFT PUMP” FUEL PRESSURE SENSOR INSTALL ............ 14
FUEL SYSTEM BLEEDING INSTRUCTIONS ....................... 15
CONNECTING TO TRANSMISSION (AUTOMATIC) ............... 16
CONNECTING TO TRANSMISSION (STANDARD) ............... 17
2003 - 2004 5.9L (CR) ............................................ 18
CONNECTING TO POWER .............................................. 19
CONNECTING TO GROUND ........................................... 20
CONNECTING TO INJECTORS ........................................ 20
CONNECTING TO MAP SENSOR ..................................... 21
CONNECTING TO DATA LINK ......................................... 21
CONNECTING TO FUEL PRESSURE SENSOR ................... 22
BOOST ELBOW INSTALLATION (OPTIONAL) ..................... 22
2004.5 - 2005 5.9L (600) ......................................... 23
CONNECTING TO POWER .............................................. 24
CONNECTING TO TURBO TIMER ..................................... 25
2006 - 2011 5.9L & 6.7L......................................... 26
CONNECTING TO POWER .............................................. 27
CONNECTING TO GROUND ........................................... 29
CONNECTING TO INJECTORS ........................................ 29
CONNECTING TO MAP SENSOR (2006 - 2007 5.9L ONLY) 30
CONNECTING TO DATA LINK ......................................... 30
CONNECTING TO THE TURBO TIMER .............................. 31
2007.5-2011 6.7L (RACING) ..................................... 33
DPF EGT SENSOR INSTALLATION .................................. 34
EGR “SPOOFER” INSTALLATION ................................... 35

TABLE OF CONTENTS
TABLEOFCONTENTS INTRODUCTION INSTALLATION OPERATINGINSTRUCTIONS APPENDIX
TABLEOFCONTENTS INTRODUCTION INSTALLATION OPERATINGINSTRUCTIONS APPENDIX
3
Installation Instructions
Dodge Juice
EGT PROBE INSTALLATION.........................................36
TAPPING AND PROBE INSTALLATION............................. 36
CONNECTING THE PROBE TO JUICE .............................. 38
JAB INSTALLATION ...................................................39
1998.5 TO 2011 - JAB INSTALLATION ............................ 39
2006-2011 OBDII CONNECTION .................................... 41
JUICE MODULE INSTALLATION ................................... 41
FINAL JUICE MODULE INSTALLATION ............................ 41
MOUNTING AND SECURING THE JUICE .......................... 42
FINAL INSPECTION....................................................42
OPERATING INSTRUCTIONS ..................... 43
USING THE JUICE ....................................................43
APPENDIX .............................................. 44
ENGINE COMPARTMENT(REFERENCE) .........................44
1998.5 - 2002 ............................................................ 44
2003-2005 ................................................................ 45
2006 - 2011 ............................................................... 46

INTRODUCTION Installation Instructions
4
Dodge Juice
TABLEOFCONTENTS INTRODUCTION INSTALLATION OPERATINGINSTRUCTIONS APPENDIX
TABLEOFCONTENTS INTRODUCTION INSTALLATION OPERATINGINSTRUCTIONS APPENDIX
PLEASE take the time to register your product on line at edge-
products.com. Follow the instructions at link: http://www.edge-
products.com/product_registration.php
BENEFITS OF PRODUCT REGISTRATION
-Your Safety - Registering your product allows us to know exactly
which product you have and provide important product updates to
you that improve the quality and/or safety of the product.
-Enhanced Features - Almost all Edge products are easily updated
via the internet. We are constantly adding new features and im-
provements to our product that we know you will want to enjoy.
-Confirmation of Ownership - Provides a record in case of prod-
uct loss, theft, or required warranty work. When you call us for
support our team will already have much of the information they
need to help you.
-Improved Product Development - Helps us better understand
you (our customer) and design products that meet your needs.
-Special Offers - Allows us to inform you about special offers on
accessories and/or new products that fit your vehicle and enhance
your driving experience.
P R O D U C T R E G I S T R A T I O N
PRODUCT REGISTRATION

INTRODUCTION
TABLEOFCONTENTS INTRODUCTION INSTALLATION OPERATINGINSTRUCTIONS APPENDIX
TABLEOFCONTENTS INTRODUCTION INSTALLATION OPERATINGINSTRUCTIONS APPENDIX
5
Installation Instructions
Dodge Juice
I M P O R T A N T N O T E S
IMPORTANT NOTES
1. If you have used another tuner/programmer on
your truck, you will need to program your truck
back to stock before using the Attitude or Juice.
Failure to return to stock may result in PCM failure or engine
damage.
2. Programming your vehicle may expose existing defects in your
vehicle’s PCM that could disable your vehicle. It is advised that
you do not program your vehicle in remote location in case of
vehicle failure.
3. All Edge modules and programmers are built to operate with
OEM calibrations. When you take your vehicle to a service center
they may, by your request or otherwise, update your vehicle’s
calibrations. Therefore it is important that you return your vehicle
to stock before taking it in for service. Edge updates its active
products (i.e. those currently being manufactured) to work effec-
tively with updated OEM calibrations. However, this process can
take some time as Edge is not always made aware of calibration
changes made by the OEM. In the case of discontinued products,
Edge cannot ensure that your unit will work effectively if you take
your vehicle to a dealership and you are given, by your request or
otherwise, a new calibration.
4. For specific information regarding horsepower, torque, and
other features available for this product:
(1) Go to www.edgeproducts.com
(2) Type the part number of your product in the “KEYWORD/
PART# SEARCH” and press enter.
(3) Click the link under “Description”
(4) Scroll down to the “DOWNLOAD VEHICLE SPECIFIC HORSE-
POWER, TORQUE,AND FEATURES CHART” link and click on it.
(5) Find the information that is specific to your make and model.

INTRODUCTION Installation Instructions
6
Dodge Juice
TABLEOFCONTENTS INTRODUCTION INSTALLATION OPERATINGINSTRUCTIONS APPENDIX
TABLEOFCONTENTS INTRODUCTION INSTALLATION OPERATINGINSTRUCTIONS APPENDIX
Congratulations on purchasing the Edge Juice/Attitude system for
the Dodge Cummins Diesel®.
The Juice/Attitude system features an intelligent module (Juice)
that acts as an add-on Engine Control Module (ECM) for the Cum-
mins Diesel® Engine. This module is controlled and customized
in the cab of your truck by the Attitude monitor/controller.
This system offers many cutting-edge, additional features not
available with the factory setup. Since the Juice Module is an add-
on ECM, it uses data from your truck’s computer or engine control
module (ECM), and then enhances the factory settings to optimize
your truck’s performance. This product offers a wide variety of
amazing performance and safety features that can ensure you get
the driving experience you desire without damaging your truck.
Please take the time to thoroughly review all of the features and
product options outlined in this manual. Taking the time to un-
derstand how this product works and how to properly operate this
product will ensure that you have an extraordinary and safe driving
experience. If we can be of any assistance to help you get the most
from your product please call us at 888-360-3343. We are open
Monday through Friday from 8am to 5pm Mountain Time.
A B O U T T H E J U I C E
ABOUT THE JUICE

INTRODUCTION
TABLEOFCONTENTS INTRODUCTION INSTALLATION OPERATINGINSTRUCTIONS APPENDIX
TABLEOFCONTENTS INTRODUCTION INSTALLATION OPERATINGINSTRUCTIONS APPENDIX
7
Installation Instructions
Dodge Juice
IMPORTANT: Read all Safety, Warranty, and Installation In-
structions in this manual and the CS/CTS User Guide before in-
stalling this product. Read through these instructions completely
so that you understand each step prior to installation.
SAFETY TERMS
Throughout this User Guide (hereafter noted as User Manual or
Manual) you will see important messages regarding your safety or
the protection of your vehicle. These messages are designated by
the words WARNING or CAUTION.
WARNING indicates a condition that may cause serious
injury or death to you, your passengers or others nearby. Pay
careful attention to these Warning messages, and always comply
with them. They could save a life.
CAUTION indicates a condition that could cause damage to your
vehicle. It is important to install and operate your EDGE prod-
uct in conformance with instructions in this Manual. Caution
alerts you to particularly important things that will keep your
vehicle operating properly.
INSTALLATION Installation Instructions
8
Dodge Juice
TABLEOFCONTENTS INTRODUCTION INSTALLATION OPERATINGINSTRUCTIONS APPENDIX
TABLEOFCONTENTS INTRODUCTION INSTALLATION OPERATINGINSTRUCTIONS APPENDIX
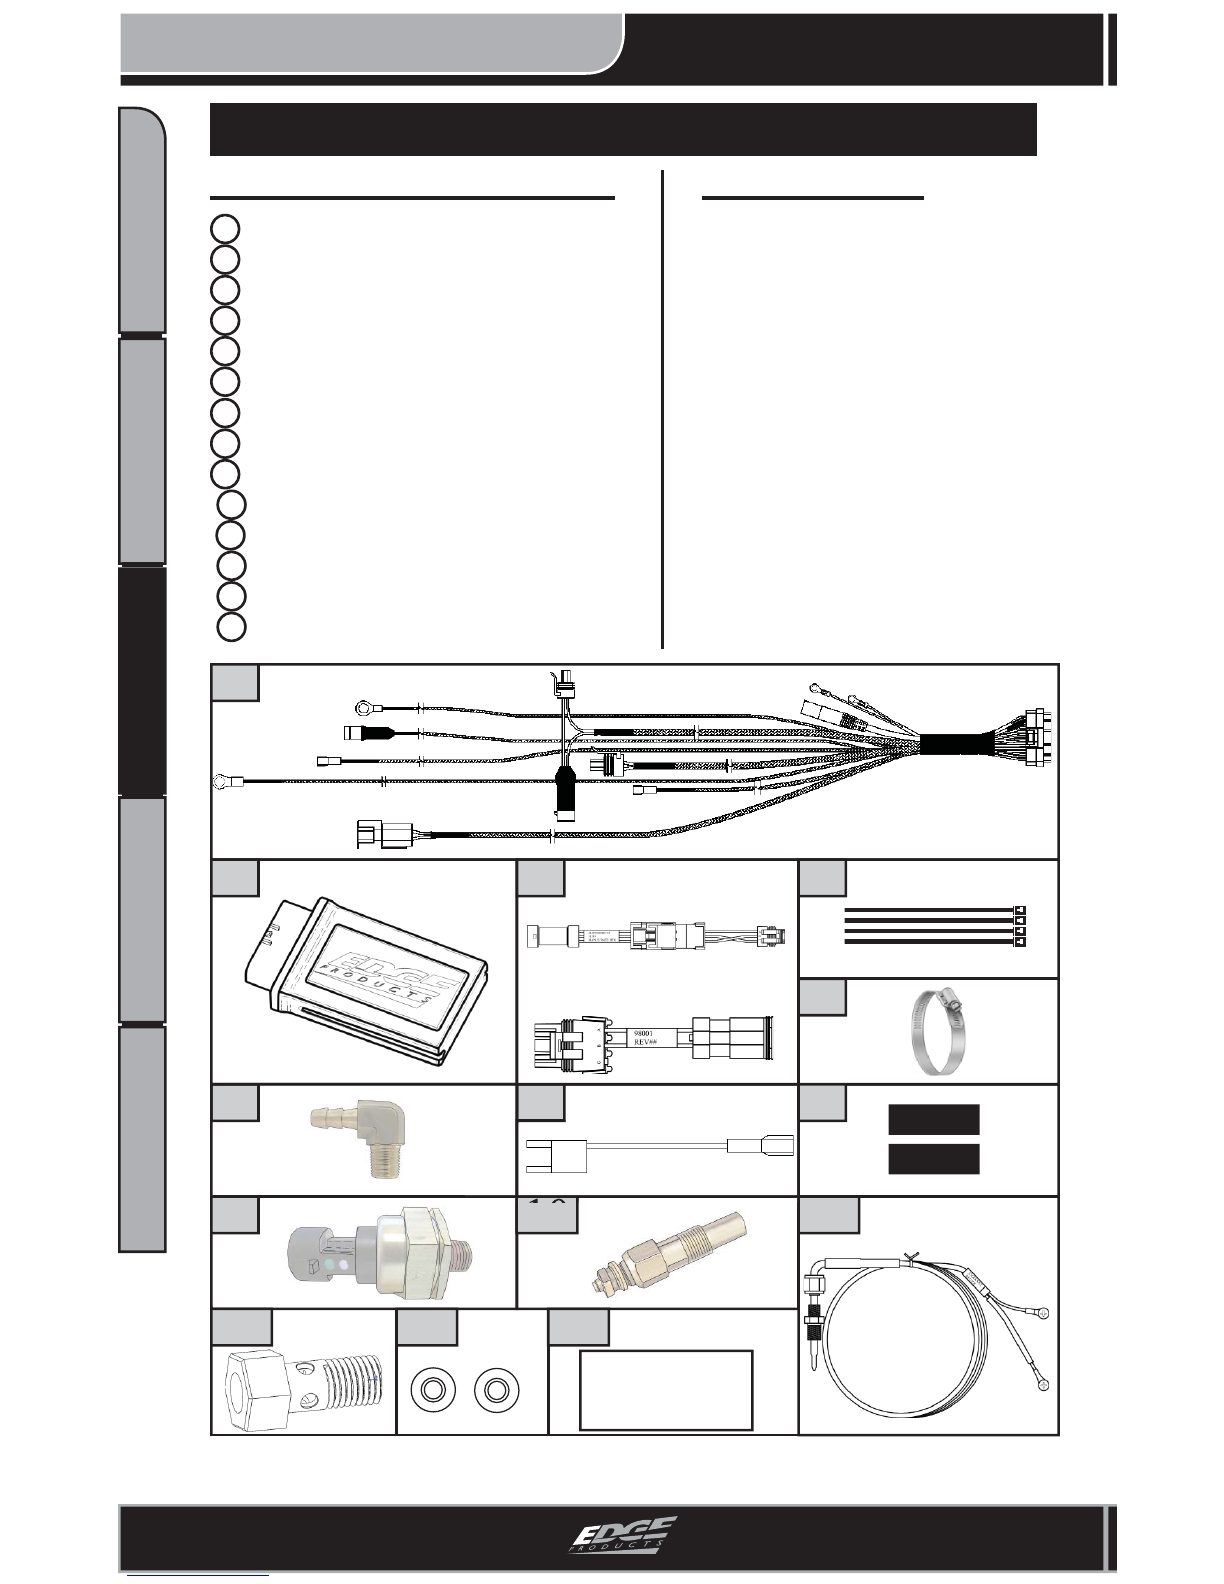
Supplied Items Qty Required Tools
-Knife
-2 to 3 ft of wire (fishing)
-Needle nose pliers
-Phillips screwdriver
-Flat tip screwdriver
-3/8” Drive Torque Wrench
-1/2” Wrench
-3/8” Drive Ratchet
-1/4” Socket
-5/16” Socket
-7/16” Deep Well Socket
-10mm Socket
-13mm Socket
-1/8” NPT Tap
-5/16” or 21/64” Drill Bit
1 9 9 8 . 5 - 2 0 0 2 5 . 9 L ( 2 4 V )
1998.5 - 2002 5.9L (24V)
1 Main Wiring Harness...................(1)
2 Edge Juice Module.......................(1)
3 Adapters.......................................(1)
4 Zip Ties ......................................(10)
5 Hose Clamp..................................(1)
6 Brass Fitting.................................(1)
7 Leaded Fuse Link.........................(2)
8 Velcro Strips..................................(2)
9 Fuel Pressure Sensor....................(1)
10 Temperature Sensor......................(1)
11 EGT Probe...................................(1)
12 Banjo Bolt...................................(1)
13 Washer.........................................(2)
14 CS/CTS Kit.................................(1)
1
2 43
6 7
5
8
9 10 11
12 13
2000 (Data Link)
2001-2002 (MAP)
Note: Depending on your year of truck, you may not need everything provided.
14
REFER TO QUICK
INSTALL GUIDE
FOR INSTALL
INSTALLATION
TABLEOFCONTENTS INTRODUCTION INSTALLATION OPERATINGINSTRUCTIONS APPENDIX
TABLEOFCONTENTS INTRODUCTION INSTALLATION OPERATINGINSTRUCTIONS APPENDIX
9
Installation Instructions
Dodge Juice
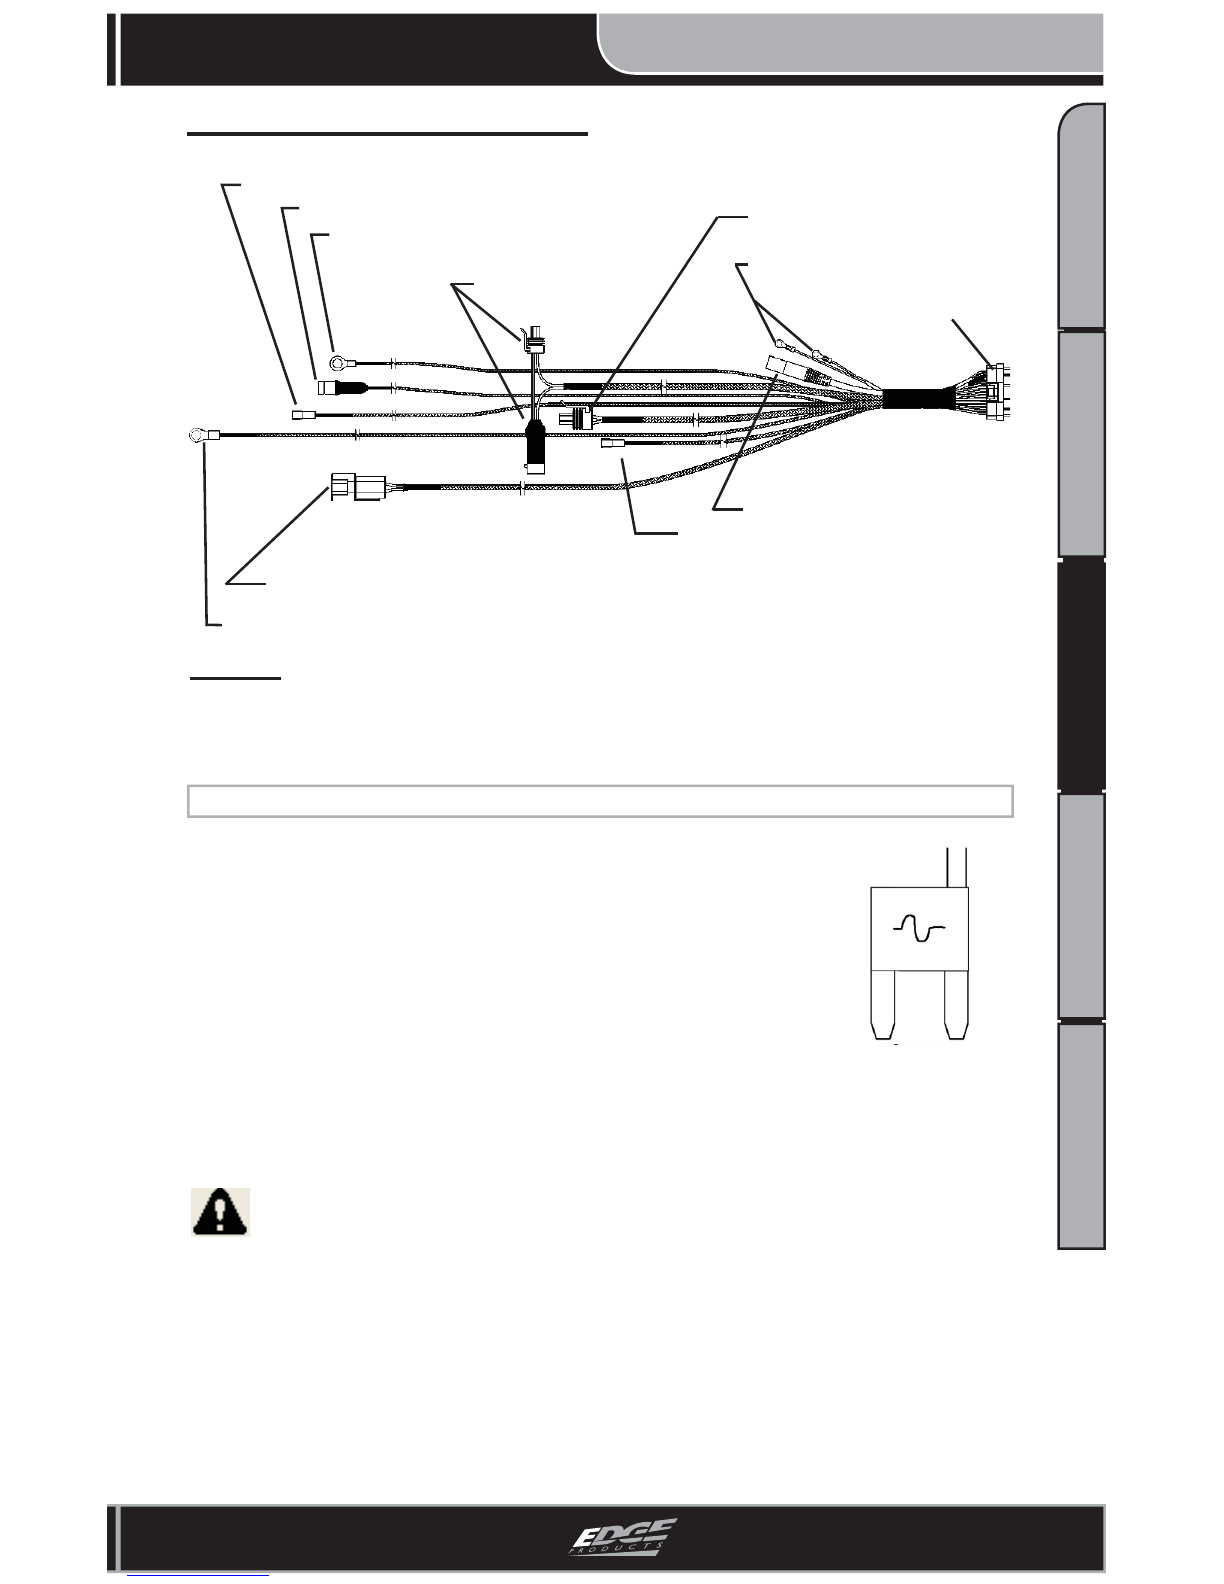
Ground Connector (Black)
Injection Pump Connector
Key-On Power Connector - Yellow (Required at all times)
Transmission Temp Sensor Connector(Purple/White)
Data Link Connector
MAP Connectors EGT Probe Connector
Attitude Connector
Fuel Pressure Connector
Constant Power Connector -
Red (Required for Turbo Timer
Install, otherwise Optional).
Harness Connection Guide
Figure 2
NOTE: DO NOT reconnect battery until installation is complete. Connecting
power may cause fault code in the ECM.
Figure 1 - (Data Link and MAPconnectors may vary from this view de-
pending on your vehicle year. If this is the case, you will need to use the
supplied adapters.)
WARNING An electrical charge or battery acid can burn you. Battery
gas can explode or ignite. Take care when working around the battery. Follow
instructions in the vehicle owner’s manual for disconnecting and reconnecting a
battery.
Main Juice
Connector
1. Using the ½” wrench, loosen both negative battery cables.
2. Remove cables from the battery posts and set aside.
3. Locate and remove the 10 Amp “A/C Clutch” fuse from
inside the engine compartment fuse panel.
4. Insert the Leaded Fuse link (see Figure 2). The leg with the
wire soldered to it needs to plug into the “HOT” side of the
fuse location. Orient the fuse exactly as shown in Figure 3 on
the following page.
5. From the main harness, connect the Red Constant Power Connector to the
installed Fuse Link (Figure 3)
CONNECTINGTOCONSTANTPOWER
(Required for proper Turbo-Timer functionality)
i

INSTALLATION Installation Instructions
10
Dodge Juice
TABLEOFCONTENTS INTRODUCTION INSTALLATION OPERATINGINSTRUCTIONS APPENDIX
TABLEOFCONTENTS INTRODUCTION INSTALLATION OPERATINGINSTRUCTIONS APPENDIX
Figure 3
Fuse Diagram (Engine
Compartment)
Figure 4 - Driver Side Fuse Panel
Fire wall
Routed Cable
Grommet
CONNECTINGTOGROUND
1. Connect the Ground Connector to the NEGATIVE side of the battery.
1. Cut a 1/2” slit in the fire wall grommet.
NOTE: Automatics - easy access is the clutch hole grommet located to the left
of the fire wall brake hole. Manuals or Automatics- Use the large vehicle wir-
ing harness grommet on the fire wall.
2. Route the Yellow Key-On Connection from the engine compartment to inside
the cab through the cut hole from step 1.
3. Locate and remove Fuse 9 (10 Amp) from inside the driver side fuse panel.
4. Insert the Leaded Fuse link (see Figure 2). The leg with the wire soldered to
it needs to plug into the “HOT” side of the fuse location. Orient the fuse exactly
as shown in Figure 4 below.
5. Connect the Yellow Key-On (routed in step 2) to the installed Fuse Link.
CONNECTINGTOKEY-ONPOWER
FUSE 9
To Fire-wall
Indice
Altri manuali Edge Products Elettronica per automobili


