Eizo SSZ-9700 Manuale utente
SSZ-9700
Instruction Manual
Thank you for purchasing this product.
Please read this manual carefully before using to ensure proper use of this product.
Be sure to read “Safety Precautions” in particular to use the product safely.
Please keep the manual at hand after reading and read it when necessary.

Table of Contents
Safety Notice ...................................................................................................................... 3
Precautions ........................................................................................................................ 4
Storage and Operating Environment .................................................................................................. 4
Transportation .................................................................................................................................... 5
Maintenance ....................................................................................................................................... 5
Phenomena Specific to CMOS Image Sensors .................................................................................. 5
Phenomena Specific to Lens .............................................................................................................. 5
Others ................................................................................................................................................. 6
Disclaimer ........................................................................................................................................... 6
Contents of This Manual ..................................................................................................................... 6
Introduction ....................................................................................................................... 7
Features ............................................................................................................................. 7
Names and Functions of Parts ......................................................................................... 8
Operation ........................................................................................................................... 9
User Setup .......................................................................................................................................... 9
Names and Functions of Setup Buttons ............................................................................................. 9
Structure of Setup Mode ..................................................................................................................... 9
Contents of Main Menu ....................................................................................................................... 9
Main Menu ............................................................................................................................................................ 9
ALC Menu ........................................................................................................................................................... 10
Picture Menu ....................................................................................................................................................... 12
Color Menu .......................................................................................................................................................... 14
Lens Menu .......................................................................................................................................................... 15
Video Output Menu ............................................................................................................................................. 16
Device Setting (1/2) Menu ................................................................................................................................... 17
Device Setting (2/2) Menu ................................................................................................................................... 19
Information: Version ............................................................................................................................................ 20
Restrictions on Menu Setting .............................................................................................................................. 21
Menu Structure ................................................................................................................ 22
Specifications .................................................................................................................. 24
Dimensions ...................................................................................................................... 26
Recycling Information ..................................................................................................... 27
Warranty Policy ............................................................................................................... 30
Warning for Radio interference ..................................................................................... 31
2
Safety Notice
Mount this unit to a stable place with sufficient strength.
Tighten all screws and locking mechanism firmly.
If the screws are loose, this unit may fall resulting in injury. Falling from height may lead to
serious accident.
Use at correct power supply and voltage.
The rated input voltage of this unit is DC 12 V. Supplying a power beyond the rated value may
cause damage to this unit, and it may lead to smoke or fire at the worst. Input a voltage
according to the rated voltage of the camera.
This unit is able to divert lightning conduction to itself and the connecting cables to some
extent, but this is not 100 % guaranteed. For installation locations subject to lightning strikes,
make sure to apply lightning induction to the connecting cables.
Avoid rubbing the metal edge.
Rubbing too hard may lead to injury.
If there is any abnormality such as smoke, abnormal noise or foreign object, turn off
the power supplied to the camera. Remove the camera and immediately contact the
retailer where you purchased the product.
Do not disassemble or modify. Doing so may impair the functions of the product or
cause an electric shock.
3

Precautions
Storage and Operating Environment
0
This unit is intended for indoor use only. Do not use it outdoor.
0
Do not shoot extremely bright subjects (such as lighting and sun) for long periods of time. And avoid
placing the product in the following locations. Doing so may result in unwanted operation or malfunction.
0
Extremely hot or cold places (Operating temperature: -10 °C to +50 °C [14 °F to 122 °F])
0
Extremely humid places (Operating humidity: 35 %RH to 90 %RH, without condensation)
0
Near strong magnetic field sources such as transformer or motor
0
Near radio wave sources such as transceivers or cellular phones
0
Near TV or radio transmitters that emit strong radio waves
0
Locations affected by reflections from fluorescent lights and window
0
Locations where unstable lighting is used (where flicker occurs)
0
Locations that reflects laser light
0
Near high-voltage lines and railroad tracks
0
Extremely dusty or sandy locations
0
Locations subject to strong vibration or shock, such as inside vehicles or ships
0
Locations exposed to rain or condensation, such as window side.
0
Locations subject to steam or oil, such as kitchens.
0
Special environment such as in combustible atmosphere
0
Locations where radiation, X-rays, salt attack or corrosive gases occur
0
Locations where chemicals are used, such as pools and hot springs
0
If this unit and the cable connected to this unit are used in a location where strong radio waves or
magnetism are generated (e.g., near a radio, TV, transformer, railroad track, monitor, etc.), noise or
beats may appear in the image and change its color.
0
Insufficient heat dissipation from this unit may lead to malfunction. To prevent heat buildup, do not block
air circulation around this unit. This unit dissipate heat from the surface (side) of the main unit. Do not
install this unit at a location where heat is trapped, such as near a wall.
0
Do not install this unit at a location exposed to cold air, such as near the air outlet of an air conditioner.
0
When using in the following conditions and environments, do contact us and pay attention to safety
measures.
0
Use in conditions and environment other than the specifications stated or outdoor.
0
Use for applications that are expected to have a significant impact on people and property and
require specific safety.
0
This unit is used under various conditions, do perform analysis and testing as necessary before making
a decision although the suitability of the device or equipment have been decided by the designer of the
device or equipment or the person who decides the specifications. The performance and safety of this
device or equipment should be guaranteed by the customer who has determined the compatibility with
the device or equipment.
0
This unit is not designed and manufactured to be used for controlling devices that directly affect
someone’s life (*1) or devices that are involved in one’s safety and have a significant impact on the
maintenance of public functions (*2). Do not use for those purposes.
*1 Devices that directly affect someone’s life are as follows.
0
Medical equipment such as life support machines and operating room equipment
0
Exhaust gas such as toxic gas, smoke exhaust device
0
Devices that are required to be installed by various laws and regulations such as the fire legislation
and building regulations
0
Devices based on the above stated
4

*2 Devices that are involved in one’s safety and have a significant impact on the maintenance of
public functions are as follows.
0
Traffic control equipment for aviation, railroads, roads, shipping, etc.
0
Equipment such as nuclear power plants
0
Devices based on the above stated
Transportation
0
Always turn off the power before moving this unit.
0
Handle the unit with care and avoid heavy shock or vibration.
Maintenance
0
Remove dust or dirt on the surface of the lens with a blower (commercially available). Do not use a spray
type blower to clean the lens as water droplets may splatter into the lens. Pay careful attention when
cleaning the lens.
Phenomena Specific to CMOS Image Sensors
0
The following phenomena that may appear in images are specific to CMOS (complementary metal-
oxide semiconductor) image sensors. They do not indicate malfunctions.
0
White Spots
Although the CMOS image sensors are produced with high-precision technologies, fine white spots
may be generated on the screen in rare cases, caused by cosmic rays, etc. This is due to the principle
of CMOS image sensors and is not a malfunction. The white spots tend to be seen especially in the
following cases:
- When operating at a high environmental temperature
- When the shutter speed is slowed down
- When you have raised the master gain (sensitivity)
0
Aliasing
When fine patterns, stripes, or lines are shot, they may appear jagged or flicker.
Phenomena Specific to Lens
0
The following phenomenon that may appear in images is specific to a lens and is not a malfunction.
0
Ghosting
When bright light source like the sun is near the angle of incidence of the lens, extremely bright
shadows may appear in the image due to diffuse reflection within the lens.
5

Others
0
For safety and power saving purposes, turn off the system when it will not be used for a long time.
0
This unit is a precision instrument, do not subject to strong impact.
0
Attach the lens cap to the lens when the camera will not be used for a long time.
0
This unit is designed to be used indoor. Be sure to take protective measures for the lens such as
attaching a protective cover when using it outdoor.
0
We recommend that a cable connected to the DC power terminal and RS-485 port be 3 meters or less.
Disclaimer
0
We will not be responsible for any inconveniences or disturbances caused in the event of privacy
invasion as a result of camera footages of this product.
0
We do not accept liability for the damage of recording or storing image and/or the missing opportunity
of recording in the case caused by a problem of this unit.
0
Before starting an important recording, make sure to take a test recording in order to confirm a normal
recording possible.
0
We are not liable for any damages caused by earthquakes, fires, acts by third parties, other accidents,
by deliberate intention or negligence of the customer, misuse, or use under other abnormal conditions.
0
We are not liable for any damages caused by malfunctions due to the use with any connected devices
(including image processing boards and lenses) and software that we are not involved in.
0
We will not take any responsibility for infringement or damage if violation of privacy occurred due to the
camera image of this unit.
0
We are not liable for any damage caused by prolonged recording with AF Mode set to Auto.
0
Please note that we are not responsible for any damage to your hardware or software caused by the
software provided by us or your own application software.
0
We are not liable for any damages caused by not observing the contents in the specification and
instruction manual.
0
We are not liable for any damages caused by operating methods other than those described in the
specification and instruction manual.
0
We are not liable for any damages caused by repairs or modifications by the customer or an unauthorized
third party (non-designated service shop, etc.).
0
In any case, the cost we bear for this product shall be within the price of this product.
Contents of This Manual
0
The specifications and/or appearance of the product are subject to change without prior notice.
0
“Carina System” is the registered trademark of Carina System Co., Ltd.
0
Other product names are trademarks or registered trademarks of their respective companies.
6

Introduction
This unit is an ultra-sensitive single-panel color camera equipped with a 35x optical zoom lens that covers
a focal length from wide angle 6.5 mm to telephoto 230 mm, and it uses a 2.12 million pixel 1/1.8-inch
CMOS sensor. Ideal for surveillance or security measures and environmental surveys in low light areas
at night for borders, harbors and other special purposes.
Features
0
Enables color imaging with high sensitivity under low-light conditions, down to 0.004 lx.
0
Maintains excellent SN ratio even at high-gain settings, with the original 2D/3D noise reduction function.
0
Achieves a maximum zoom ratio of up to 350x (f = 10500mm in 35mm equivalent) by combining a 35x
optical zoom lens and 10x digital zoom (when using digital zoom, resolution is reduced).
0
Enables recording of clear images under hazy condition with the optical Defog function by an infrared
light transmission filter.
0
Enables recording under significant brightness difference condition with the HDR function.
0
Capable of establishing an advanced surveillance system with the RS-485 communication function.
7
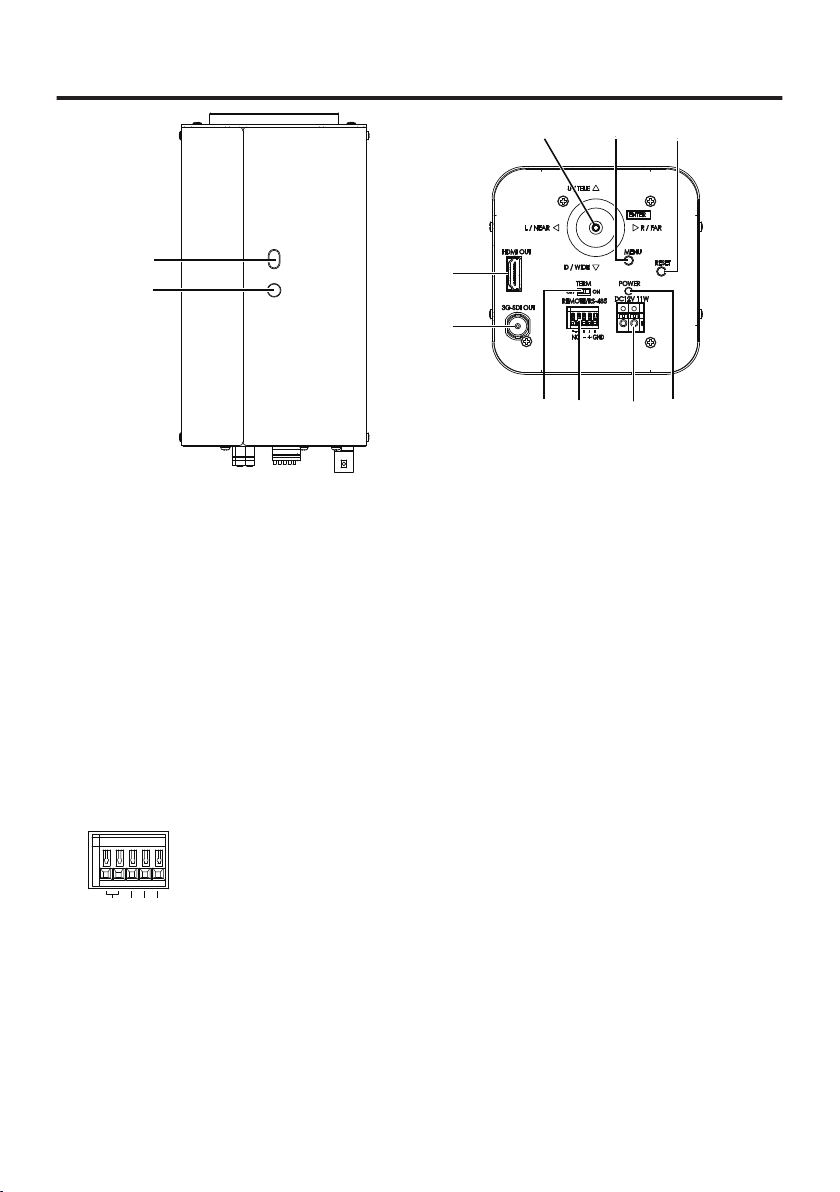
Names and Functions of Parts
❶⓫
❷
❸❹❺
❻❼❽❾
❿
A
Securing Hole
Can be used to prevent rotation.
B
Tripod Socket
Socket for securing onto a tripod etc. Use 1/4"-20 UNC screws with length of 5.5 mm or less.
C
Arrow Buttons
Refer to the menu operation. (→ P 9)
D
MENU Button
Refer to the menu operation. (→ P 9)
E
RESET Button
Reboots the camera when it is pressed.
F
Power Indicator
Lights up in green when the camera is turned on.
G
DC 12 V Connection Terminal Block
Input DC 12 V. (No polarity)
H
RS-485
Use for remote controlling via RS-485.
NC - +
GND
I
RS-485 Terminal Switch
During RS-485 communication, set to “ON” for one-to-one control and “OFF” for daisy-chain
connection. (Last connection device is ON)
J
3G-SDI Output Terminal
Image output terminal for 3G-SDI.
K
HDMI Output Terminal
Image output terminal for HDMI.
8
Operation
User Setup
Setup menu can be set on the OSD display.
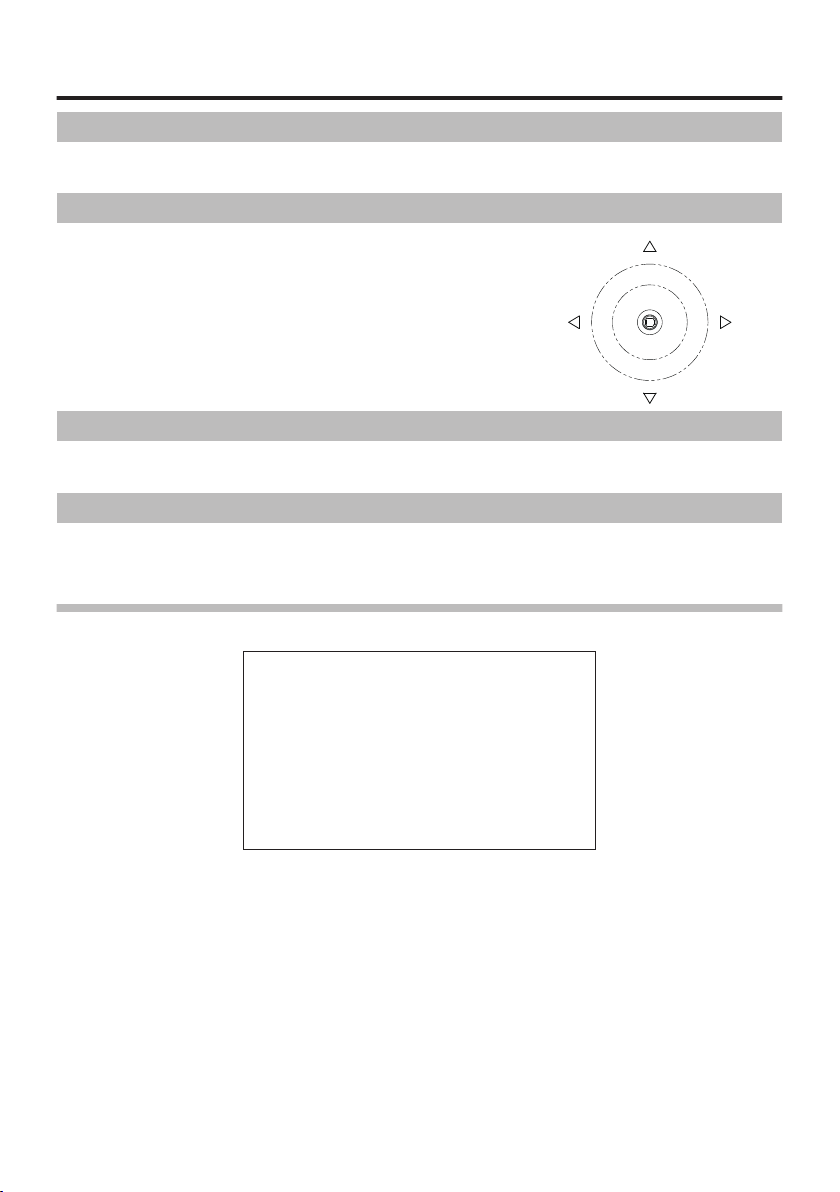
Names and Functions of Setup Buttons
Operate using the Arrow buttons (figure on the right) on the back
of the camera. Use the Arrow buttons to move up, down, left and
right to the item you want to select, and press the Arrow button (OK
button) to confirm.
Structure of Setup Mode
The setup menu consists of 7 items of setup menu.
Contents of Main Menu
The menu’s initial screen (Main Menu) appears when the MENU button is pressed. Various settings for
the camera operation are available. To close the menu screen, press the MENU button again or select
EXIT.
Main Menu
ALC
Picture
Color
Lens
Video Output
Dev. Setting
Information
Setup
Setup
Setup
Setup
Setup
Setup
Disp
䐝
䐝
䐝
䐝
䐝
䐝
䐝
Main Menu
EXIT
U / TELE
D / WIDE
L / NEAR R / FAR
9

ALC Menu
ALC Mode
ALC Level
Limits
Shutter
Gain
Iris
BLC Mode
Detailed
Full Auto
・・・・・・・
Setup
1/60
0.0dB
F**
Off
Settings
㻌
100
䐝
㻌
㻌
㻌
䐝
ALC
EXITRETURN
ALC Mode
For selecting the method to control the brightness.
Full Auto
The gain, shutter speed and iris are automatically adjusted.
Shut.Prio.
The gain and iris are automatically adjusted and the shutter speed can be adjusted to any setting value.
Gain Prio.
The shutter speed and iris are automatically adjusted and the gain can be adjusted to any setting value.
Iris Prio
The gain and shutter speed are automatically adjusted and the iris can be adjusted to any setting value.
Manual
The gain, shutter speed and iris can be adjusted to any setting value.
ALC Level
Adjust the convergence value for automatic exposure using the Arrow buttons. Moving the lever to the
right enhances the brightness. Adjust to the appropriate position while looking at the actual image.
Limits
Adjust the maximum and minimum values of shutter speed, gain, and iris to any setting value during automatic
adjustment.
Shutter
When ALC Mode is set to Shut.Prio. or Manual, use the Arrow buttons to adjust any value setting for the
shutter speed.
0
1/1, 1/2, 1/4, 1/8, 1/15, 1/30, 1/60, 1/100, 1/125, 1/250, 1/500, 1/1000, 1/2000, 1/4000, 1/10000 [59.94 Hz system]
0
1/1, 1/2, 1/3, 1/6, 1/12, 1/25, 1/50, 1/100, 1/125, 1/250, 1/500, 1/1000, 1/2000, 1/4000, 1/10000 [50 Hz system]
* There is a margin of error in the displayed value of the shutter speed and the actual control.
Gain
When ALC Mode is set to Gain Prio. or Manual, use the Arrow buttons to adjust any setting value for the
gain.
0
0 to 78 dB (in step of 0.3 dB)
Iris
When ALC Mode is set to Iris Prio. or Manual, use the Arrow buttons to adjust any setting value for the iris.
0
F1.5, F2, F2.8, F4, F5.6, F8, F11, F16, F22
10
Indice
Altri manuali Eizo Convertitore multimediale


