Eonon D5110M Manuale utente
User Manual
Please read this manual before using and
save this manual for future reference.
Model: D5110M
TROUBLE SHOOTING
PROBLEM CAUSE SOLUTION
Can not power on
Check whether power fuse
blew or not.
Some factor cause MPU
wrong operation.
Change fuse same as the old one.
Press RESET button on the panel by pen
point, then, power on.
After ignition
switch off, setting
information all lose
Wrong connection between
ignition line ACC and
Constant 12 Volt wire.
Change the wiring around.
Remote control no
function
Poor performance
of radio station
Can not load disc
Can not play disc
Can not switch
language/subtitle
No image
Change battery in remote control.
No enough power supply
from battery.
Check whether antenna is connected or not,
or poor connection.
Improper length of antenna,
poor connection of antenna
grounding.
There is a disk inside. Eject disk, then, slot in new disk.
Disc is scratched. Change new disc.
Put wrong side of disc into unit. Slot in the disc with sign side up.
There is only one language/
subtitle in disc.
Lens has dirty. Clean lens by lens clean disc.
Video line between unit and
TV is not properly connected.
If disc is not with multi-language/subtitle, it
cannot switch language/subtitle.
Reconnect lines.
CONTENTS
0128
1. BEFORE USE 02
2. Panel function description 03
3. Remote control function 06
4. On/Off the Unit 08
5. Radio Function Operation 09
6. Disc Play 10
7. SD Card/USB Storage Device Playback 15
8. Bluetooth Function Operation 16
9. Multimedia Function Operation 18
10. Navigation Function Operation 20
11. Other Modes 21
12. Setup Function Operation 22
13. Virtual Disc 26
14. IPOD 27
28
TROUBLE SHOOTING
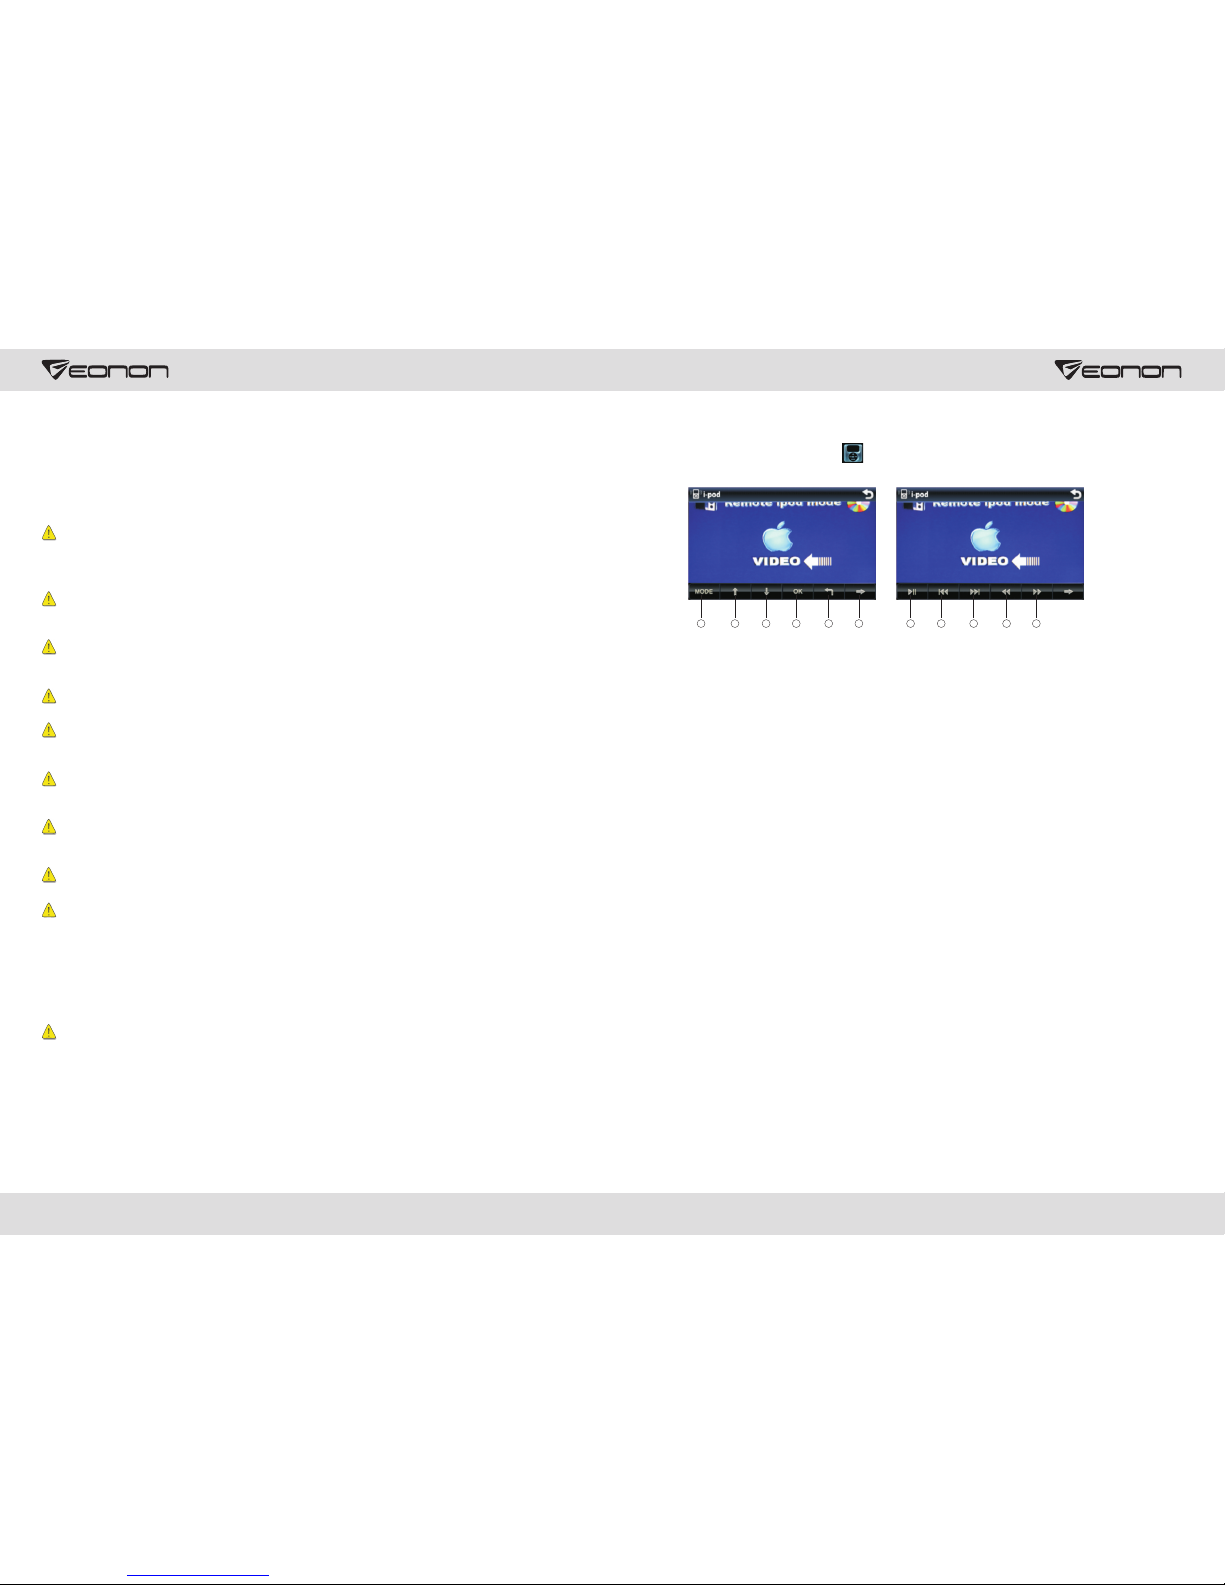
6. Next menu
7. Pause/play
8. Previous song
9. Next song
10. Speed backward
11. Speed forward
14. IPOD
Connect IPOD first, then press in multimedia main interface to access interface as
shown below:
Touch Menu
1. MODE Audio/video file switch
2. Select upward
3. Select downward
4. Confirm
5. Back to file folder menu
Note: the operation is subject to the actual interface.
1 2 345678 9 10 11
1. BEFORE USE
How to Read the Manual
The manual uses photographs to illustrate operational procedures and precautions.
Photographs in the manual are only for reference , please make the object as the
standard.
Warm
To ensure your safety and the safety of your car and others, please make sure you
follow the basic requirements below:
Before using the unit, please read all the relative instructions carefully. Warranty does
not apply to any damage caused by noncompliance with the instruction.
To ensure driving safety and avoid breaking traffic regulation, please do not watch
program or operate the unit while you are driving.
Do not expose the unit to rainwater in case of short circuit.
To avoid short circuit, please do not put or left any metal parts (such as coin or metal
tool) in the unit.
Please use the unit as the manual suggests, do not open the unit or repair by yourself.
If necessary, please go to the professional repair station for help.
When the engine is turned off, do not use the car audio for a long time, otherwise it
will run the battery down.
Do not insert any object into the ventilation slot or other openings.
Do not touch, rub or knock the screen with sharp objects.
Reset Device
If the unit or its connected device does not work normally, use prong tool to press the
reset button, after it restarts, the unit recovers factory default settings.
Directly spray the cleaning fluid onto the device may effect mechanical parts. Use
rough cloth or volatile fluid(such as thinner or alchol) may scratch the surface or
remove the characters.
Lens Mist
In cold weather, mist occurs on the lens of disc player when heat is open. This is called
lens mist which may effect the disc play. In that case, eject the disc and wait until the
condensate fully evaporates, then you can play it again.
27
02
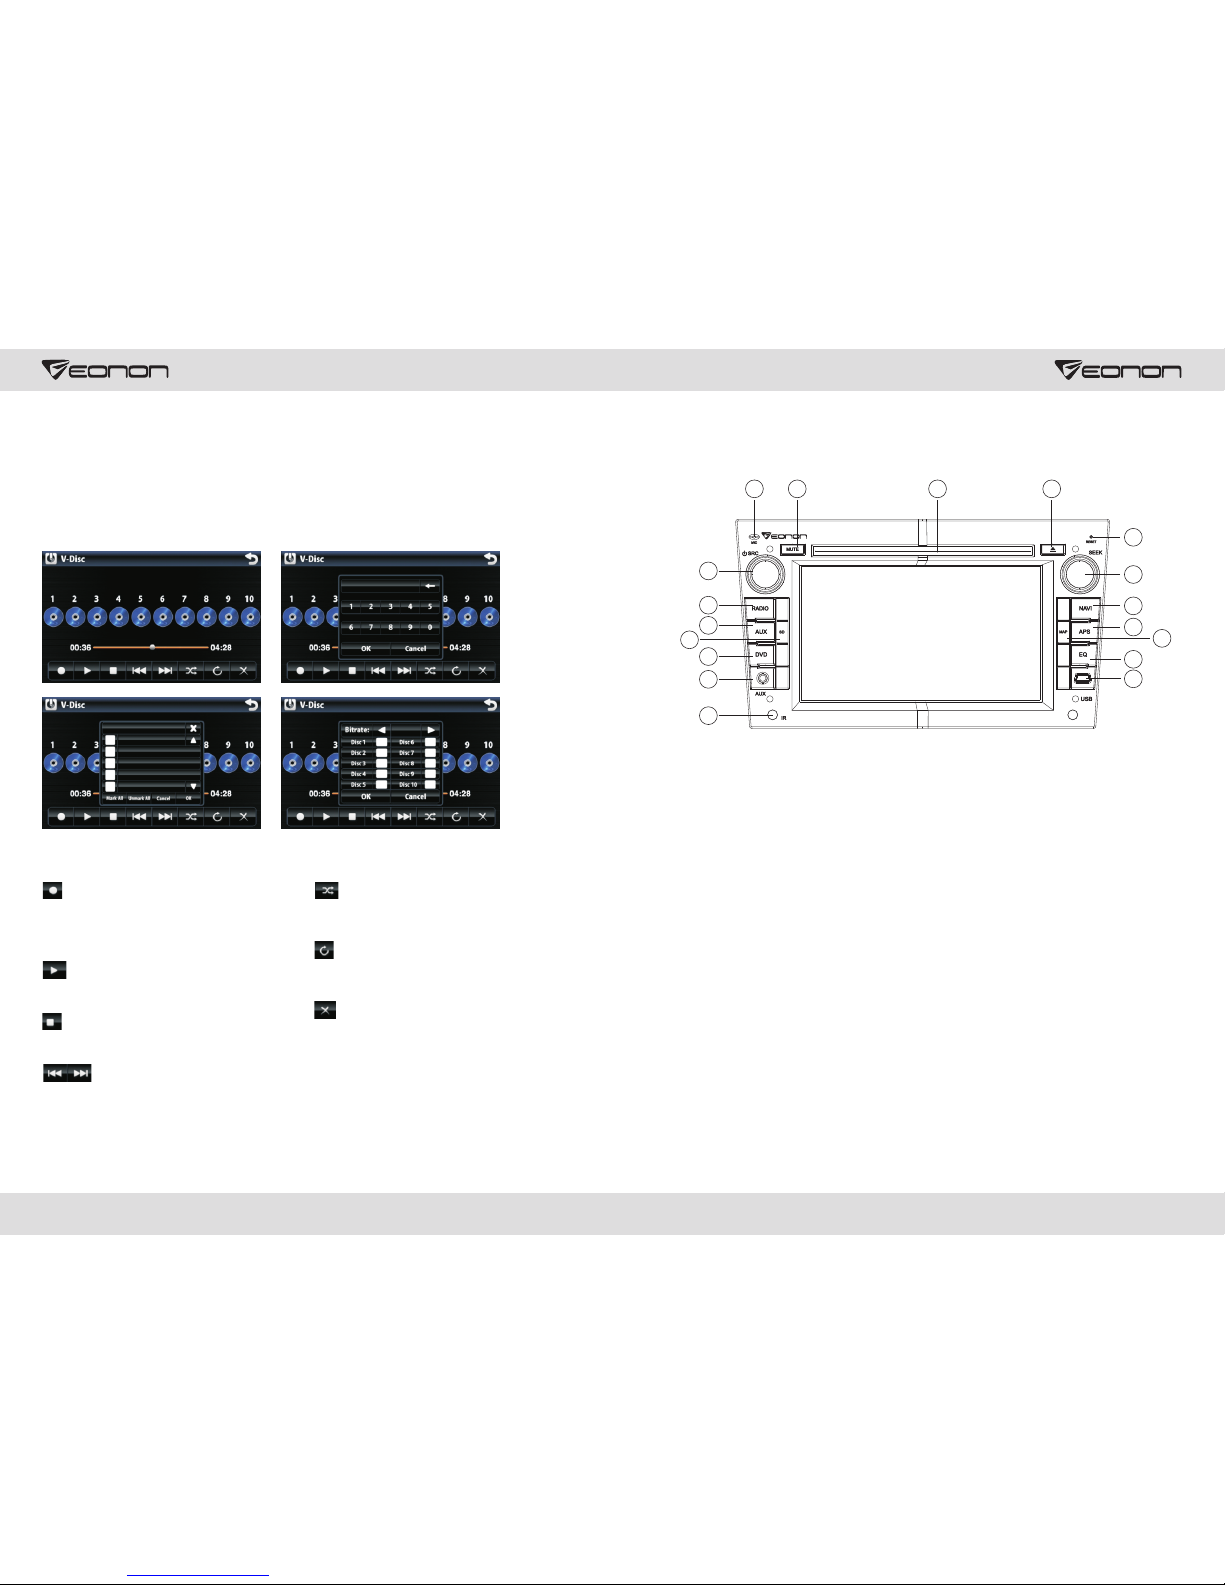
13. Virtual Disc
Through virtual disc, you can copy CD disc to a virtual disc, after copy completed, next
time you just need to open the virtual disc that you can enjoy all songs in the CD disc.
1. Access Virtual Disc
Switch the unit to main interface.
Press VIRTUAL DISC icon in main interface to access virtual disc interface.
2. Button Function Introduction
: Recording On/Off
Click the button to copy songs in CD disc.
: Play
Click to button to play CD disc.
Ten CD disc at most can be copied.
: Stop
Click the button to stop playing.
: Previous/Next Song
Click the button to play previous/next song.
: Random Play
Play songs in the current disc randomly.
: Repeated Play
Play preset file or data repeatedly.
: Delete
Delete all files in the selected disc or one of
them.
11
12
13
14
10
9
8
7
6
5
4
3
2
1
2. Panel function description
1. SRC button
2. RADIO button
3. AUX button
4. SD slot
5. DVD button
6. AUX slot
7. IR
8. USB slot
9. EQ button
10. MAP slot
11. APS button
12. NAVI button
13. SEEK button
14. RESET
15. Eject Disc button
16. Disk load slot
17. MUTE button
18. MIC Window
15161718
03
26
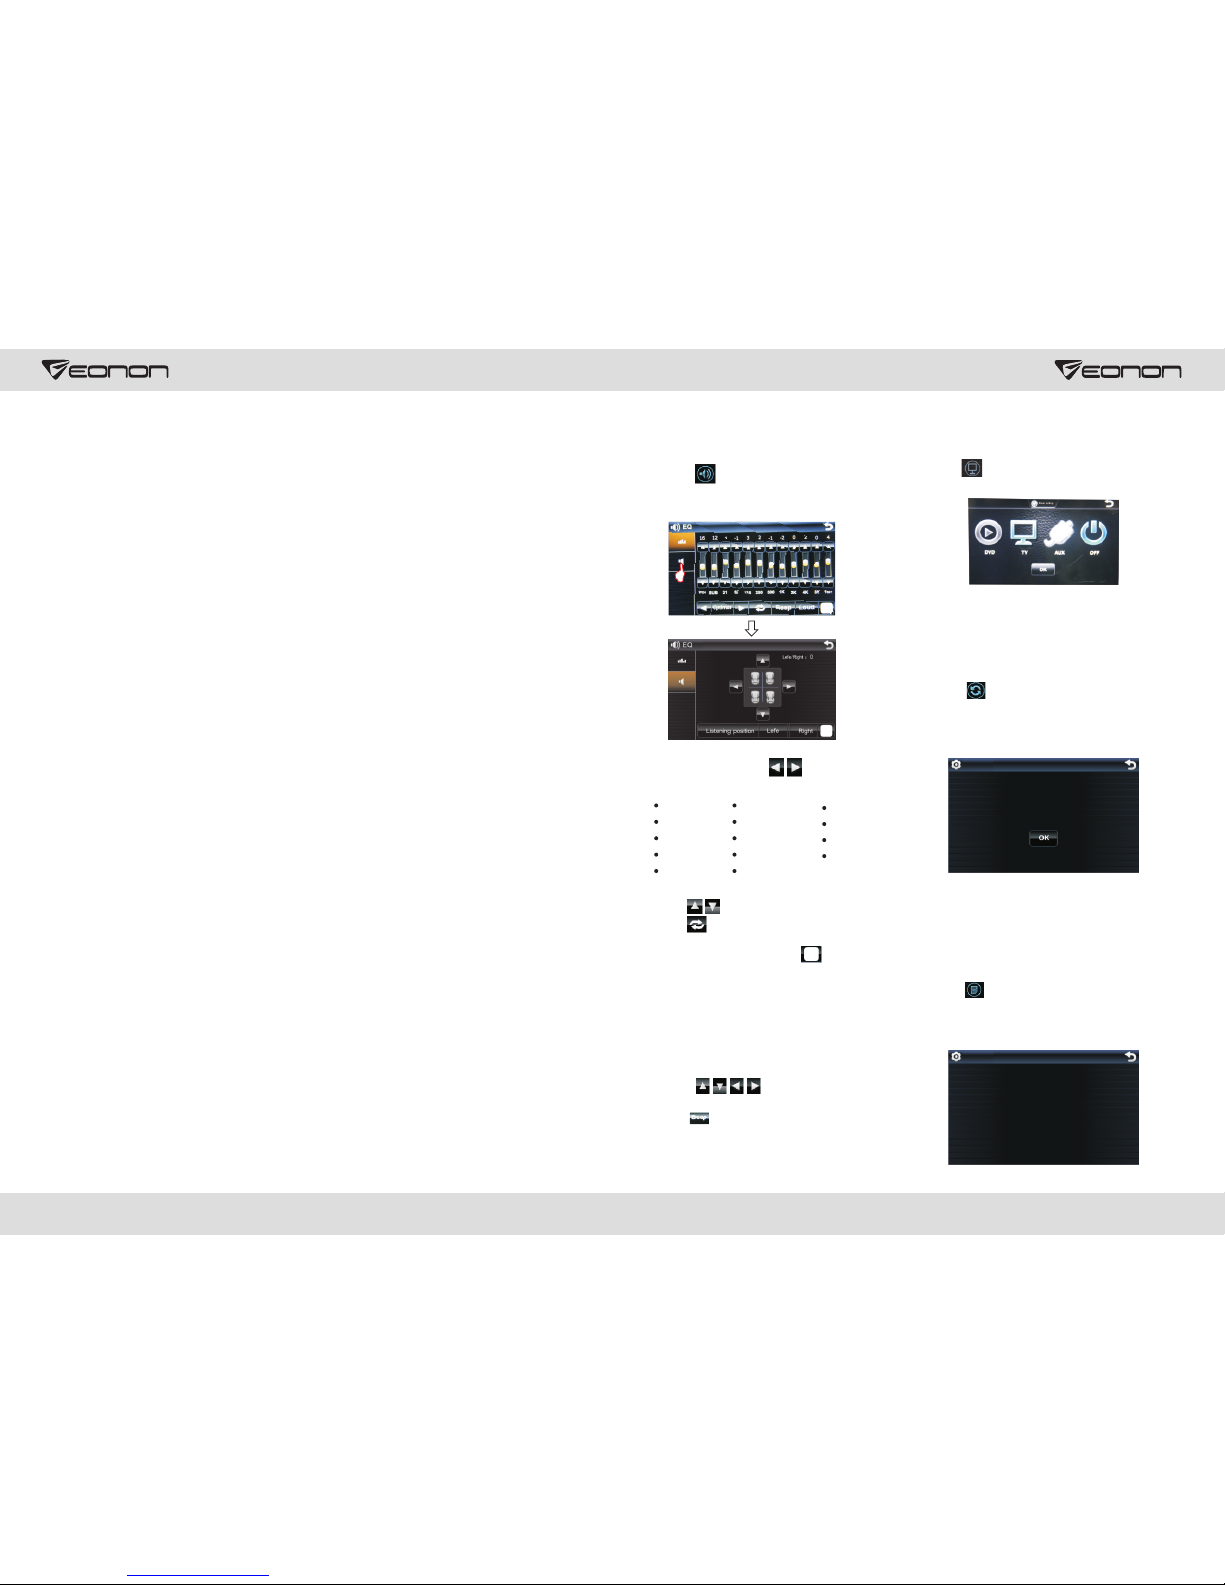
Audio Setup
Touch icon in setup interface to
access sound setup interface as shown
below.
Setup Method
Sound effect-click can switch
among the following sound effects”
Click to adjust favorie sound effect.
Click can resume to initial settings.
Equal Loudness — click icon to turn
on/off equal loudness.
Listening Position-you can select left
/right listening position or turn off the
function.
Listening Position-you can select left
/right listening position or turn off the
function.
Touch can adjust speaker
balance in volume.
Click There are three key tones to
choose from.
Restore Factory Default Settings
Touch icon in setup interface, input
password [888888] and click OK to access
restore factory default settings interface
as shown below:
Setup Method:
Click OK button under “whether to
restore factory default settings”, restore
the unit back to factory default settings.
Version Information
Touch icon in the setup interface and
enter password [888888]. Click OK to enter
into version setup interface as shown in the
picture.
Dual Zone Setup
Click icon to enter into background
setup interface.
You can choose to turn on/off the functions
that are already available in the background
setup interface, and then click [OK] to save
the settings.
Pop country opera
Rock jazz voice
Metal classic custom
Dance blues easy
Electro nostalgia
reset factory
Do you want to reset factory?
Version
Kernel
Application
MPEG
PA01-V1.01.0028.03-3
V11A.BAI06.SL8177_UI20.69.f
0.0
MCU
4.0
Panel Function introduction
1.SRC button
Press this button shortly to power on, press this button longer to power off.
In normal situation, press source button can return to the main menu.
2.RADIO button
In any mode, press the button to access radio mode,
Note: For certain machine model press the button in radio mode to band switch.
3.AUX button
In any mode, press the button to access AUX mode.
4.SD slot
Insert SD card to read video, audio and image files of large volume.
5.DVD button
In any mode, press the button to enter into DVD auto reading mode.
6.AUX slot
To input external audio.
7.IR
It can receive infrared signal of remote control.
8.USB slot
Connect USB mobile device to read video, audio and image files of large volume.
9.EQ button
In a source mode, press the button to enter equalizer setup.
10.MAP slot
The receptacle of map card, inserts the map card to be possible to read the guidance
data.
11.APS button
In radio mode, short press the button to browse memorized station, long press to search
stored stations automatically.
12.NAVI button
Press the button to enter into/exit navigation interface.
13.SEEK button
Radio mode, a short rotation lf the button can be up and down step search for the station,
long rotation of the button can automatically scan for stations.
Playback mode, rotating the knob can be achieved with short upward, and downward
selections; long rotation of the button allows fast forward, rewind playback.
2504
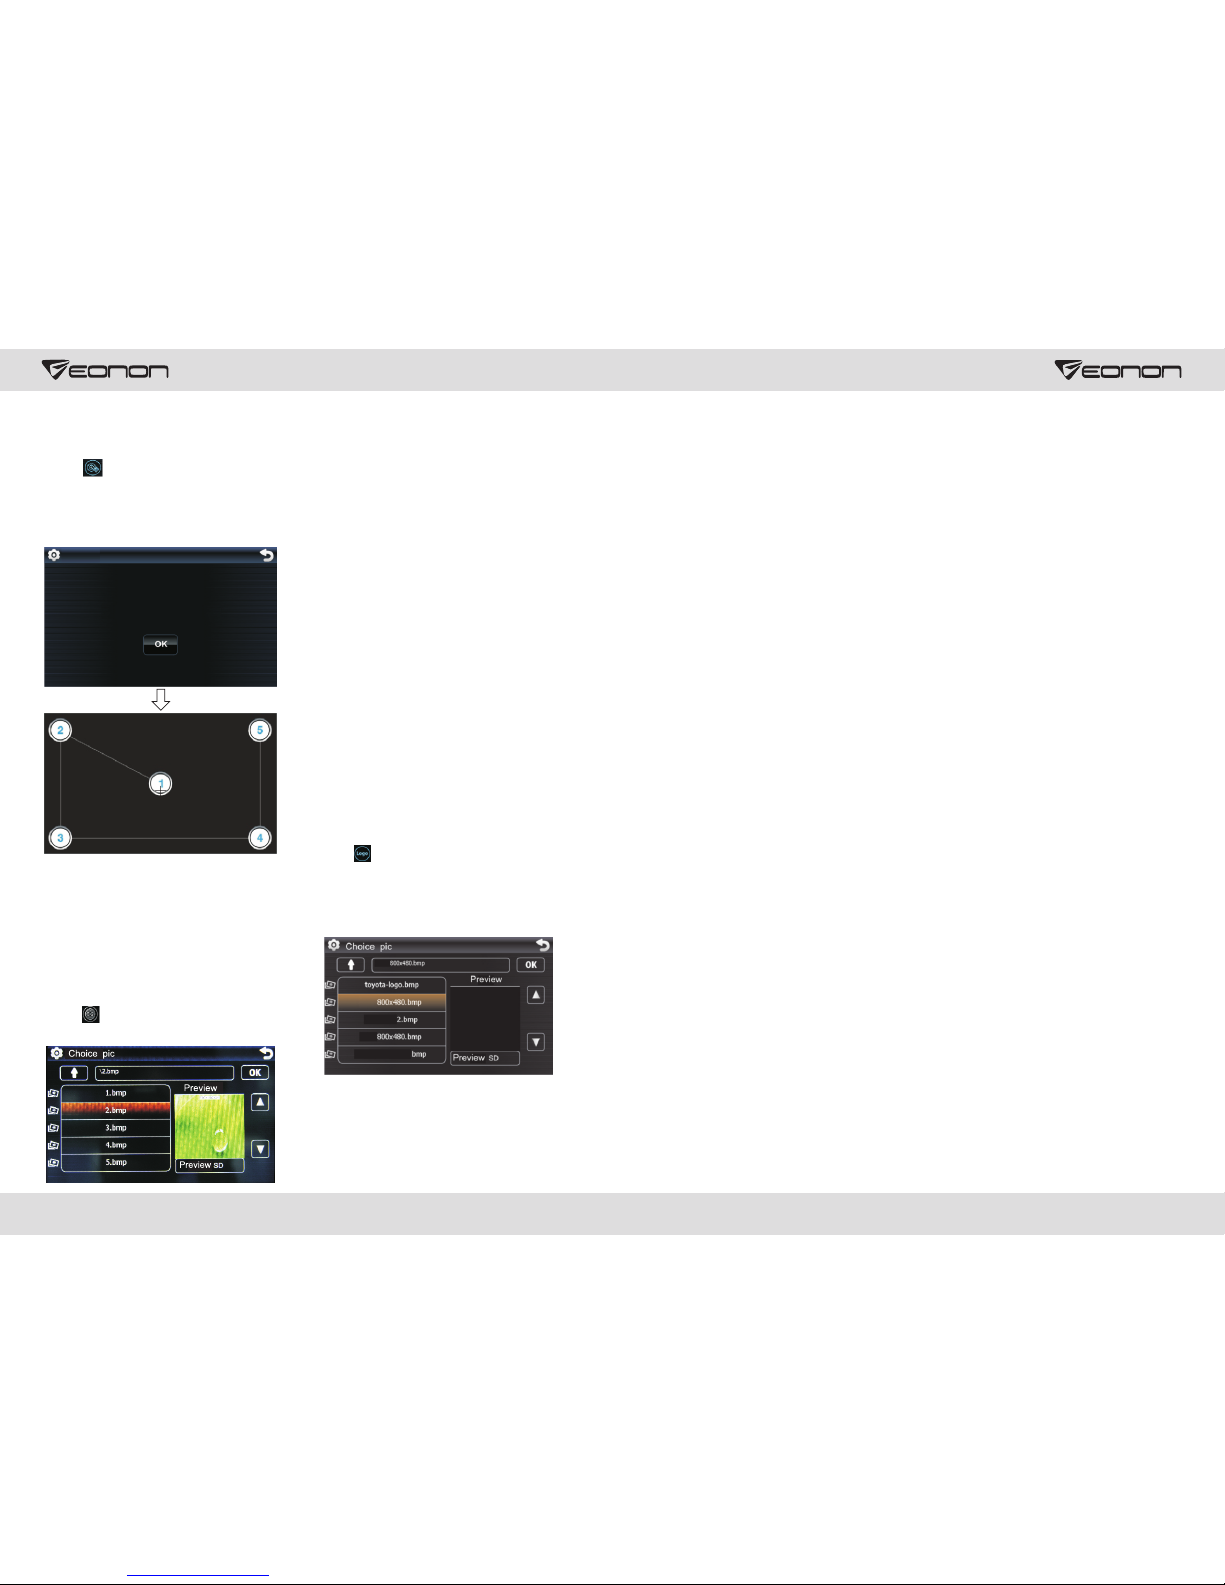
Calibration Method:
Use touch pen to click the center of “+”,
calibrate the screen in sequence by which
the center of “+” moves. After calibration
is completed, the unit will save data and
exit the screen.
Setup Method:
Select your desired background icon via
preview window, then click OK to save
setting.
If you'd like to use your own background
picture in the unit, insert SD card which
stocks background pictures into GPS
card socket. Click Browse SD button in
picture-select interface to set your
favorite background picture.
Note: Please use 288 * 244,
BMP format picture.
BMP options
for the 32-bit,
Method of making the icon:
1. download Adobe Flash CS3 or later.
2. The picture will need to be made into
288 * 244 PNG image, open the image into
Flash Flash tool.
3. The scene is set to 288 * 244 Flash.
4. Click File → Export → Export Image→
Save → color depth set to 32 bit color
Alpha→ OK.
Boot Screen
Touch icon in setup interface to
access boot screen setup interface. Boot
screen is preset when delivery from
factory, please do not access this interface
to change boot screen.
Background Setup
Touch icon in setup interface to access
background setup interface:
14.RESET
Press this button can back to default mode.
15.Eject disc button
Press the button to eject disc.
16. Disk load slot
Enter /exit disc window.
17.MUTE button
Press the button to close volume output, repress it to resume previous volume level.
Long press the button to turn off TFT display screen, then short press it to restart TFT
display.
18.MIC Window
Input socket for microphone.
05
24
Note:
screen, use 800 * 480, BMP image formats.
After pressing the Reset button to change
the boot screen.
If you want to replace the boot
Touch Calibration
Touch icon in setup interface, input
password [888888], click OK to pop up a
dialogue as shown below, click OK to
confirm to access touch calibration
interface:
Calibration
Do you want to calibrate?
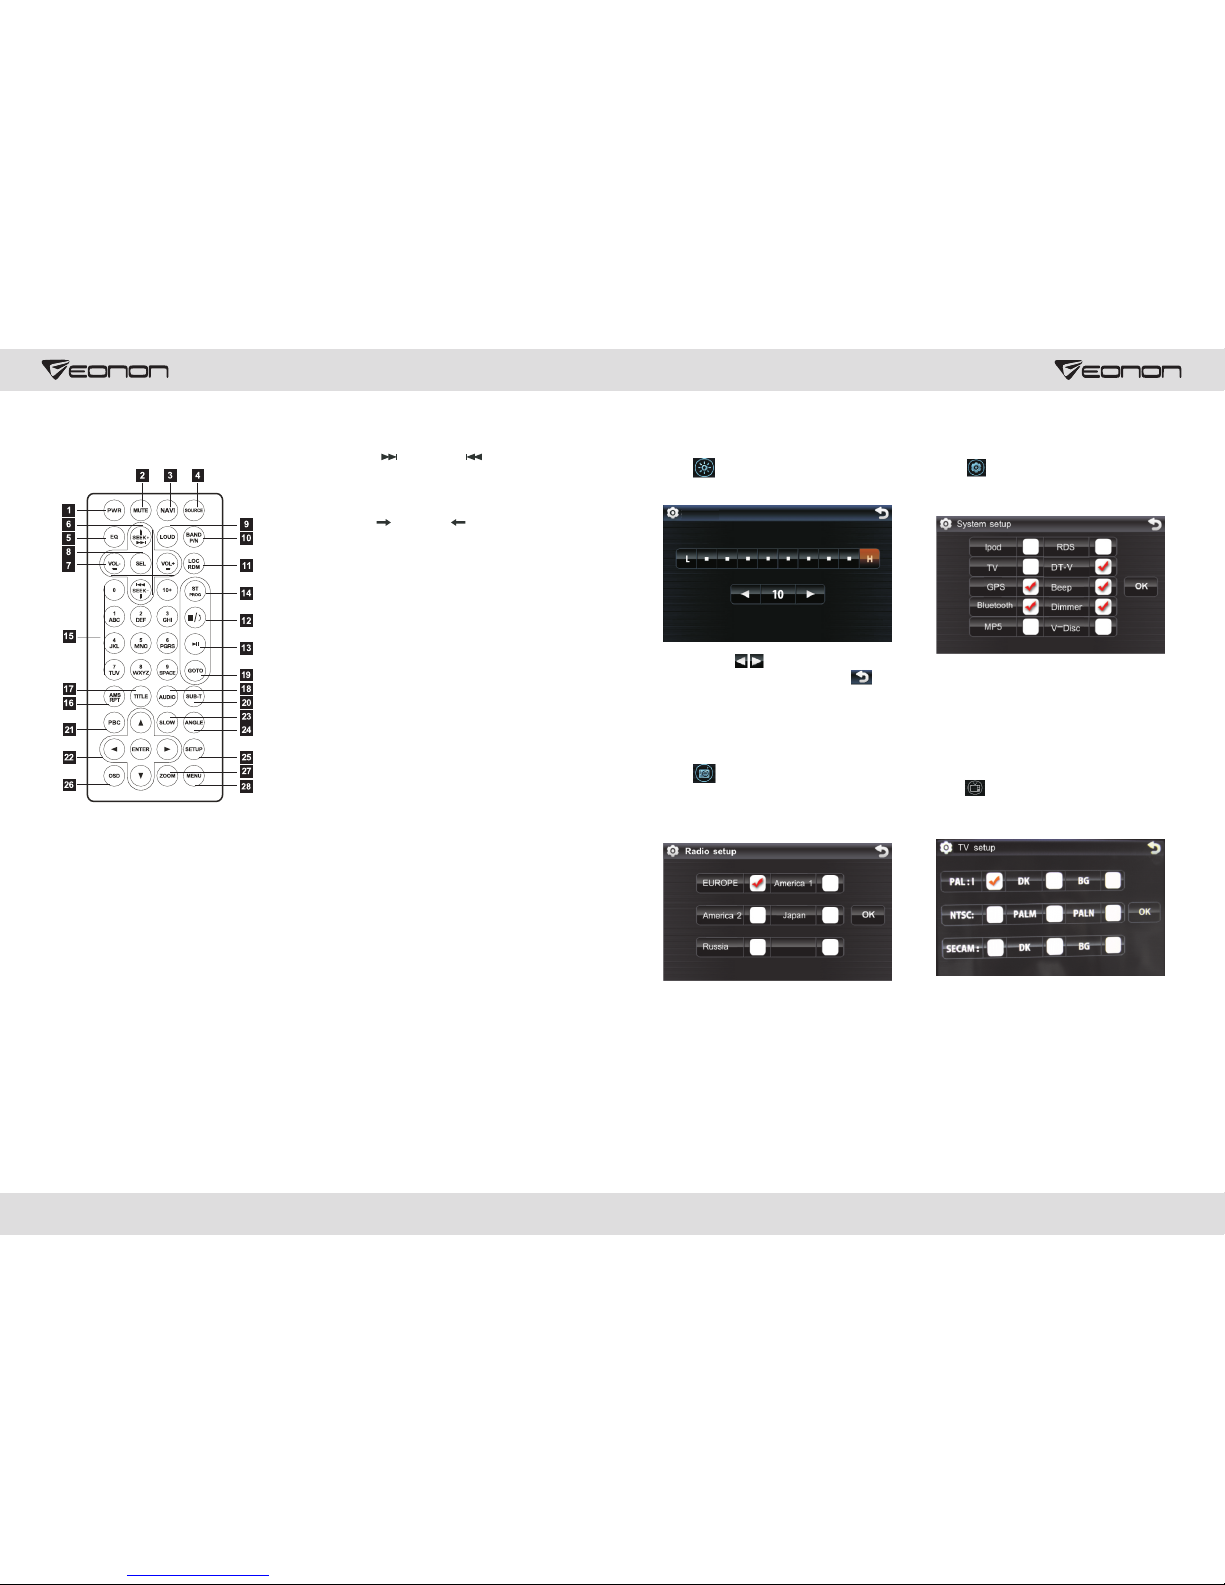
Brightness Adjustment
Touch icon in setup interface to access
brightness setup interface as shown below:
You can click button to adjust screen
brightness. After completion click button
to back to previous interface and save
settings.
Radio Area (optional)
Touch icon in the setup interface and
enter password [888888]. Click OK to enter
into radio setup interface as shown in the
picture.
Select your desired radio setup, click OK
to save settings.
System Setup
Touch icon in setup interface ,input
password [888888], click OK to access
system setup interface as shown below:
You can select to enable or disable existing
functions in system setup interface. After
completion click OK to save settings.
TV Setup
Touch icon in setup interface, input
password [888888], click OK to access TV
setup menu as shown below:
Select your desired TV setup, click OK to
save settings.
Brightness
3. Remote control function
1.POWER
Press once to switch on, press again to
switch off.
2.MUTE button
Press once to turn off audio output,
Press again to resume volume level.
3.NAVI button
Press it to enter to exit the navigation.
4.SOURCE button
Press this button to choose audio sources.
5.EQ button
Press this button to choose POP, ROCK,
CLASS, EQ off.
6.SEEK+ ( )/ SEEK- ( )button
Press this button to manual turning, sped
or quick back, previous song and next song.
7.VOL+ ( )/ VOL- ( )
Press this button to increase or decrease
volume level.
8.SEL button
Press this button to choose sound feature.
9.LOUD button
Press this button to startup LOUD function.
10.BAND -P/N button
In radio mode, press this button to choose
band. In VCD, DVD mode, press this button
to choose AUTO, PAL or NTSC system.
11.LOC/ROM button
In radio mode, press this button to switch
between local and direction, In VCD, CD
mode, press this key to randomly play.
12.STOP button
Press this button to stop playing.
13.PLAY/PAUSE button
Press this button to switch between play
and pause, In stop mode, press this button
to play.
14.ST/PROG button
In radio mode, press this button to choose
stereo or mono station. In audio mode, it
can help stop button to programmed play.
15.0-10+ button
Press this button to choose desired song,
section, preset stations.
※ Decimal numbers, for example the 19th
song, press 1,9 button;
※ Centesimal numbers, for example, the
120th song, press 1,2,0 button.
23
06
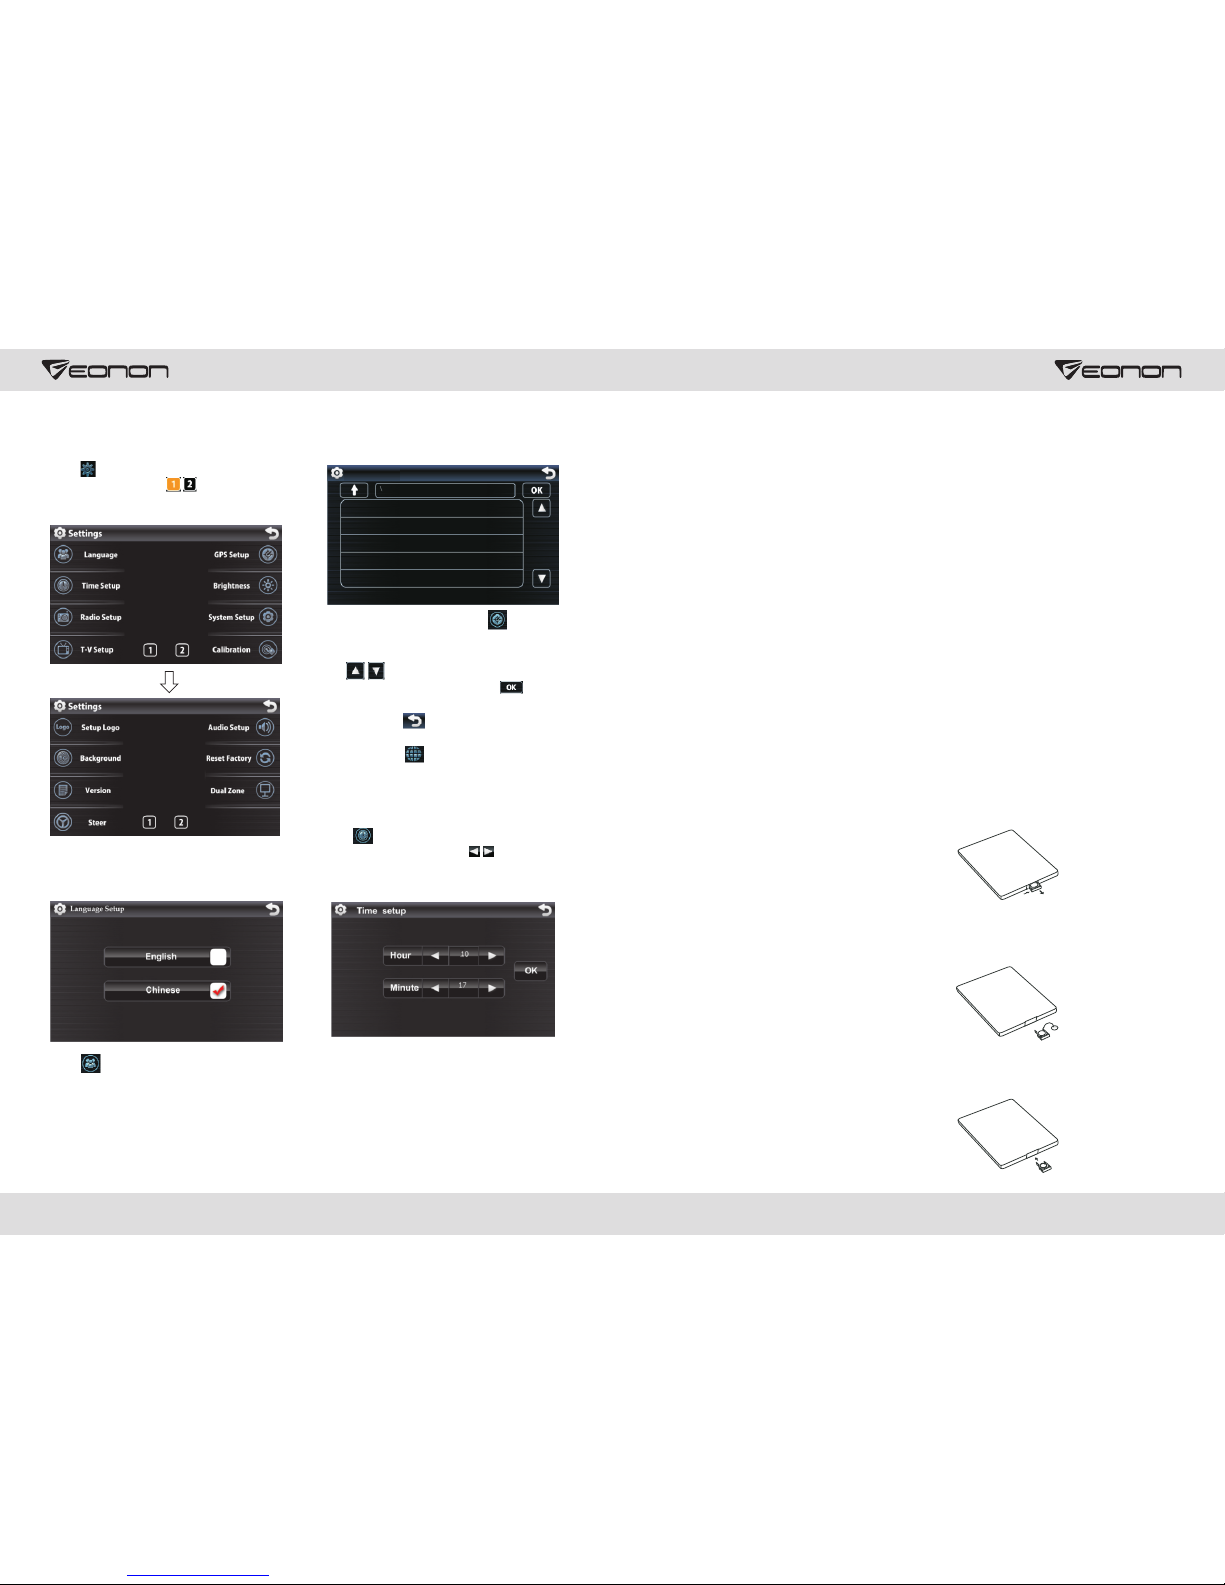
12. Setup Function Operation
Access Setup Interface
Touch icon in main interface to access
setup interface, click to turn page as
shown below:
Language Setup
Touch icon in setup interface to
access language setup interface as shown
above: you can select Simple Chinese or
English.
Insert navigation card, touch icon in
setup interface to access navigation setup
interface as shown above.
Click icon can browse upward
/backward, select your desired
navigation start route, click OK to save
setup, retouch button to exit navigation
setup. Then system goes back to main
interface, click in main interface to
access navigation.
Time Setup
Touch icon in setup interface to access
time setup interface, click icon can set
clock, minute respectively, click OK to save
settings.
GPS setup
Navigation Setup
In audio mode, press this button to choose
different set items.
26.OSD display
Press this button to display the title chapter
and the left time.
27.ZOOM button
In DVD/VCD mode, press this button to
ZOOM in.
28.MENU button
Press button to back to the main menu.
BATTERY CHANGE
When control distance of remote control
becomes shorter or no function, please
change battery, please confirm polarity
before change.
One hand press stopper, then pull out
battery.
Put battery into controller.
Insert battery holder into controller.
25.SETUP button
16.AMS/RPT button
In radio mode, press this button to browse
stored stations. In audio mode, press this
button to play repeatedly.
17.TITLE button
In DVD mode, press this button to play
back to the top menu of disc.
18.AUDIO button
In DVD mode, press this button to switch
language of dialogue. In VCD mode, press
this button to choose left track, right track,
and stereo.
19.SET playing time
In DVD mode, press this button, you can
define playing time.
20.SUBTITLE button
In DVD mode, press this button to switch
language of subtitle.
21.PBC button
In VCD mode, press this button to display
all song menus, work with number button
to choose songs.
22.UP, DOWN, LEFT, RIGHT, ENTER
button
In DVD mode, press this button to move
cursor up, down, left, right to choose item
in menu, Press the enter button to confirm
choice.
23.SLOW button
In audio mode, press this button to slow
backward and slow forward.
24.ANGLE button
In DVD mode, press this button to change
play angle.
07
22
Do not rely entirely on CCD, confirm safety of the environment with naked
eyes while you are driving. CCD only assists the drive to park the car. Due to the
limits in CCD range and distance, it may cause traffic accident if the drive
entirely on CCD.
please
release
Field Simulation of Reverse Back Rearview Image
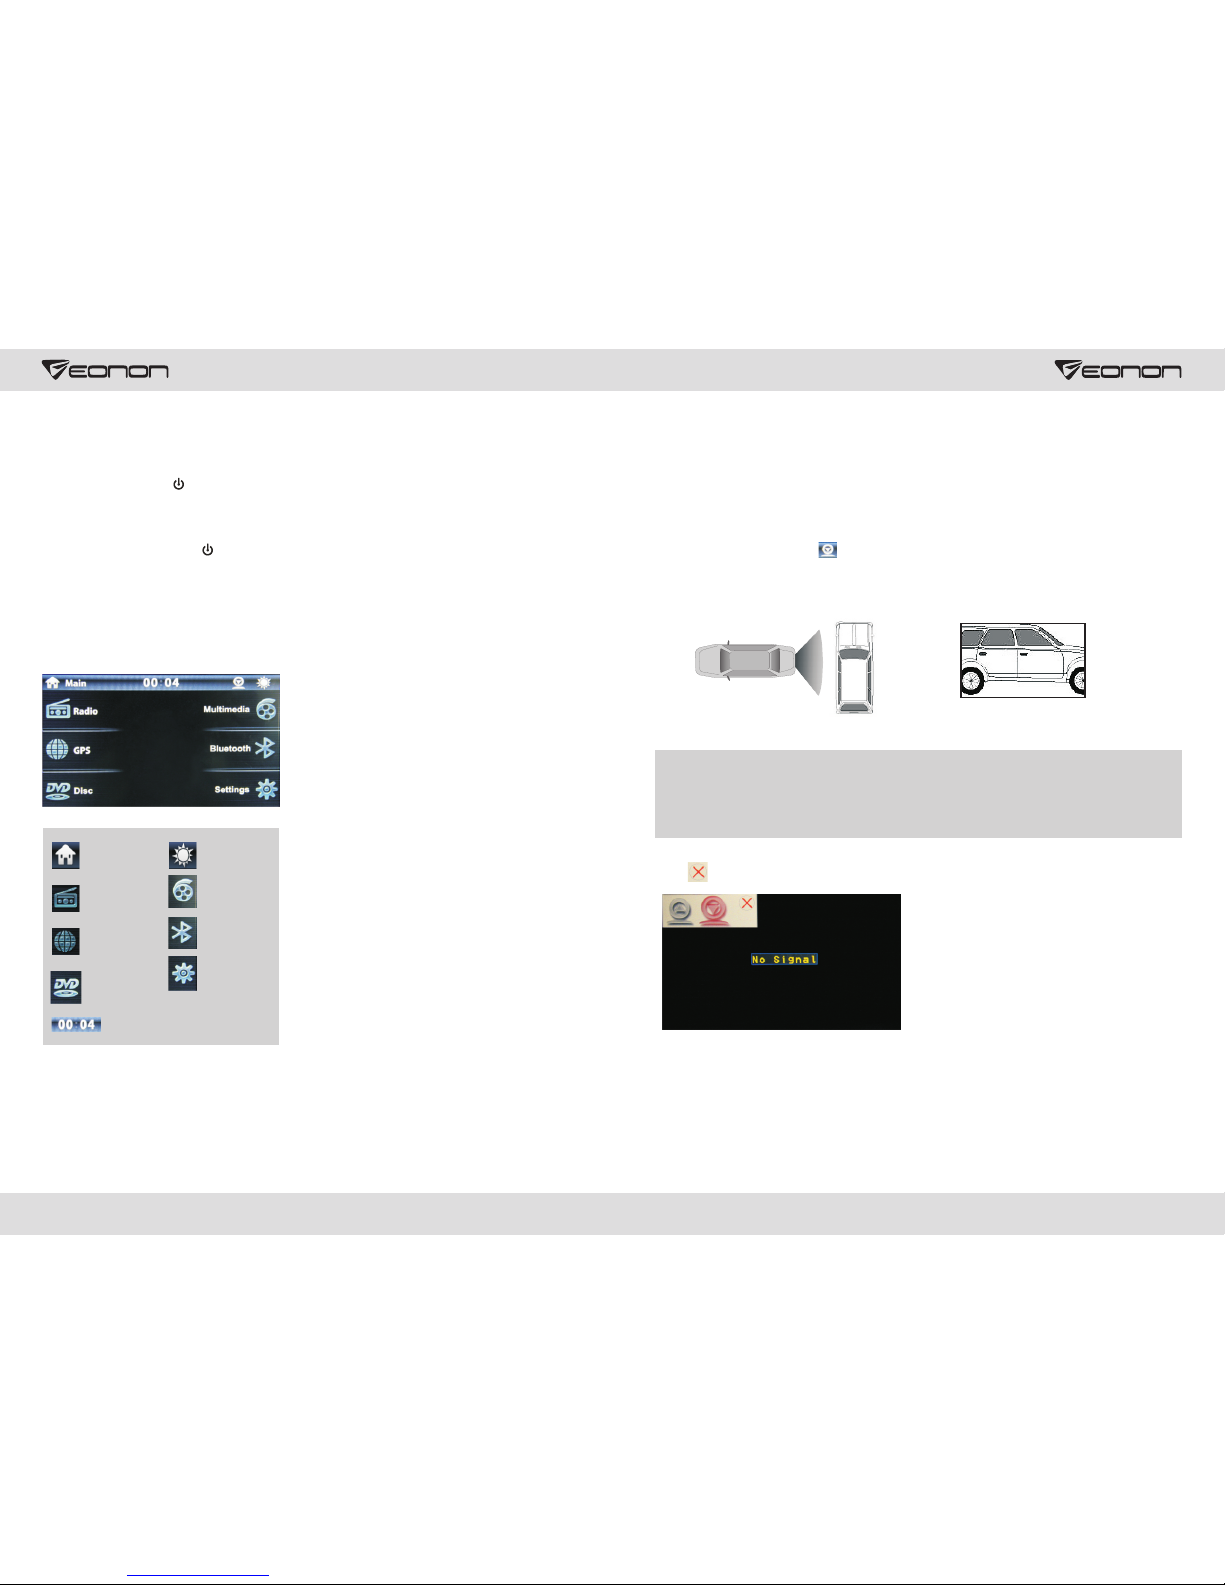
11. Other Modes
Click on the main interface directly into the rear view system.
AUX Input Operation
Put video input plug into AUX video input socket, put audio input plug into AUX audio
input socket.
The unit only provides a video input port and a AUX audio input port group.
CCD System (back rearview mirror)
If your car is equipped with back cameras, please connect “BACK” control cable with
video input port of the camera. When you back your car, the unit shall switch to rearview
mirror mode automatically. (as shown below).
4. On/Off the Unit
On
When the ignition switch is locked in ACC
or ON position, press button on the
panel to turn on the unit.
Off
After starting the unit, hold button for 3
seconds or more to turn off the unit.
Access Main Interface
At power on, press back to main interface
button on the panel to switch to main
interface.
back to
main menu
select day/
night mode
radio mode
GPS mode
disc reading
mode
time display
Volume Adjustment
Press VOL button on the front panel or
remote control to increase/decrease
volume level.
Mute
Press MUTE button on the remote control
or front panel to turn on/off volume output.
On/Off Equal Loudness
Press LOUD button on remote control to
turn on/off equal loudness.
Picture-in-picture Function
Touch PIP icon to enter picture-in-picture
interface. This function means in normal
running status of current mode, you can
start DVD/Bluetooth/Navigation function at
the same time.
Multimedia
mode
bluetooth
mode
function
setup
21
08
Click to exit the rear view system.
Indice
Altri manuali Eonon Sistema video per auto

Eonon
Eonon E1062 Manuale utente

Eonon
Eonon E0853 Manuale utente

Eonon
Eonon D5109 Manuale utente

Eonon
Eonon E1102 Manuale utente

Eonon
Eonon L0606 Manuale utente

Eonon
Eonon DB Series Manuale utente

Eonon
Eonon D2207 Manuale utente

Eonon
Eonon E0821 Manuale utente

Eonon
Eonon M2 Manuale utente

Eonon
Eonon E3020 Manuale utente

Eonon
Eonon E1053 Manuale utente

Eonon
Eonon E0805 Manuale utente

Eonon
Eonon D2210 Manuale utente

Eonon
Eonon L0308M Manuale utente

Eonon
Eonon L0401M Manuale utente

Eonon
Eonon D3108M Manuale utente

Eonon
Eonon E0837 Manuale utente

Eonon
Eonon E1065 Manuale utente

Eonon
Eonon D5102 Manuale utente

Eonon
Eonon 12.1 TFT-LCD DVD Manuale utente


