Escea ST900 Manuale utente

630101_2_Manual_Propane_Conversion_US.doc
ST900 Direct Vent Gas Fireplace
Conversion Kit Manual
Propane for North America
Important:
The appliance shall be converted in accordance with;
• Local codes or, in the absence of local codes, with the National Fuel
Gas Code, ANSI Z223.1/NFPA 54, or the Natural Gas and Propane
Installation Code, CSA B149.1
• A manufactured home (USA only) or mobile home OEM installation
must conform with the Manufactured Home Construction and Safety
Standard, Title 24 CFR, Part 3280, or, when such a standard is not
applicable, the Standard for Manufactured Home Installations
ANSI/NCSBCS A225.1, or Standard for Gas Equipped Recreational
Vehicles and Mobile Housing, CSA Z240.4
• Any other relevant statutory regulations.
• Must be installed by a qualified installer, service agency or gas supplier
• Converting this appliance for use with other gasses must be done by a
qualified installer, service agency, or gas supplier
Ce manual est disponsible en Français sur demande. www.escea.net
Manufactured By: Escea International Limited, 375b Green Valley Road, Griffen, GA 30224, USA. Ph: 866 615 3096 | info@escea.ne

630101_2_Manual_Propane_Conversion_US.doc
1.0 Contents of this Conversion Kit
This conversion kit contains the following parts.
1. Main Burner Jet (1.2mm orifice)
2. Pilot Burner Jet (No. 46 Jet)
3. Dataplate Label with Propane information
4. This instruction manual detailing the steps required to complete the
gas conversion for this Escea ST900 Direct Vent Gas Fireplace.

630101_2_Manual_Propane_Conversion_US.doc
2.0 Isolating the Gas Supply
Before any work is commenced, the appliance must first be shut down,
allowed to cool and then isolated from the gas supply
3.0 Removing the Fascia
The ST900 fascia attaches to the fireplace by four hooks. To remove the
fascia, simply lift it upwards 5/8”-3/4”, and pull towards you. Care should
always be taken when handling the fascia.
To replace the fascia, line up the four hooks with the matching receptacles
on the fireplace and push the fascia into place and let it drop down, the
fascia should now be securely in position.
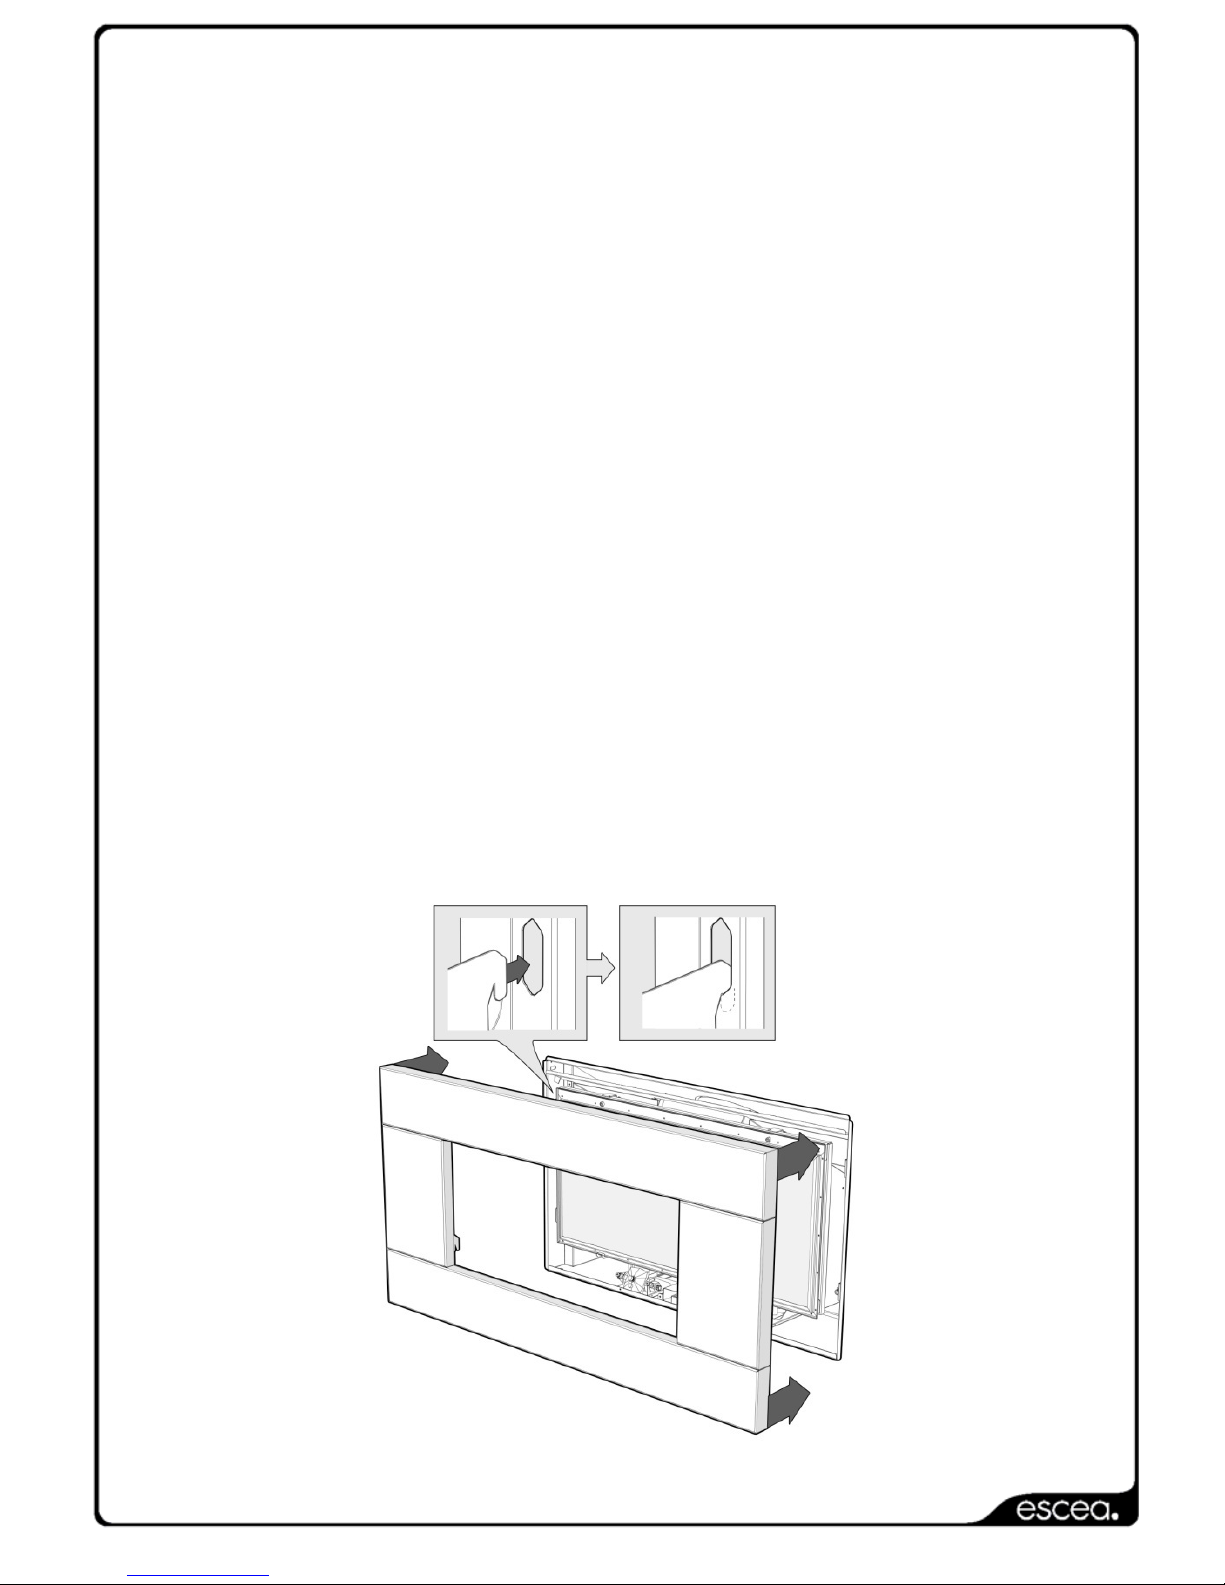
4.0 Removing the Glass Assembly
Pull the four hooks shown on the following page towards you and then
away from the glass to release the glass frame underneath the hook.
Lift the glass assembly towards you to clear the locating supports and
place it flat upon some newspaper or a sheet of cardboard to protect your
floor coverings.
Do not operate the appliance if the glass has been broken, damaged,
or the glass is not properly positioned/hooked onto the appliance.
630101_2_Manual_Propane_Conversion_US.doc
5.0 Removing the Fuel Bed Media
Remove all pieces of the fuel bed media from the firebox and place them in
a container carefully to avoid damage.
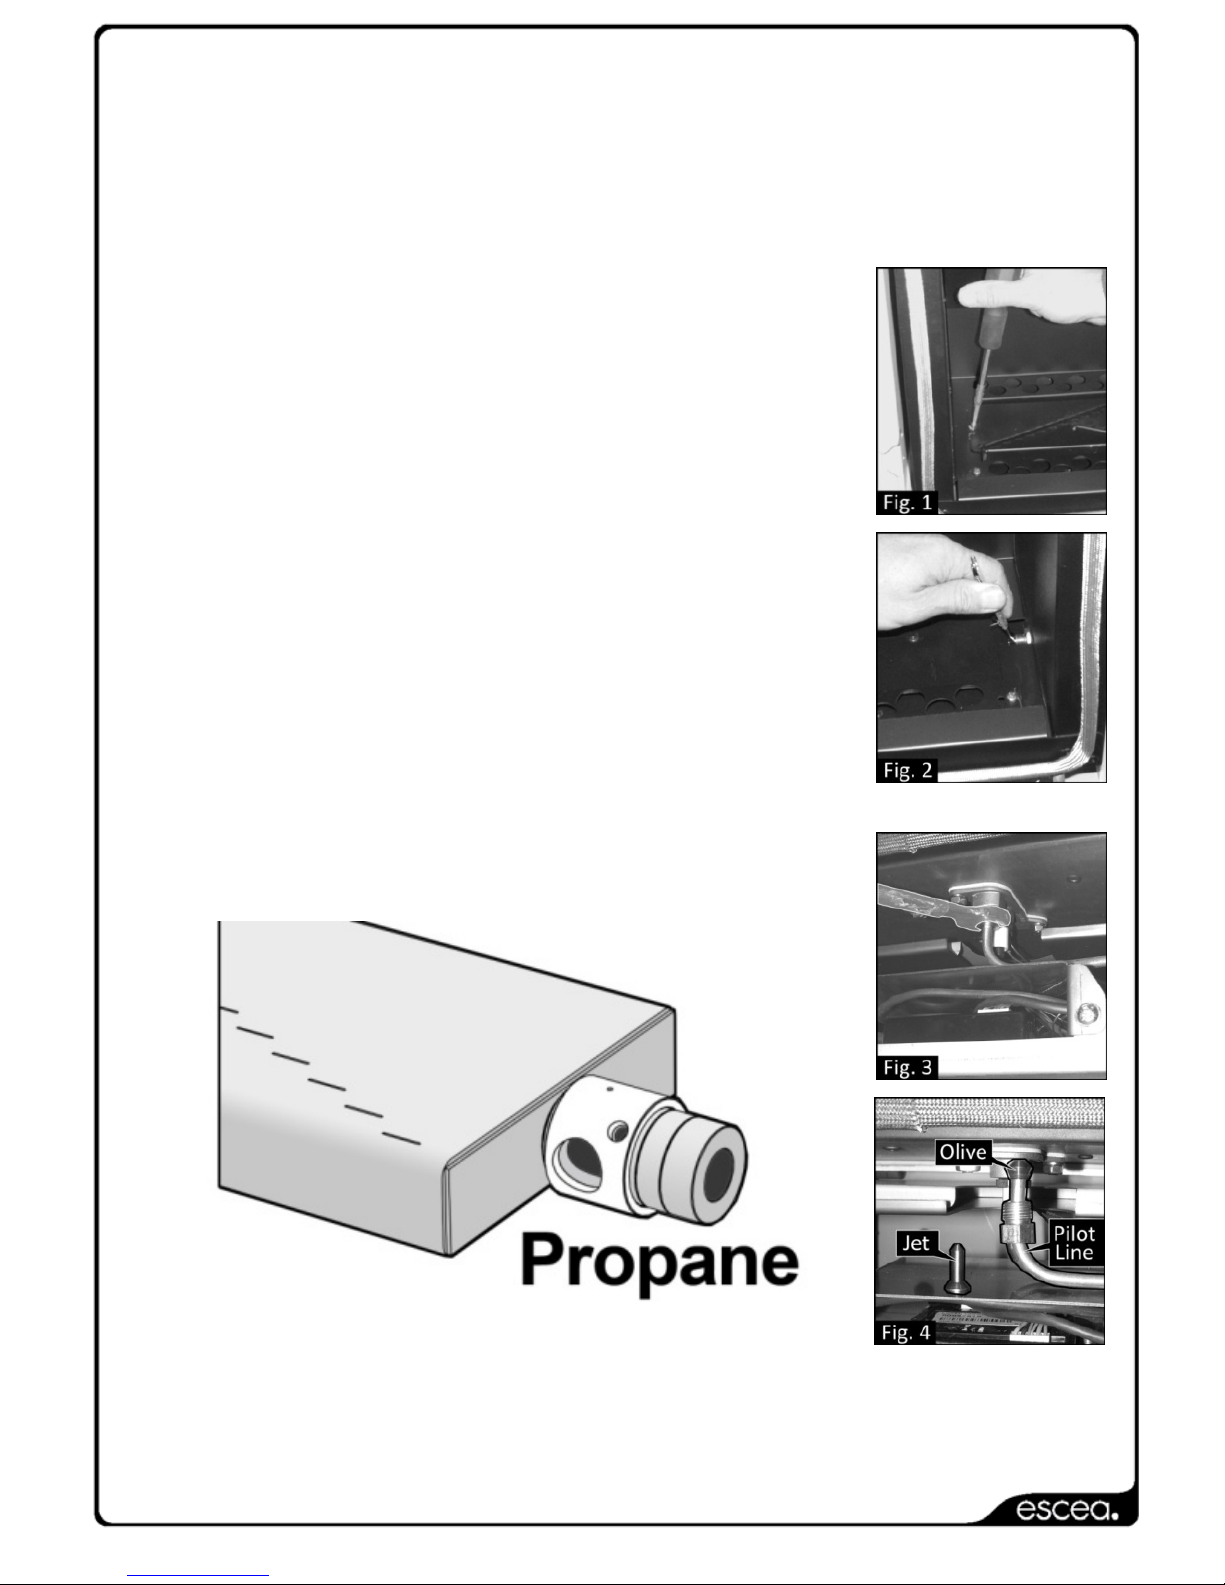
6.0 Converting the Appliance
First you need to remove the burner by removing the
screw holding it in place on the left hand side of the
firebox (Fig. 1).
Then remove the 1.9mm burner jet (Fig. 2) and
replace it with the 1.2mm jet supplied in the kit.
Now remove the gas pipe fitting under the pilot (Fig.
3) and remove the No.48 pilot Jet (Fig. 4) and
replace it with the No.46 pilot jet supplied in the kit.
Replace the pilot line.
Adjust the Primary Aeration Collar on the burner to
the Propane position as shown in the diagram below,
then place the burner into position and screw it in
place.
630101_2_Manual_Propane_Conversion_US.doc
ST900 US
Edition
R
C US
Sticker
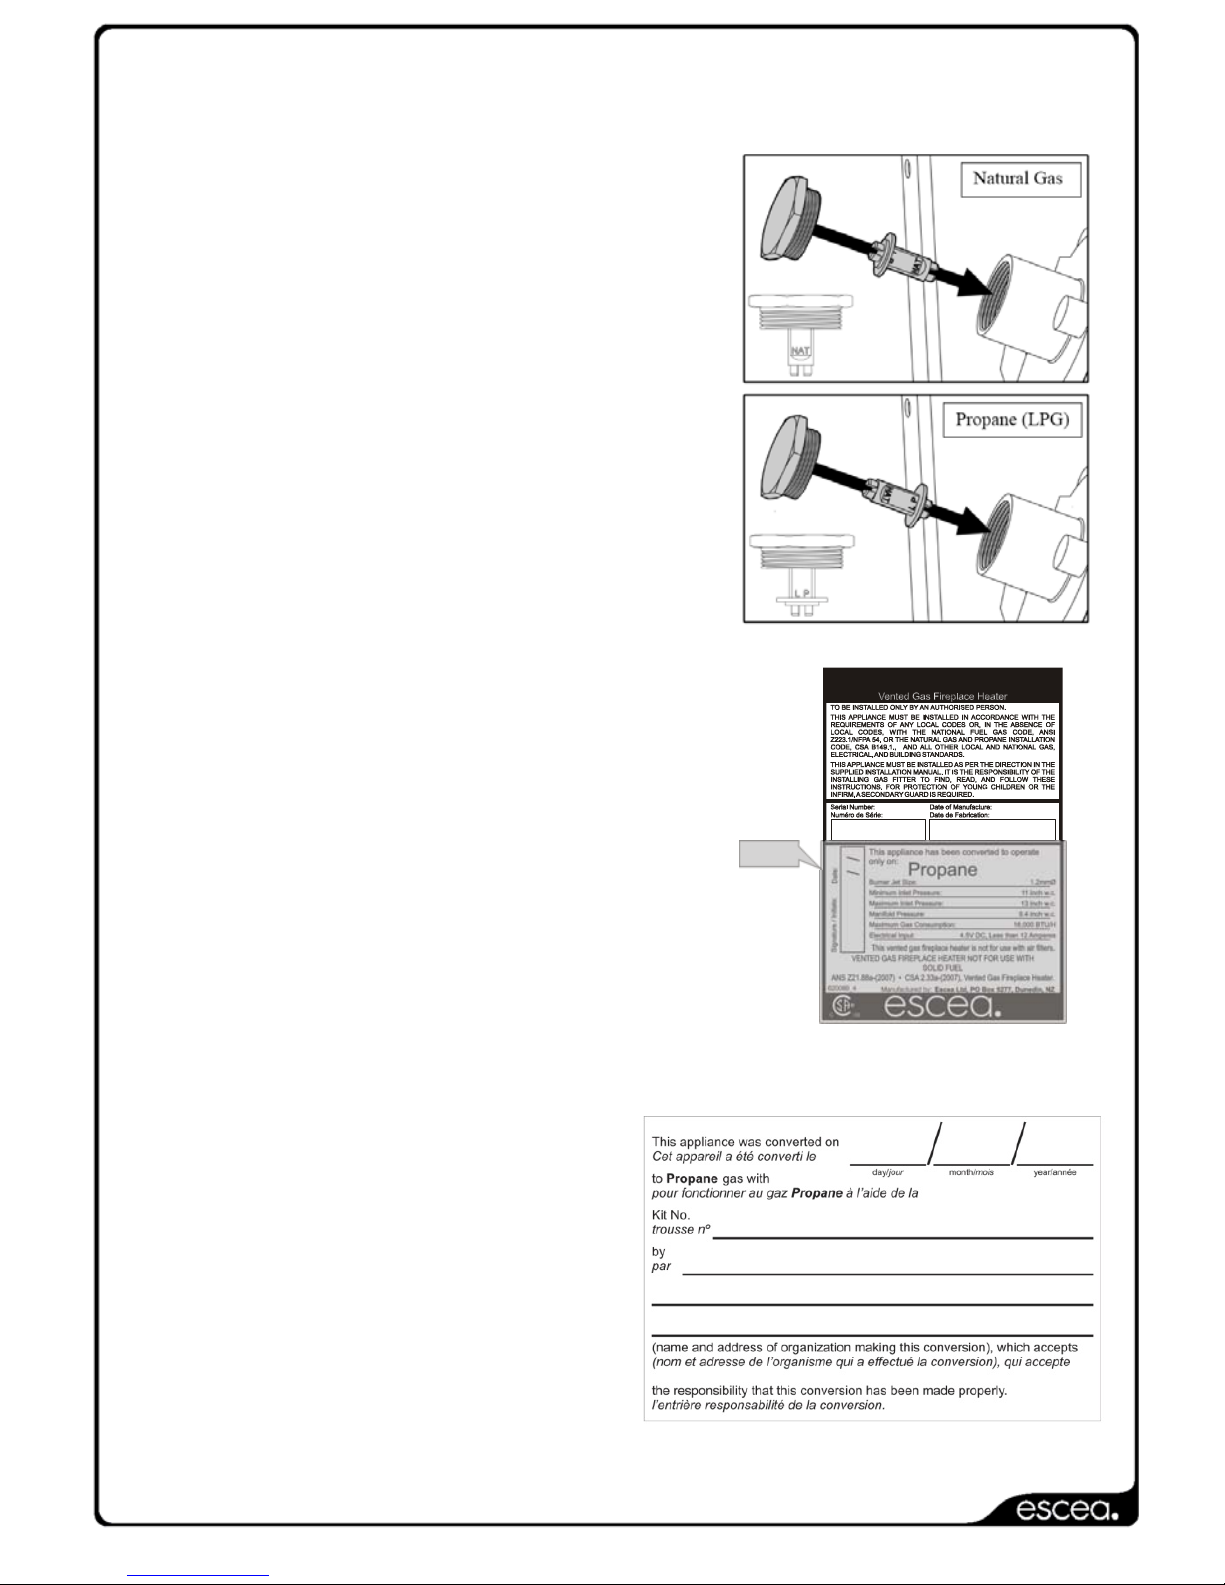
The gas regulator needs to be converted from the Natural Gas setting to
the Propane setting.
The regulator is located on the left hand
side of the control tray, at the base of the
fire. To change the regulator between
Natural Gas and Propane, unscrew the
top cap off the regulator and pull the
plunger from it. Re-insert the plunger on
the opposite side (as shown in the
diagram to the right) and screw the
assembly back in the stack
Now, put the gas data (Propane sticker shown)
sticker supplied in the conversion kit in onto the
dataplate of the ST900 in the position shown.
Note: This will need to be completed on the
English language as well as the French
language dataplates. (English
language dataplate shown)
The sticker must be signed and dated by the
tradesperson who has completed the gas type
conversion.
The conversion is only complete
once the conversion label has
been adhered to the available
label plate and filled out by the
tradesperson who has
completed the gas type
conversion.
630101_2_Manual_Propane_Conversion_US.doc
7.0 Replacing the Fuel Bed Media
The fuel bed media must now be placed back in the firebox in the correct
manner to ensure that the appliance will operate in a safe and proper way.
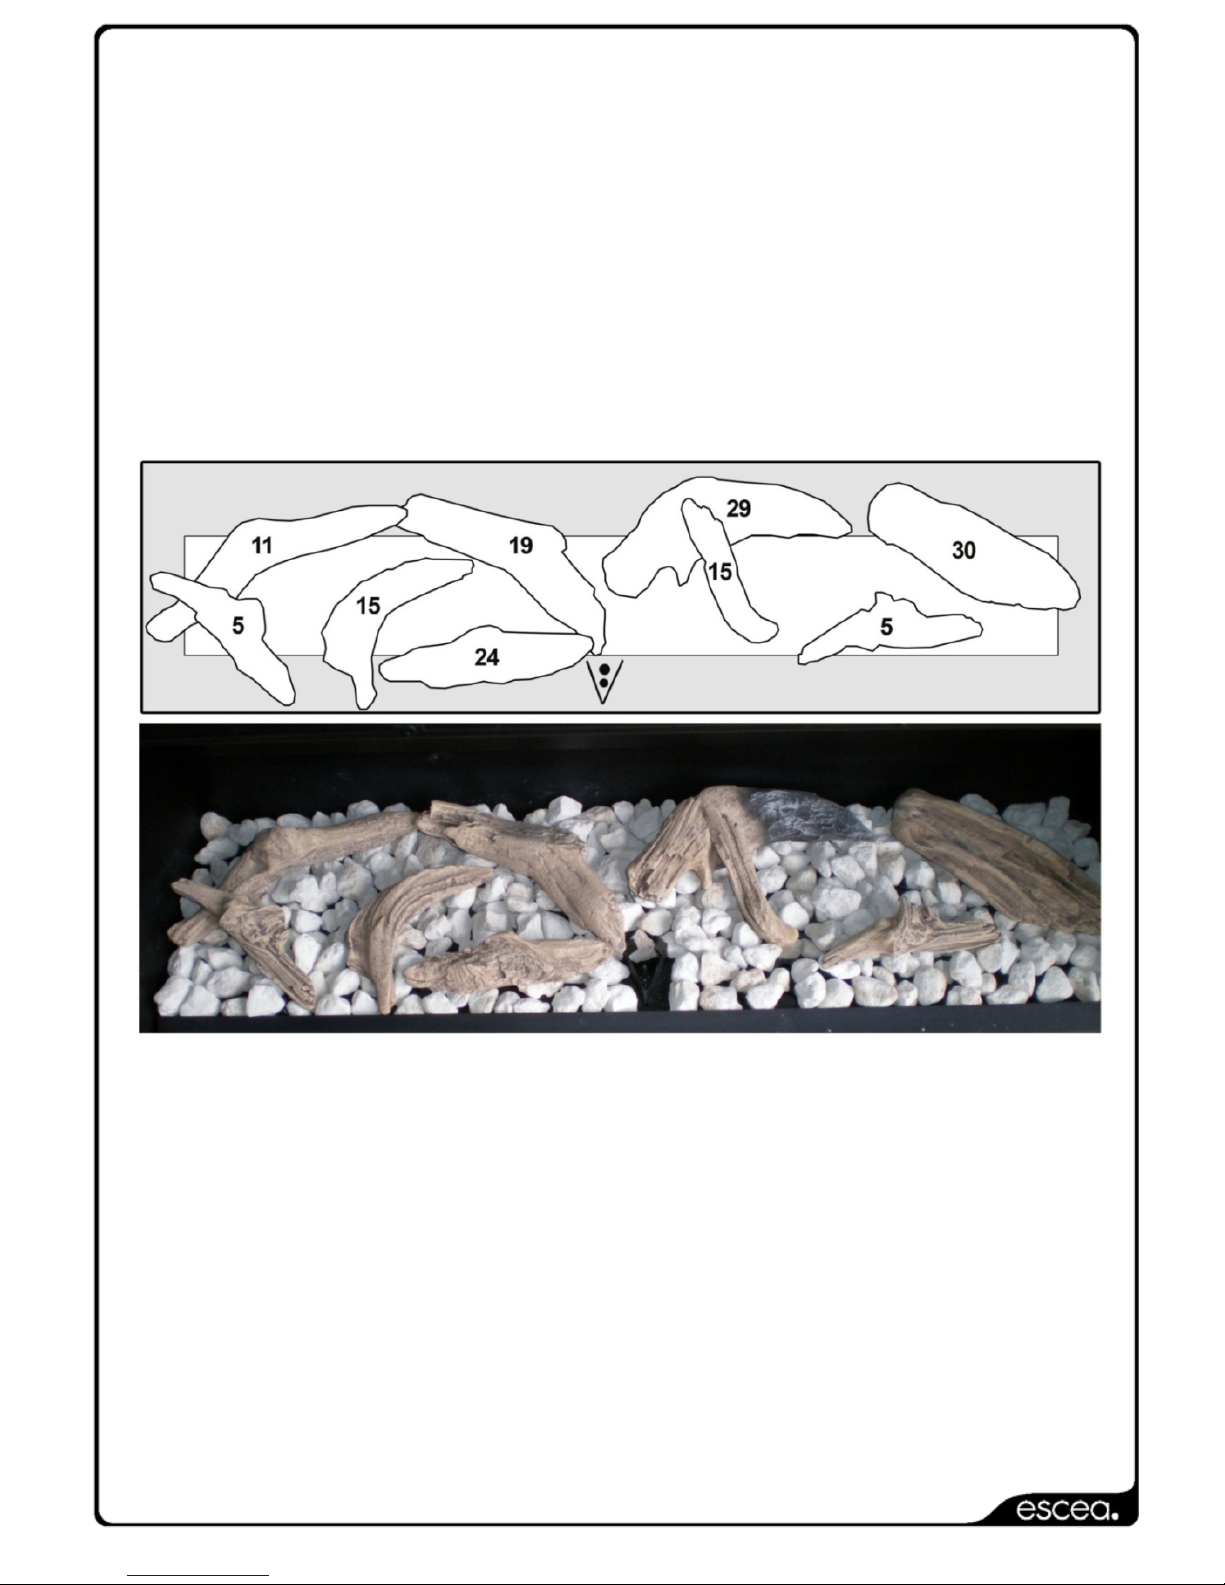
7.1 Replacing the Driftwood and Pebbles Set
Scatter one layer of the supplied white coals evenly across the base of the
firebox, ensuring there are no coals or media inside the pilot flame
surround guard. Arrange the supplied logs exactly as shown in the diagram
and photo on the following page. Underneath each log is a written number
which will help in correctly positioning the logs.
7.2 Replacing the White or Black Coals Set
Scatter the coals evenly across the base of the firebox, ensuring there are
no coals or media inside the pilot flame surround guard which may obstruct
or impair the pilot assembly.
630101_2_Manual_Propane_Conversion_US.doc
8.0 Re-fitting the Glass Assembly
The glass assembly must be re-fitted to the appliance before the gas
conversion process can proceed.
Follow the instructions in ‘4.0 Removing the Glass Assembly’ in reverse
to refit the glass assembly to the fireplace.
Do not operate the appliance if the glass has been broken, damaged,
or the glass is not properly positioned/hooked onto the appliance.
9.0 Re- establishing the Gas Supply
With all the above steps completed, the gas supply can now be re-
established to the appliance.
Leak test all test points and unions/joins that have been replaced or
re-connected.
The appliance should be re-commissioned to ensure that it is running
correctly in its re-configured state.
10.0 Re-fitting the Fascia
The fascia must be re-fitted to the appliance before the conversion process
is complete.

630101_2_Manual_Propane_Conversion_US.doc
Notes:
Altri manuali per ST900
10
Indice
Altri manuali Escea Accessori per caminetti


