eTIGER ES-CAM4A Manuale utente

www.etiger.com
ES-CAM4A
Motorized IP Camera
EN
2
Specications
- Image sensor: 1/3.2” CMOS, 2 MP
- Video resolution 320x240, 640x480, 1280x720 (H.264)
- Digital zoom: x2
- Rotation: horizontal (-175° / +175°), vertical (0° / 110°)
- Focal: 3.8mm, Aperture: F2.2
- 6 infrared LEDs for night vision (up to 8 m)
- Vision scope: Horizontal: 57° / Vertical: 31° / Diagonal: 66°
- Refresh frequency: up to 25 images/sec.
- Processor: 580MHz, DRAM: 128MB, Flash: 16MB
- Wi-Fi: IEEE 802.11 b/g/n
- Built-in microphone and speaker
- Audio compression: G.711, PCM, AAC
- Dimensions: 107.9 x 107.9 x 116.8 mm
- Weight: 280 g
- Operating conditions: 0°C to 40°C (humidity: 20%~80%, non-condensing)
- Power supply: 5V 2A, 110~240V/ DC Jack
- Compatible with smartphones under iOS and Android / Tablets / PC / Mac
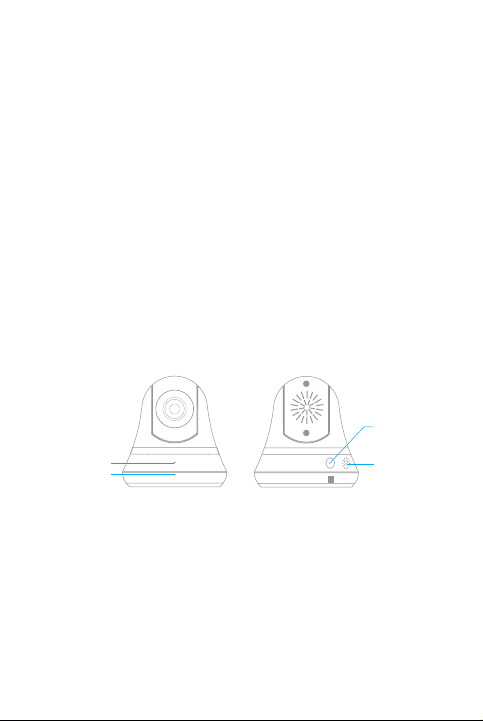
LED indicator
Microphone
Reset button
Speaker
Box content
- ES-CAM4A x1
- Mounting bracket x1
- AC Adaptor x1
- User Manual x1

3
Android and iOS apps
Before using the ES-CAM4A, download the
app iSecurity+ on the App Store or Google
Play.
Plug the camera
Plug the AC adaptor to your ES-CAM4A, and plug the former into the mains.
Attention: never manually rotate the camera upward, downward, toward
the left or the right. This may damage the camera.
Initialization of the setup
Two minutes after having plugged the
ES-CAM4A, the camera rotates and the
LED indicator starts blinking alternately
in green and orange. This indicates that
the camera is now in Connection mode.

4
Connect your smartphone to the camera
iOS Android
Go to the Wi-Fi
settings of your
smartphone,
select the network
“ES-CAM4AXXXX”
(the last 4 gures
represent the last 4
gures of the MAC
ID at the back of
your camera).
Launch the app iSecurity+
iOS Android
Once the
connection
has been made
(after around
30 seconds),
launch iSecurity+.
iSecurity+ detects
automatically your
camera.
Select ‘Yes’ to start
the setup of your
camera.

5
Conguration of the camera
1
Select “Continue”
and follow the
instructions of the
installation assistant.
iOS Android
2
Preview of the
camera
What your camera
views appears in
the interface : your
camera is connected
Select “Connect
camera to Internet”.
iOS Android

6
Connection of the camera to the Internet
1
Select the Wi-Fi
network to which
your camera will be
connected (ADSL
box, router, etc...).
iOS Android
2
Enter the password
of the Wi-Fi network
selected and press
“Continue”.
Note
It may take a few
minutes for the
camera to access the
Internet.
iOS Android

7
Connection to iSecurity+
1
Create an iSecurity+
account by lling in
the elds.
iOS Android
2
Enter your iSecurity+
username and
password to log in.
iOS Android

8
Creation of the prole of your camera
Choose a name and
a description for your
camera and press
“Continue”.
Note
The registration of
your camera on the
iSecurity+ server
will only take a few
seconds.
iOS Android
Finalization of the installation
You can use your
Android or iOS
smartphone / tablet
to access your
camera using an
Internet connection.
iOS Android
To connect another smartphone, press the reset button at the back of the camera

9
once. The LED indicator at the front of the camera blinks in green and orange
alternately. You may now start the process again from page 4 “Connect your
smartphone to the camera”.
Remark
If you have pressed the reset button at the back of the camera in error and you do
not wish to connect another smartphone, press the reset button again.
Controls on the camera
iOS Android
Take a picture
Record a video
Sound On / O
Hold and talk
Take a picture
Record a video
Sound On / O
Hold and talk
Speak / listen through the camera
To start a conversation through the camera, enable the sound by clicking on
and hold the icon while talking.
Zoom in / zoom out / rotate
You can zoom in/zoom out by pinching the screen. Click twice on the screen to
reset the zoom.
You can rotate the camera by sliding on the screen. The camera can rotate in four
directions (up, down, right, left).
LED lights indications

10
Front LED indicator
Green
Connected to local network
Green - Blinking
Searching Wi-Fi networks
Orange - Blinking
Not connected to any network
Green/Orange - Blinking
Ready to initiate Wi-Fi setup
Reset button (at the back)
Green
Setup mode on
Orange
Setup mode initializing
O
Setup mode o
Motion Detection and Notications
When the camera is on, the iSecurity+ app informs you when the camera detects
an intrusion or a movement. iSecurity+ is available for download on Google Play
and the App Store.
By default, this feature is disabled. You can enable it in the settings of the iSecrurity+
app.
Access your camera from a computer
Follow the link below to access your camera from a computer:
https://app.isecurityplus.com/app/c/login.html
Altri manuali per ES-CAM4A
1
Indice
Lingue:


