
ETNA VWV243 Series Manuale utente

VWV243---
INSTRUCTIONS FOR USE
ANLEITUNG
DISHWASHER
GESCHIRRSPÜLER

EN User instruction EN 3 - EN 34
DE Anleitung DE 3 - DE 34
Pictograms used - Benutzte Piktogramme
Important information - Wissenswertes
Tip - Tipp

EN 3
CONTENTS
Your dishwasher
Introduction 4
Using your dishwasher
Description 5
Quick start 5
Control panel 6
Water softener 9
Adding salt 10
Preparing and loading dishes 11
Function of the rinse aid and dishwasher detergent 15
Filling the rinse aid reservoir 16
Filling the detergent dispenser 17
Programming the dishwasher
Wash cycle table 18
Saving energy 19
Starting a cycle wash 19
Changing the program mid-cycle 19
Forget to add a dish? 20
Auto open 20
Maintenance
Filtering system 21
Cleaning the spray arms 22
Caring for the dishwasher 23
Cleaning the door 24
Errors
What should I do, if... 25
Error table 25
Technical data sheet 30
Loading the baskets according to EN60436 31
Tips for using the cutlery rack 33
Your dishwasher and the environment
Disposal 34

EN 4
Introduction
Congratulations on your choice of this appliance. This product was designed with simple
operation and optimum comfort in mind.
This manual describes the best way to use this appliance. In addition to information on
operation, you will also find background information that may come in handy when using the
appliance.
Please read the separate safety instructions carefully before
using the appliance.
Read this manual before using the appliance and keep it in a safe place for future use.
You can find the most recent version of the instructions for use on our website.
YOUR DISHWASHER
EN 5
USING YOUR DISHWASHER
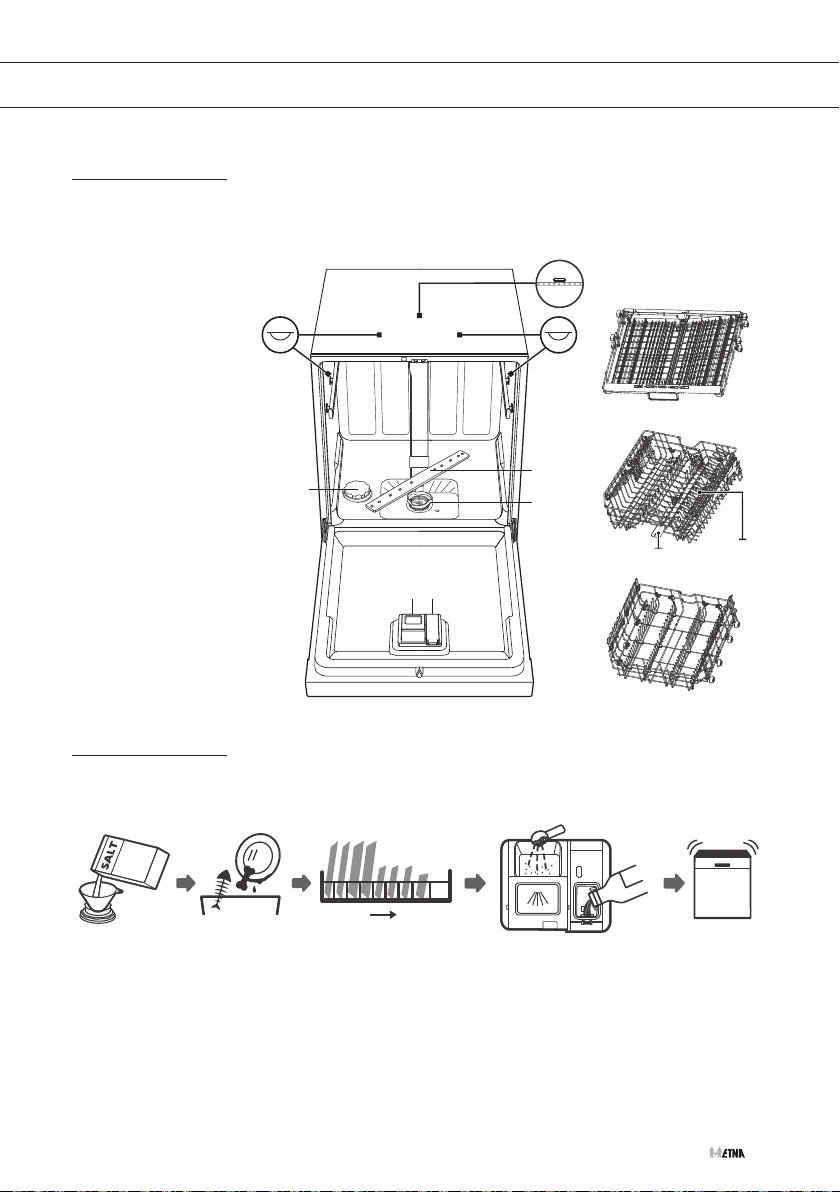
Description
Features and appearance of baskets and cutlery baskets may vary, depending on your
model.
1. Salt container
2. Detergent dispenser
3. Rinse aid reservoir
4. Lower spray arm
5. Filtering system
6. Top spray arm
7. Inner lighting
8. Cutlery rack
9. Upper spray arm
10. Cup rack
11. Upper basket
12. Lower basket
Quick start
Please read the corresponding content in this manual for more details about the operation.
Inside Outside
1. Setting the water softener/loading the salt.
2. Removing larges residues on the cutlery/dishes.
3. Loading the baskets.
4. Filling the dispenser and the rinse aid reservoir.
5. Selecting a program and running the dishwasher.
12
11
910
8
2
1
4
5
6
7 7
3

EN 6
USING YOUR DISHWASHER
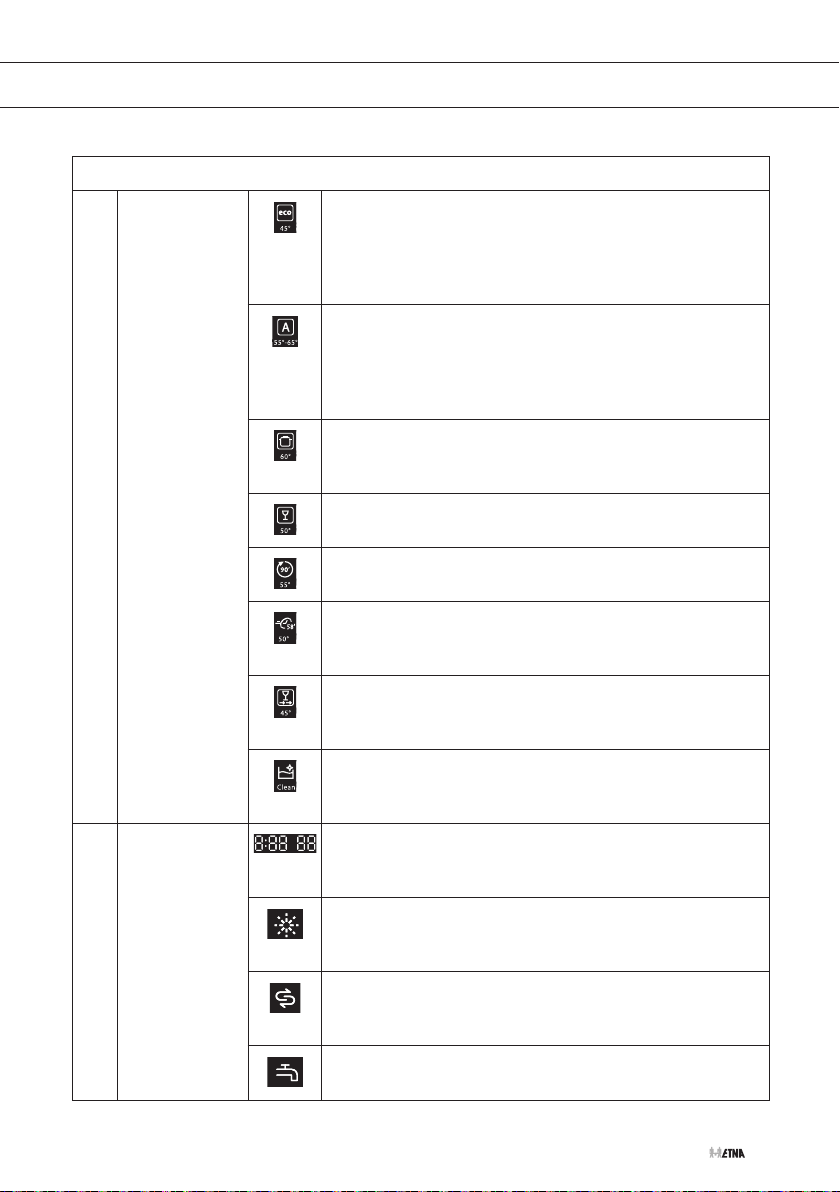
Control panel
1 2 3 4 5 6 7 8
12 13
10
911
Operation (push buttons)
1 On/Off Press this button to turn on your dishwasher, the screen lights up.
2 Program Select the appropriate washing program. The corresponding indicator will
be lit.
3 Delayed
start
Press this button (several times) to set a delayed start. Delay a cycle for
up to 24 hours in one-hour increments.
4 Auto
open
The dishwasher door opens automatically at the end of the program,
which improves the drying results. It can't be used with the program
Rapid and with the program Self-Cleaning.
5 Function Press this button to select a function. The corresponding indicator will be
lit.
6 Alt Press this button for specifically cleaning the load in the selected basket.
You do not have to wait until the whole dishwasher is loaded completely.
The corresponding indicator will be lit.
7 Child
lock
This option allows you to lock the buttons on the control panel, except
the on/off button, so children cannot accidently start the dishwasher by
pressing the buttons on the panel.
8 Start/
Pause
Press this button to start a selected program or to pause a program.
EN 7
USING YOUR DISHWASHER
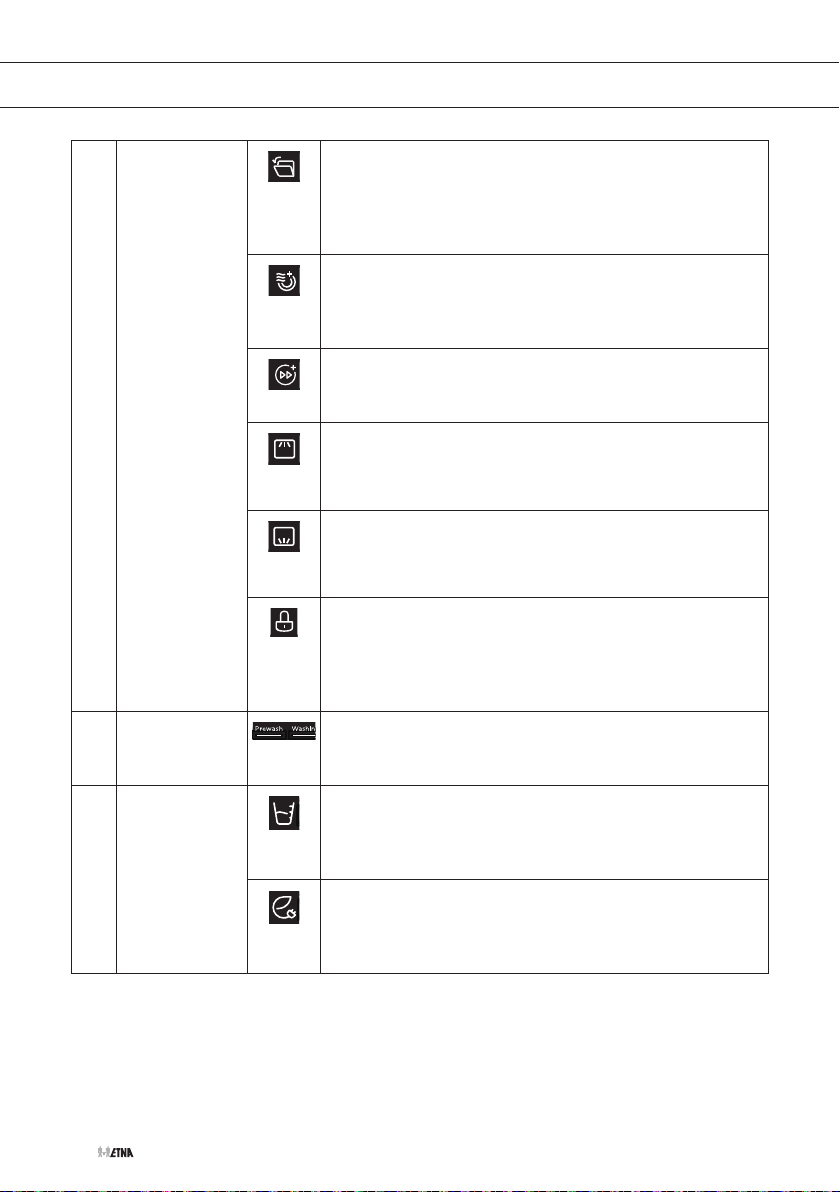
Indicators
9 Program
indicator
1 2 3 4 5 6 7 8
12 13
10
911
ECO
This is the standard program, it is suitable to clean
normally soiled tableware and it is the most efficient
program in terms of its combined energy and water
consumption for that type of tableware.
1 2 3 4 5 6 7 8
12 13
10
911
Auto
An auto sensing wash for lightly, normally or heavily soiled
crockery, with or without dried-on food. A sensor detects
how dirty the water in the machine is and automatically
adjusts the program temperature and duration.
1 2 3 4 5 6 7 8
12 13
10
911
Intensive
Heavily soiled items include pots and pans. With dried on
food.
1 2 3 4 5 6 7 8
12 13
10
911
Glass
For lightly soiled crockery and glass.
1 2 3 4 5 6 7 8
12 13
10
911
90 Min
For normally soiled loads that need a quick wash.
1 2 3 4 5 6 7 8
12 13
10
911
58 Min
For normally soiled dishes that need to be washed and
dried quickly.
1 2 3 4 5 6 7 8
12 13
10
911
Rapid
A shorter wash for lightly soiled loads that do not need
drying.
1 2 3 4 5 6 7 8
12 13
10
911
Self-Cleaning
This program provides an effective cleaning of the
dishwasher itself.
10 Display
1 2 3 4 5 6 7 8
12 13
10
911
Display
To show the remaining time, delayed start time, error
codes etc.
1 2 3 4 5 6 7 8
12 13
10
911
Rinse aid
If this indicator is lit, it means the dishwasher is low on
dishwasher rinse aid and requires a refill.
1 2 3 4 5 6 7 8
12 13
10
911
Salt
If this indicator is lit, it means the dishwasher is low on
dishwasher salt and needs to be refilled.
1 2 3 4 5 6 7 8
12 13
10
911
Water faucet
If this indicator is lit, it means the water faucet is closed.
EN 8
USING YOUR DISHWASHER
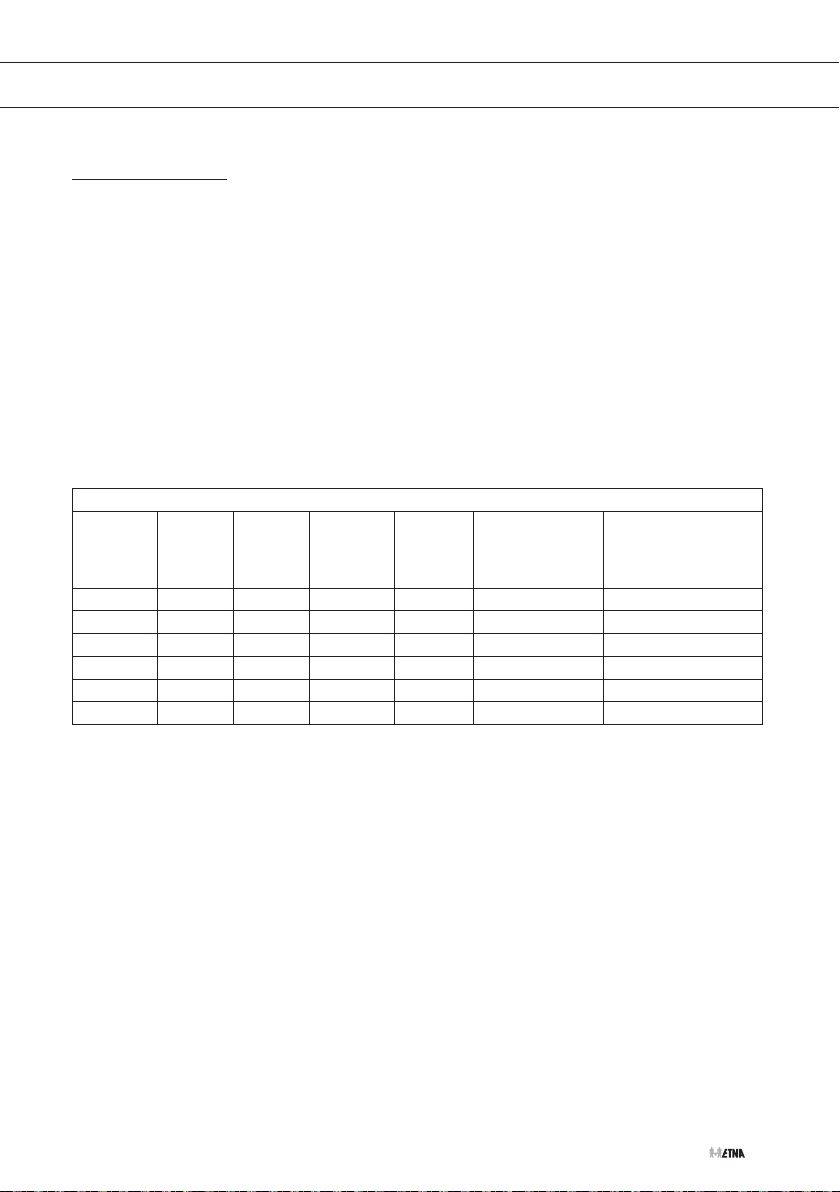
11 Function
indicator
1 2 3 4 5 6 7 8
12 13
10
911
Auto open
The dishwasher door opens automatically at the end of the
program, which improves the drying results. This function
can't be used with the program Rapid and with the
program Self-cleaning.
1 2 3 4 5 6 7 8
12 13
10
911
Extra drying
To dry dishes more completely. This function can't be
used with the program Auto, Rapid and with the program
Self-cleaning.
1 2 3 4 5 6 7 8
12 13
10
911
Turbo Speed+
Reduce the program time. This function can't be used with
the program Auto and Rapid.
1 2 3 4 5 6 7 8
12 13
10
911
Upper
When you select Upper, only the dishes in the upper basket
will be washed. The spray system of the lower basket will
not operate.
1 2 3 4 5 6 7 8
12 13
10
911
Lower
When you select Lower, only the dishes in the lower basket
will be washed. The spray system of the upper basket will
not operate.
1 2 3 4 5 6 7 8
12 13
10
911
Child lock
This option allows you to lock the buttons on the control
panel, except the on/off button, so children cannot
accidently start the dishwasher by pressing the buttons on
the panel.
12 Running
status
indicator
1 2 3 4 5 6 7 8
12 13
10
911
The running status indicator shows the running phase of a
selected program when the dishwasher is started.
13 Consumption
indicator
1 2 3 4 5 6 7 8
12 13
10
911
Water consumption level
The consumption indicator shows the water consumption
level of a selected programme. The more bars displayed,
the higher the water consumption.
1 2 3 4 5 6 7 8
12 13
10
911
Energy consumption level
The consumption indicator shows the energy consumption
level of a selected programme. The more bars are
displayed, the higher the energy consumption is.
EN 9
Water softener
• The hardness of the water varies from place to place. If hard water is used in the
dishwasher, deposits will form on the dishes and utensils.
• The appliance is equipped with a special softener that uses a salt container specifically
designed to eliminate lime and minerals from the water.
Adjusting salt consumption
The dishwasher is designed to allow for adjustment in the amount of salt consumed based on
the hardness of the water used. This is intended to optimise and customise the level of salt
consumption. The dishwasher must be adjusted to the water hardness in your area (contact your
local water board for information). This will affect the consumption of dishwasher salt consumed.
The factory setting is H3.
Water hardness
ºClarke ºdH ºfH mmol/l Setting Regeneration
occurs every
X program
sequence 1)
Salt consumption
(grams/cycle)
0 - 6 0 - 5 0 - 9 0 - 0.94 H1 No regeneration 0
7 - 14 6 - 11 10 - 20 1.0 - 2.0 H2 10 9
15 - 21 12 - 17 21 - 30 2.1 - 3.0 H3 5 12
22 - 28 18 - 22 31 - 40 3.1 - 4.0 H4 3 20
29 - 42 23 - 34 41 - 60 4.1 - 6.0 H5 2 30
43 - 69 35 - 55 61 - 98 6.1 - 9.8 H6 1 60
1) Every cycle with a regeneration operation consumes additional 4.0 litres of water, the energy
consumption increases by 0.06 kWh and the program extents by 10 minutes.
To adjust the water softener setting follow the steps below:
1. Close the door and switch on the appliance;
2. Press the program button for more than 5 seconds to open the water softener settings
mode within 60 seconds after the appliance was switched on;
3. Press the program button again (several times) to select the correct setting according to
your local environment. The settings will change in the following sequence: H1->H2->H3-
>H4->H5->H6;
4. Press the On/Off button to confirm the setting and to end the setting mode.
USING YOUR DISHWASHER
EN 10
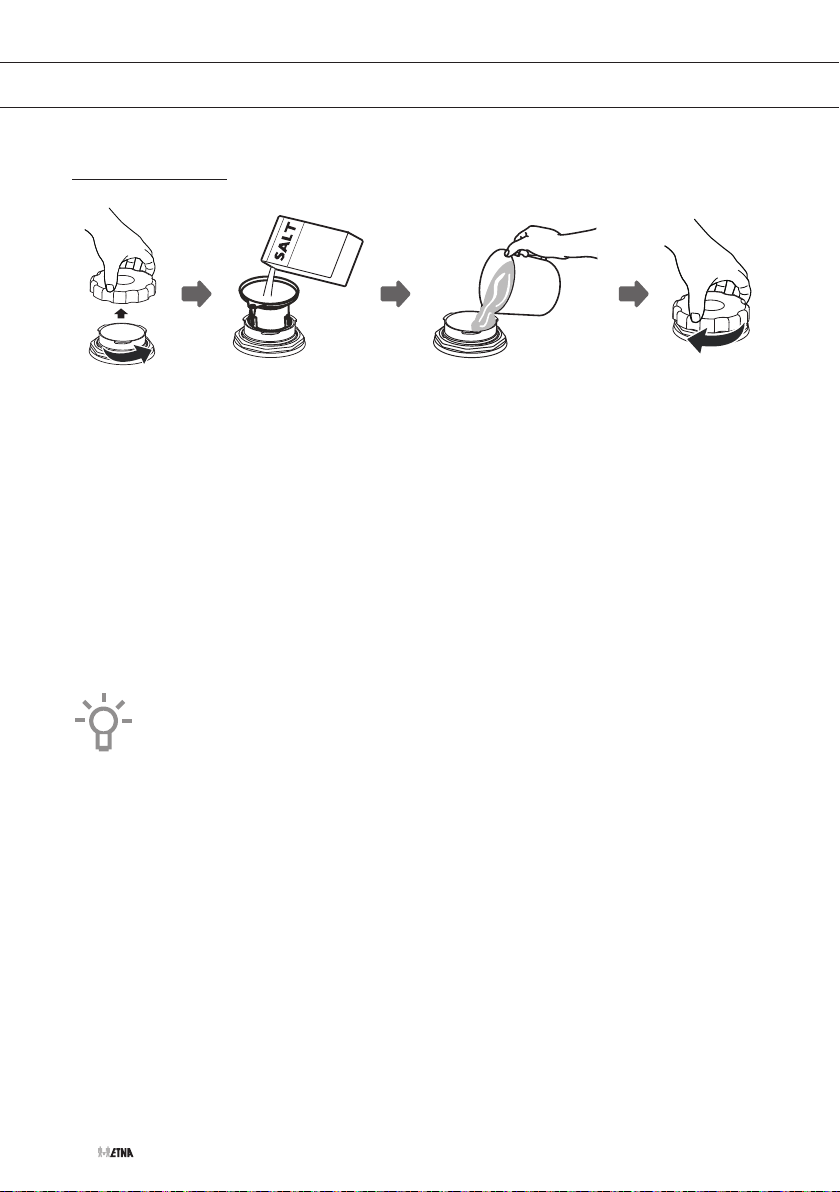
Adding salt
1. Remove the lower basket and unscrew the reservoir cap.
2. Place the end of the funnel (supplied) into the container
3. Fill the salt reservoir with about 1.5 kg of salt.
4. Add water until the reservoir is full; water may flow out.
5. After filling the container, put back the cap (tighten firmly).
6. The salt warning light will go off after the salt container has been filled with salt.
7. Immediately after filling the salt into the salt container, a washing program should be
started (we suggest to use a short program). Otherwise the filter system, pump or other
important parts of the machine may be damaged by salty water. This is out of warranty.
Note! The salt container must only be refilled when the salt warning light in the control
panel comes on. Depending on how well the salt dissolves, the salt warning light may
still be on even though the salt container is filled. If salt has spilled, run a soak or quick
program to remove it.
USING YOUR DISHWASHER
Indice
Lingue:
Altri manuali ETNA Lavastoviglie

ETNA
ETNA VWV642ZIL Manuale utente

ETNA
ETNA VWV440ZWA Manuale utente

ETNA
ETNA VWH545ZT Manuale utente

ETNA
ETNA VW149ZIL Manuale utente

ETNA
ETNA VWT349WIT Manuale utente

ETNA
ETNA VW942HN Manuale utente

ETNA
ETNA VW844M Manuale utente

ETNA
ETNA TFI8014ZT Manuale utente

ETNA
ETNA VWV647WIT Manuale utente

ETNA
ETNA AFI8527ZT Manuale utente

ETNA
ETNA VWV240CRVS Manuale utente

ETNA
ETNA EVW870RVS Manuale utente

ETNA
ETNA VW738MC Manuale utente

ETNA
ETNA EVW7860 Manuale utente

ETNA
ETNA VW649RVS Manuale utente

ETNA
ETNA VW939N Manuale utente

ETNA
ETNA VW147ZIL Manuale utente

ETNA
ETNA VW244HN Manuale utente

ETNA
ETNA TI8021ZTUU/E02 Manuale utente

ETNA
ETNA EVW100WIT Manuale utente


