
eTrikes eTc Cruiser Manuale utente

eTc Cruiser
User Manual
Introduction................................................................................................................................................ 2
Before You Ride .......................................................................................................................................... 3
E-Trike Support ....................................................................................................................................... 3
E-Trike Warranty..................................................................................................................................... 3
Handlebar Adjustment and Configuration.................................................................................................. 7
Left Side Handlebar Controls .................................................................................................................. 9
Right Side Handlebar Controls .............................................................................................................. 10
LCD Display ........................................................................................................................................... 11
Parking Brake Locks .............................................................................................................................. 12
Battery Installation and Charging ............................................................................................................. 13
Charging Instructions............................................................................................................................ 13
Taking the Battery on and off the Trike ................................................................................................ 14
Operating Instructions.............................................................................................................................. 15
Riding Tips................................................................................................................................................. 16
Service and Maintenance ......................................................................................................................... 16
LCD Error Codes........................................................................................................................................ 19
September 2023
eee eTrikes Canada
W: etrikescanada.com
Introduction
Dear customer,
Before using this e-trike please take time to read this manual.
It is the Owner’s responsibility to carefully read all the contents of this manual and to comply
with all laws pertaining to the safe operation of bicycles and/or electric bicycles in your local
jurisdiction. Failure to follow the guidelines in this manual may cause injury or damage to your
e-trike and void any warranty.
Please take a moment to record the following information.
Your Trike Details
Frame Serial Number
Front Battery Serial Number
Rear Battery Serial Number
Date of Purchase
Order Number
CAUTION: Fully charge the batteries for first use
Please use this product according to the instructions. All applicable rules
and regulations for operation of an e-bike or bicycle apply to this e-trike.
You must obey all road rules and regulations for your local government
while operating this pedal assist electric tricycle.

September 2023
eee eTrikes Canada
W: etrikescanada.com
Before You Ride
Before you head out, it's important to make sure that your trike is ready to ride. Always check
your battery, major bolts, especially on the rear axle, plus brakes, quick release bolts for seat
and wheels as well as tire pressure.
E-Trike Support
Our e-trikes use standard bike components, so service and maintenance is straight forward.
This includes but is not limited to, Shimano Gears, Tektro, Bengal brakes, Kenda Tires, Bafang
Motors, Samsung and Panasonic Lithium-Ion Batteries.
General maintenance for the most part is the same as any normal e-bike and most competent
bike shops will be able to help you with this.
If you have a warranty question or issue with your trike within the warranty period of purchase,
please visit https://etrikescanada.com/pages/customer-help-desk and open a support ticket.
Please note we do not offer telephone support without a support ticket linked to a valid Order
ID. Our ticketing system allows for any issues to be documented and tracked.
E-Trike Warranty
While all of our e-trikes go through quality assurance and testing both during manufacture and
assembly prior to shipping from Canada, occasionally components may malfunction, break, or
not work as intended.
Your e-trike is covered by a 12-month manufacturers warranty which covers major components
for defects not caused by riding. These include the battery, motor, LCD, controller, and frame.
Unless otherwise specified, ex-demo and showroom models do not come with any warranty.
Standard wear and tear parts like tires, tubes, nuts and bolts, chains, brake cables or hydraulics,
bearings, disc brake wear are not covered by warranty.
For full warranty details visit https://etrikescanada.com/pages/terms-conditions

September 2023
eee eTrikes Canada
W: etrikescanada.com
1. These electric trikes are not classified as motor vehicles; however, to drive them on the
roads, various provinces have differing laws.
2. We have worked hard to provide you with a quality product, well designed, and without
defects. You too have a part to play with proper care, maintenance, and attention to
bicycle safety rules, your e-trike will give you years of enjoyment.
3. Do not ride this tricycle until you have read and thoroughly understand the owner’s
manual. It contains information critical to your safety. If you have questions about the
operation of this electric tricycle, consult your authorized dealer. It is extremely
important that you follow the safety guidelines contained in this manual to ensure your
maximum safety. If you loan your e-trike to anyone, make sure they also know how to
operate it safely.
4. When using, do not exceed the maximum user weight of 150 kgs (330 lbs.) and please
be aware of increased braking distances during inclement weather conditions.
5. Do not ride through excessive water or puddles deep enough to submerge the motor,
controller, or any electronics as this will cause short circuiting and damage to the
electric apparatus. Damage caused by the water is not covered by the warranty.
6. The exposed metal contacts on the battery box are both positive and negative;
therefore, do not touch at the same time with wet hands.
We recommend service and maintenance by a professional technician at a local bicycle shop.
All components on this e-trike are standard brand name 2-wheel bicycle components so service
and maintenance are the same as any e-bike.

September 2023
eee eTrikes Canada
W: etrikescanada.com
Safety Precautions
Safeguard your batteries to insure continued high performance. It should be recharged after
each use. The normal full-cycle battery life if it is continuously discharged and re-charged is
about three years or 600-800 cycles or recharges, after which the storage capacity of the
battery will gradually decline. If it is not fully discharged and is recharged regularly, the service
life of the battery will be at its optimum. The batteries supplied are top quality Samsung
Lithium Batteries specifically designed for this vehicle.
•Battery performance is affected by the temperature and is generally more efficient in
warmer temperatures. When the temperature drops below 0 C (32 F) the battery
current may decrease by up to a third or more. Consequently, the travel range on a full
charge in cold environments is much less.
•Frequent braking and starting, riding uphill, traveling against a strong wind, starting
from a standstill, riding on rough or muddy roads, carrying more than one person
and/or heavy loads will consume extra battery power and shorten the range. A few tips
to prolong the battery life during these conditions are as follows:
oFrequent Braking –try to look ahead and coast rather than stop and go
frequently. Riding uphill or against a stiff wind –pedal to supplement the
battery power.
oWhen starting from a standstill –use the pedals to help bring you up to speed.
oWhen the battery meter indicates the voltage is low, switch to manual power
and avoid using the battery so you don’t shorten the battery life.
•If the battery is being stored make sure it is in a clean dry space not near any water or
heat source, remove the battery from the bicycle and recharge it every month.
CAUTION! Fully charge the batteries before the first use!
Failure to do this can result in decreased battery performance for the life of
the bike. Fully charge the battery each time you use the bike.
September 2023
eee eTrikes Canada
W: etrikescanada.com
This electric tricycle can be used in the light rain and snow, however, it must not be submerged
in water or puddles or ridden in excessively rainy weather - the controller, motor and other
electrical devices may be short circuited and malfunction as a result. Damage caused by water
is NOT covered by the warranty.
Battery Chargers contain sensitive electronics. Improper use, dropping, or sudden jolts can
damage the charger and its internal components.
CAUTION! Always turn off the power and remove the key from the battery
before and during charging to prevent damage to the controller and to the
batteries!
DO NOT use chargers or other components that have not been approved
and tested by eTrikes Canada. eTrikes Canada is not responsible for damage
caused by the use of other products not specifically designed and tested for
use with this electric bike. Use if a charger other than the original supplied
will void warranty.
CAUTION! Do NOT use an air compressor to inflate the tires, instead use a
hand pump. Tires should not be inflated to more than 25PSI, while the
manufacturers rating for the tires is 30PSI this it not recommended as it can
cause tires to un-seat from the rim in some circumstances.
September 2023
eee eTrikes Canada
W: etrikescanada.com
Handlebar Adjustment and Configuration
Tools Required: 5mm Allen-Key
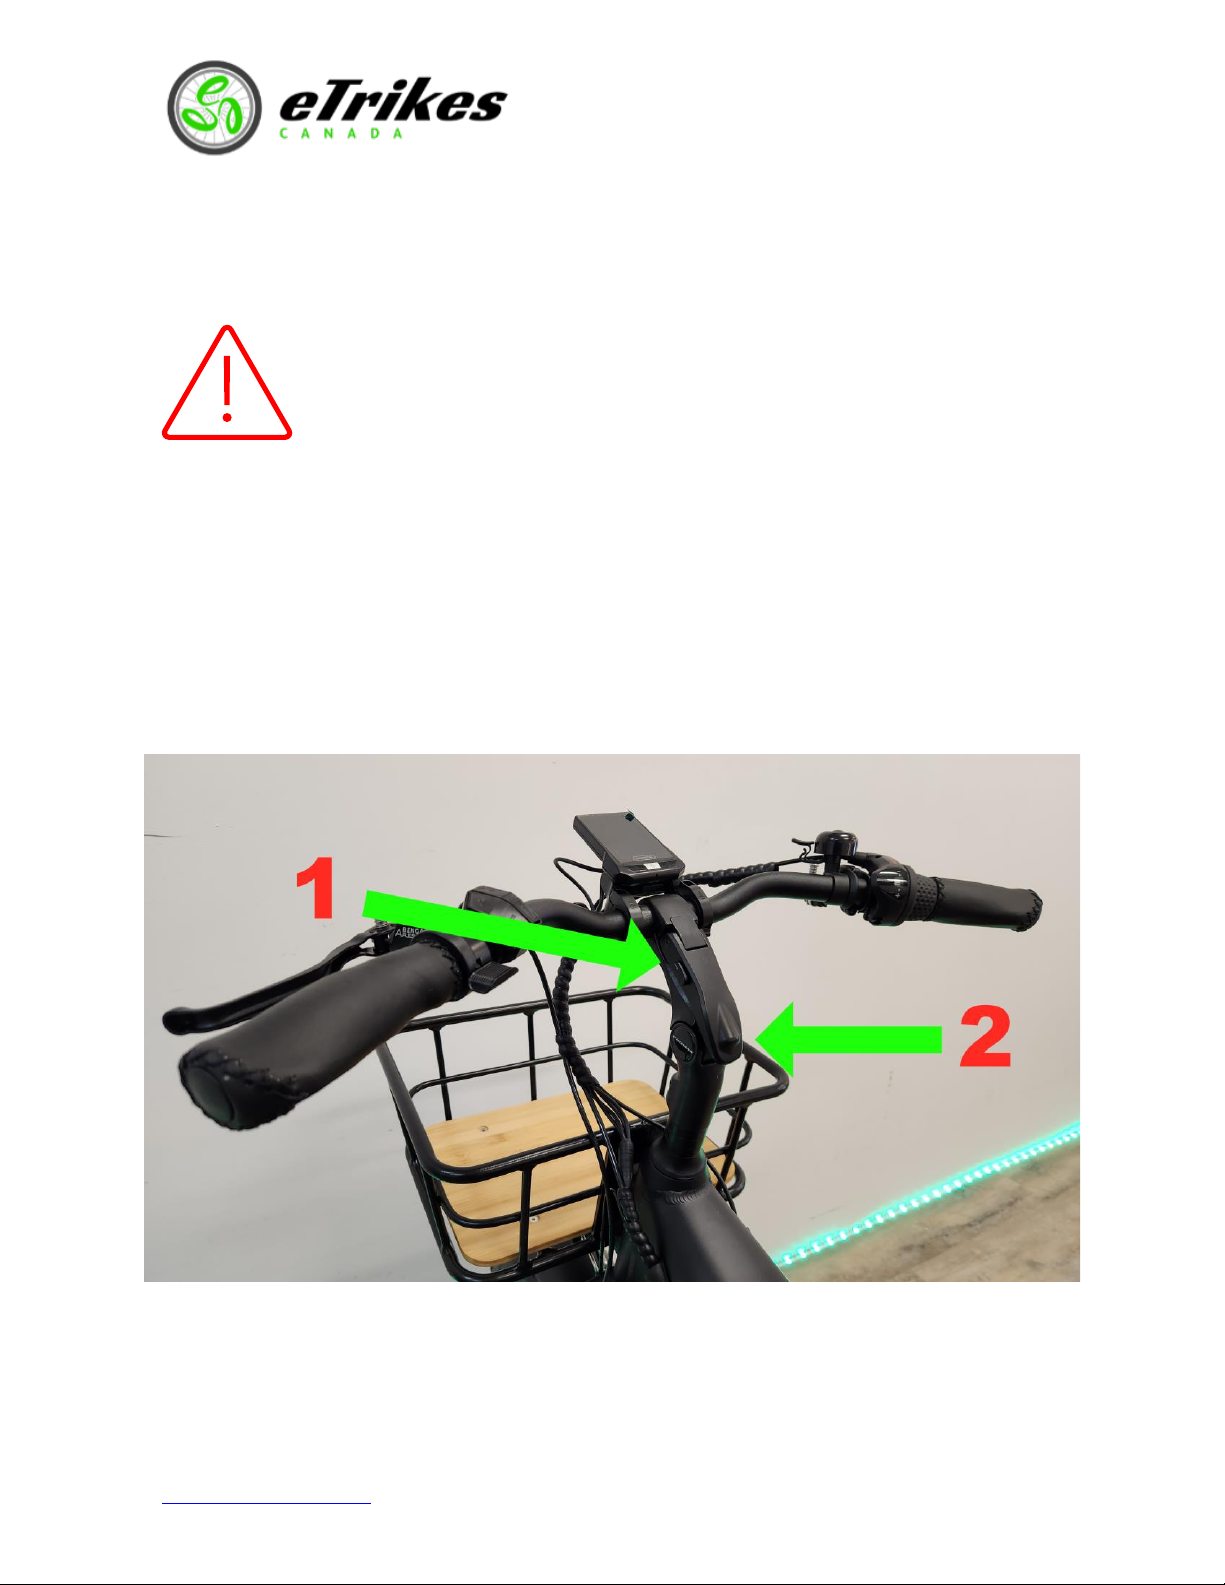
To adjust the tilt position of the bars, pull the lock button down (See Photo A #1) and lift the lever (See
Photo A #2) to unlock the handlebar.
Adjust the handlebars to the desired position and push the lever down to lock in place. If the handlebars
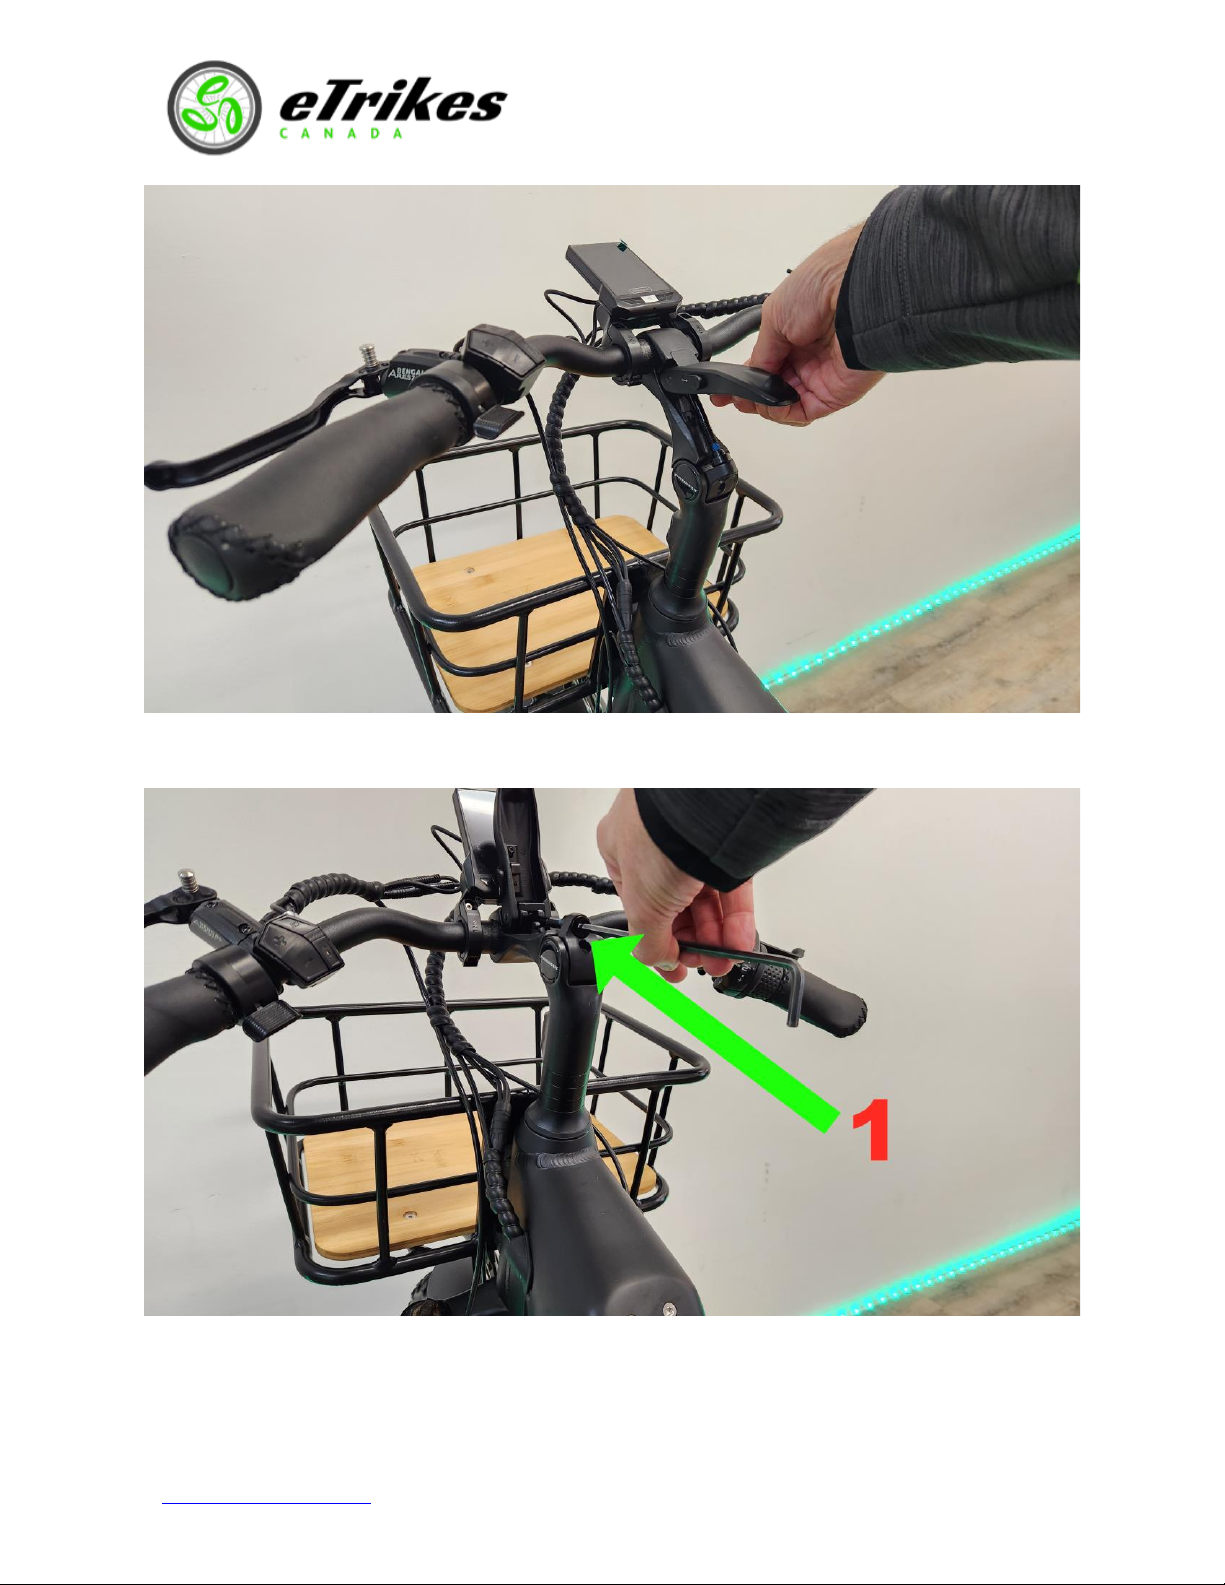
are still loose when the lever is in its locked position, repeat steps #1 and #2 above and use a 5mm
Allen-key to tighten the centre bolt then re-lock the lever (See Photo B #1). Repeat as necessary until the
handlebars do not move when locked. Be sure to test everything is tight before riding.
Photo A
CAUTION! For safety reasons, all bolts must be checked for tightness
before every ride!
Failure to do so could result in serious and/or fatal injuries
September 2023
eee eTrikes Canada
W: etrikescanada.com
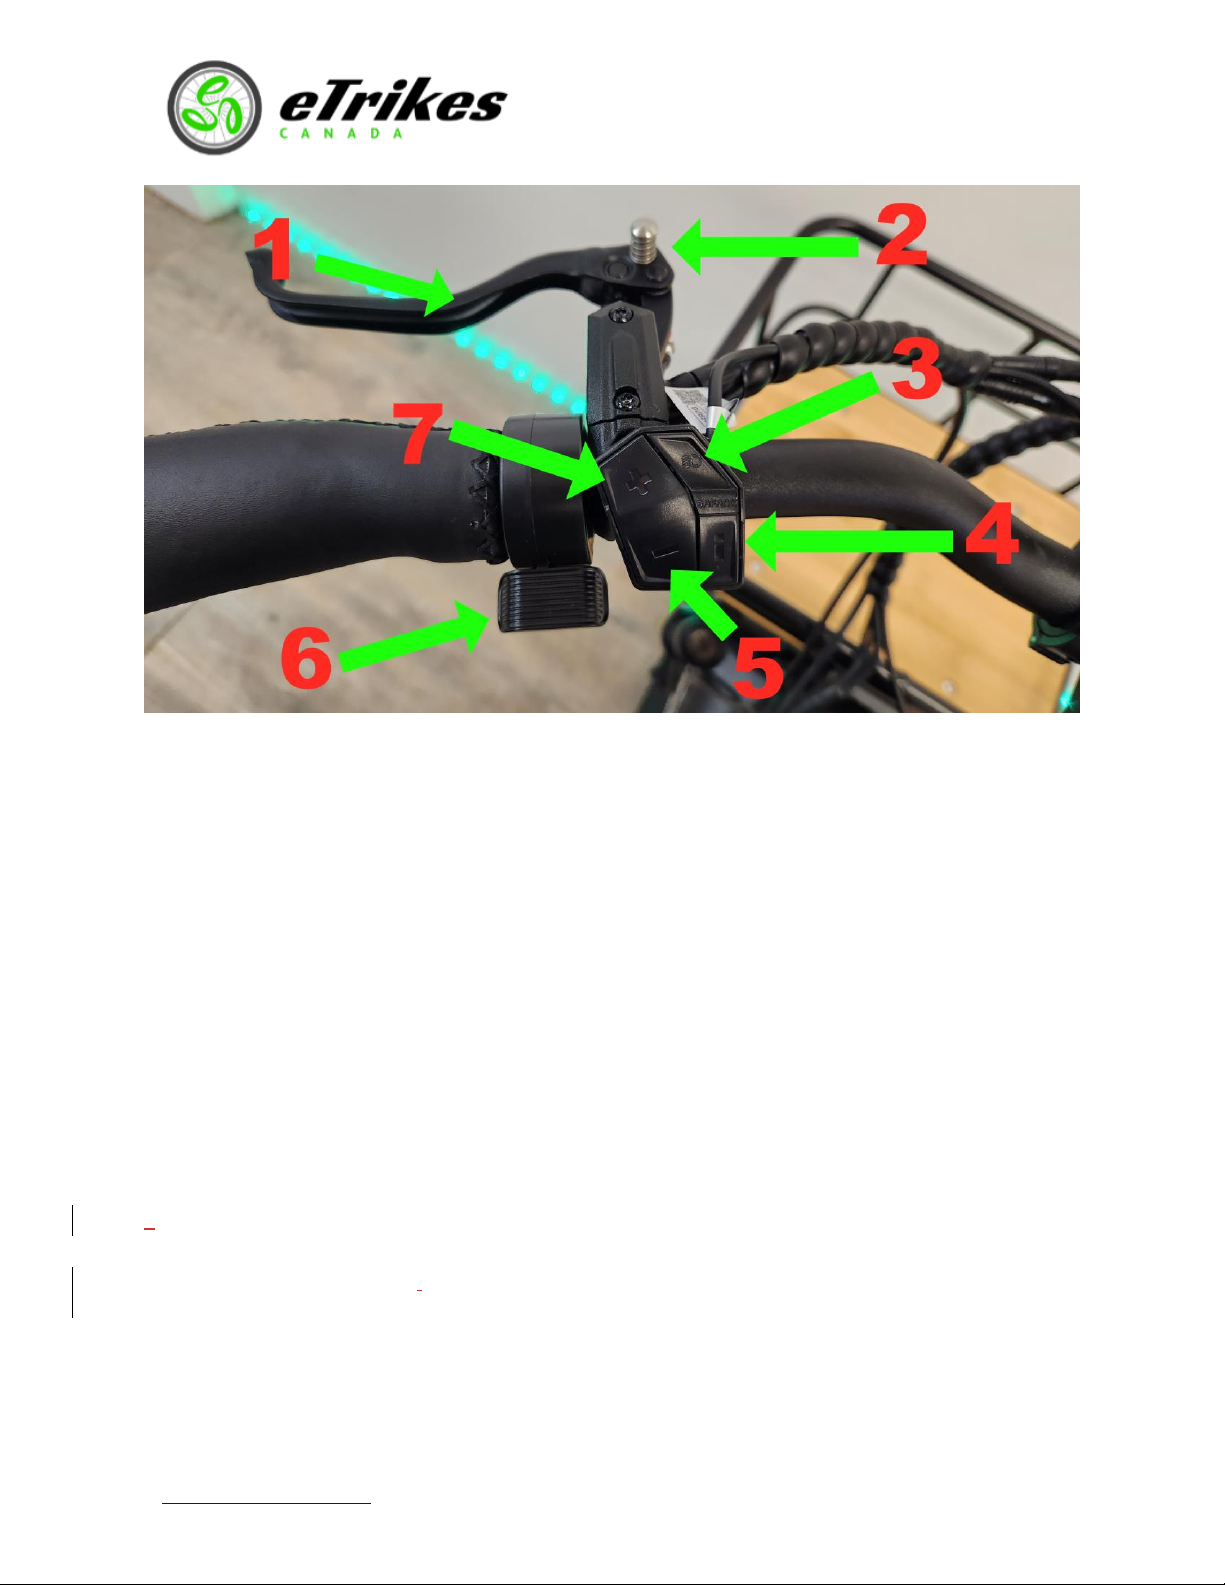
Photo C
Left Side Handlebar Controls
1. Front Brake Lever
2. Front Brake Lever Lock (squeeze lever, press silver button down and release lever to lock,
squeeze lever again to release. Parking Brakes are NOT to be used while riding the trike.
3. Lights. When LCD is ON, press and hold to turn lights on, press and hold again to turn off.
4. Info button, toggle through different LCD displays.
5. Decrease Pedal Assist Levels (1 is lowest power, 5 is highest, current PAS level is shown on the
LCD screen (Photo E)
6. Thumb Throttle *
7. Increase Pedal Assist Levels (1 is lowest power, 5 is highest, current PAS level is shown on the
LCD screen (Photo E)
*NOTE: This is a Pedal Assist Trike and is meant to be operated using both pedal power and motor assist.
Due to the weight of the trike and rider it is not meant to be operated using only the throttle, especially
on challenging terrain, inclines,and hills.
September 2023
eee eTrikes Canada
W: etrikescanada.com
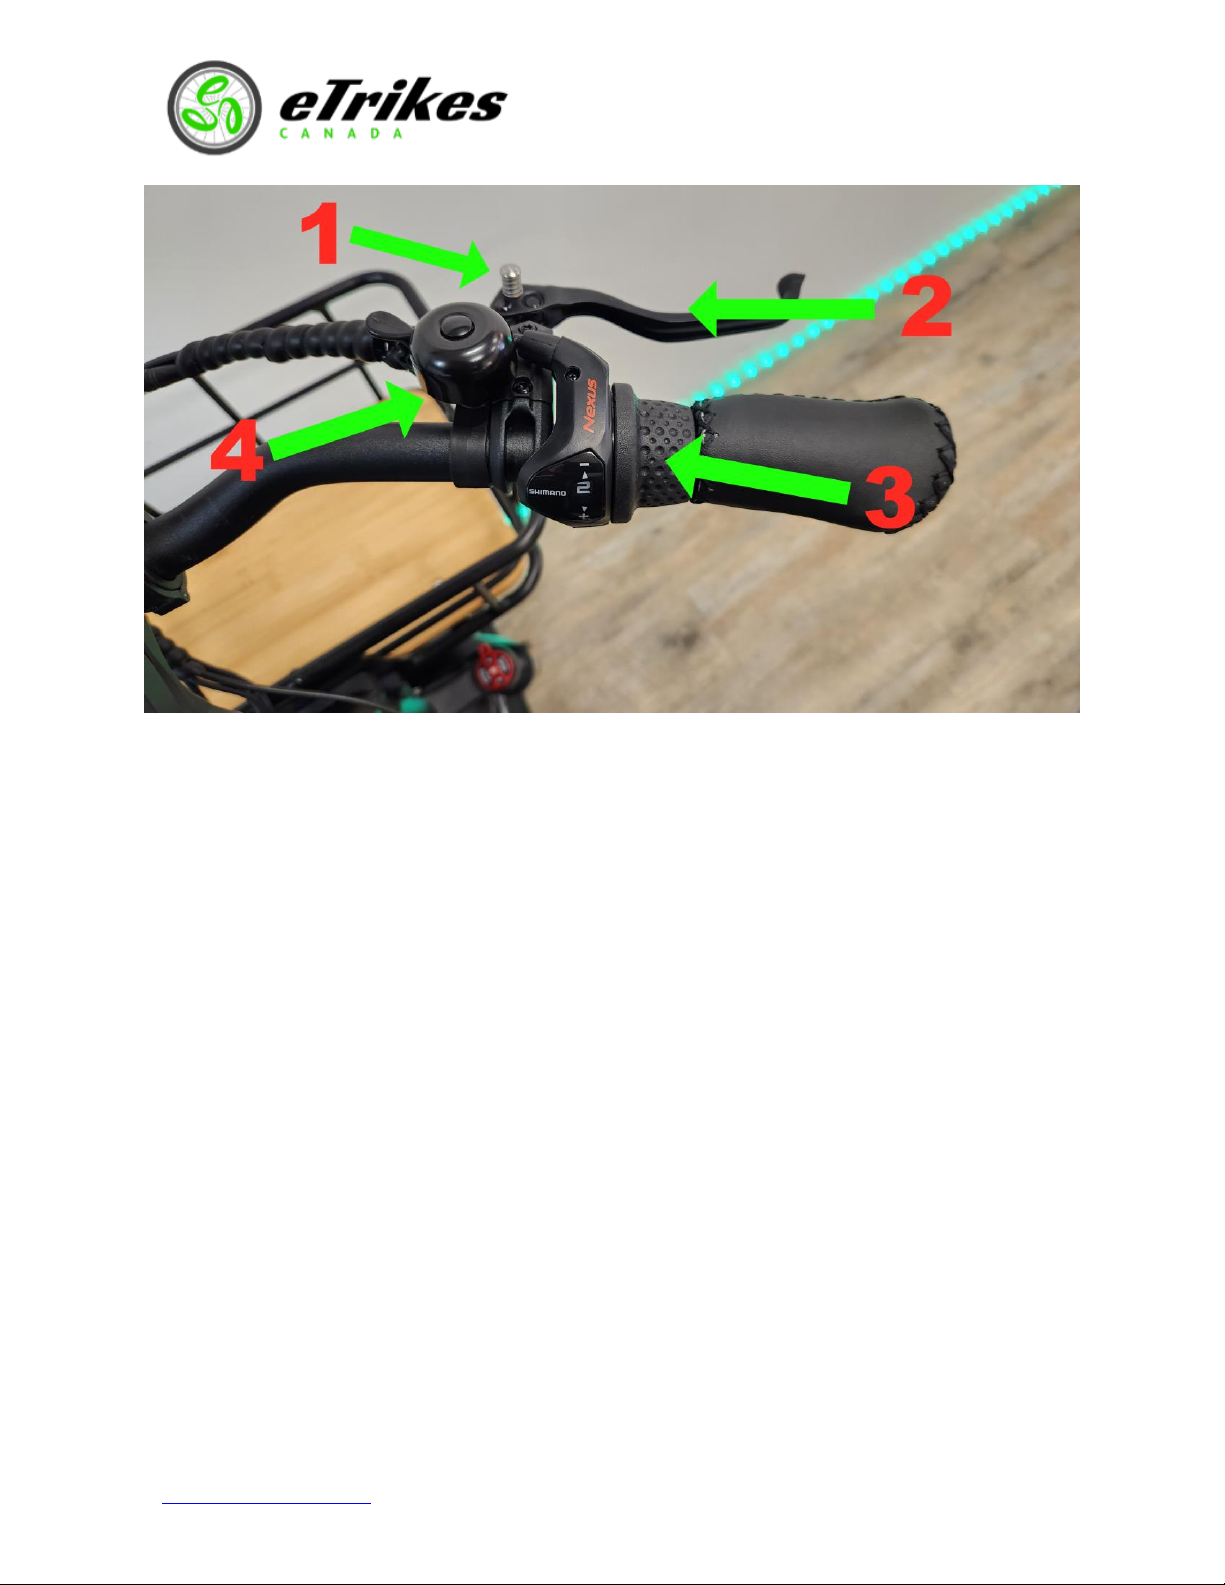
Photo D
Right Side Handlebar Controls
1. Rear Brake Lever Lock (squeeze lever, press silver button down and release lever to lock,
squeeze lever again to release. Parking Brakes are NOT to be used while riding the trike.
2. Rear Brake Lever
3. Shimano Nexus Gears –twist to increase or decrease the normal bicycle gears. 1 is lowest gear
(easiest to pedal), 3 is highest gear (hardest to pedal)
4. Bell, flip lever down and quickly release.
Indice
Altri manuali eTrikes Accessori per biciclette


