Eurovema Volaris Smart Manuale utente

User Manual
Important, read before use!
SMART/SMART XL
DISCOVERY/DISCOVERY XL
PATROL/PATROL XL

P
P
2
Congratulations on your new rollator!
We ask you to read carefully through this User Guide in order to familiarise yourself with your new rollator. Correct use and
care will give you increased safety and ensure that your rollator enjoys a longer service life.
Volaris is a stable and easy to use rollator. It can easily be folded up in order to take up less space or to facilitate handling
during transport. The product can be complemented with a range of dierent accessories according to your personal re-
quirements.
Volaris rollators are developed and manufactured in Sweden, ensuring best funconality and the highest level of quality.
Intended use
The rollator provides support when moving and shall only be used as a walking aid for those with limited or impaired mobil-
ity. The product can be used both indoors and outdoors.
Its seat can be used for rest whilst the rollator is in a staonary posion.
Volaris rollators (SMART, Discover, and Patrol models) are intended to be used by adults.
Alteraons or customisaons beyond those described in this User Guide are not permied.
Use limitaons
The rollator must not be used by individuals who do not have the strength to walk or stand assisted by the rollator.
The product may not be used by individuals who exceed the maximum weight indicated for each specic model.
Standards
Volaris rollators (SMART, Discover, and Patrol models) are compliant with Swedish standard SS-EN 11199-2:2021 (Assisve
products for walking manipulated by both arms).
Volaris is CE-marked and is compliant with the requirements of the Medical Devices Ordinance MDR 2017/745.
Warranty
The warranty period is two (2) years and covers materials and manufacturing defects. In the case of wear parts, such as
wheels, brake components and handles, the warranty is one (1) year. The warranty assumes that the product has been used
as intended in accordance with this user guide. Expected service life of the rollator is ve (5) years provided that the prod-
uct has been used in accordance with our instrucons and undergoes regular maintenance.
Contact
If you have any quesons about the product and how to use it, contact your dealer or Technical Aid Centre.
Eurovema Mobility AB
Baldersvägen 38
SE-332 35 Gislaved
Tel.: +46 (0)371 39 01 00
E-mail: info@eurovema.se
Internet: www.eurovema.se
Safety instructions
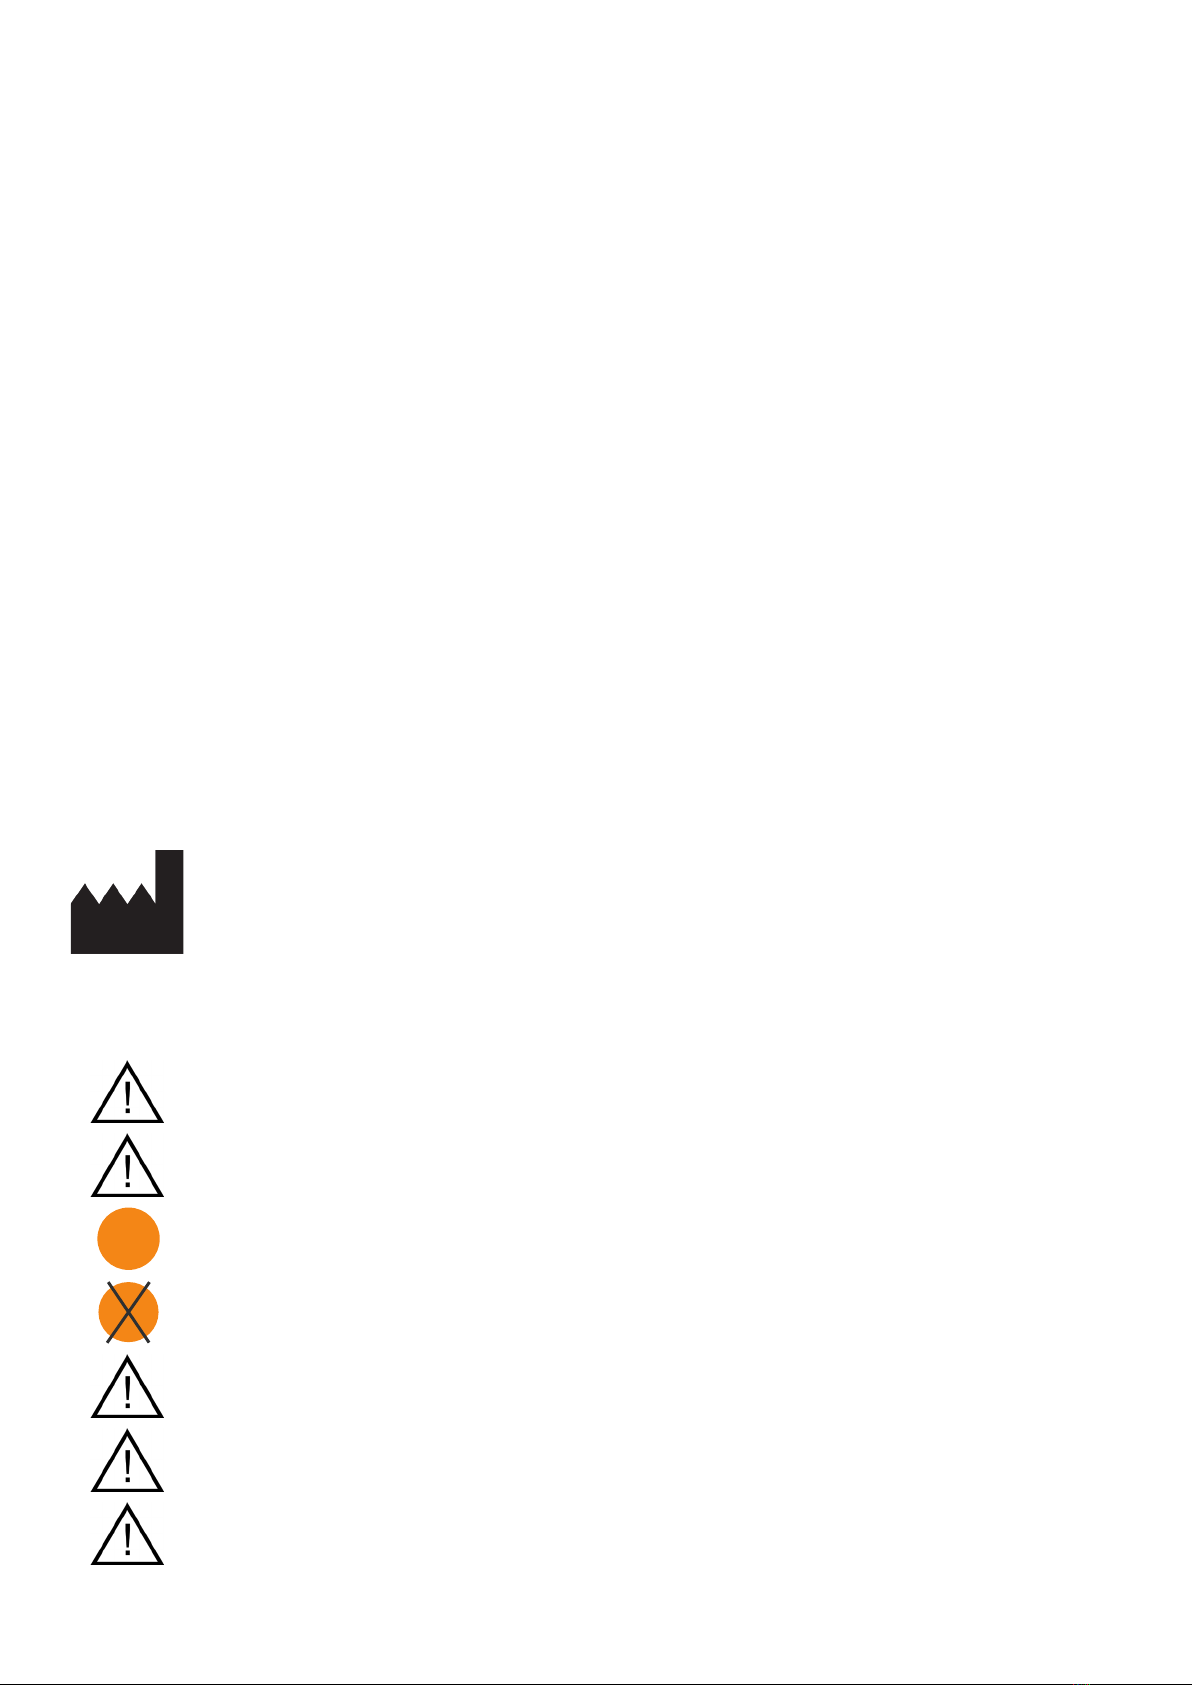
Warning! Be careful when using the rollator to avoid any personal injury.
Important! Read the instrucons to avoid damaging the product.
Symbol indicang that the parking brake is applied.
Symbol indicang that the parking brake is released.
Warning! The rollator must be in park mode (the parking brake applied) when sing on or geng up o
the seat.
Warning! Never walk with the rollator whilst someone is sing on the seat.
Important! The seat must be at, i.e. at the same height on both sides, when the rollator is folded up.

XXX
XXXX-XX-X
3
List of contents
Intended use 2
Warranty 2
Standards 2
Contact 2
Safety rules 2
Contents 3
Marking 3
Seat height adjustment 4
Handle height adjustment 4
Folding and unfolding the rollator 5
Fixed transportaon strap 5
Braking 6
Brake adjustment 7
Arculaon brake adjustment 7
Use ps - “comfort chassis” 8
Learn the “scissors technique” 9
Maintenance:
Cleaning 10
Recondioning 10
Cable lubricaon 11
Troubleshoong 11
Prole clips 10
Accessories 12-15
Technical data 16
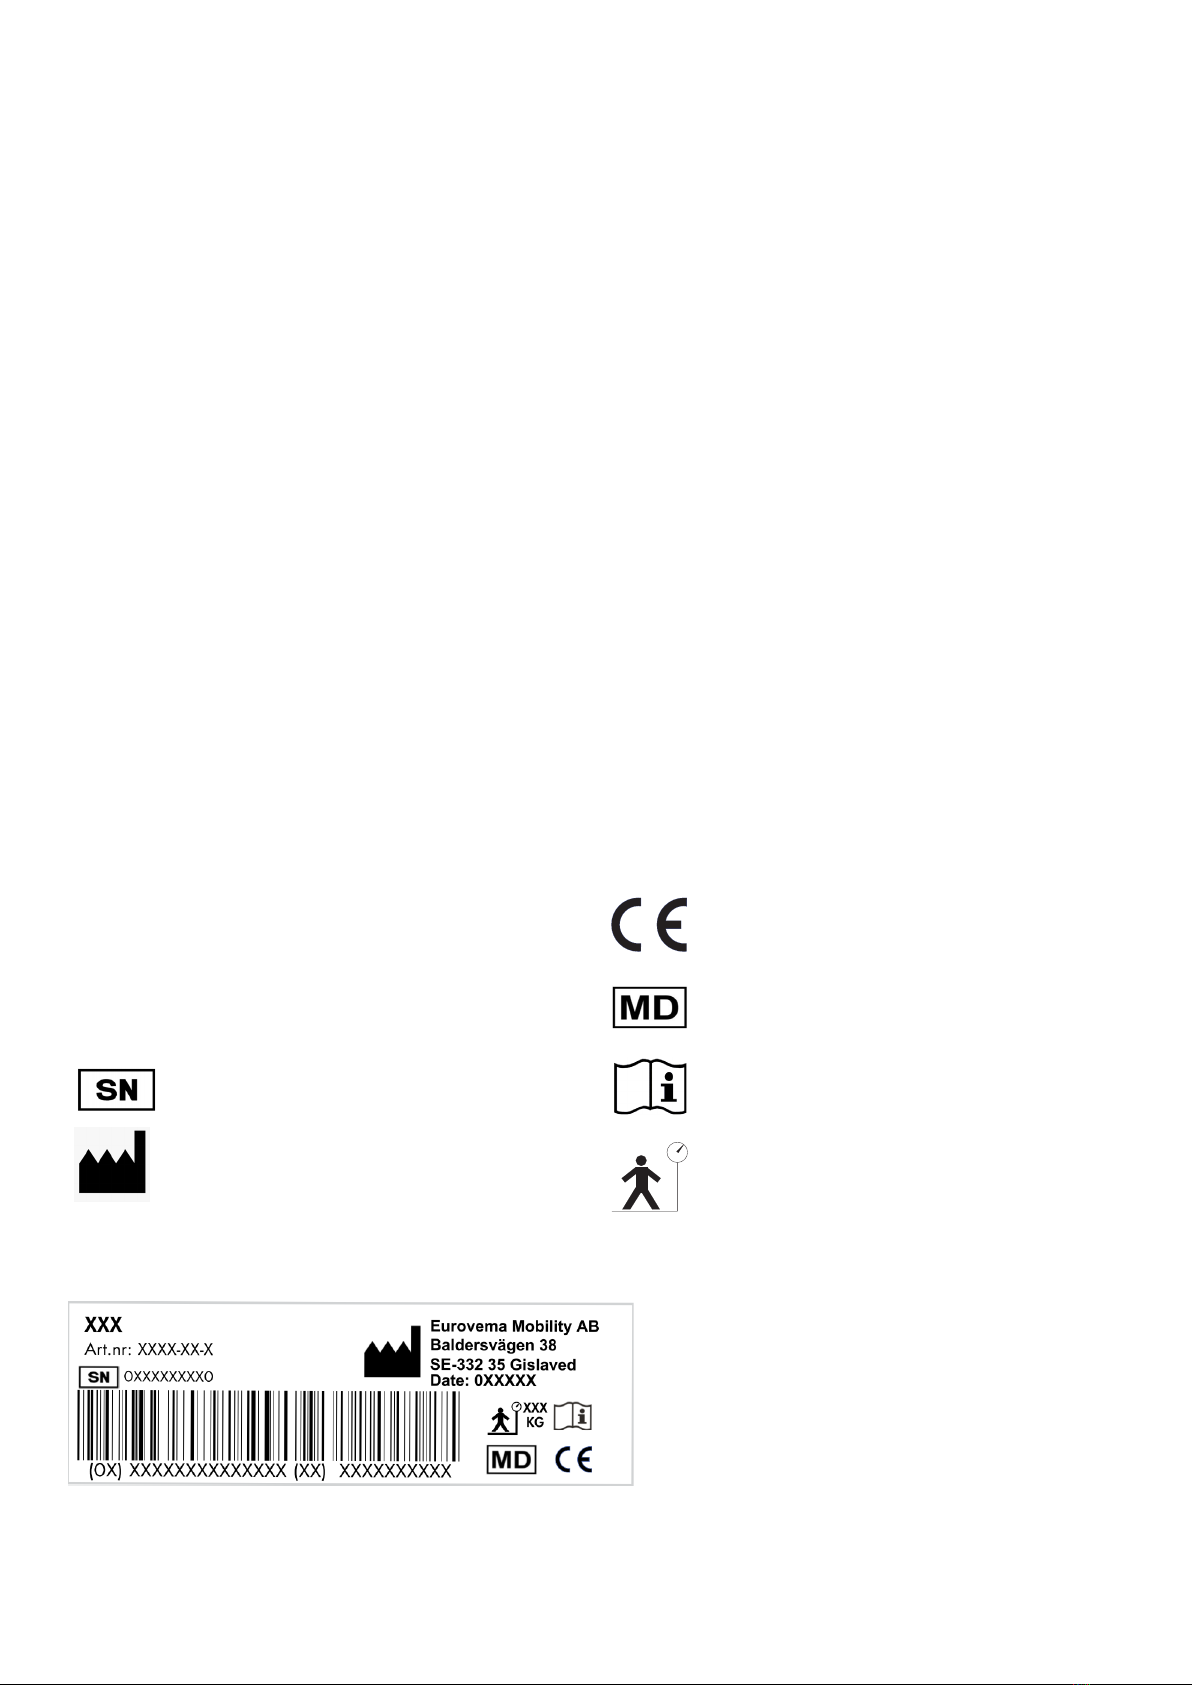
= Product name
= Item number
= Serial number
= Manufacturer/Manufacturing date
Marking
Label
= CE-marking
= Medical device
= Read User Guide
= Max. user weight

x2
x2
P
4
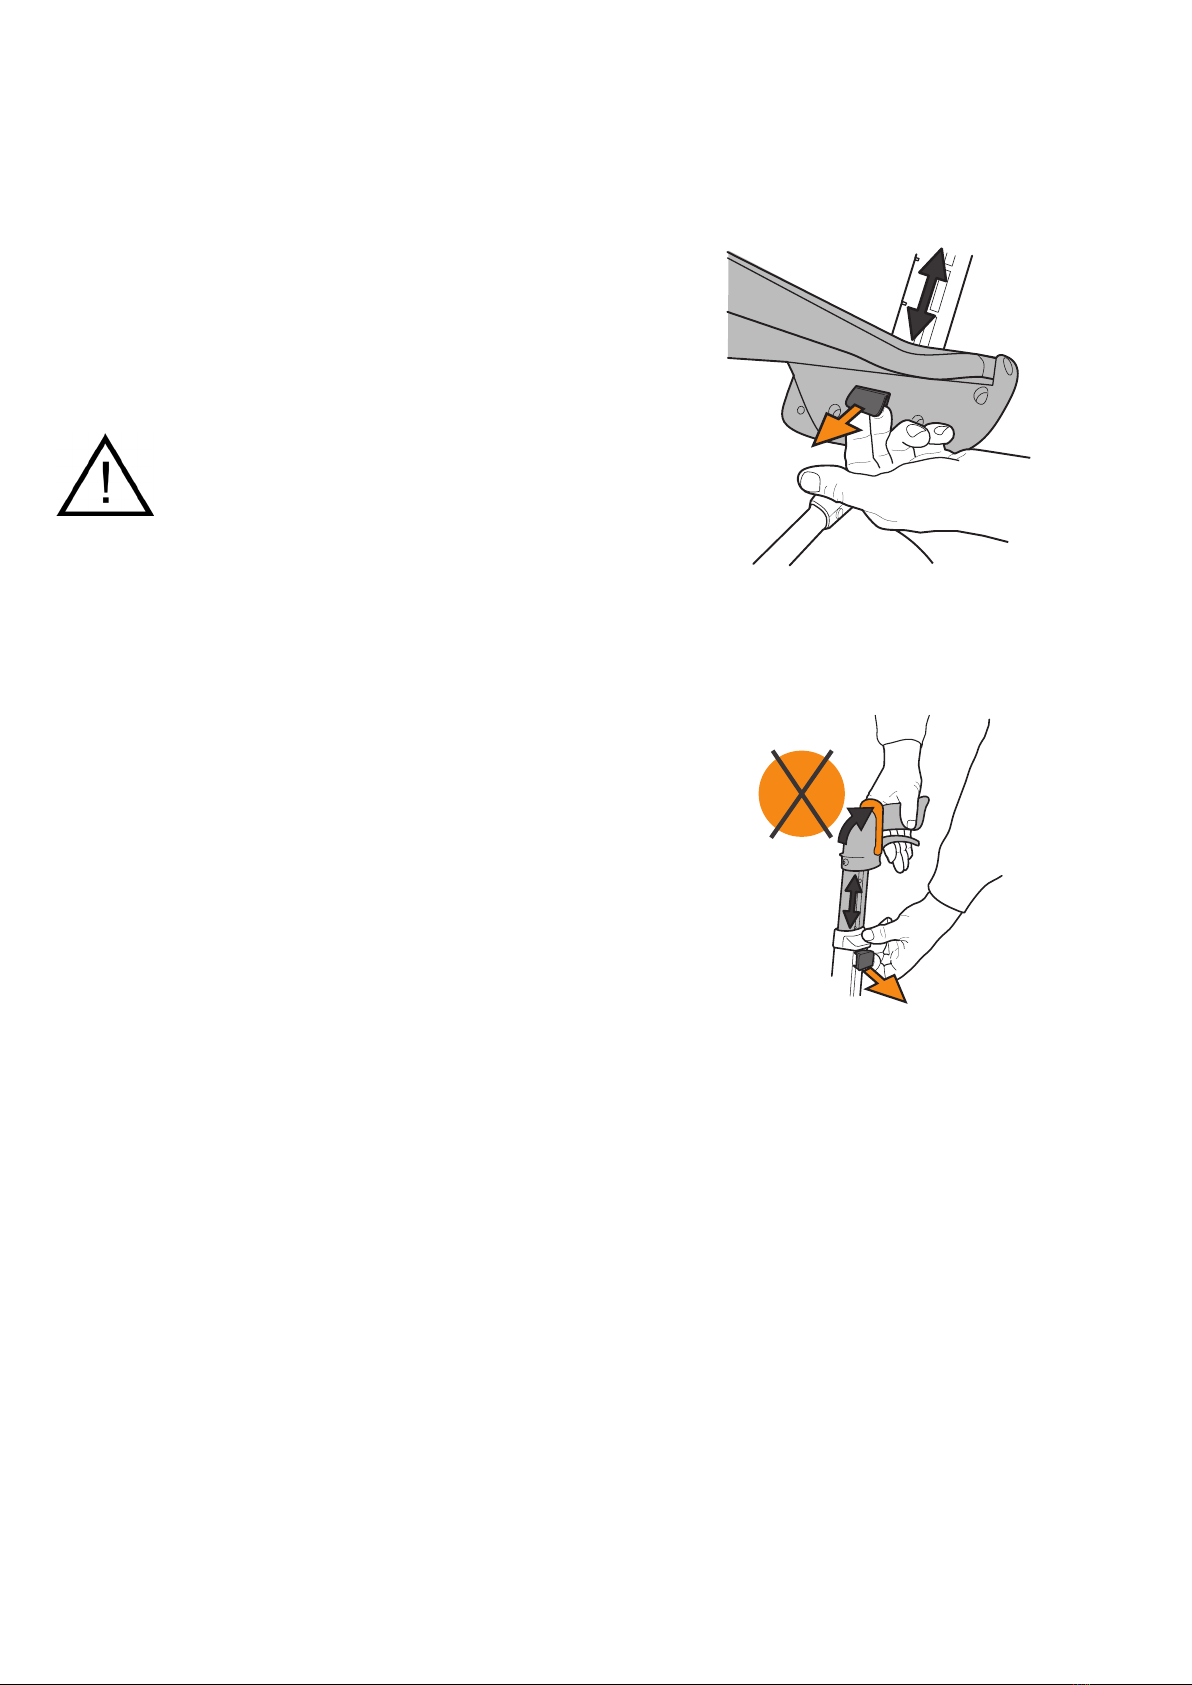
Seat height adjustment
Adjust the handle height
Remove any prole clips (see page 9). Adjust the
height of the handles by pulling out the knob and
adjusting the height; see the setting heights on page
16. Make sure the parking brake lever is up, then
adjust the height and check that the knob clicks back
into place. After adjustment, check the brakes before
using the rollator! Stand upright next to the rollator.
The handles are set at the correct height when your
hands are level with them. Once you have used the
rollator for a while, you will know if you want to make
any further adjustments. You should feel comfortable
when you are walking with your Volaris. Mechanical
stop for maximum handle height. Number of visible
holes constitute marked height interval.
Handle height
Adjusting your rollator
Adjust one side at a me. Pull out the knob under the
seat. At the same me, raise or lower the seat to the po-
sion required. Release the knob, ensuring that it locates
properly to secure the seat in place. Do the same on the
other side. Check carefully that the seat is level before us-
ing the rollator. Press down the centre secon of the seat.
Warning!
Never walk with the rollator whilst some-
one is sing on the seat.
When you walk using the rollator, you should walk
without bending forwards, keep the rollator close to your
body, keep your back straight and look straight head.

1
2
3
5
Comfort Frame
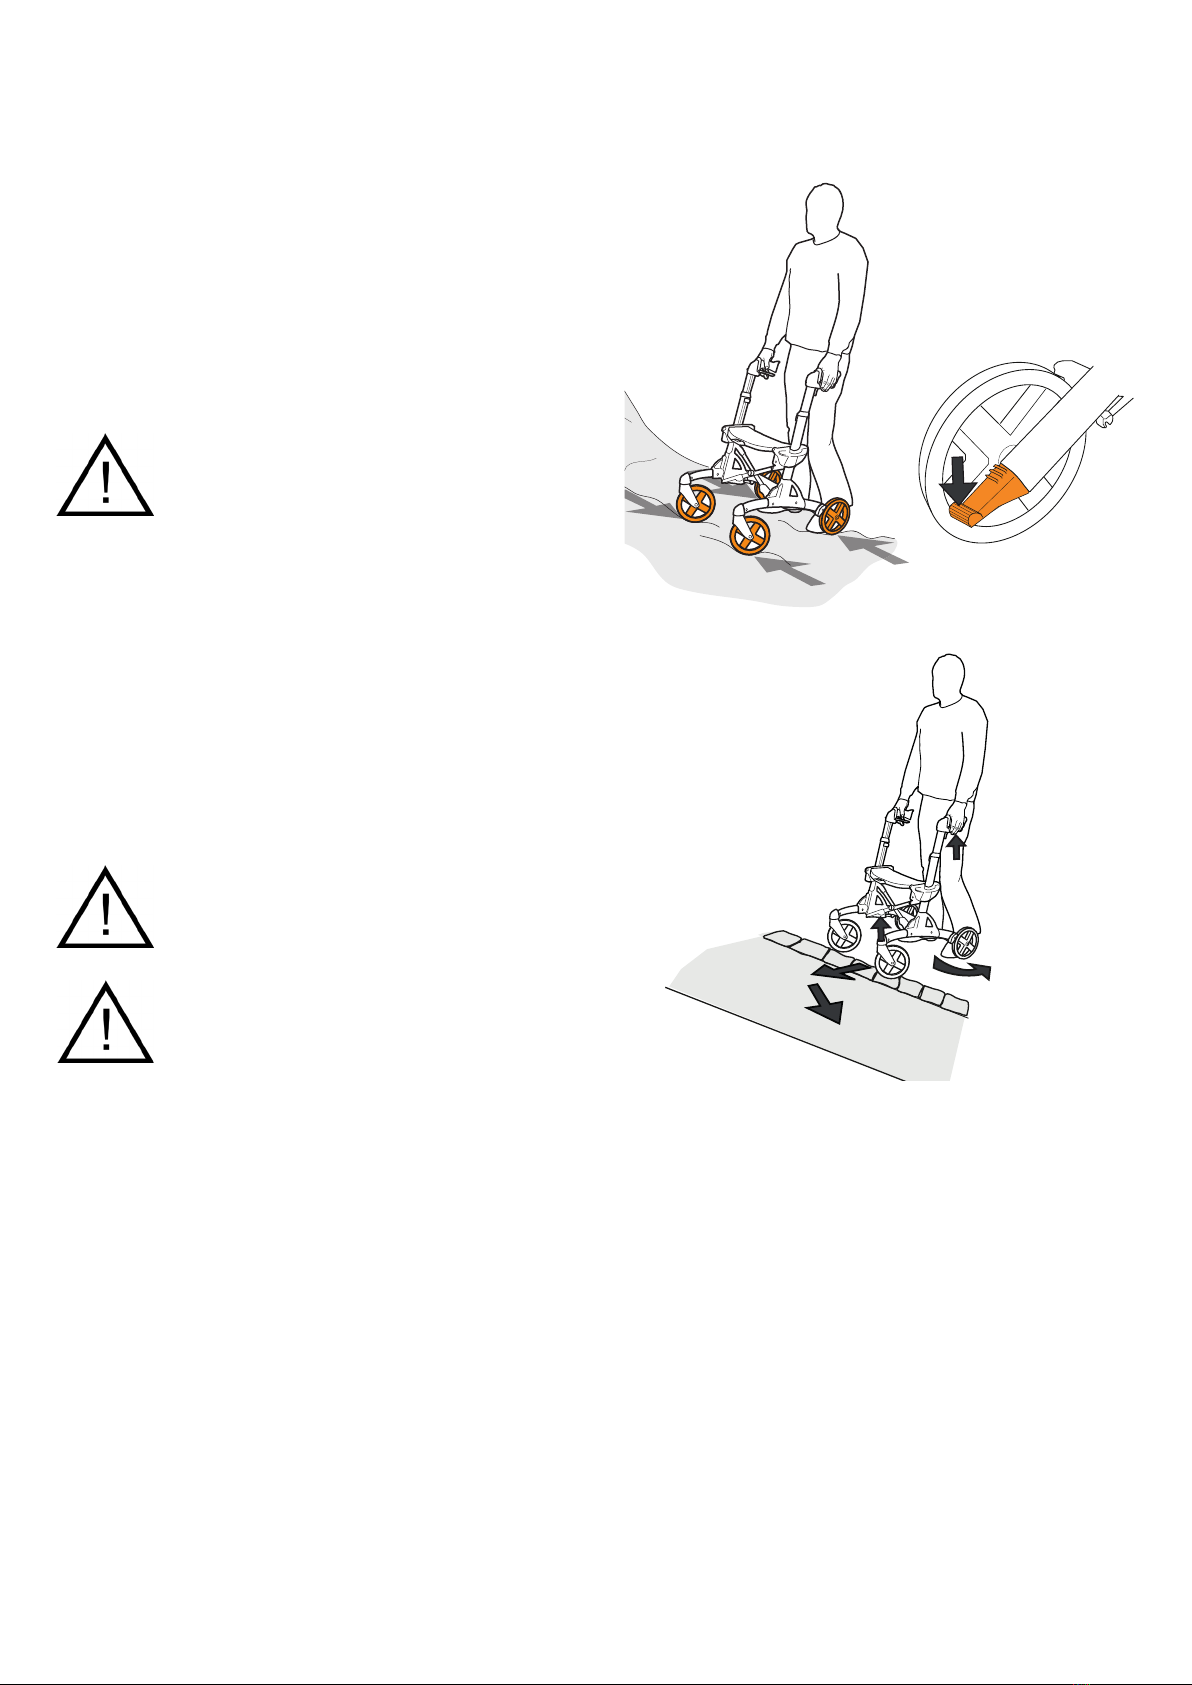
Learn the "scissors technique"
Approach the obstruction at an angle. Apply the
brake on the wheel closest to the obstruction. Tilt the
rollator slightly backwards, so the front wheels lift
up, swing the front wheels over the obstruction. It is
easy once you have learned how!
Volaris rollators are built with a Comfort Frame™, which
enables it to pass smoothly over uneven surfaces. When
you need to pass over larger obstacles or mount a pave-
ment edge, you can get help from the lt peddles located
by the rear wheels. Press down one of the peddles whilst
simultaneously liing the rollator by the handles.
Warning!
When going over an obstacle, do not li the
rollator by the seat as this could cause it to
fold!
Tips for use
Warning!
The rollator must be in park mode (the
parking brake applied) when sing on and
climbing o the seat.
Warning!
Never walk with the rollator whilst someone
is sing on the seat.

3
2
1
1
3
2
6
Unfolding and folding your Volaris
1. Hold one of the push handles and lt the rollator
slightly to that side so the wheels on the opposite side
just li o the ground.
2. Unfold the rollator using the grey liing handle on the
opposite side. A spring helps to unfold the rollator.
3. Press down the centre secon of the seat to lock the
rollator.
4. If the rollator is equipped with a folding catch, pull the
strap and press down the centre secon of the seat to
lock the rollator.
Folding the rollator
If there is a basket ed, remove it.
If a folding catch is installed, pull out the strap and then
li.
1. Pull the strap.
2. Li the strap.
3. Press the Smart together using the side handles.
Important!
The seat must be at, i.e. at the same
height on both sides, when the rollator is
folded up. See g. no. 3
If the rollator is equipped with a xed transport strap,
the rollator must be folded up by securely pressing the
transport strap to the buon between the two seat height
adjusters - this keeps the rollator folded. Release the but-
ton when you want to unfold the rollator.
Unfolding your Volaris
Fixed transport strap

PP
7
Service brake
Parking brake
.
Release the parking brake
The parking brake is released by moving the parking
brake lever to the upright position until a click is
heard.
The foot brake is applied by pulling up the brake lever
located under the handle.
The parking brake is applied by pushing the brake lever
forward unl it is horizontal and points straight forwards.
The parking brake must not be applied when the brake or
the handle height are being adjusted.
The brake must be applied when you are sing on the
seat.
Braking

8
Adjust the brake for the correct functionality
Restriction brake
Braking eect can be set using the cable adjuster located
under the frame.
1. Release the parking brake.
2. Undo/loosen the nut using an 8mm spanner, and turn the
threaded sha.
3. Screw in the threaded sha to increase the braking
eect. Screw out the threaded sha to decrease the
braking eect.
4. Tighten the nut using a spanner.
The brake shoes should be set as close to the wear path
as possible without actually touching it. If the shoes are
set too close, the parking brake will be unnecessarily hard
to apply.
To adjust arculaon brake eect, turn the knob.

1mm
9
Maintenance
Cleaning of rollators
Look aer your rollator, and your rollator will look aer
you.
Remove dirt using a wet cloth and a mild detergent. En-
sure that dirt does not collect between the wheels and the
brake shoes. You can rinse the product using a high-pres-
sure cleaner or garden hose. Wipe dry aer cleaning. Blow
away any residual water using compressed air.
Reconditioning
Disengage the brakes when cleaning in a wash cabinet.
The rollator must be allowed to cool to room temperature
before being used and adjusted.
Cable lubrication
Aer cleaning, lubricate the brake cable under the frame
by applying a few drops of oil to the cable.
Troubleshooting
If, during operaon, the rollator pulls to one side, check
that the wheels rotate equally easily, that the wheel forks
turn easily, that the wheels and forks are securely in
posion, and that no dirt or foreign objects have got stuck
between the wheels and brake shoes.
If the brake does not engage, or engages unevenly, check
that the play between brake head and wheel is 1 mm on
both sides. Make sure that the brake cables are rmly at-
tached to the brake shoes under the frame, that the spring
on the rear wheel brake shoe is intact, and that the brake
shoes apply even pressure to the wheels on both sides
when the rollator is under braking. Adjust the cable.

10
Accessories
Restriction brake
A brake with adjustable, continuous friction.
Back support/Adjustable back
support
Stable support for your back; can help make you feel
more secure. Attached with two bolts to the existing
ttings.
Prole clips
Prole clips are used to prevent anything geng caught
in the openings. These are included with the product and
should sit in all visible notches. Both above and below the
seat.
Altri manuali per Volaris Smart
1
Questo manuale è adatto per i seguenti modelli
8
Indice
Altri manuali Eurovema Ausilio alla mobilità

Eurovema
Eurovema Euroflex Manuale utente

Eurovema
Eurovema 200 Classic Manuale utente

Eurovema
Eurovema Euroflex 224001-4900 Manuale utente

Eurovema
Eurovema Euroflex 700 ABC Manuale utente

Eurovema
Eurovema ALVEMA Atila Manuale

Eurovema
Eurovema Volaris Discovery Manuale utente

Eurovema
Eurovema Volaris Smart Manuale utente

Eurovema
Eurovema Euroflex Miniflex Classic Manuale utente

Eurovema
Eurovema Volaris Compact Manuale utente

Eurovema
Eurovema Volaris S2 Manuale utente