Everet EVP412 Manuale utente

EVERET EVP412
12x UHD 4K PTZ Video Camera
User Manual
Version V1.0
(English)

CONTENT
SAFETY GUIDES 2
PACKING LIST 3
QUICK START 3
1. Check all cable connections before power on. 3
2. Dial Switch Settings (at the bottom of the camera) 4
PRODUCT HIGHLIGHTS 5
TECHNICAL SPECIFICATIONS 6
CAMERA INTERFACE 8
CAMERA DIMENSIONS 8
IR REMOTE CONTROLLER 9
VISCA IN(RS232 PORT) 11
VISCA PROTOCOL 13
PART1 CAMERA RETURN COMMAND 13
PART2 CAMERA CONTROL COMMAND 13
PART3 CAMERA CONTROL COMMAND 19
VISCA PAN TILT ABSOLUTE POSITION VALUE 22
VISCA PAN TILT SPEED VALUE 22
PELCO-D PROTOCOL COMMAND LIST 23
PELCO-P PROTOCOL COMMAND LIST 24
OSD MENU 25
IP ADDRESS SETTING 29
WEB SETTINGS 30
USING VLC TO VIEW RTSP/RTMP VIDEO 35
VISCA OVER IP 35
HOW TO USE VISCA OVER IP 36
1 WWW.EVERETIMAGING.COM
SAFETY GUIDES
1.Before operation, please fully read and follow all instructions in the manual.
2.For your safety, always keep this manual with the camera.
3.The camera power input range is 100-240 VAC (50-60Hz), ensure the power supply input
within this rate before powering on.
4.The camera power voltage is 12VDC, rated currency is 2A. We suggest you use it with the
original power supply adapter supplied by the factory.
5.Please keep the power cable, video cable and control cable in a safe place. Protect all
cables especially the connectors.
6.Operational environment: 0℃-50℃, humidity less than 90%.To avoid any danger, do not
put anything inside the camera, and keep away from the corrosive liquid.
7.Avoid stress, vibration and damp during transportation, storage and installation.
8.Do not detatch the camera housing and cover. For any service, please contact authorized
Everet technicians.
9.Video cable and control cable should be individually shielded, and cannot be substituted
with other cables.
10.Do not direct the camera lens towards strong light, such as the sun or the intensive light.
11.Use a dry and soft cloth to clean the camera housing. Applied with neutral cleaning agent
when there is need to clean. To avoid damage on the camera lens, never use strong or
abrasive cleaning agents on the camera housing.
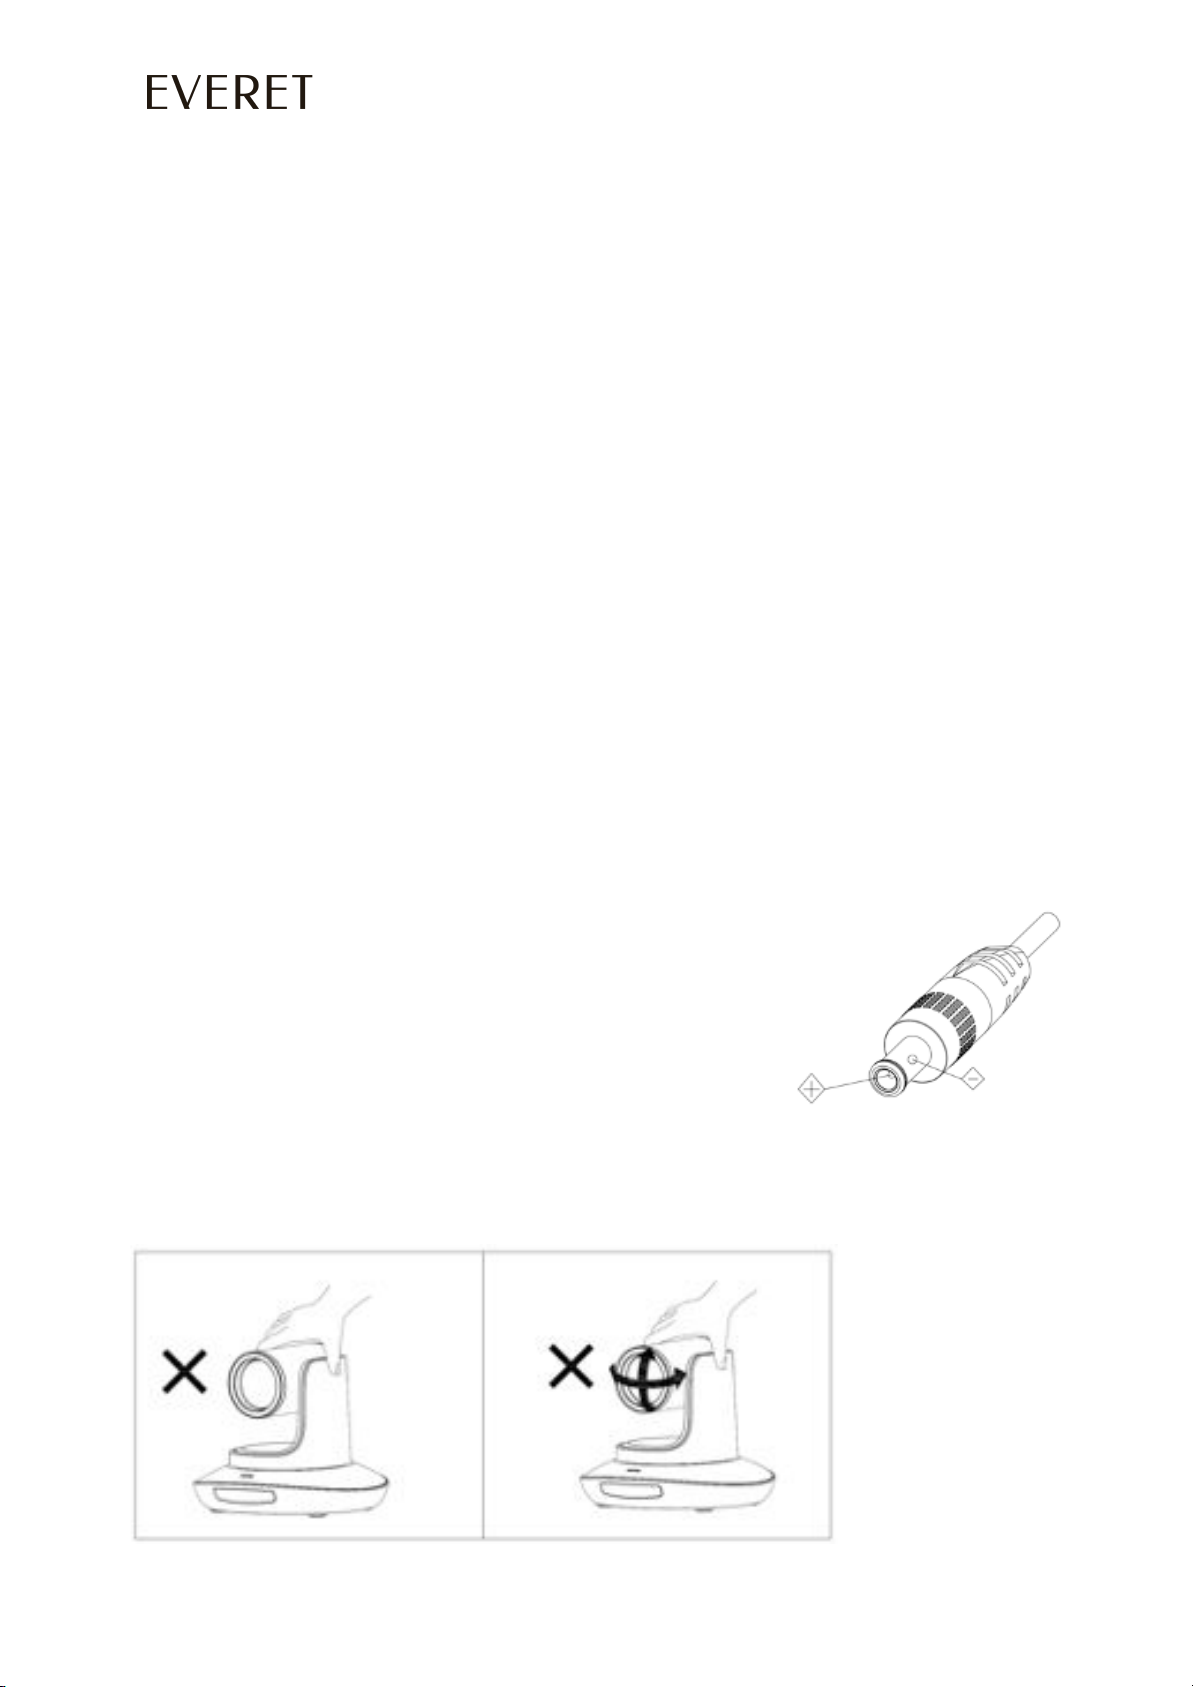
12.
Do not move the camera by holding the camera head. To avoid mechanical trouble, do not
rotate the camera head by hand. NEVER MOVE THE CAMERA MANUALLY WHEN IT IS
WORKING.
13.Put the camera on fixed and smooth desk or platform,
avoid leaned installation.
14.Power Supply Polarity (Drawing)
Note:
The video quality may be affected by the specific frequencies of
electromagnetic fields.
Never grasp the head of the camera, and never move the camera by hand when it is working,
otherwise the camera will breakdown.
2 WWW.EVERETIMAGING.COM

PACKING LIST
Check all bellow items when open the package:
Camera
1
Power Adapter
1
Power Cable
1
RS232 Control Cable
1
USB 3.0 Cable
1
Remote Controller
1
QUICK START
1. Check all cable connections before power on.
3 WWW.EVERETIMAGING.COM

2. Dial Switch Settings (at the bottom of the camera)
Dial Switch(ARM)
SW-1
SW-2
Instruction
1
OFF
OFF
Updating mode
2
ON
OFF
Debugging mode
3
OFF
ON
Undefined
4
ON
ON
Working mode
Dial Switch
SW-3
SW-4
Instruction
1
OFF
OFF
reserve
2
ON
OFF
reserve
3
OFF
ON
reserve
4
ON
ON
reserve
Dial Switch (USB)
SW-5
SW-6
Instruction
1
OFF
OFF
Undefined
4 WWW.EVERETIMAGING.COM

2
ON
OFF
Working mode
3
OFF
ON
Updating mode
4
ON
ON
Undefined
PRODUCT HIGHLIGHTS
●Sony Adopts most advanced ISP, 1/2.5 inch 8.5MP sensor, providing 3840x2160 p30
Ultra HD video resolution
●4K wide angle optical lens: 12x optical zoom and 2x digital zoom , with 72.5 degree
field of view;
●4K video over IP, H.264, H.265 encoding;
●IP, HDMI, 3G-SDI, USB video outputs interface
●White Balance, Exposure, Focus, Iris can be adjusted automatically or manually
●Support POE: easy to use one RJ45 cable to get video, control and power supply
●Special Focusing Algorithm: fast and precise focusing performance when zooming or
moving
●Smooth PTZ mechanical design, accurate pan tilt motor control
●128 presets supported
●Standard Sony VISCA, VISCA over IP, PELCO-P, PELCO-D control protocol; IP VISCA
over both TCP and UDP
●Daisy chain supported, max 7 cameras connected in VISCA protocol
●Image flip function, support upside-down installation
●Supplied with functional IR remote controller
●Fast video format switch: less than 3 seconds
●Supported field upgrade for ISP, ARM, FPGA and USB
●USB3.0 port compatible with USB2.0 output.
●Support RS232/RS485/UVC control
●Standard UVC1.5 protocol, seamlessly compatible with major video conferencing
software and platform
●Support IR transfer function, code of the third party remote controller can be
transferred to the host via VISCA IN port, in case client’s development
●OSD menu in English, IP address, streaming resolution and size can be set in OSD
menu
5 WWW.EVERETIMAGING.COM

TECHNICAL SPECIFICATIONS
Video Format
HDMI
3840*2160P30/25
1920*1080P60/50/30/25/59.94/29.97/24
1920*1080I60/50/59.94
1280*720P60/50/30/25/59.94/29.97
SDI
1920*1080P60/50/30/25/59.94/29.97/24
1920*1080I60/50/59.94
1280*720P60/50/30/25/59.94/29.97
USB
1920*1080P60/50/30/25(USB3.0)
1280*720P60/50/30(USB3.0)
1280*720P25(USB3.0 & USB2.0)
1024*576P30(USB3.0 & USB2.0)
960*540P30(USB2.0)
640*360P30(USB2.0)
512*288P30(USB2.0)
IP
3840*2160@1~30 / 1920*1080@1~30 (Main Stream)
1280*720@1~30 / 1027*576@1~30 / 640*360@1~30 (Sub stream)
Video Interface
HDMI, 3G-SDI, RJ45, USB3.0
Sensor
1/2.8” 8.5MP Panasonic CMOS sensor
Zoom
F3.92~47.32mm (12X), View Angle:72.5° (Far) - 6.43° (Near)
Rotation Angle
Pan: -170° ~ +170°; Tilt: -30° ~ +90°
Rotation Speed
Pan: 0°~120°/s ; Tilt: 0°~80°/s
Preset:
Remote controller: 10; RS232: 128; Accuracy: 0.1°
Control Port
RS232、RS485 (optional)、RJ45 (VISCA over IP)、USB3.0 (UVC1.5), USB2.0
(UVC1,1)
Network Speed
1000M
Video encode
H.264/H.265(default: H.264)
Bit Rate Control
Variable Bit Rate, Constant Bit Rate
Video Bit Rate
0Kbps~15360Kbps
IP Protocol
TCP/IP, HTTP, RTSP, DHCP , Onvif
6 WWW.EVERETIMAGING.COM

POE
Supported
Daisy Chain
Support RS232 serial daisy chain
Minimum Lux
0.1 lux
White Balance
Auto/Indoor/Outdoor/Manual/Auto/Sodium Lamp Auto/Sodium Lamp
Exposure
Auto/Manual/Bright/Shutter/Iris
Focus
Auto / Manual
Iris
Auto / Manual
Electric Shutter
Auto / Manual
Gamma
Supported
WDR
Supported
BLC
Supported
2D/ 3D Noise
Reduction
Supported
Anti Flicker
OFF/50Hz/60Hz
Pan Tilt Flip
Supported
Input Voltage
DC12V / POE
Dimension
220mm×190mm×173mm
Net Weight
1.4KG(3.1LBS)
Note: When HDMI outputs 4K the 3G-SDI & USB3.0 will have no image. If you need
simultaneous 3G-SDI and HDMI output image, the HDMI needs to output 1080p or
lower than 1080p resolution.
7 WWW.EVERETIMAGING.COM

CAMERA INTERFACE
1.Camera Lens
2.Camera Base
3.IR Receiver Panel
4.Power Indicator Light
5.Dial Switch
6. Tripod Screw Hole
7. Installation Hole
8. RS232 control port (input)
9. RS232 control port(output)
10. HDMI port
11.3G-SDI port
12, USB port
13, RJ45 port
14. DC12V plug
CAMERA DIMENSIONS
8 WWW.EVERETIMAGING.COM

IR REMOTE CONTROLLER
POWER
Under normal working mode, short press
POWER key, to enter standby mode;
Press it again, the camera will do
self-configuration, then go back to HOME
position.
It will go to preset position if power on model
has been set before.
FREEZE (Not Supported in USB)
Short press FREEZE key to freeze/ unfreeze the
image.
IRT (IR Transfer/IR Pass)
Open / close the IR pass function. Once press
the IRT key, the camera will receive and
Pass the IR remote control signal to the
codec/terminal (via VISCA IN port).
SET 1~SET4 ADDRESS SETTING
Long press for 3 seconds until the key light ON,
to set camera address.
CAM1~CAM4(CAMERA SELECTING)
Short press to select the relative camera.
PRESET NUMBER KEY (1-9)
Set preset: long press (3 seconds) the number
key to set preset.
Run preset: Short press the number key to run
preset.
CLR PRE (CLEAR PRESET)
CLR PRE+ number key:
to clear the relative preset.
Long press to clear all presets.
9 WWW.EVERETIMAGING.COM
Altri manuali per EVP412
1
Indice
Altri manuali Everet Videocamera


