Explore Scientific RDC1004 Manuale utente

EN INSTRUCTION MANUAL...............2
IT ISTRUZIONI PER L’USO.............. 14
DE BEDIENUNGSANLEITUNG .......... 26
FR MODE D‘EMPLOI....................... 38
ES MANUAL DE INSTRUCCIONES.... 50
*Radio-controlled clock function not available in all territories. / Funzione di orologio radiocontrollati non disponibile in ogni territorio. / Funkuhrfunktion nicht in jederm Gebiet verfügbar. / La fonction
d‘horloge radio-piloté n‘est pas disponible dans tous les territoires. / La función de reloj radiocontrolado no está disponible en todos los territorios.
RADIO-CONTROLLED* ALARM CLOCK
SVEGLIA RADIOCONTROLLATA*
FUNKWECKER*
RÉVEIL RADIO-COMMANDÉ*
DESPERTADOR RADIO-CONTROLADO*
Art.No.: RDC1004

2
ABOUT THIS INSTRUCTION
MANUAL
These operating instructions are to be
considered a component of the device.
Please read the safety instructions and the
operating instructions carefully before use.
Keep these instructions for renewed use at a
later date. When the device is sold or given to
someone else, the instruction manual must be
provided to the new owner/user of the product.
The device is intended only for indoor use.
GENERAL WARNINGS
•Risk of electric shock — This device con-
tains electronic components that operate
via a power source (batteries). Children
should only use the device under adult su-
pervision. Only use the device as described
in the manual; otherwise, you run the risk
of an electric shock.
• Choking hazard —Children should only use
the device under adult supervision. Keep
packaging material, like plastic bags and
rubber bands, out of the reach of children,
as these materials pose a choking hazard.
• Risk of chemical burn —Keep batteries
out of the reach of children! Make sure you
insert the batteries correctly. Leaking bat-
tery acid can lead to chemical burns. Avoid
contact of battery acid with skin, eyes and
mucous membranes. In the event of con-

3
EN
IT
DE
FR
ES
tact, rinse the affected region immediately
with a plenty of water and seek medical
attention.
• Risk of re/explosion —Do not expose the
device to high temperatures. Use only the
recommended batteries. Do not short-cir-
cuit the device or batteries, or throw them
into a re. Excessive heat or improper han-
dling could trigger a short-circuit, a re, or
an explosion.
• Do not disassemble the device. In the
event of a defect, please contact your
dealer. The dealer will contact the Service
Centre and can send the device in to be
repaired, if necessary.
• Use only the recommended batteries. Al-
ways replace weak or empty batteries with
a new, complete set of batteries at full ca-
pacity. Do not use batteries from different
brands or with different capacities. The
batteries should be removed from the unit
if it has not been used for a long time.
SCOPE OF DELIVERY
Alarm clock, Operating instructions, 3x AAA
batteries.
BEFORE YOU BEGIN
• We recommend using alkaline batteries.
If temperatures regularly fall below 0°C
(32°F), we recommend using lithium batter-
ies.
• Avoid using rechargeable batteries. (Re-
chargeable batteries cannot maintain cor-
rect power requirements.)
• Insert batteries before rst use, matching
the polarity in the battery compartment.
3x AAA Batteries are required.
4
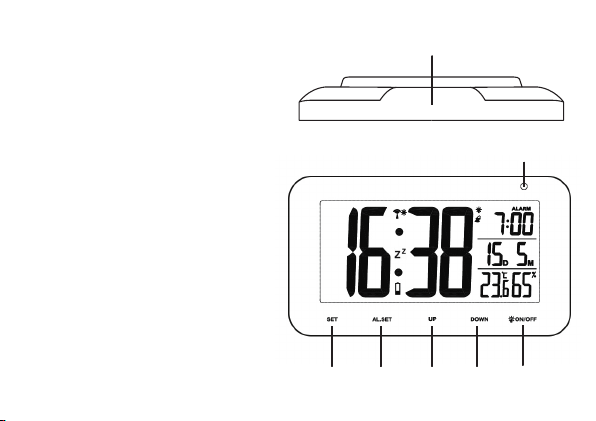
PRODUCT OVERVIEW
1. Press the touch button to activate
backlight for 9 seconds or to activate
the snooze function to delay the alarm
by 5 minutes.
2. Light sensor for automatic backlight
at night.
3. Press and hold [SET] to enter time and
date settings mode.
4. Press and hold [AL.SET] to switch to
alarm setting mode.
5. Press [UP] to activate the alarm. Press
and hold to mute button sound.
6. Press [DOWN] to switch temperature
unit °C/°F. Press and hold to initiate
RCC receiving.
7. Press to activate/deactivate the auto-
matic backlight feature (night light).
5
EN
IT
DE
FR
ES
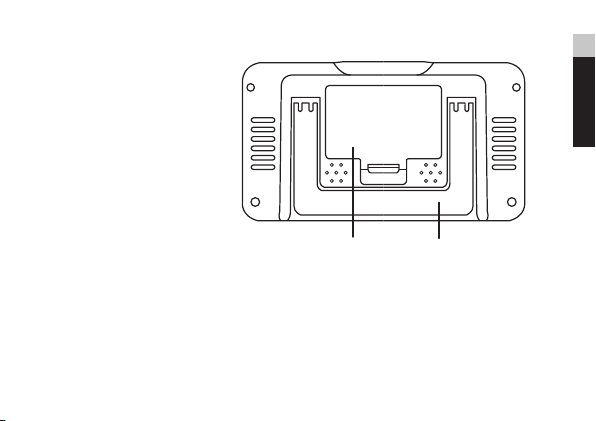
8. Battery compartment.
9. Stand.
TOUCH BUTTONS
Clean the touch buttons with
a dry cloth regularly to ensure
perfect function.

6
BUTTON
MODE SET AL.SET UP DOWN
Standard
mode
PRESS _______
Press AL.SET
or any other
button to
stop alarm
(ringing)
Turn Alarm
on/off °C/°F Turn on
night light
HOLD
Enter into
Time setting
mode
Enter into
Alarm setting
mode
Button tones
on/off
Initiate RCC
receiving _______
Time
setting
mode
PRESS Conrm setting _______ Increase Decrease _______
HOLD _______ _______ Quick Increase Quick Decrease _______
Alarm
setting
mode
PRESS _______ Conrm setting Increase Decrease _______
HOLD _______ _______ Quick
Increase Quick Decrease _______
7
EN
IT
DE
FR
ES
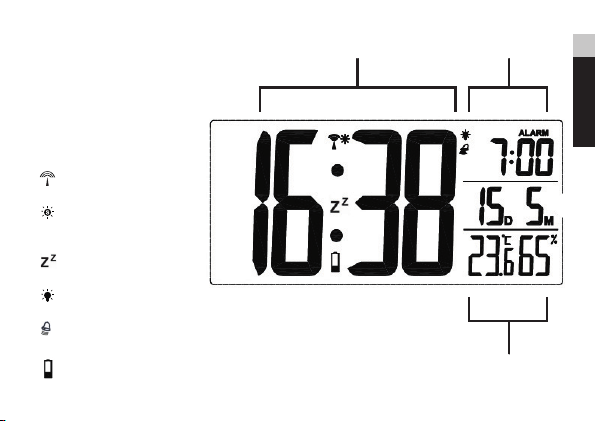
LCD DISPLAY
1. Time display
2. Alarm Time display
3. Date display
4. Indoor Temperature and
humidity display
[] RCC signal received
[ ] DST ON
(Daylight Saving Time)
[ ] Snooze activated
[ ] Night light ON
[ ] Alarm ON
[ ] Low battery indicator

8
GETTING STARTED
INSERT BATTERIES
1. Remove the battery door from the back.
2. Insert 3x AAA (LR03)/1.5V batteries. Please
ensure the polarities (+/-) of the batteries
match upon installation.
3. Reattach the battery door.
NOTE: Replace batteries when [ ] displays,
or when the display is dim.
CLOCK
CLOCK RECEPTION
1. When you insert or replace the batteries, RCC
reception is initiated. To manually start RCC
reception press and hold [DOWN] button.
2. The receiving process duration is 7 minutes.
3. During receiving process, the RCC signal
symbol [ ] ashes.
4. If the RCC receiving process is successful, a
completed RCC symbol [ ] will be shown
in the display and the date and time will be
set automatically. If it fails within 7 minutes,
RCC setting will quit automatically. If that
happens, press and hold [DOWN] button to
re-initiate RCC receiving.
5. No other button will work during RCC recep-
tion. Press and hold the [DOWN] button to
stop reception and the other buttons will
return to normal operation.
6. If the device is still not receiving the signal,
please proceed to set the time manually.
SET THE CLOCK MANUALLY
1. If [ ] is ashing, then RCC reception is
active. Press and hold [DOWN] button to de-
activate RCC reception.
2. Press and hold [SET] button to enter time

9
EN
IT
DE
FR
ES
and date setting.
3. The setting parameter will flash.
4. Press [UP] button once, the figure will in-
crease 1 unit (when setting minute, second
will reset to 0). Press and hold the [UP] but-
ton, the figures will increase rapidly.
5. Press [DOWN] button once, the figure will de-
crease 1 unit (when setting minute, second
will reset to 0). Press and hold the [DOWN]
button, the figures will decrease rapidly.
6. Press [SET] button to confirm setting and
enter to next parameter.
7. Sequence of setting: Time Zone +/-12h
Time format 12/24h Hour Minute
Year Month Date Exit
8. If there is no action in 30 seconds, the setting
will be saved and will exit the setting mode.
TIME ZONE SETTING
To set a different time zone, proceed as follows:
1. Press and hold [SET] button to enter time
and date setting.
2. Press [+] or [–] button to set the time zone
offset +/-12 hours.
5. Press [SET] button several times until you
exit the setting mode.
°C/°F SETTING
1. Press [DOWN] button to switch Celsius (°C)
/ Fahrenheit (°F).
ALARM
SETTING/ADJUSTING ALARM TIME
1. Press and hold [AL.SET] button to enter the
alarm setting mode.
3. The setting parameter will flash.
4. Press [UP] or [DOWN] button to set the de-
sired data.
5. Press [AL.SET] button to confirm setting
and enter to next parameter.

10
6. Sequence of setting: Hour Minute Exit
8. If there is no action in 20 seconds, the setting
will be saved and will exit the setting mode.
TURN ON/OFF ALARM
1. In standard mode, press the [UP] button to
turn on/off the alarm.
2. The alarm lasts 2 minutes and becomes
faster and faster over time.
OPERATION
1. At the set time, alarm signal rings.
2. During the alarm, press the touch button to
delay the alarm by 5 minutes.
3. If you do not press any button to stop the
alarm, it will automatically turn off after 2
minutes.
4. To stop the alarm, press [AL.SET] or any
other button.
5. The alarm will start again at the next alarm
time, unless you switch off the alarm func-
tion by pressing the [UP] button.
SPECIFICATIONS
Dimensions (Main unit):
143 x 25 x 80 mm (L x W x H)
Weight (Main unit):
146 g (Exclude batteries)
Temperature display range:
0°C to +50°C (32°F to 122°F)
Accuracy:
0° to +40°C: +/- 1.5°C
<0° and >+40°C: +/- 2°C
Resolution:
0.1°C (0.2°F)
Indice
Lingue:
Altri manuali Explore Scientific Orologio

Explore Scientific
Explore Scientific RDC2002 Manuale utente

Explore Scientific
Explore Scientific RDC8002 Manuale utente

Explore Scientific
Explore Scientific RDC2002 Manuale utente

Explore Scientific
Explore Scientific RPW3009 Manuale utente

Explore Scientific
Explore Scientific RDC8002 Manuale utente

Explore Scientific
Explore Scientific BCC1001 Manuale utente


