
EzCAP ezcap325 Manuale utente

manual
Live Cam
Model number: ezcap325
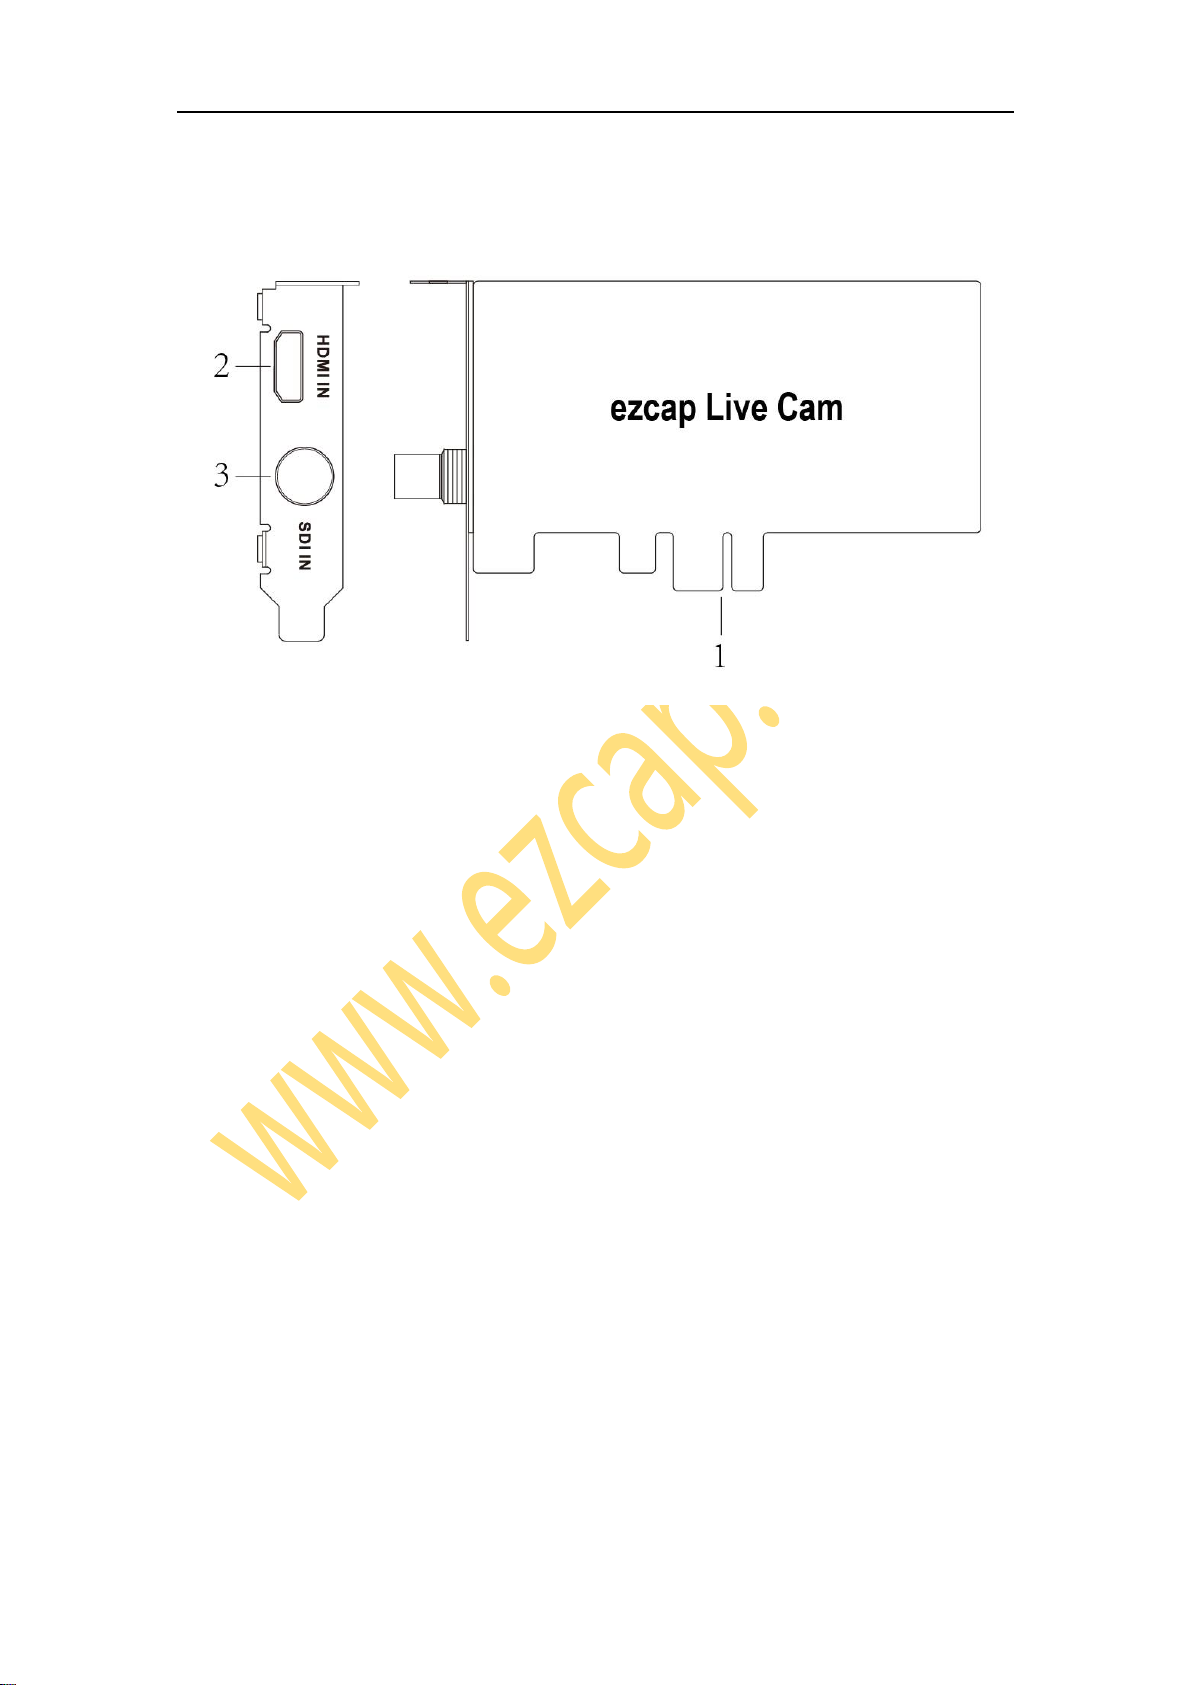
1
Overview
1, PCI-E X1: Connect to PCI-E slot of your computer
2, HDMI IN: HDMI input port, connect to camera or other video source
3, SDI IN: SDI input port, connect to camera or other video source
Note: It is not recommended to connect HDMI signal and SDI signal at the same time, if
they are connected at the same time, SDI signal will be given priority by default.
In the Box
ezcap325 Live Cam x1, Standard Profile Bracket x1, Manual x1
Hardware
Before installing ezcap325 Live Cam capture card, make sure your computer has a free
PCI-E X1 slot.

2
Before you get started, make sure your PC is shut down. Then disconnect all the cables
from the back of the computer. Only begin this process when everything is
disconnected.
Remove the cover on the PC. After you identify a PCIe slot, unscrew the small metal
bracket attached to the computer case directly behind the PCIe slot. Gently yet firmly,
slide the video capture card into the PCIe slot, making sure it's fully locked down. Screw
the card into the back of the case so that the inputs and outputs are exposed on the
back of the computer case. Place the panel on the case, put the screws back in, and
stand the case upright. Plug all the cables back into the case. Power on the PC.
System will automatically recognize the game capture card, and you will see the device
name “ezcap Live Cam” in the Device Manager, which means that the device is ready
to work.
Note: We don't recommend using the device on Windows 7 system, but if you need,
please download the driver and install it.
http://www.cddownload.top/ezcap323win7driver.zip
Software
For professional live streaming or recording, we suggest use OBS, download
link:https://obsproject.com/
Note: ezcap Live Cam capture card also can work with Mac Pro, and please download
OBS Mac version. The operation is similar as working under Windows as below.

3
Work with OBS
Select Device
After download and installation, double click OBS Studio icon on desktop to run OBS.
Click icon +under Sources window at the bottom left of OSB panel, and select Video
Capture Device. Click OK in the new pop-up window. You also can insert a name you
want to create for the device. One window will appear you after above. Please click the
drop-down box next to Device and select ezcap Live Cam.
Video Setting
You should get the video in window. If you want to set the video resolution, click the
drop-down box next to Resolution/FPS Type and select Custom, then click the
drop-down box next Resolution to select one resolution.
Note: The default output resolution of ezcap325 Live Cam capture card is 1920 x 1080
@ 60fps NV12, because the Max input resolution of SDI source is 1920 x 1080. The Max
input resolution of HDMI source is 3840 x 2160 @30fps, and then you can choose the

4
output resolution to the same resolution.
After you set the resolution to 3840 x 2160, and you change the video source, and the
resolution of video source is smaller than 3840 x 2160, such as 1920 x 1080, the
software will not display the video and you will see Check Resolutions Settings on the
window. Now you need to set resolution to 1920 x 1080 or smaller resolution, then you
will see the video on the window.
If resolutions of video source and device output are3840 x 2160, you may find that the
viewing picture is way out of the frame of OBS. Right click image window of OBS, select
Resize output(source size), and you will get the whole picture.
You can click the drop-down box next to FPS to select the appropriate FPS -
30,60,Highest FPS, or Match Output FPS, and click the drop-down box next to Video
Format to select the video format -XRGB, NV12,or YUY2.
The video format options depend on resolution, the max FPS depends on both

5
resolution and video format:
Video Format options
MAX FPS
3840 x 2160
NV12
30
1920 x 1080
NV12
120
YUY2
60
XRGB
30
2560 x 1440
NV12
60
YUY2
50
1280 x 720
NV12
60
YUY2
60
XRGB
60
Audio Setting
You may can not hear the sound when you finish above settings. Please tick Use
custom audio device, and click the drop-down box next to Audio Device and select
HDMI (ezcap Live Cam), you will hear the sound now.
If you still cannot hear the sound, please click under Audio Mixer and Video
Capture Device at the bottom middle of OBS panel as below picture and select
Advanced Audio Properties. In Advanced Audio Properties window, click drop-down
box under Audio Mornitoring and select Monitor Only (mute output). Please set to -
470ms under Sync offset, for audio and video sync, you can adjust it till your audio
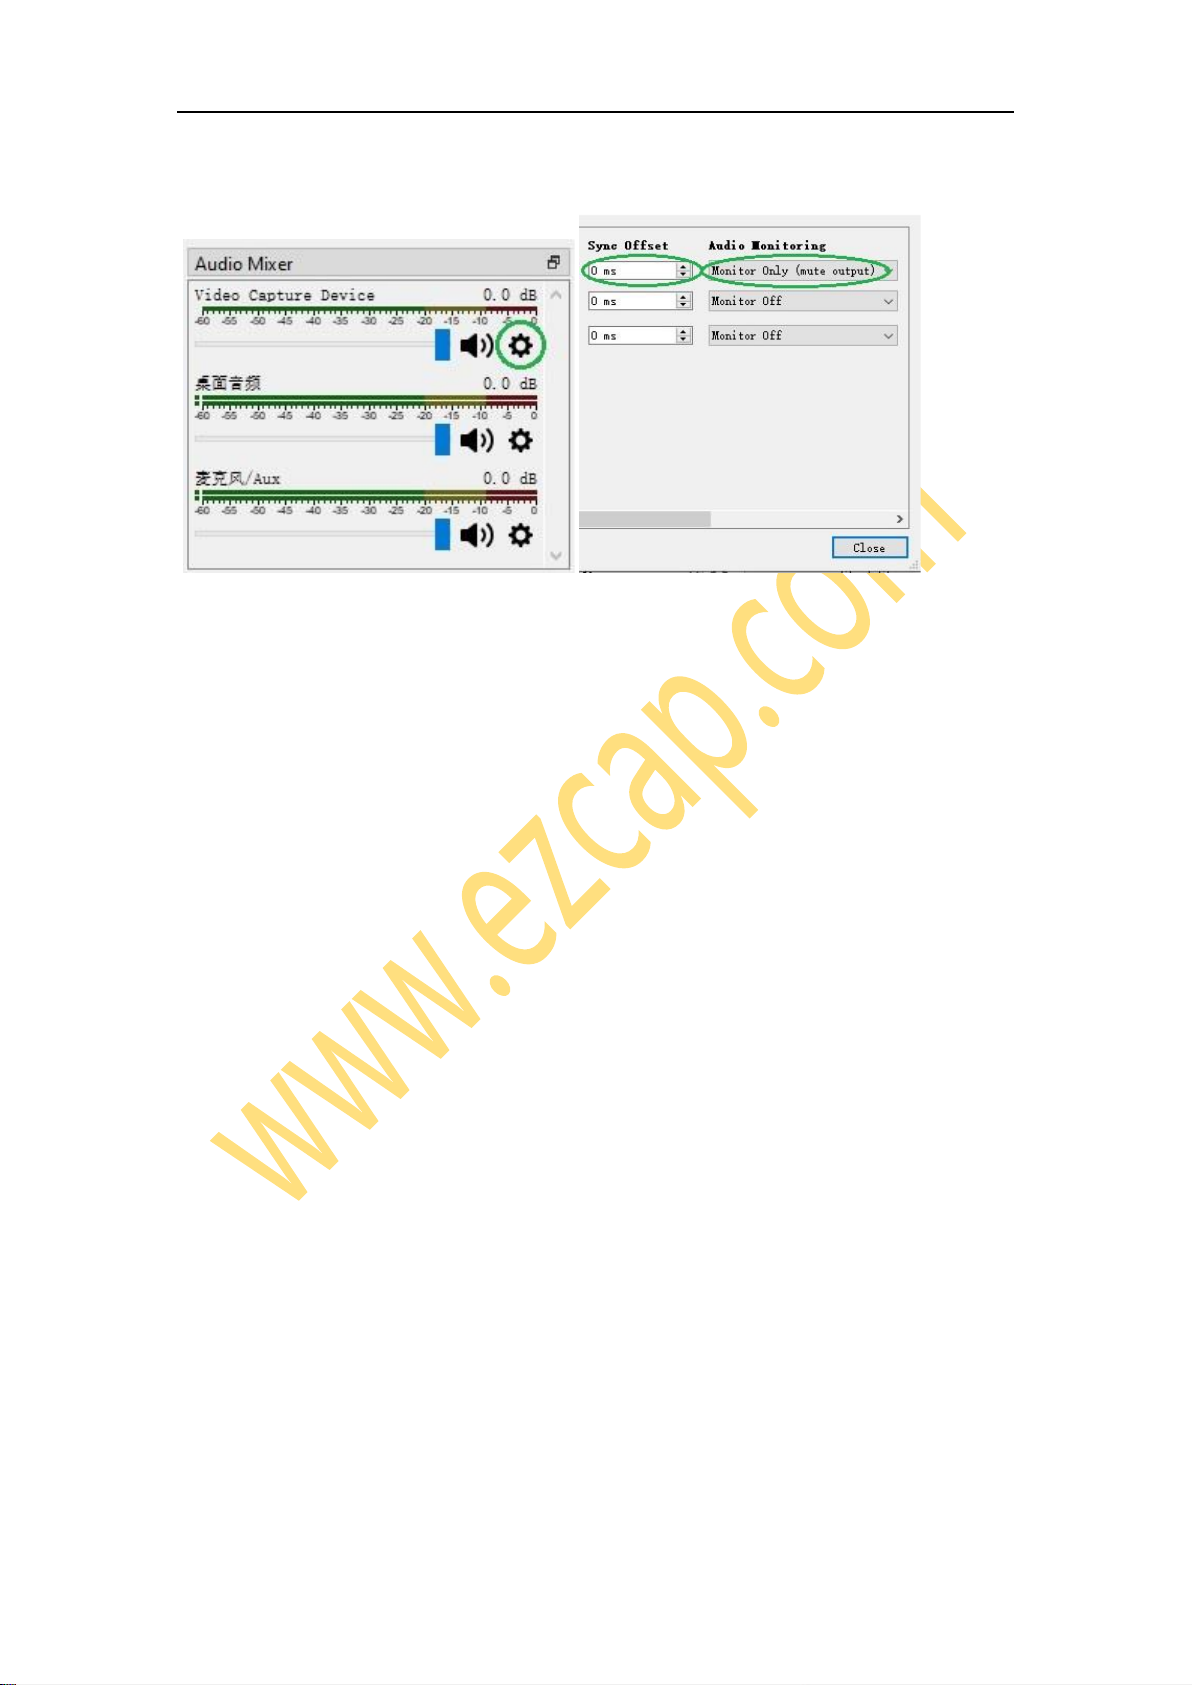
6
video is synchronous.
Maybe you hear the noise if the resolution is 3820 x 2160. Please click the drop box
next to Audio Output Mode as above picture, and change the selection from
Capture audio only to Output desktop audio (WaveOut) or Output desktop
audio (DirectSound).
Note:If you hear the noise when using SDI input, please select Audio Output Mode
to Output desktop audio (WaveOut) or Output desktop audio (DirectSound).And if
the audio sampling rate of your video source is not 48Khz, then you will hear a bad
sound.
Note: If you want to change video audio settings, please double click the name of
video capture device in Sources column, and change the settings you want as above
operations.
Recording
Click Settings in the low right corner of OSB panel, and click Video on the left in the
pop-up Settings window. Click the drop-down box next to Base (canvas) Resolution to

7
select the appropriate resolution, and click the drop-down box next to Output (Scaled)
Resolution to select the output resolution. Click the drop-down box next to Common
FPS Values to select the FPS values. If you want to record 120HZ video, please click the
drop-down box of Common FPS Values and select Integer FPS Values, then enter 120
in the window on the right.
Click Output on the left of Settings window as above, in Recording column, you can set
Recording Path, Recording Quality, Recording Format, Encoder. If you want record a
better quality, one of the suggest setting is:
Recording Quality
High Quality, Medium File Size
Recording Format
Mp4
Encoder
Software (x264 low CPU usage preset, increase file size
After setting, click Apply and Ok in the low right corner of Settings panel, then simply
click Start Recording in the low right corner of OSB panel to start recording videos, and
click Stop Recording to stop recording.

8
Streaming
Click Output in the Settings panel, in the Streaming column, set video quality for
streaming (adjust depends your computer, network speed), then click icon Apply and
OK in the Settings panel. Click Stream in the Settings panel then you can click the
drop-down box next to Service to choose the software platform you want, then click
icon Apply and OK in the Settings panel.
Click Start Streaming in the low right corner of OSB panel to start streaming, and click
Stop Streaming to stop streaming.
Note: Please click the help at the top of the OBS interface, and learn more about OBS in
the link that pops up.
Specifications
Interface
PCIe Gen 2 X1
Input
HDMI 1.4 or 3GSDI
Audio Input
HDMI,SDI
Max. Recording Resolution(HDMI)
1080p120, 2160p30, 1440p60
Max. Recording Resolution(SDI)
1080p60
Supported Resolution(HDMI)
2160p, 1440p, 1080p, 720p
Supported Resolution(SDI)
1080p,720p

9
Video Format(HDMI)
YUY2, NV12, XRGB
Video Format(SDI)
YUY2, NV12,XRGB
Dimensions (W x D x H)
130 x 80 x 22 mm
Operating System
Windows 10 x64, PCI-E X1 slot
For 4Kp30 or 1080p120 recording:
- Intel Core i5-6XXX / AMD Ryzen 3 XXX or above
- NVIDIA GTX 1060 / AMD RX 5700 or above
- 8 GB*
For 1080p60 recording:
- Intel Core i5-3330 or above (i7-3770 recommended)
- NVIDIA GeForce GTX 650 / AMD Radeon R7 250X or above
- 4 GB
* RAM must be DDR4 2400 or above
Mac system requirement:
Mac Pro, MacOS X High Sierra 10.15 and above, PCI-E X1slot
Indice
Altri manuali EzCAP Scheda PCI


