Fanmaster IDH2-20IN Manuale utente

FA NM A ST E R
cooling heating ventilation extraction
INSTRUCTION MANUAL
MODEL: IDH2-20IN
INDUSTRIAL DIESEL FAN HEATER (INDIRECT-FIRED)
TO PREVENT SERIOUS INJURY, READ & UNDERSTAND ALL WARNINGS &
INSTRUCTIONS BEFORE USE. PLEASE KEEP THIS DOCUMENT FOR YOUR RECORDS
FOR INDUSTRIAL USE ONLY
ADEQUATE VENTILATION REQUIRED

FOR YOUR INFORMATION
Thank you for purchasing a Fanmaster diesel heater. Please read this instruction
manual carefully before using this heater.
Disclaimer:
Fanmaster reserves the right to make alterations to specications, quantities,
dimensions, for production or other reasons, subsequent to publication.
While we believe the information is accurate and complete, we make no warranty
or representation for any particular purposes. The information is offered in good faith
and with the understanding that any use of the units or accessories in breach of the
directions and warnings in this document is at the sole discretion and risk of the user
Disposal Guidelines:
Do not dispose of this product with general household waste. This product must be
disposed according to the laws governing Waste Electrical and Electronic Equipment.
If required, contact your local authorities for information regarding the available
disposal facilities.

1. GENERAL SAFETY RULES & WARNINGS
• PLEASE READ INSTRUCTIONS CAREFULLY.
• PLACE INSTRUCTION MANUAL IN A SAFE PLACE FOR FUTURE REFERENCE. DO NOT ALLOW
ANYONE WHO HAS NOT READ THESE INSTRUCTIONS TO ASSEMBLE, ADJUST OR OPERATE THIS
HEATER.
• IF THE INFORMATION IN THIS MANUAL IS NOT FOLLOWED EXACTLY, A FIRE OR EXPLOSION
MAY RESULT IN CAUSING PROPERTY DAMAGE, SERIOUS INJURY OR LOSS OF LIFE.
• FAILURE TO COMPLY WITH THE PRECAUTIONS AND INSTRUCTIONS PROVIDED WITH THIS
HEATER, CAN RESULT IN DEATH, SERIOUS INJURY AND PROPERTY LOSS OR DAMAGE FROM
HAZARDS OF FIRE, EXPLOSION, BURN, ASPHYXIATION, CARBON MONOXIDE POISONING,
AND/OR ELECTRICAL SHOCK.
• ONLY PERSONS WHO CAN UNDERSTAND AND FOLLOW THE INSTRUCTIONS SHOULD USE OR
SERVICE THIS HEATER. IF YOU NEED ASSISTANCE OR REQUIRE HEATER INFORMATION SUCH AS
AN INSTRUCTION MANUAL, LABELS, ETC. CONTACT FANMASTER.
• ADEQUATE VENTILATION IS REQUIRED. DO NOT USE IN ENCLOSED ENVIRONMENTS.
• UNVENTED PORTABLE HEATERS USE AIR (OXYGEN) FROM THE EXISTING AREA. ADEQUATE
COMBUSTION & VENTILATION AIR MUST BE PROVIDED.
• DO NOT STORE OR USE GASOLINE, PETROL OR ANY OTHER FLAMMABLE OR COMBUSTIABLE
VAPORS AND LIQUIDS IN THE VICINITY OF THIS HEATER.
• FIRE, BURN, INHALATION, AND EXPLOSION HAZARD. KEEP SOLID COMBUSTIBLES, SUCH AS
BUILDING MATERIALS, PAPER OR CARDBOARD, A SAFE DISTANCE AWAY FROM THE HEATER
AS RECOMMENDED BY THE INSTRUCTIONS. NEVER USE THE HEATER IN SPACES WHICH DO OR
MAY CONTAIN VOLATILE OR AIRBORNE COMBUSTIBLES, OR PRODUCTS SUCH AS GASOLINE,
SOLVENTS, PAINT THINNER, DUST PARTICLES OR UNKNOWN CHEMICALS
• DIRECT-FIRED HEATERS MAY CAUSE CARBON MONOXIDE (CO) POISONING WHEN
INCORRECTLY USED, E.G INDOORS WITHOUT ADEQUATE AIR CIRCULATION, OR IF NOT
PROPERLY WORKING. CO POISONING MAY LEAD TO DEATH.
• NOT FOR DOMESTIC OR RECREATIONAL VEHICLE USE
• THE ELECTRICAL SYSTEM TO WHICH THE APPLIANCE IS CONNECTED MUST COMPLY WITH
LOCAL REGULATIONS. A RESIDUAL-CURRENT DEVICE (RCD) MUST BE INSTALLED.
• UNPLUG THE APPLIANCE BEFORE PERFORMING ANY MAINTENANCE OPERATIONS.
• ALWAYS CHECK THE POWER CABLE BEFORE USING THE APPLIANCE. IT MUST NOT BE BENT,
TAUT, STRETCHED, CRUSHED OR ANY WAY DAMAGED.
• IF THE POWER CORD AND/OR PLUG IS DAMAGED, IT MUST BE REPLACED BY FANMASTER, A
SERVICE AGENT OR A QUALIFIED PERSONS.
• THE FRONT OUTLET IS VERY HOT DURING OPERATION. DO NOT TOUCH! BURN DANGER.
• DO NOT LEAVE THE HEATER UNATTENDED WHEN IN USE.
• NEVER USE THE HEATER WITH WET HANDS OR WHEN EITHER THE HEATER OR THE POWER CABLE
IS WET.
• CHILDREN SHOULD BE SUPERVISED TO ENSURE THAT THEY DO NOT PLAY WITH THE HEATER.
• THE HEATER IS NOT INTENDED FOR USE BY PERSONS (INCLUDING CHILDREN) WITH REDUCED
PHYSICAL, SENSORY OR MENTAL CAPABILITIES, OR LOCK OF EXPERIENCE & KNOWLEDGE.
FOR YOUR INFORMATION

2. PRODUCT DESCRIPTION & SPECIFICATIONS
PRODUCT DESCRIPTION
Industrial diesel or kerosene indirect red portable space/fan heater with closed
combustion chamber.
SPECIFICATIONS
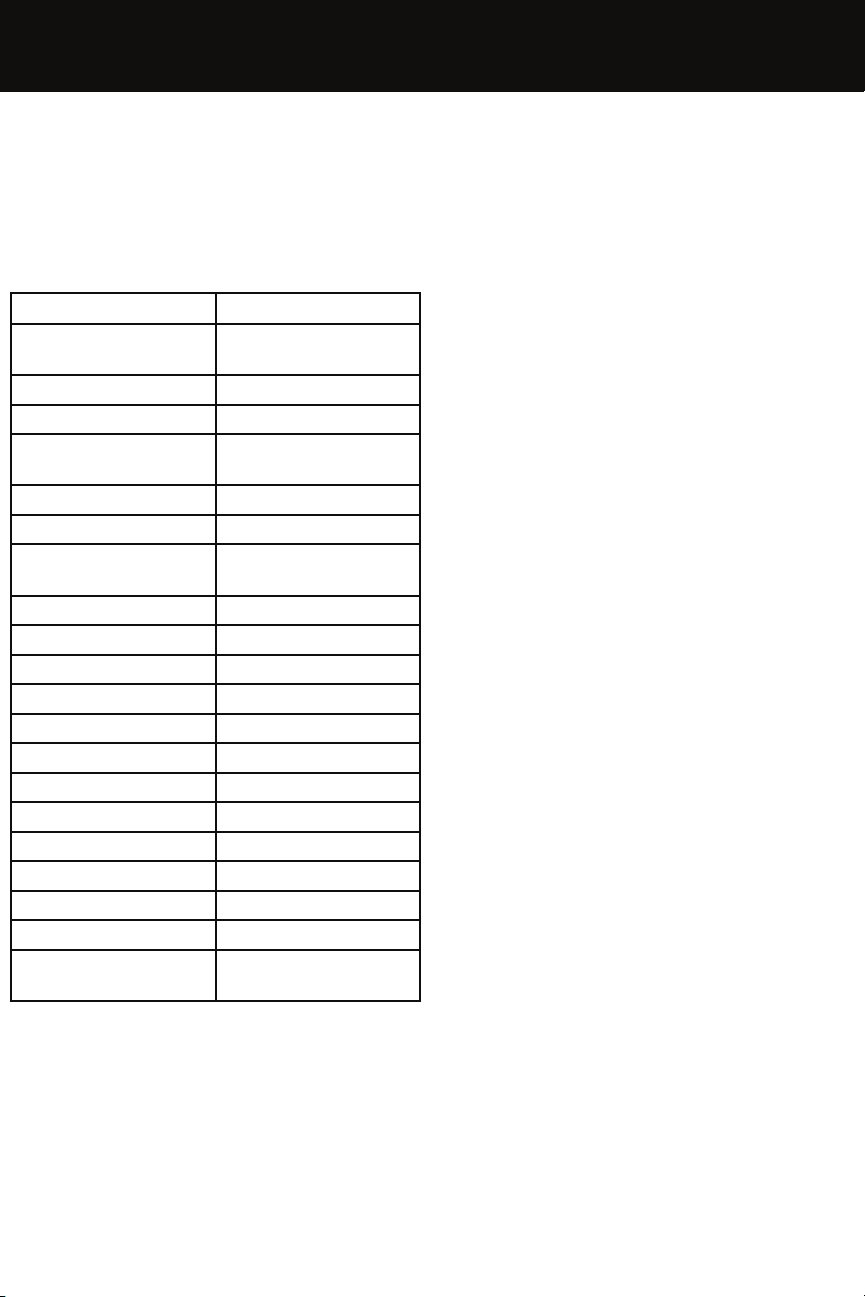
MODEL IDH2-20IN
Heat Output* 20KW
68,240 BTU
Air Flow (L/s) 166
Fuel Type Diesel or Kerosene
Fuel Consumption
(L/h) 1.9
Fuel Nozzle Size (gph) 0.60
Voltage (V/Hz) AC220-240V/50
Air Pressure Setting
(bar) 0.38
Current Rating (A) 1.1
Electrical Power (W) 230
Fuse Rating T3.15A
Net Weight (kg) 22.6
Dimensions (mm) 870(L)*450(W)*686(H)
Tank Capacity (L) 24
Operating Range (H) ~13
Flue outlet Dia (mm) 125
Standard Accessories
Fuel Gauge Yes
Handle 1
Ambient Thermostat Built-in
Malfunction detec-
tion light Built-in

3. ASSEMBLING INSTRUCTIONS2. PRODUCT DESCRIPTION & SPECIFICATIONS
Remove the heater from the carton. If the heater is damaged, please contact
Fanmaster or where you purchased the heater from.
Fig 1.
Pos. Description Qty
A Power Cord Frame 2
BFeet Pipe Assembly 1
CPlain Washer M5 8 or 12
DNut M5 8 or 12
E Feet Pipe Nut M12 2
F Plain Washer M12 2
G Wheels 2
H Cotter Pin 2
I Wheel Shaft 1
JScrew M5 8 or 12
K Plain Washer 8 or 12
L Fuel Tank 1
MChimney/Flue 1
N Handle 1

3. ASSEMBLING INSTRUCTIONS - CONTINUED
1. Insert the wheel shaft “I” to the corresponding holes of the feet pipe
assembly “B”.
2. Insert the cotter pin “H” to the corresponding holes; slide the wheels “G”
over the wheel shaft “I”, put plain washer “F” to the two sides of the shaft,
screw nut “E” to x the wheel on the shaft.
3. Place the heater body on the feet pipe assembly (stand), make sure the
4 holes of handle “N” point towards the corresponding 4 holes on the low
tube frame respectively.
4. Using the screws “J”, plain washer “C” and nut M5 “D” to x the low tube
frame assembly and handle to the tank “L”.
5. Align the holes for power cord frame “A” to the handle “N”, using the
screw “J”, plain washer “C” and nut “D” to x it.

4. OPERATING INSTRUCTIONS3. ASSEMBLING INSTRUCTIONS - CONTINUED
• Position the heater on a at, level, non-ammable & solid surface.
• Indirect-red heaters while used in indoors, must be connected to an exhaust
pipe to vent the fumes of combustion outside. To maintain an adequate Oxygen
rate, a minimum of 80 m3/h airow from outside must occur.
• For indirect-red heaters: connect the heater to an exhaust duct. To get a proper
exhaust ow out, the fumes must rise throigh the ue. Avoid any elbows and
bends in the rst part of the exhaust ducts for at least 3m.
• Only position the heater in the normal upright position (on the wheels)
• Do not place the heater near walls, corners or low ceilings.
• Do not place the heater below a power socket outlet.
• Do not place the heater on moving vehicles or where it can tip over.
• Keep the heater away from ammable, combustible, explosive or corrosive
materials.
• Keep the heater away from curtains or similar materials that could block the air
inlet and outlet.
• Never block or restrict the air inlet and outlet for any reason.
• Keep the power cable away from heat sources, sharp edges, cutting and
moving parts.
• Do not expose directly to the weather or to excessive humidity.
• Do not place the heater in the immediate surroundings of a bath, shower or
swimming pool.
• Ensure the following minimum safety clearances from materials or objects in the
surroundings of the heater:
Side: 0.6m
Air inlet side: 1m
Top: 1.5m
Hot air outlet side: 3m

4. OPERATING INSTRUCTIONS - CONTINUED
FLUE/EXHAUST INSTALLATION
For indirect-red heaters: connect the heater to an exhaust duct. To get a proper
exhaust ow out, the fumes must rise throigh the ue. Avoid any elbows and bends in
the rst part of the exhaust ducts for at least 3m.

4. OPERATING INSTRUCTIONS - CONTINUED4. OPERATING INSTRUCTIONS - CONTINUED
START-UP
• Fill the tank with clean fuel. Only use Diesel or Kerosene
• The fuel gauge on top of the tank allows you to check the fuel level
• Connect the plug to the relevant power source
• If the thermostat control knob setting temperature is higher than the ambient
temperature, the electrodes will start sparking & after 7 seconds the heater will
start.
• If the thermostat control knob setting is lower than the ambient temperature, turn
the thermostat control knob to the desired temperature setting. The electrodes
will start sparking & after 7 seconds the heater will start.
COLD START-UP
In low temperature, in Alpine/Highland/Inland regions, unseasonably cold weather.
Block the air vent hole on the air pump (see Fig. 4) by using your nger during ignition
to make start-up easier.
ABNORMAL OPERATION:
In case of malfunction (ame failure, reduced air ow, bad combustion) the heater
stops and the indicator light starts FLASHING (THE LOCK-OUT MODE code will be
showed on the display window).
MANUAL RESET/RESTART
If the heater is in lock-out mode, check and remove the cause of lock-out before
restarting the heater. To reset, turn the ON/OFF switch to 0 and then again to I. If
problem continues please contact Fanmater. Turning the thermostat control knob will
NOT reset the heater.
SHUTDOWN
Move switch to “OFF” (O) position.
• Never disconnect the heater from mains to stop it while in operation.
• Always allow the cooling sequence to be completed, otherwise the residual heat
could damage internal components.
• Do not cover the heater. Do not block the air inlet and outlet.
• The heater outlet is very hot during operation and after use. Do not touch! Use
personal protecting equipment if needed.
• Unplug the heater before moving it. Never pull the cable to unplug or move the
unit.

5. CLEANING, MAINTENANCE & STORAGE
• Before starting any maintenance task, shut down, unplug and let the heater cool
down for at least 15 minutes.
• Do not attempt any electrical repair yourself. If the heater needs service or repair,
contact a qualied persons.
• When cleaning, make sure that water does not enter the unit.
• Do not open the enclosure to clean the inner parts. Do not spray water into the
heater.
• Never use solvents, gasoline, toluene and similar aggressive chemicals to clean
the heater.
Regularly wipe the enclosure using a soft sponge or cloth. For very dirty parts, use a
sponge wetted with lukewarm water and a mild detergent, then dry using a clean
cloth. Keep air inlet and fan free from dust and dirt. To clean inner parts, gently blow
compressed air through air inlet. Regularly inspect the power cable: if worn, cracked
or damaged have it replaced by a qualied persons only.
Before storing the heater, make sure it is perfectly cool and dry. Cover the unit with a
blanket or tarp and store it in a dry, ventilated plac
The following checks are recommended before every seasonal use:
Nozzle
Carefully unscrew nozzle from nozzle tting. Blow compressed air through nozzle
orice to free it from dirt. Replace nozzle if necessary.
Air Filters
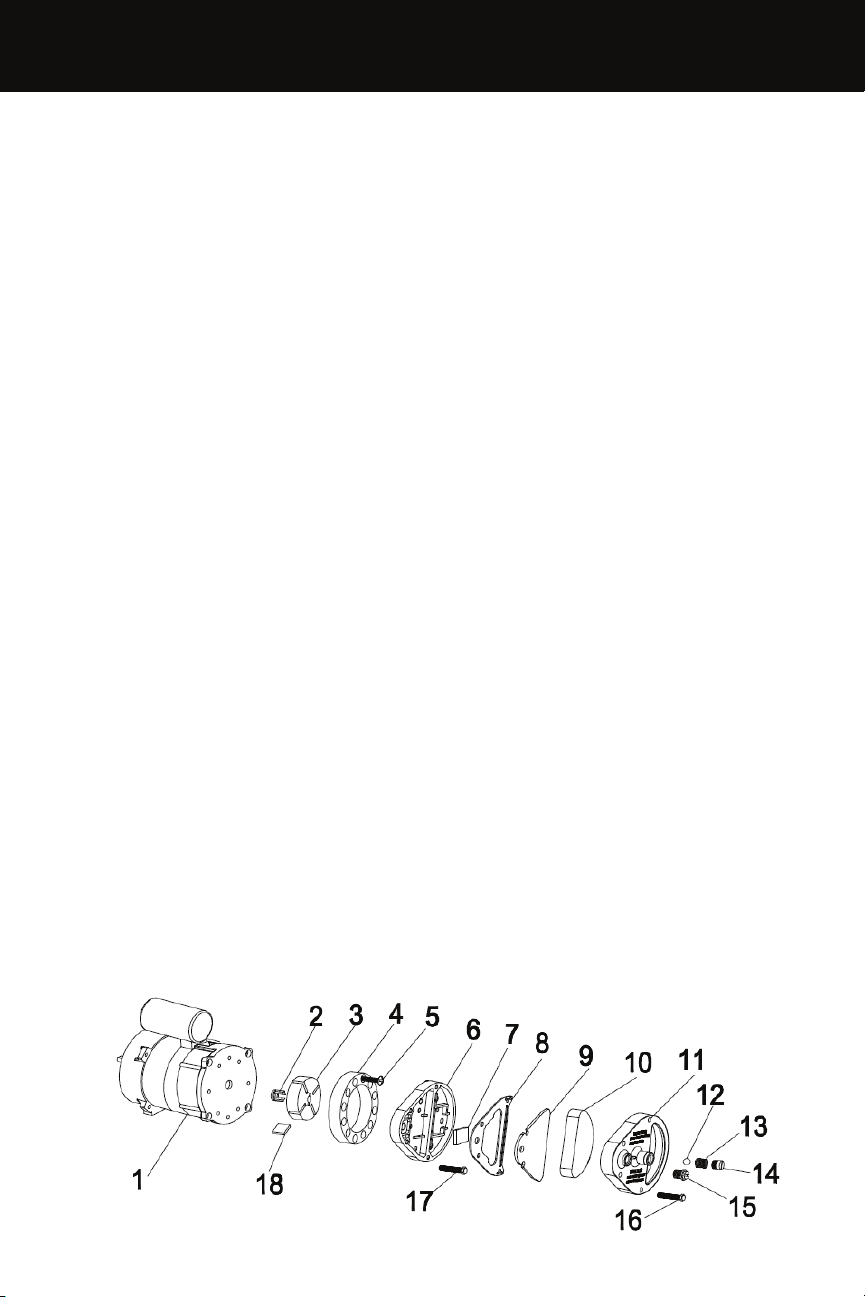
Clean air lters. Remove lter end cover (11), wash air intake lter (10) using a light
detergent and dry it thoroughly before re-installing. Replace air delivery lter (9) once
a year (Fig.3)
Fig 3.
Indice
Altri manuali Fanmaster Stufa

Fanmaster
Fanmaster HDR20 Manuale utente

Fanmaster
Fanmaster IDH2-20 Manuale utente

Fanmaster
Fanmaster 3 Series Manuale utente

Fanmaster
Fanmaster IFH-5 Manuale utente

Fanmaster
Fanmaster IGH2-20 Manuale utente

Fanmaster
Fanmaster CF2000 Manuale utente

Fanmaster
Fanmaster PESH9 Manuale utente

Fanmaster
Fanmaster IFH-3 Manuale utente

Fanmaster
Fanmaster IFH-9 Manuale utente

Fanmaster
Fanmaster IFH-15 Manuale utente
Manuali Stufa popolari di altre marche

Empire Heating Systems
Empire Heating Systems WCC65 Manuale utente

Wetekom
Wetekom 92 86 43 Manuale utente

Desa
Desa SPC170-F Manuale utente

Watlow
Watlow Watrod Electric Tubular Heaters Manuale utente

Haverland
Haverland ECO-DRY GPS Series Manuale elenco delle parti

Stelpro
Stelpro ASILVC2060 Series Manuale utente