Fixman 211834 Manuale utente

211834
TV Bracket Fixed
Installation Guide
TV Dimension
TV Bracket Fixed
Support mural pour écran plat
Wandhalterung für Fernsehbildschirme
Soporte jo para TV
Staa di supporto TV
TV steun
450mm
431mm
40-400mm
7
211834_Z1MANPRO1.indd 1 09/08/2016 12:41

211834_Z1MANPRO1.indd 2 09/08/2016 12:41

English................4
Français ..............8
Deutsch ..............12
Español............... 16
Italiano ............... 20
Nederlands.........24
211834_Z1MANPRO1.indd 3 09/08/2016 12:41

4
GB
1
2
• TV Size Range: 23–47”
• Maximum Weight: 45kg
• VESA Compatibility: 200 x 200, 300 x 300, 400 x 200, 400 x 400
• Locking by spinning bolt on the bottom
• 3D televisions require the television to be mounted close to eye level so the 3D image is clearly visible
• Check socket positions on television before commencing installation to ensure all cables can reach
CAUTION
This product was designed to be installed on wood stud walls and concrete or brick walls. Before installing make sure the supporting
surface will support the combined load of the equipment and hardware. Never exceed the maximum load capacity.This product is
intended for indoor use only. Use of this product outdoors could lead to product failure or personal injury.
Keep television out of reach of young children. Do not exceed maximum weight. Correct assembly is essential. It is the responsibility of
the installer to ensure the wall structure is capable of supporting the screen and mount in a normal working environment. Always check
for hidden power cables and pipes before commencing work. Check the strength of the installation before installing the screen. If you
have any doubts concerning installation consult a qualified contractor.
Hardware List
12
Tools you will need
Stud finder
10.5mm dia
A. Lag Screws x 4
B. M8 x 16mm Bolt x 4
C. M6 x 16mm Bolt x 4
D. M5 x 16mm Bolt x 4
1. Wall Plate
2. Brackets x 2
3. Safety Bolts x 2
E. M5 Washer x 4
F. M6 Washer x 4
G. M8 Washer x 4
H. Masonry Anchor Plugs x 4
3
AB-D E-G H
211834_Z1MANPRO1.indd 4 09/08/2016 12:41

5
www.fixman.co.uk
Part 1a Stud Wall Mounting
Level the Wall Plate (1) and use as a template, marking four mounting holes along the centre lines of the wood studs. Drill four 3/16
(4.5mm) diameter holes, 2” (50mm) deep. Level the Wall Plate and attach to the wall using the four Lag Screws (A) and four Washers (F).
Tighten Lag Screws firmly but do not over tighten.
Part 1b Concrete or Brick Wall Mounting
Level the Wall Plate (1) and use as a template, marking four mounting holes on the concrete or brick surface.
NOTE: If attaching to a brick wall, do not drill in to soft mortar. Always drill in to the brick or concrete block and avoid using hammer mode
while drilling through plaster layer.
Drill four 7/16 (10.5mm) diameter holes, 2” (50mm) deep.Vacuum out the holes after drilling. Insert four Masonry Anchor Plugs (H) into
the holes and secure levelled wall plate with four Lag Screws (A) and four Washers (F).Tighten screws firmly but do not over tighten.
Make sure holes are not oversized.
Wood stud
Stud finder
2" (50mm)
3/16" (4.5mm) dia
E-G
A
2" (50mm)
7/16" (10.5mm) dia
E-GA
Concrete/brick wall
H
211834_Z1MANPRO1.indd 5 09/08/2016 12:41

6
GB
Part 2 Attaching Brackets to Screen
Centre Brackets (2) vertically on the back of the screen. Select the appropriate-sized bolts and washers for the screen. Attach the
brackets to the screen using the four selected bolts and washers at the top and bottom of each bracket. Tighten bolts firmly but do not
over tighten.
Part 3 Mounting the Flat Panel Screen
Hook the top of the Brackets (2) to the fop flange of the Wall Plate (1). Swing the screen down.Tighten the Safety Bolts (3) on the
underside of each bracket to lock the screen into place.
NOTE: Always use an assistant or mechanical lifting equipment to safely lift and position heavy equipment.
B-D
E-G
2
1
3
211834_Z1MANPRO1.indd 6 09/08/2016 12:41

7
www.fixman.co.uk
Warning
This product contains small items that could be a choking hazard if swallowed. Keep these items away from young children.
1. Make sure these instructions are read and completely understood before attempting installation. If you are unsure of any part of this
installation, contact a professional installer for assistance.
2. The wall or mounting surface must be capable of supporting the combined weight of the mount and the display, otherwise the
structure must be reinforced
3. Safety gear and the correct tools must be used. A minimum of two people are required for this installation. Failure to use safety gear
can result in property damage, serious injury or death.
211834_Z1MANPRO1.indd 7 09/08/2016 12:41

8
FR
• Pour écrans de 23 à 47 pouces
• Poids maximal de 45 kg
• Compatibilité VESA : 200 x 200, 300 x 300, 400 x 200, 400 x 400
• Fixation par boulon fileté à la base
• Les télévisions 3D passives demandent à être montées à hauteur des yeux pour que les images 3D soient visibles.
• Vérifiez l’emplacement des prises avant de commencer toute installation pour s’assurer que tous les câbles puissent être branchés.
ATTENTION
Ce produit est conçu pour être installé sur les solives en bois du mur, les murs en béton et en brique.Avant toute installation, vérifiez
bien que la surface soit adéquate avec tous les équipements et accessoires de fixation. Ne jamais dépasser la capacité maximale de
charge. Ce produit est destiné uniquement à un usage intérieur. L’utiliser à l’extérieur peut entrainer le non fonctionnement du montage et
provoquer de graves blessures.
Gardez la télévision hors de portée des enfants. Ne jamais dépasser la capacité maximale de charge. Un bon assemblage est essentiel. Il
est de la responsabilité du monteur de vérifier que le mur soit capable de supporter l’écran et la monture dans des conditions normales.
Toujours vérifier qu’il n’y a pas de câbles ou tuyaux avant de commencer l’installation. Vérifiez la solidité de l’installation avant de fixer la
télévision. Si vous avez un doute concernant l’installation, n’hésitez pas de faire appel à un professionnel.
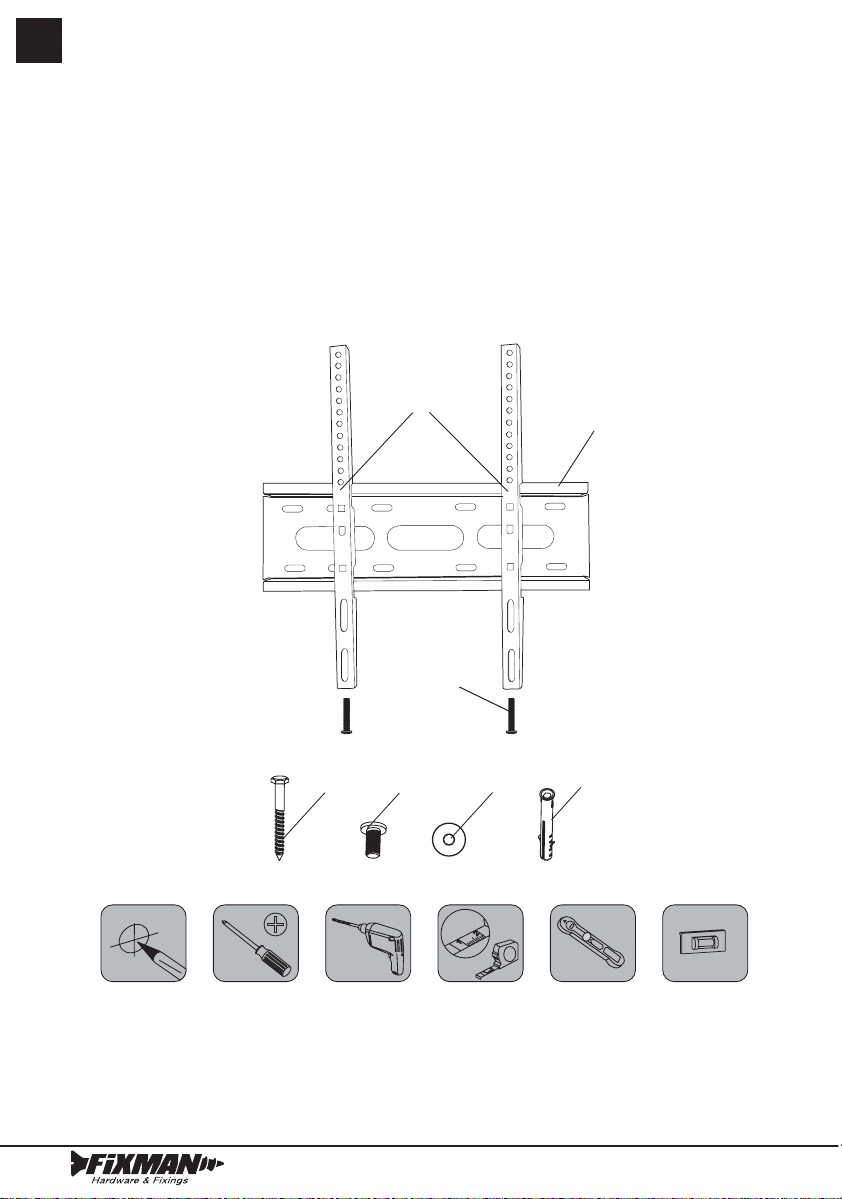
Liste du matériel
1. Plaque murale
2. Support verticals (x 2)
3. Boulons de sécurité (x 2)
12
Outils nécessaires au montage
Détecteur
de montants
10.5 mm dia
A. Vis tirefonds (x 4)
B. Boulon M8 x 16 mm (x 4)
C. Boulon M6 x 16 mm (x 4)
D. Boulon M5 x 16 mm (x 4)
E. Rondelle M5 (x 4)
F. Rondelle M6 (x 4)
G. Rondelle M8 (x 4)
H. Chevilles d’ancrage spéciales maçonnerie (x 4
AB-D E-G H
1
2
3
211834_Z1MANPRO1.indd 8 09/08/2016 12:41

9
www.xman.co.uk
Partie 1a : Fixer le support mural sur des montants en bois
Utilisez la plaque murale (1) comme guide, vérifiez qu’elle soit bien de niveau et faites 4 marques bien centrées sur les montants en bois.
Percez les 4 trous de passage d’un diamètre de 4,5 mm et de 50 mm de profondeur. Placez la plaque murale et mettez-la de niveau pour
la fixer avec quatre vis tirefonds (A) et les quatre rondelles (F). Visser les vis tirefonds fermement mais sans trop forcer.
Partie 1b : Fixer le support sur un mur en béton ou en brique
Utilisez la plaque murale (1) comme guide, vérifiez qu’elle soit bien de niveau et faites 4 marques pour les trous.
REMARQUE : Éviter de percer dans le mortier mou entre les briques ou les blocs de béton. Eviter de mettre la perceuse en mode marteau
si vous percez à travers une couche plastique.
Percez les 4 trous de passage d’un diamètre de 10,5 mm et de 50 mm de profondeur. Insérez quatre chevilles d’ancrage spéciales
maçonnerie (H) et fixez la plaque murale avec quatre vis tirefonds (A) et quatre rondelles M6 (F). Visser fermement les vis mais sans trop
forcer. Vérifiez bien que les trous ne soient pas trop grands.
Montant en bois
Détecteur de
montants
2" (50 mm)
3/16" (4.5 mm) dia
E-G
A
2" (50 mm)
7/16" (10.5 mm) dia
E-GA
Mur en béton / briques
H
211834_Z1MANPRO1.indd 9 09/08/2016 12:41

10
FR
Partie 2 : Fixer les supports verticaux sur l’écran
Centrez verticalement les supports (2) au dos de l’écran. Choisissez les boulons et les rondelles de taille adaptée à l’écran. Fixez les
supports avec les quatre boulons et quatre rondelles choisis sur les extrémités des supports. Visser fermement mais sans trop forcer.
Partie 3 : Fixer l’écran plat
Crochetez le haut du support (2) sur l’embase supérieure de la plaque murale (1). Puis faites pivoter l’écran vers le bas. Vissez les boulons
de sécurité (3) sur le dessous de chaque support vertical pour maintenir l’écran.
Remarque : Toujours demander assistance ou utiliser un système de levage pour soulever et installer des équipements lourds.
2
1
3
B-D
E-G
211834_Z1MANPRO1.indd 10 09/08/2016 12:41
Indice
Lingue:
Altri manuali Fixman Supporto TV


