Flamelux PARIS Guida alla pianificazione

PARIS
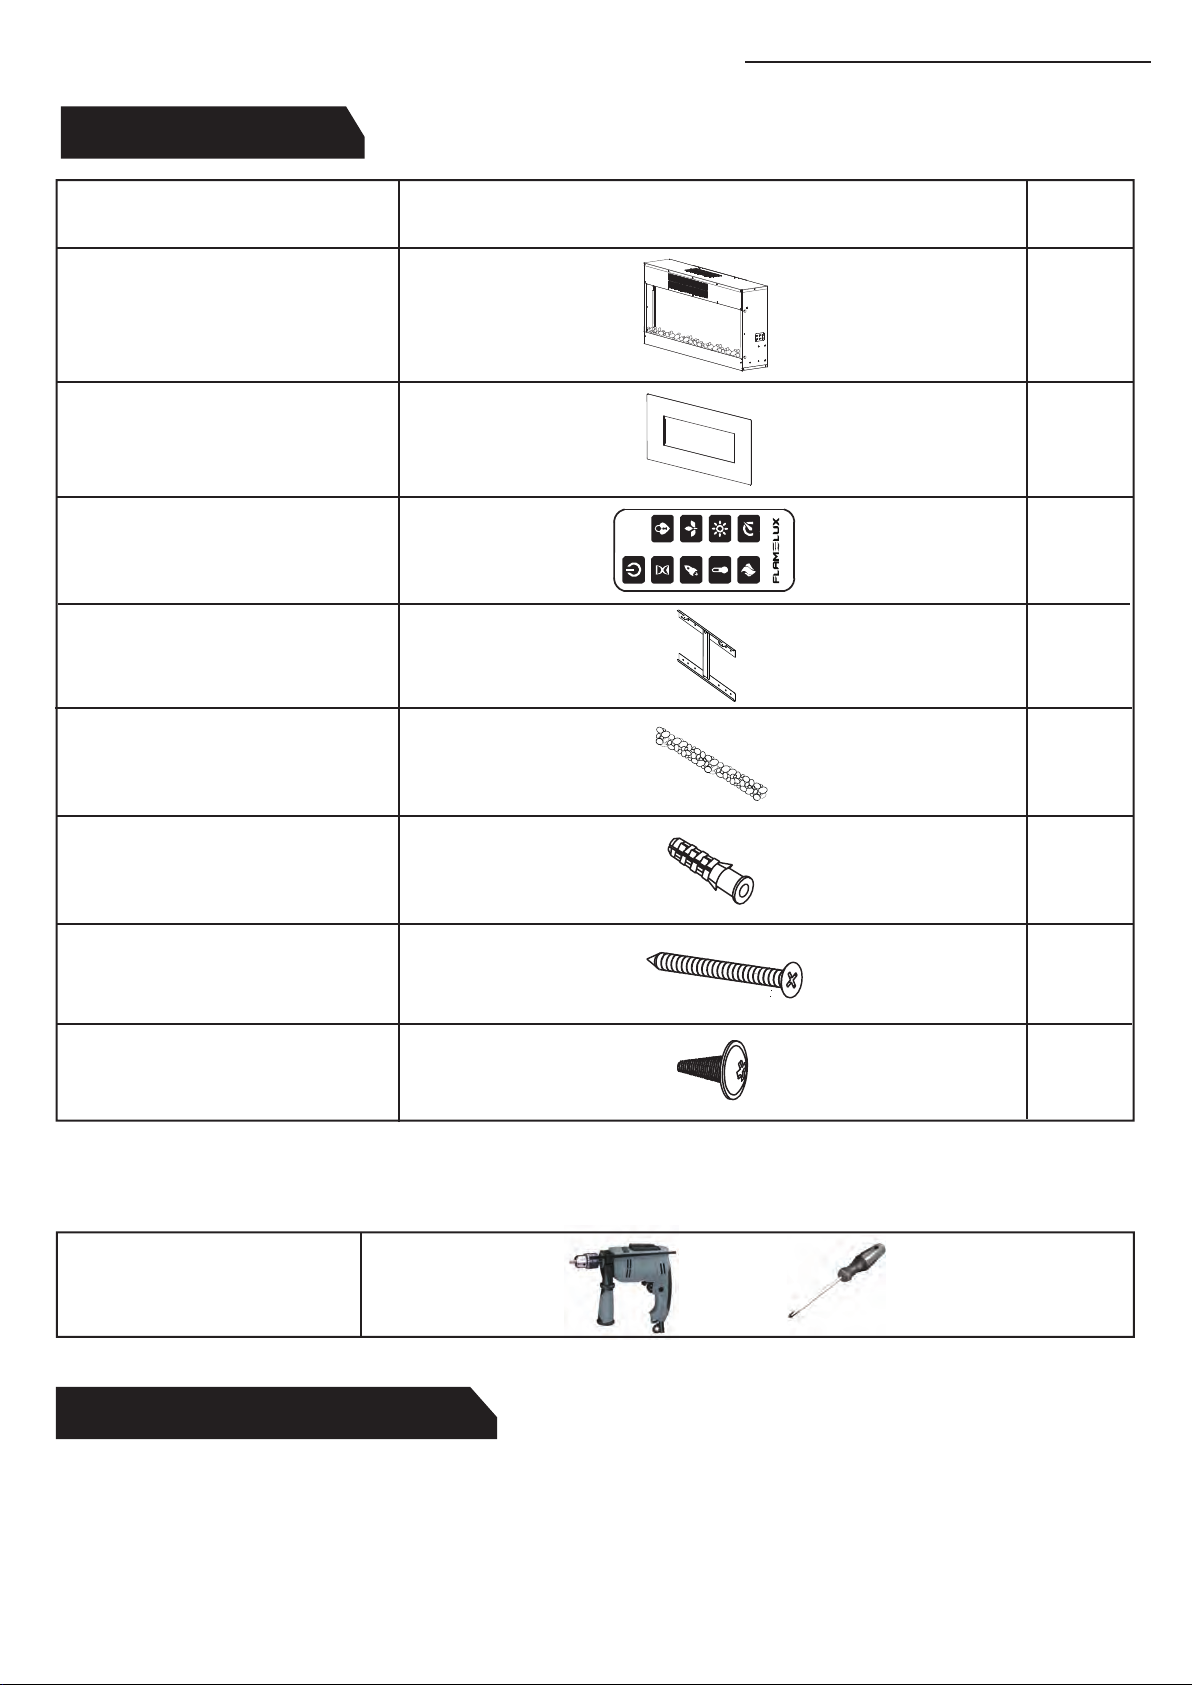
1
1
Remote control 1
Hanging bracket
(preassembled to fireplace)
1
Crystal bed 0.3 kg
4
Wall Plug
4
Fireplace insert
Front panel
Description Illustration Qty
Screw 1
Screw 2
4
Drill
Unpack your fireplace package and make sure you have all of the parts listed above. If parts are missing, please contact customer
This appliance is designed for use as a supplementary heat source. It is not intended to be the main source of heat.
Required Tools (not included)
Parts List
Before you start
E-1
Philips Screwdriver
IMPORTANT INSTRUCTIONS
ASSEMBLY INSTRUCTIONS

1. Read all instructions before using this appliance.
2. This heater is hot when in use. To avoid burns, do not let bare
skin touch hot surfaces. Keep combustible materials, such as
pillows, bedding, papers, clothes and curtains at least 3 feet
(0.9m) from the front of this heater and keep them away from the
sides and rear.
3. CAUTION: Extreme caution is necessary when any heater is
used by or near children or invalids and whenever the heater is left
operating unattended.
4. Always unplug this appliance when not in use.
5. Do not operate any heater with a damaged cord or plug or after
the appliance malfunctions, has been dropped or damaged in any
manner. Return heater to authorized service facility for examination,
electrical or mechanical adjustment, or repair.
6. Any repairs to this appliance should be carried out by a qualified
service person.
7. Under no circumstances should this appliance be modified.
8. Do not use outdoors.
9. This heater is not intended for use in bathrooms, laundry areas
and similar indoor locations. Never locate heater where it may fall
into a bathtub or other water container.
10. Do not run cord under carpeting. Do not cover cord with throw
rugs, runners or similar coverings. Arrange cord away from traffic
areas and where it will not be tripped over.
11. To disconnect this appliance, turn controls to the off position,
then remove plug from outlet.
12. Connect to properly grounded outlets only.
14. Do not insert or allow foreign objects to enter any
ventilation or exhaust opening as this may cause an electric
shock, fire or damage the heater.
15. To prevent possible fire, do not block air intakes or exhaust
in any manner. Do not use on soft surfaces, like a bed, where
openings may become blocked.
16. This heater has hot and arcing or sparking parts inside. Do
not use it in areas where gasoline, paint or flammable liquids
are used or stored. This appliance should not be used as a
drying rack for clothing, nor should Christmas stockings or
decorations be hung on or near it.
17. Use this appliance only as described in this manual. Any
other use not recommended by the manufacturer may cause
fire, electric shock or injury to persons.
18. Always plug heaters directly into a wall outlet/receptacle.
Never use with an extension cord or relocatable power
tap (outlet/power strip).
19.The heater has a safety device that makes it stop working
once the inner temperature reaches 85º (± 2°C). To reset the
appliance, turn heater off and disconnect power, let it cool off
for 10 minutes and plug back in.
20.This Class B digital apparatus complies with Canadian
ICES-003.
The fireplace must not be used until it is securely fastened to
,ecalperifcirtceleruoyrofnoitacolagnisoohcnehW.llaweht
ensure that the general instructions are followed. For best
results, install the electric fireplace away from direct sunlight
and dust.
General
LOCATING
YOUR FIREPLACE
E-2
furniture,
IMPORTANT INSTRUCTIONS
ASSEMBLY INSTRUCTIONS
13.This appliance, when installed must be electrically grounded in
accordance with local codes, with the current CSA C22.1 Canadian
Electrical code or for USA installations, follow local codes and the
National Electric Code,
ANSI/NEPA No. 70.

IMPORTANT INSTRUCTIONS
ASSEMBLY INSTRUCTIONS
1. Do not connect this heater to a programmer, timer, separate remote control system or any other device that switches the heater on
automatically, since a fire risk exists if the heater is covered or positioned incorrectly.
2. If the supply cord is damaged, it must be replaced by the manufacturer, its service agent or similarly qualified persons in order to
avoid a hazard.
3. In order to avoid a hazard due to inadvertent resetting of the thermal cut-out, this appliance must not be supplied through an external
switching device, such as a timer, or connected to a circuit that is regularly switched on and off by the utility.
4. Do not use this heater in the immediate surroundings of a bath, shower or swimming pool.
5. If the glass becomes damaged, do not use the heater in order to avoid a hazard.
6. Always make sure the electrical socket is accessible and located adjacent to but not above the heater.
7. This heater must be mounted to the wall.
1. This heater must be fitted onto a flat wall. Ideally, install the heater directly to a brick wall, masonry surface or the internal wooden
frame of a plasterboard wall. If the wooden frame behind the plasterboard is not accessible, use a minimum of four heavy-duty anchors
that are suitable for the weight of the heater.
2. We do not recommend that the heater be fitted to a wall covered in blown vinyl wallpaper, polystyrene tiles or other flammable materials.
3. It is important that the heater be never installed under a shelf or flammable materials such as curtains.
4. If the heater is to be mounted on to a plasterboard wall with wooden studs, make sure the wall is strong and stable enough to hold the
weight of the appliance. The vapour control barrier must not be damaged, and the structural members of the house must not be damaged.
We recommend minimum 12mm thick plasterboard.
5. Before drilling into walls, always check that there are no hidden wires, pipes, etc. Make sure that screws and wall plugs supplied are
suitable for supporting the unit in your surface. Consult a qualified person if you are not sure.
Handling and unpacking
Before starting the installation of this fireplace, please read the following:
1. The installation should be carried out by two adults to avoid injury or damage. If for any reason it is considered too heavy, please
obtain assistance.
2. When lifting the fireplace, always keep your back straight. Bend your legs and not your back. Avoid twisting at the waist. It is better
to reposition your feet.
3. Avoid upper body / top heavy bending. Always bend from the knees rather than the waist. Do not lean forward or sideways while
handling the heater.
4. Always grip the heater with the palm of the hand. Do not use the tips of fingers for support.
5. Always keep the heater as close to the body as possible. This will minimize the cantilever action.
6. Use gloves to provide additional grip.
7. Unpack the package and lift the product gently out of the box, put it on a flat surface with the front panel facing up.
E-3
Safety Warnings
Installation tips

IMPORTANT INSTRUCTIONS
ASSEMBLY INSTRUCTIONS
A x 1 B x 0.3 kg C x 4 D x 4 E x 4
E-4
Hardware
Step 1
Remove hanging bracket (A) from back of fireplace by removing the two screws (E) at the top of the unit.
Remove the hanging bracket (A).
E
A

IMPORTANT INSTRUCTIONS
ASSEMBLY INSTRUCTIONS
E-5
Step 2
Step 3
Install wall plugs (C) into wall.
Attach hanging bracket (A) into wall.
1. Drill 4 holes (8 mm diameter, 4 mm deep) on the wall.
2. Insert wall plugs (C) into the drilled holes.
3. Please refer to the diagram for hole locations.
4. Both top holes should be located at least 420 mm away
from the ceiling.
Note: Before drilling into walls, always check that there
are no hidden wires, pipes, etc. Make sure that screws
and wall plugs supplied are suitable for supporting the
unit in your wall material. Consult a qualified person if you
are not sure.
270 mm
181 mm
1. Holding the hanging bracket (A) to the drilled holes,
insert screws (D) through the second & fifth holes on the
upper and lower hanging bracket.
2. Attach the hanging bracket (A) in place with a Philips
screwdriver.
3. The screw should be fully inserted, flush to the wall in
order to avoid the screw head protruding over the bracket.
4. Ensure the hanging bracket is securely attached.
C
A
D

IMPORTANT INSTRUCTIONS
ASSEMBLY INSTRUCTIONS
E-6
1. Check to make sure the hanging bracket (A) is securely
attached to the wall.
2. Hang the fireplace insert on the hooks at the bottom of
the hanging bracket (A) and push the fireplace insert into
the hanging bracket (A).
3. Re-fasten the screws removed in Step 1.
4. Check that the top of the fireplace is at least 400 mm from
the ceiling.
1. Ensure the crystals are spread evenly in the fireplace
opening.
2. Check to make sure the crystal bed is securely in place.
Step 5
Step 4
Hang the fireplace insert onto the hanging
bracket.
Place the crystal bed in the fireplace insert.
A
B

IMPORTANT INSTRUCTIONS
ASSEMBLY INSTRUCTIONS
E-7
1. Make sure the front panel is free of
debris and dirt.
2. Hold the panel securely and hang it onto
the fireplace hooks, located on both sides.
3. The panel should be secured on all four
hooks on the fireplace.
4. Check to make sure the panel is held
securely in place.
Step 6
Install the front panel.
Step 7
1. Locate the holes on both left and right sides and
insert a screw (E) through the hook, into the fireplace
insert.
2. Tighten screw to pass it through the hook, on both
sides.
3. Ensure the front panel is secure.
Note: Tighten up the screw carefully, to avoid damage
to the front panel.
Attach the front panel to the fireplace.
E
E
E
E

power tap (outlet/power strip).
Dimensions (W x D x H)
Grounding pin
Cover of
Grounded
Outlet BOX
15.3 kg / 19.6 kg
41 x 6 1/8 x 19 1/4 in
104.1 x 15.6 x 49 cm
WALL MOUNTED FIREPLACE
SPECIFICATIONS
fireplace
fireplace
8
Figure 1.
1. If the glass panel cracks or breaks, stop using the appliance
immediately and have the glass replaced.

Indicators
E-9
OPERATING INSTRUCTIONS
Figure 3
When a function is changed from the control panel or remote there will be a corresponding indicator displayed. The indicator shows
the function changed and the level selected. When the function is turned off, the corresponding indicator will fade off.
Figure 2
Manual control
Indice
Lingue:
Altri manuali Flamelux Camino da interno


