
Flash FLASHV1 Manuale utente

IMPORTANT READ THIS MANUAL FIRST
BEFORE YOU START TO RIDE YOUR BIKE
www.flashbike.io
Model: FLASHV1
FCC ID: 2AMLO-FLASH1
This device complies with Part 15 of the FCC Rules.
Operation is subject to the following two conditions:
1) this device may not cause harmful interference, and
2) this device must accept any interference received,
including interference that may cause undesired operation.
This equipment should be operated with minimum distance
of 20cm between the radiator and the human body.

Learn About Flash
Contents
01-02
Read Me First 03
Assembling Flash
Completing Account Setup
Riding Flash
04-05
Limited Warranty
Bicycle Owner's Manual
Frequently Asked Questions
12-13
06-07
08-11
14-56
57

Learn About Flash
1
Handlebar
Shifters
Brakes
Front LED Headlight
Front disc brake
Front wheel
Quick release
Turn signals
Lights
Horn
Pedal assist
Stem
Touchscreen (TFT)
Seat post quick release
Saddle
Rear LED brake light
Rear disc brake
Rear wheel
motor
Derailleur & cassette Schrader Tire Valve
Right pedal
Charge port
Kickstand
Learn About Flash
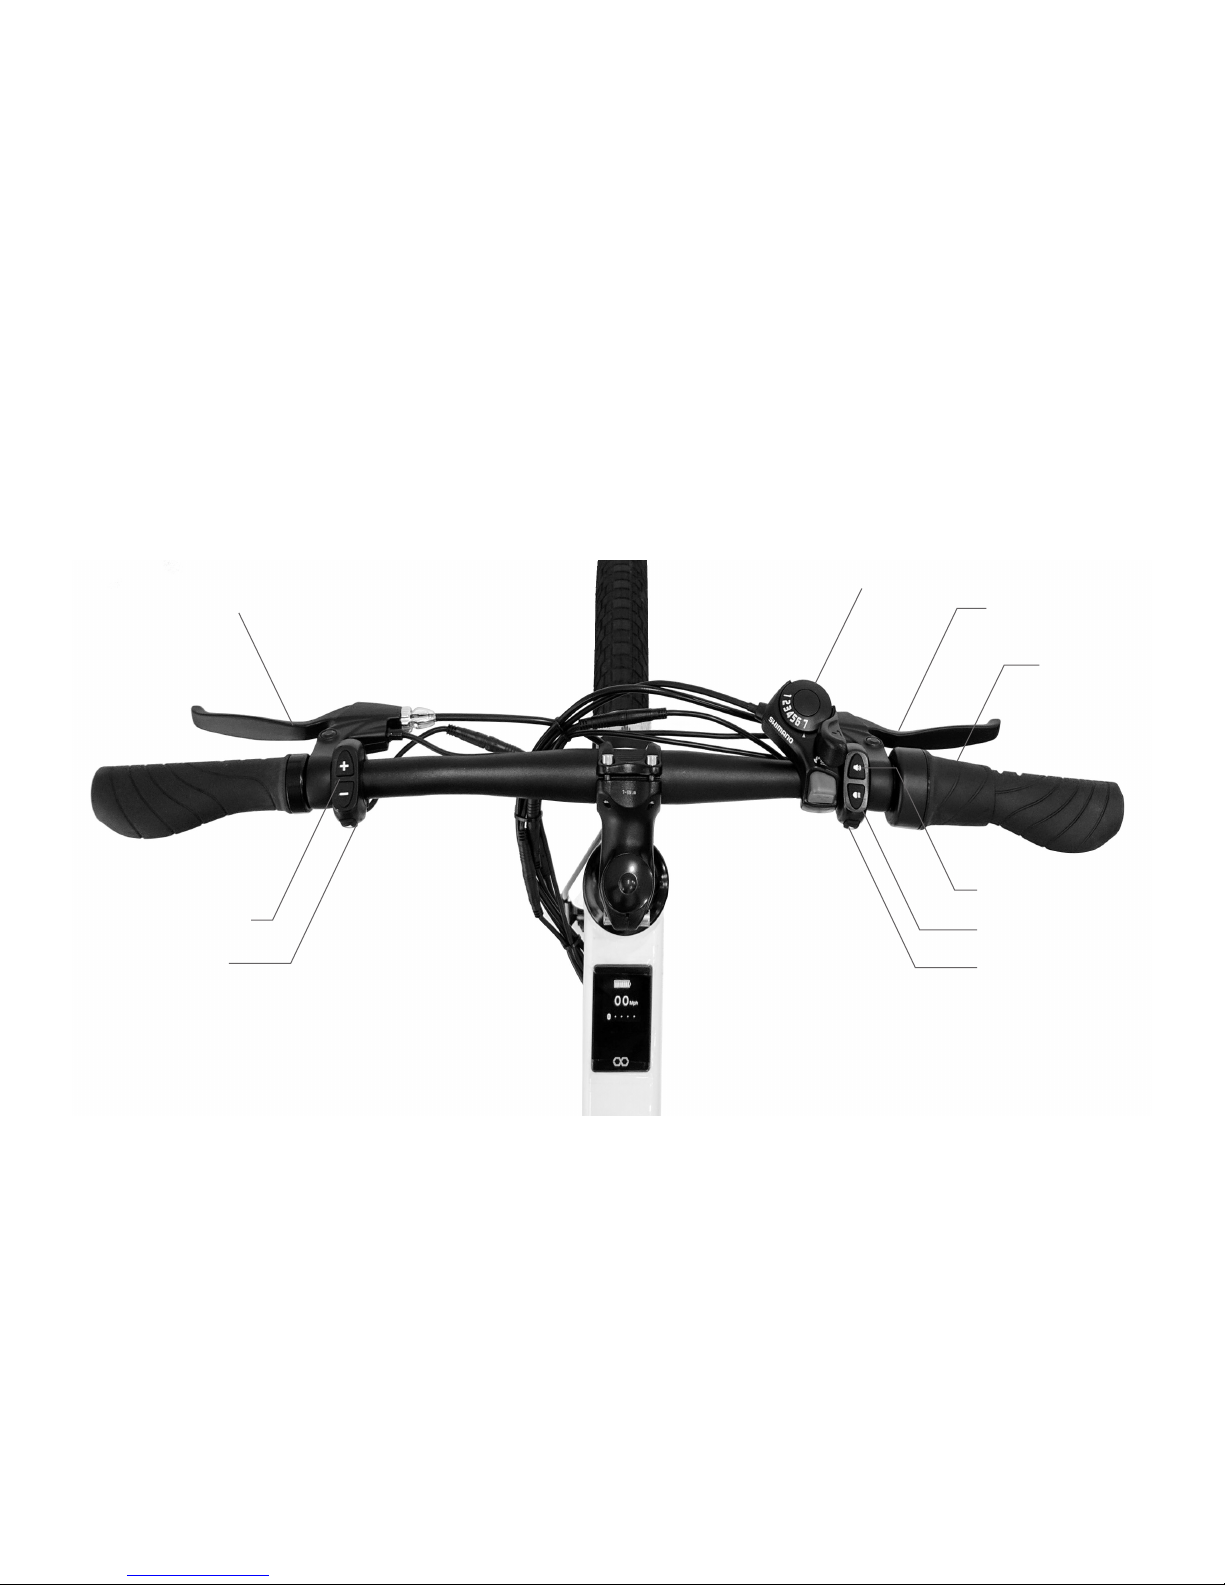
2
Rear Brake Lever
Headlight
Horn
Throttle
Right Turn Signal
Left Turn Signal
Pedal Assist Level
Front Brake Lever
7-Speed Shifter

3
Read Me First
Unwrapping the bike
• Ask a friend to help remove the bike from the box.
• Open the box with the TOP side up.
• Remove the bike from the carton.
• Locate the user manual if you have not already.
• Then carefully remove all foam, paper and tie-strap
wrapping materials from the bike.
• Locate the battery charger box and kit box containing
the tools, pedals, skewer and reflectors.
We have provided YouTube videos at http://support.flashbike.io with detailed
instructions on how to setup your Flash with the free Flash smartphone App.
Download the Flash APP
• Download free smartphone APP for iOS and Android
• Follow detailed instructions at http://support.flashbike.io
Required tools
• 4mm allen wrench (included)
• 5mm allen wrench (included)
• Adjustable crescent wrench or 15mm wrench
• Philips screwdriver
What’s included in the box
• 1x Flash
• 1x user manual
• 2x pedals
• 1x front skewer
• 1x 36V lithium ion battery pack (inside the bike frame)
• 1x 110V battery charger
• 2x reflectors (front and rear)

4
Assembling Flash
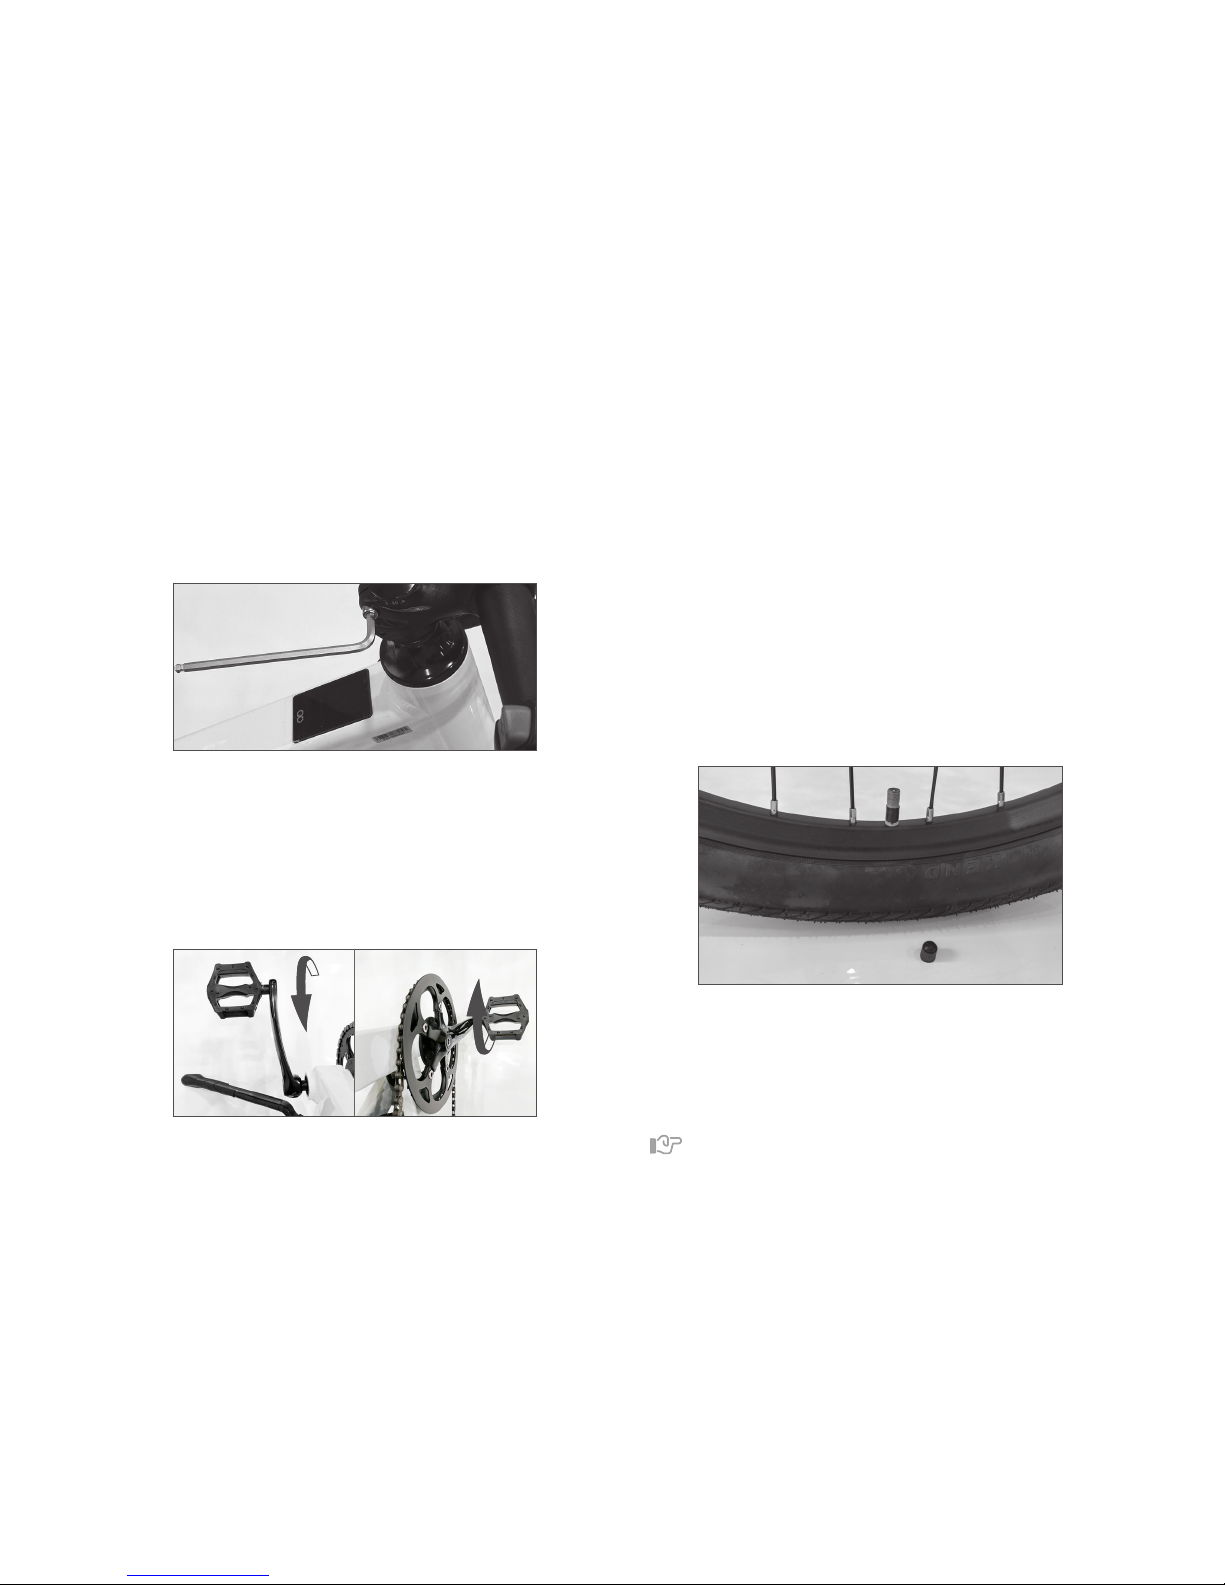
How to assemble the bike 3. Assemble the handlebar on the stem using a provided
4mm allen key. Remove the (4x) 4mm screws from the
stem. Then attached the handlebar as shown in the
image. Then angle the brakes on the handlebar at 45
degrees towards the front of the bike. Then tighten the
4x 4mm screws on the stem at 7Nm - 8Nm of torque.
We have provided YouTube videos at http://support.flashbike.io with detailed
instructions on how to assemble your bike. Written instructions are below.
2. Assemble the front wheel on the bike’s front fork.
1. Start first by attaching the skewer to the front hub and
wheel.
5
4. Assemble and center the stem so the handlebar is per
pendicularly aligned with the front wheel. Tighten the
(2x) 5mm hex screws on the stem to 8Nm - 9Nm of
torque.
5. Use a 15mm wrench to assemble the pedals. NOTE:
the right pedal must be attached to the right crank arm
(chainring side) and tighten the pedal in a clockwise
rotation. The left pedal must be attached to the opposite
side and tighten by counter clockwise. Do not reverse
the pedals or you will damage the bike. Apply 35Nm of
torque.
6. Assemble the clear front reflector on the front of the
handlebar and the red reflector on the seatpost facing
the rear.
7. Add 40 P.S.I. (min) to 65 P.S.I. (max.) to both the front and
rear tire if your tire is a Kenda 26” x 2.10” tire. We recom-
mend to use a hand pump or foot pump with a schrader
valve that is similar to an auto tire valve. Note: Always
check the tire pressure indicated on the outside wall of
your tire before each ride.
It's easy: how to videos at http://support.flashbike.io

6
1. Downloading the free smartphone APP
Please download the Flash APP available in iOS App
store or Android Google Play Store or visit http://sup-
port.flashbike.io
2. Create your Account
The first time you open your newly downloaded Flash
APP, you will be asked to register and create a profile
with your email address. You can register your Flash
during the registration process.
3. Pairing your bike with your Flash APP on your
smartphone
1. Make sure to turn on your Bluetooth under your
smartphone’s settings.
2. After you create your user profile you will receive
a Bluetooth pairing code. You will need to enter this
code when you pair your Flash APP on your smart-
phone with your Flash bike.
It's easy: how to videos at http://support.flashbike.io
Completing Account Setup
3. Create your unique 5-digit security PIN code. Save
this code in a safe place as you will need it to turn
on the bike or turn the bike from ARM to OFF. If you
choose not to create a PIN code you can enter the
default PIN code 11111 on the LCD screen.

7
4. First charge the battery in your Flash
You must first connect the battery charger to a 110V
wall outlet and then to the charge port found on the
underside of your main tube of the bike. Remove the
rubber flap to insert the charger plug to the charge
port. The battery charger LED will indicate red when
the battery is charging. The TFT screen will indicate
when the battery is being charged. The battery is fully
charged when the LED light turns green on the battery
charger. To fully charge a battery typically takes 4-7
hours. Charge the bike until it turns green before your
first ride.
It's easy: how to videos at http://support.flashbike.io

8
How to turn the bike on for the very first time
Once your bike is fully charged tap the touchscreen with
your finger to turn on the TFT screen. The Flash logo will ap-
pear on the screen. Note: make sure the bike is fully charged
and the charger plug is removed from the bike’s charge port.
How to turn your bike On and start riding
1. Tap the touch screen with your finger to turn on the TFT
screen and the Flash logo will appear on the screen.
2. Enter your unique 5-digit security PIN code to unlock
and turn on Flash. If your bike is armed use this same
PIN code to disarm the bike. Note: if you did not create
a unique PIN code during the profile setup process on
your Flash smartphone APP, you can enter the factory
default PIN code 11111.
3. The screen will then show 0 mph and Pedal Assist Level
0. If your bike is armed you will need to enter your
5-digit security code by touching the numbers on the
TFT screen. If you entered your security code incorrectly
Riding Flash
you will have 4 more tries before the bike is locked and
unable to turn on. If this happens you will need to unlock
the bike with your APP. Please contact Flash support if
you encounter any issues.
How to turn the bike o
Swipe the touch screen from the right edge of the screen to
the left edge of the screen. Then touch the OFF button to
turn the bike to its OFF state. The motor will be turned o in
this state. The throttle and PAS will not work in this state. All
electrical features such as the lights and horn and motor will
be turned o in this state. You can continue to ride the bike
like any traditional bike in the OFF state.
How to Arm the bike
1. To ARM the bike you will need to turn on the TFT by
touching or swiping the screen.
2. Then select by touching O & Arm button. Your bike is
now in the Armed mode. You can track the status of your
It's easy: how to videos at http://support.flashbike.io
Indice


