
FLIR Raymarine CPT-S Istruzioni per il montaggio

CPT-SIn-hullT
ransducerInstallation
sheet
Warning:Productinstallationand
operation
•Thisproductmustbeinstalledandoperatedin
accordancewiththeinstructionsprovided.Failure
todosocouldresultinpersonalinjury,damageto
yourvesseland/orpoorproductperformance.
•Raymarinerecommendscertifiedinstallation
byaRaymarineapprovedinstaller.Acertified
installationualifiesforenhancedproduct
warrantybenefits.ContactyourRaymarinedealer
forfurtherdetails,andrefertotheseparate
warrantydocumentpackedwithyourproduct.
Warning:Highvoltage
Thisproductcontainshighvoltage.DoNOTremove
coversorattempttoaccessinternalcomponents,
unlessspecificallyinstructedinthedocumentation
provided.
Warning:Switchoffpowersupply
Ensurethevessel’spowersupplyisswitchedOFF
beforestartingtoinstallthisproduct.DoNOT
connectordisconnecteuipmentwiththepower
switchedon,unlessinstructedinthisdocument.
Warning:Transduceroperation
Onlytestandoperatethetransducerinthewater.Do
NOToperateoutofwaterasoverheatingmayoccur.
Warning:Marine-gradesealant
Onlyusemarine-gradeneutralcurepolyurethane
sealants.DoNOTusesealantscontainingacetateor
silicone,whichcancausedamagetoplasticparts.
Caution:Transducercable
•oNOTusethetransducercabletoliftor
suspendthetransducer;alwayssupportthe
transducerbodydirectlyduringinstallation.
•oNOTcut,shorten,orsplicethetransducer
cable.
•oNOTremovetheconnector.
Ifthecableiscut,itcannotberepaired.Cutting
thecablewillalsovoidthewarranty.
isclaimer
R aymarinedoesnotwarrantthatthisproductiserror-freeorthatit
iscompatiblewithproductsmanufacturedbyanypersonorentity
otherthanRaymarine.
Raymarineisnotresponsiblefordamagesorinjuriescausedby
youruseorinabilitytousetheproduct,bytheinteractionofthe
productwithproductsmanufacturedbyothers,orbyerrorsin
informationutilizedbytheproductsuppliedbythirdparties.
eclarationofConformity
FLIRBelgiumBVBAdeclaresthattheCPT-SIn-hullTransducer
(partnumberA80691)isincompliancewiththeEMCDirective
2014/30/EU.
TheoriginalDeclarationofConformitycertificatemaybeviewed
ontherelevantproductpageatwww.raymarine.com/manuals.
Productdisposal
DisposeofthisproductinaccordancewiththeWEEEDirective.
TheWasteElectricalandElectronicEuipment(WEEE)Directive
reuirestherecyclingofwasteelectricalandelectroniceuipment
whichcontainsmaterials,componentsandsubstancesthat
maybehazardousandpresentarisktohumanhealthandthe
environmentwhenWEEEisnothandledcorrectly.
Euipmentmarkedwiththecrossed-outwheeled
binsymbolindicatesthattheeuipmentshould
notbedisposedofinunsortedhouseholdwaste.
Localauthoritiesinmanyregionshaveestablished
collectionschemesunderwhichresidents
candisposeofwasteelectricalandelectronic
euipmentatarecyclingcenterorothercollection
point.
Formoreinformationaboutsuitablecollection
pointsforwasteelectricalandelectronic
euipmentinyourregion,refertotheRaymarine
website:www.raymarine.eu/recycling.
IMOandSOLAS
Theeuipmentdescribedwithinthisdocumentisintendedfor
useonleisuremarineboatsandworkboatsNOTcoveredby
InternationalMaritimeOrganization(IMO)andSafetyofLifeatSea
(SOLAS)CarriageRegulations.
Warrantyregistration
ToregisteryourRaymarineproductownership,pleasevisit
www.raymarine.comandregisteronline.
Itisimportantthatyouregisteryourproducttoreceivefull
warrantybenefits.Y ourunitpackageincludesabarcodelabel
indicatingtheserialnumberoftheunit.Y ouwillneedthisserial
numberwhenregisteringyourproductonline.Y oushouldretain
thelabelforfuturereference.
Productoverview
•ConicalCHIRPsonarbeam.
•Easyinstallation.
•Theproductcomesreadytobefittedtocommon20°deadrise
hulls.
•Thetransducertubecanbecuttobefittedtoahullwitha0°or
12°deadrise.
•ConnectsdirectlytoAxiom™7DV,Axiom™ProS,Element™S
variantMFDs,andCP100sonarmodule.
•CompatiblewithAxiom™RV,Axiom™+RV,Axiom™ProRVX
MFDswhenusingadaptorcable(A80490).
•CompatiblewithElement™HVMFDswhenusingadaptorcable
(A80559).
•ConnectsdirectlytoDownVision™variantaSeriesandeSSeries
legacyMFDs.
Operationinstructions
Fordetailedoperationinstructionsforyourproduct,refertothe
documentationthataccompaniesyourdisplay.
Documentnumber:88101-2AB;22255;2020-11-16 T14:13:23Date:11-2020
Allproductdocumentationisavailabletodownloadfromthe
R
aymarinewebsite:www.raymarine.com/manuals.
Partssupplied
Thefollowingpartsaresuppliedinthebox.
Unpackyourproductcarefullytopreventdamageorlossof
parts.Checktheboxcontentsagainstthelistbelow.Retainthe
packaginganddocumentationforfuturereference.
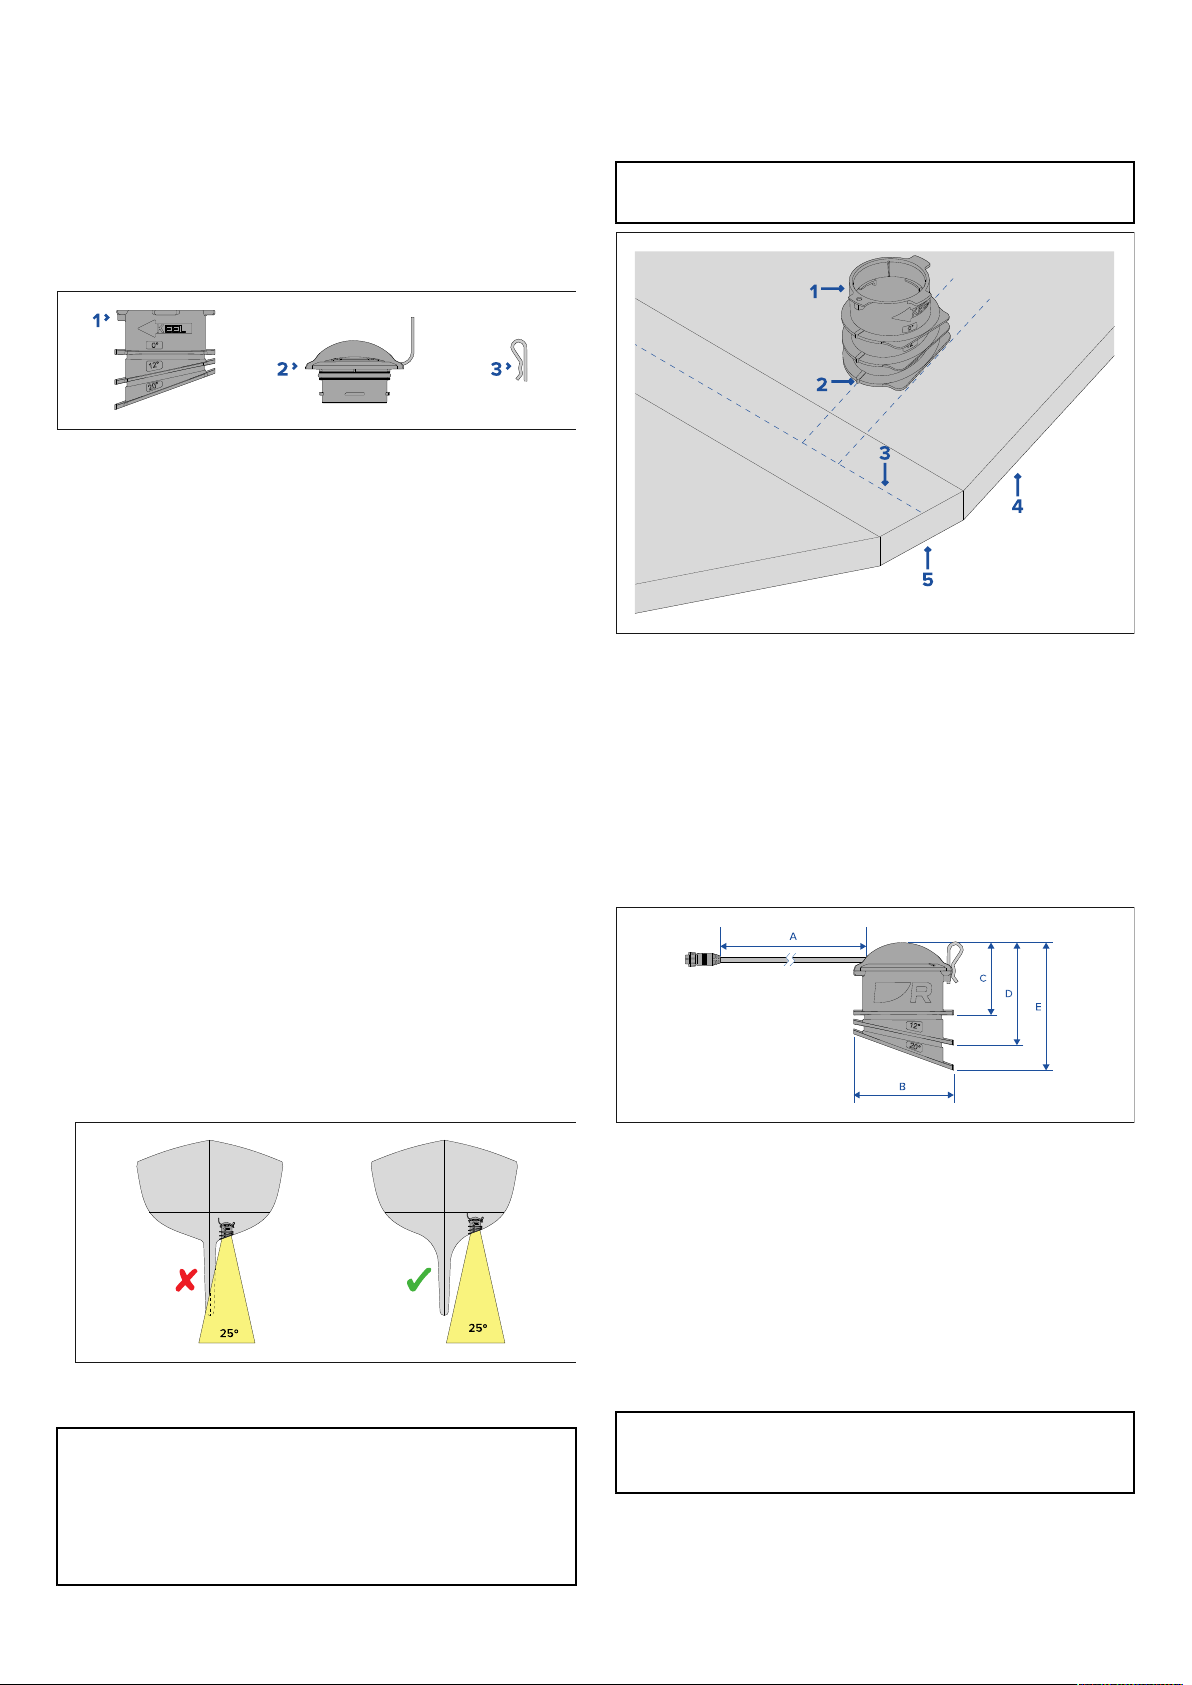
1.In-hulltransducertube
2.In-hulltransducer
3.R-clip
L
ocationrequirements
Itisimportanttoensurethatthetransducerisinstalledinalocation
thatprovidesoptimumperformance.Followtheguidancebelow
toensureyouchooseasuitablelocation.
Forbestperformance,transducersshouldbeinstalledinalocation
withtheleastturbulenceandaeration.
TheTransducershouldbeinstalled:
•onasolidsectionofafiberglasshullthathasnocoringorairgap
•withthetransducerkeelarrowspointingtowardsthecenter
lineofthevessel
•onthedeadriseofthehullascloseaspossibletothevessel’s
centerline
•perpendiculartothevessel’scenterline
•inalocationwherethehullwillalwaysbeincontactwiththe
water
•inalocationwherewaterflowingunderthehullisleastturbulent
•inalocationwherethetransducer’sbeamwillnotbeobstructed
orreflectedbythekeel,orpropellershafts.Thetransducerhas
a25ºconicalbeamwidth:
•awayfromanyeuipmentordevicesthatmaycause
interferencesuchashighvoltagecablesorothertransducers.
Important:
DoNO Tinstallthetransducer:
•closetoorinlinewithengineintakeordischargeports.
•overanyprotrusionssuchasribsandstrakes.
•onthecoredsectionofafiberglasshull.
Transducertubeorientation
Thetransducertubemustbeinstalledperpendiculartothekeel
(centerline)ofthevessel.Thetransducertubeincludesmarkings
whichshouldpointtowardsthekeel.
Note:
Incorrectpositioningcanaffecttransducerperformance.
1.Transducertube.
2.Keelarrows.
3.Vesselcenterline.
4.Hulldeadrise
5.Keel
Thetopofthetransducertubeshouldbelevel.Thisshouldbe
checkedusingaspiritlevel.
Productdimensions
A—6m(19.69ft)Cablelength
B—76mm(2.99in)Ø
C—58mm(2.28in)0°
—80mm(3.15in)12°
E—99mm(3.90in)20°
Toolsandequipment
Thefollowingtoolsandeuipmentarereuiredtoinstallyour
transducer.
Note:
Thelistoftoolsandeuipmentbelowarereuiredforthe
recommendedinstallationasdetailedinthisdocument.
1.Anglefinder
2.Saw(finetooth)
3.Plasticbag
4.Twistties
2CPT -SIn-hullTransducerInstallationsheet
5.Carpenter’
ssuare
6.Markerpen
7.Milddetergent
8.Sandpaper
9.Discsander(maybereuired)
10.Rubbingalcohol
11.File
12.Marine-gradeneutralcurepolyurethanesealant
13.Spiritlevel
14.Fiberglassresin
15.Marineantifreeze(Propyleneglycolbasednon-toxic)
Cuttingthetransducertube
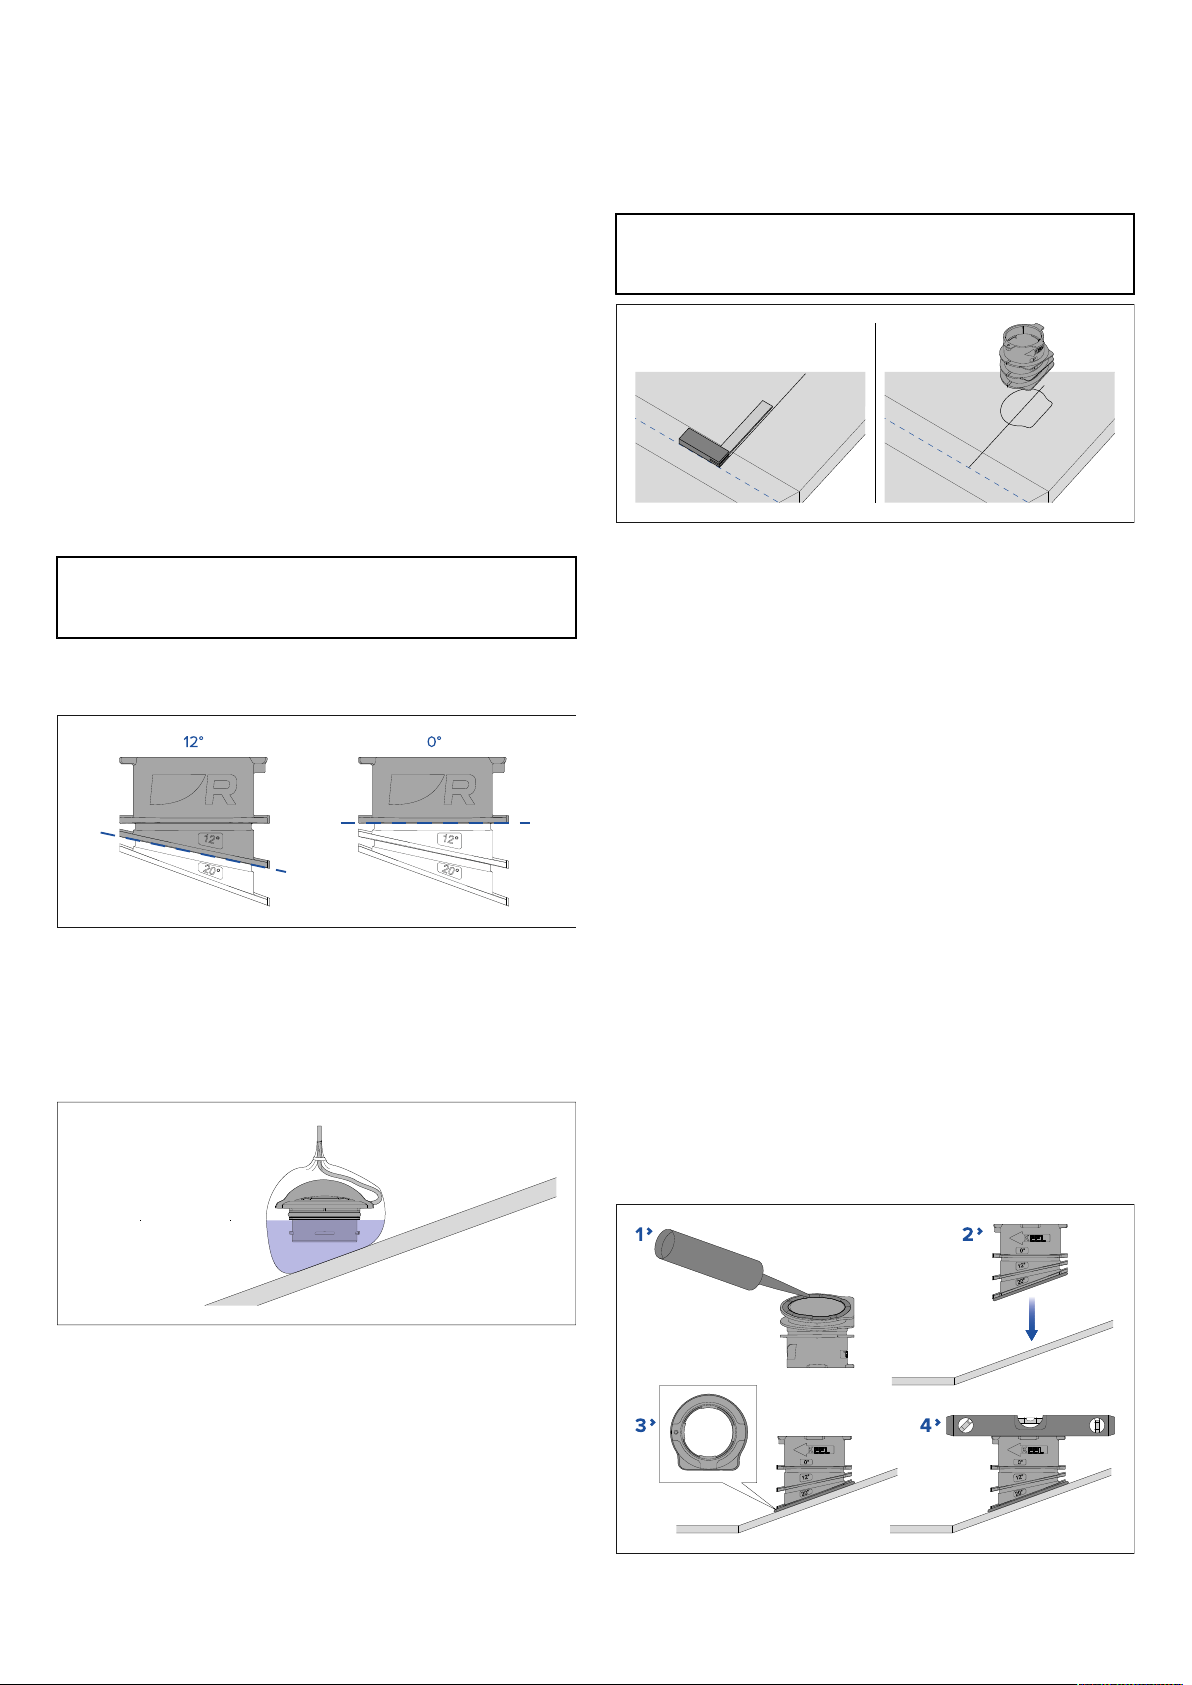
Forvesselswithaa0°or12°deadrise,thetransducertube
reuirescutting.Adigitalanglefindercanbeusedtoidentifythe
deadriseanglereuired.
Note:
Thetransducertubedoesnotreuirecuttingwheninstalling
ona20°deadrise .
1.Thecutmustbemadeasclosetothebottomoftherelevant
tubeflangeaspossible .Thedottedlinesillustratedbelow
showtherespectivecutlocations.
T estingthetransducer
Itisrecommendedthattransducerperformanceistestedpriorto
installation.Itisrecommendedthatforthetestthevesselistaken
outtothedeepestwatersitwillbeexpectedtooperatein.
1.Ensureyourdisplayhasthelatestversionofsoftware .
ChecktheRaymarinewebsiteforthelatestsoftwareforyour
products:www.raymarine.com/software
2.Decideonthebestlocationforyourtransducerbasedonthe
locationreuirementsprovided.
3.Placethetransducerinasealedplasticbagthatishalffullof
water .
4.Ensurethatthetransducerfaceiscompletelysubmergedin
thewater.
5.Connectthetransducertoyourdisplay/sonarmodule.
6.Holdthetransducerina0°positionwiththetransducer’skeel
arrowpointingtowardsthekeel.
7.Assesstheperformanceofthetransducerusingyourdisplay’s
Fishfinder/Sonarapplication.
8.Repositionandretestifnecessary.
Preparingthehullandtransducertube
Note:
Ensurethatthechosenlocationmeetsthelocationreuirements
fortheproduct:Locationrequirements
1.Cleantheareausingamilddetergenttoremoveanydirtor
grease.
2.Usingacarpenter’ssuareandmarkerpen,drawa
perpendicularlinefromthekeelthroughthecenterofthe
transducertube’sdesiredlocation.
3.Placethetransducertubeatthedesiredlocationensuringthe
keelarrowsonthetransducertubearealignedwiththeline
drawnonthehullandthatthetopofthetransducertubeis
level.
4.Holdthetransducertubeinplaceanddrawaroundthe
transducertubewithamarkerpen.
5.Sandanareaslightlylargerthanthemarkedareatoremove
anydebrisandenablegoodadhesion.
Forveryroughhulls,itmaybenecessarytouseadiscsander
tosmooththehullsurface.
6.Cleantheareawithrubbingalcoholandallowtodry.
7.Ifnecessary,redrawthelinesonthehull.
8.Ifthetransducertubehasbeencut,sandorfileanyburrsso
thatthebottomsurfaceofthetubeisflat.
9.Sandthebottomsurfaceofthetransducertubetoenable
goodadhesion.
10.Cleanthebottomsurfaceofthetubewithrubbingalcohol
andallowtodry.
Mountingthetransducertube
Followthestepsbelowtomountthetransducertube.
1.Applyacontinuousthickbeadofmarine-gradeneutral
curepolyurethanesealantaroundthebottomflangeofthe
transducertube.
CPT -SIn-hullTransducerInstallationsheet3
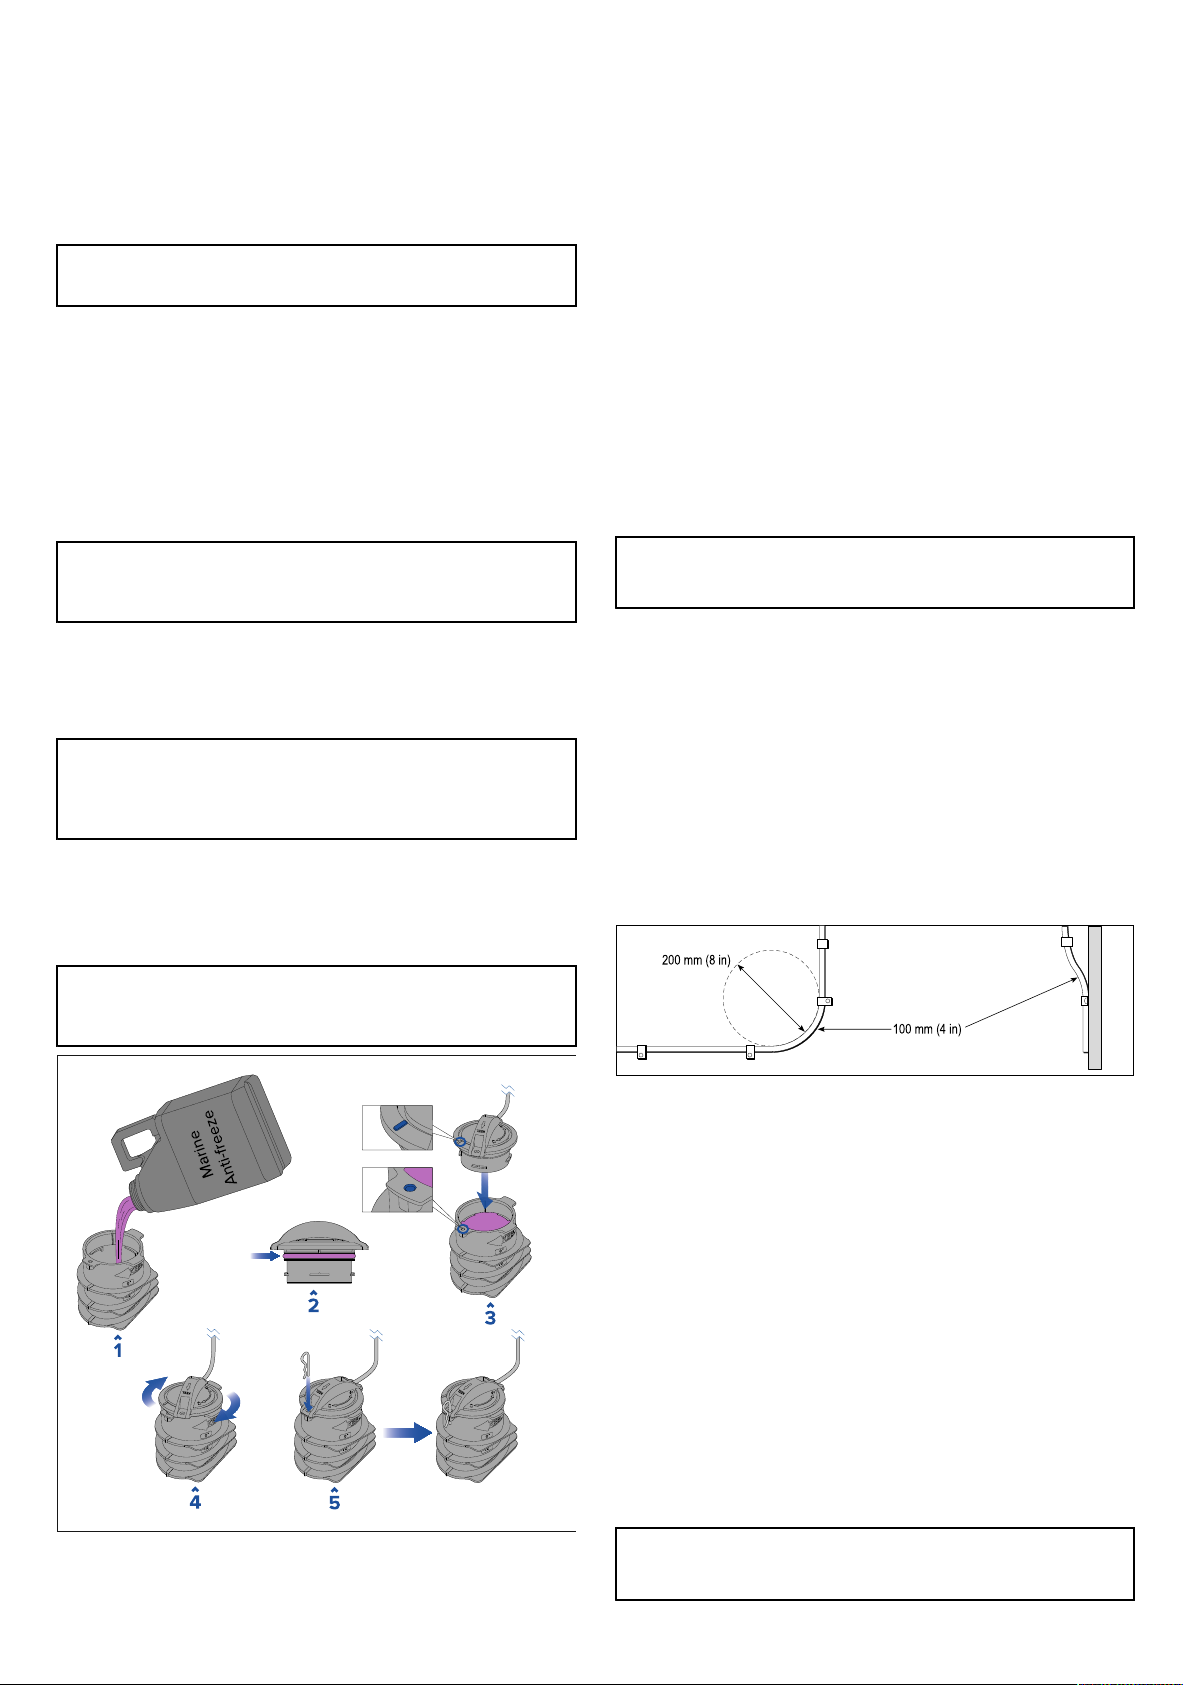
For20°deadriseinstallations,thebottomofthetransducer
tubehasarecessthatshouldalsobecompletelyfilledwith
marine-gradeneutralcurepolyurethanesealant.
2.Ensuringcorrectalignment,placethetransducertubein
positiononthepreparedsurface
.
3.Gentlyapplypressuretothetransducertubesothatthe
sealantprotrudesfromtheedgesofthetransducertube.
Important:
Applyingtoomuchpressuremayresultinanineffectiveseal.
4.Usingaspiritlevel,ensurethatthetopofthetransducertube
islevel;adjustifnecessary .
5.Smooththesealantaroundtheinsideandoutsideedgeofthe
transducertube.
6.Allowspecifiedcuringtimeforthemarine-gradesealant.
Curingtimewillbedependentonthesealantbeingused,but
caninsomecasesbe24to36hours.Ensureyoureadthe
sealantinstructionscarefully,andallowthefullcuringtime.
Note:
Forincreasedrigidityitisrecommendedthatfiberglassresinis
usedtostrengthenthetube-to-hullbond.
Coredfiberglasshullmounting
Thetransducerisintendedtobemountedinasolidnon-cored
sectionofthehull.
Important:
Ifyourvesselhulltypereuiresthetransducertobeinstalledin
acoredsectionofthehullthenthisshouldonlybecarriedout
byacompetentmarineinstaller .
Insertingthetransducer
Thetransducerisfittedandlock edintothetransducertube.
Important:
Ensurethatthesealanthascompletelycuredbeforeattempting
tofillthetransducertube .
1.FillthetransducertubetothefilllinewithaPropylene
glycol-basednon-to xicmarineanti-freeze.
2.Toaidtransducerinsertion,applyasmallamountofthemarine
anti-freezetothetransducer’sO-ring.
3.Alignthemarkonthetopofthetransducerwiththelocking
holeonthetransducertubeandslowlyinsertthetransducer
intothetransducertube.
Asmallamountofanti-freezemayspilloverthetopofthetube
whentheliuidisdisplacedbythetransducer.
4.Holdthetransducertubesecurelywithonehand,andusing
yourotherhandturnthetransducer45°intothelocked
position.
Becarefulwhenturningthetransducer;ensurethatthe
transducerisinsertedfullyandthatthetransducertubeisheld
securelyinplacetopreventthetransducertubefromtwisting
anddamagingtheseal.
5.InserttheR-clipintothelockingholes.
Cablerouting
Cableroutingreuirementsforthetransducercable.
Important:Toavoidinterference,thecablemustberouted
asfarawayfromVHFradioantennadevicesandcablesas
possible.
•Checkthatthecableislongenoughtoreachthedisplayitwill
beconnectedto.Optionalextensioncablesareavailable,if
reuired.
•Ensurethereisenoughslackinthetransducercable,atthe
transducerend,toallowthetransducertoinsertedandremoved
fromthetransducertube.
•Securethecableatregularintervalsusingthesuppliedcable
clips.
•Anyexcesscableshouldbecoiledupataconvenientlocation.
•DoNOTbendcablesexcessively.Whereverpossible,ensure
aminimumbenddiameterof200mm(8in)/minimumbend
radiusof100mm(4in).
Makingconnections
Followthestepsbelowtoconnectthecable(s)toyourproduct.
1.Ensurethatthevessel'spowersupplyisswitchedoff.
2.Ensurethatthedevicebeingconnectedtotheunithas
beeninstalledinaccordancewiththeinstallationinstructions
suppliedwiththatdevice.
3.Ensuringcorrectorientation,pushthecableconnectorfully
ontothecorrespondingconnectorontheunit.
4.Turnthelockingcollarclockwisetosecurethecable.
Conformancespecification
Thisproducthasbeentestedtomeetorexceedthefollowing
Standards:
BSENISO8846:2017(supersedesBSEN28846:1993)
Note:ForalistofadditionalapplicableStandards,referto
themanualapplicabletotheconnectedsonarmoduleor
multifunctiondisplay.
4CPT -SIn-hullTransducerInstallationsheet
Altri manuali FLIR Trasduttore

Manuali Trasduttore popolari di altre marche


Mianyang Weibo Electronic
Mianyang Weibo Electronic WB Series Manuale utente

ProMinent
ProMinent Dulcometer DMT Manuale utente

MKS
MKS MicroPirani 925 Series Come usare

WIKA
WIKA WU-20 Manuale utente

Alcatel Vacuum Technology
Alcatel Vacuum Technology BARATRON 622A Manuale utente

Camille Bauer
Camille Bauer SIRAX CH-5610 Manuale utente


