Fondis WINEMASTER SP 100 Manuale utente

WINEMASTER
SP 100
Mode d’emploi
Gebrauchsanweisung
Instruction for use

2
CONTENTS
1CHARACTERISTICS .......................................................................................................... 4
1.1 DIMENSIONS :........................................................................................................................ 4
2LAYOUT OF PREMISES.................................................................................................... 5
2.1 INDOOR UNIT......................................................................................................................... 5
2.2 OUTSIDE UNIT ....................................................................................................................... 5
2.3 THE CELLAR .......................................................................................................................... 5
2.3.1 INSULATION............................................................................................................................ 5
2.3.2 CHOICE OF INSULATION ......................................................................................................... 6
2.3.3 WALL AND CEILING INSULATION ............................................................................................. 6
2.3.4 FLOOR INSULATION ................................................................................................................ 6
2.3.5 THE DOOR .............................................................................................................................. 7
2.3.6 INSULATION OF OTHER ITEMS................................................................................................. 7
3INSTALLING THE OUTSIDE UNIT ................................................................................. 7
Make sure you have chosen the best place for fitting the outside unit : ....................................... 7
3.1 DRILLING THE WALL .......................................................................................................... 7
3.2 FLEXIBLE DISMOUNTING.................................................................................................. 7
3.2.1 THE COVER............................................................................................................................. 7
3.2.2 THE FIXING BRACKETS............................................................................................................ 8
3.2.3 THE REFRIGERANT CONNECTIONS .......................................................................................... 8
3.2.4 ELECTRICAL CONNECTOR....................................................................................................... 9
3.3 INSTALLATION OF THE OUTSIDE UNIT .......................................................................... 9
3.3.1 INSTALLATION OF THE WALL MOUNTING BRACKETS ............................................................... 9
3.3.2 ATTACHING THE OUTSIDE UNIT .............................................................................................. 9
4INSTALLATION OF THE INSIDE UNIT ........................................................................ 11
4.1 RE-CONNECTION OF THE FLEXIBLE ............................................................................. 11
4.2 INSTALLING THE CONDENSING WATER FLUE........................................................... 11
5USING THE WINEMASTER SP100................................................................................. 12
5.1 CONNECTING THE AIR-CONDITIONER ......................................................................... 12
5.2 CONTROL PANEL................................................................................................................ 12
AUTOMATIC DEFROST.................................................................................................................. 12
6SERVICING THE WINEMASTER AIR-CONDITIONER .............................................. 12
6.1 CHANGING THE FILTER.................................................................................................... 13
7WARRANTY...................................................................................................................... 14
7.1 YEARS CONTRACTUAL WARRANTY............................................................................. 14
7.2 TERMS OF APPLICATION OF THE GUARANTEE.......................................................... 14
7.3 EXCLUSIONS AND LIMITS OF GUARANTEE ................................................................ 14

3
In former times, good french cellars were built to maintain a temperature not exceeding
14 to 16°C in all seasons.
Today, this is rarely the case.
Nevertheless, a cellar worthy of the name must be protected against wide variations in
temperature, be as damp as necessary and ventilated, dark and free of vibration.
This is why, for more than fifteen years, we have used the expertise of specialists and
enthusiastic amateurs to design, develop, test and produce thousands of air-conditioners
destined to help in the storage and ageing of wine.
If you follow our advice and respect our recommendations Winemaster will provide the
optimal ageing conditions for your treasured wine collection.
You have to read the installation and operating guide for your FONDIS WINEMASTER cellar
air-conditioner.
Contact us if you have any questions :
So....even if there ay be long years to wait before the wine reaches perfection, the great
day will come when you face the delicate job of uncorking.
Hold the bottle carefully – do not remove the capsule on a level with the mouth – use a
good quality tool or lever – remove the cork without shaking the bottle and examine the “
mirror “..
But that’s another story......
SERVICE CLIENTS FONDIS
Phone 33 3 89 37 75 15/Fax 33 3 89 37 75 89
ATTENTION : Wait for 24 hours before switching on the air-conditioner.
FROM VINEYARD TO WINE

4
1 CHARACTERISTICS
Setting the temperature Preset to 12°C, adjustable between 12 and 25°C*
Maximum outdoor temperature 35°C**
Cooling power 2500W at 12°C**
Heating power 1000W
Electricity supply 230-240V 50Hz with earth connection ( supplied
with 3m cable )
Electrical power 1250W
Gas R407C without CFC
Refrigerant gas 1000g
Length of refrigerant flexible
connection 5m
The circuit breaker must be at least 16 Amps.
* The insulation quality and thickness has to be in accordance with the volume of the cellar and the set
temperature.
** The cooling performance is dependant from the outside temperature. Therefore, the set temperature of 12°C
for the cellar cannot be maintained if the outside temperature of the cellar is maintained at 35°C.
If the thermal safety functions to often, there is a risk for the condensator and starter to be damaged.
In all the cases, it must be avoided that the outside temperature remains at 35°C, this high
temperature should be limited to the summer period.
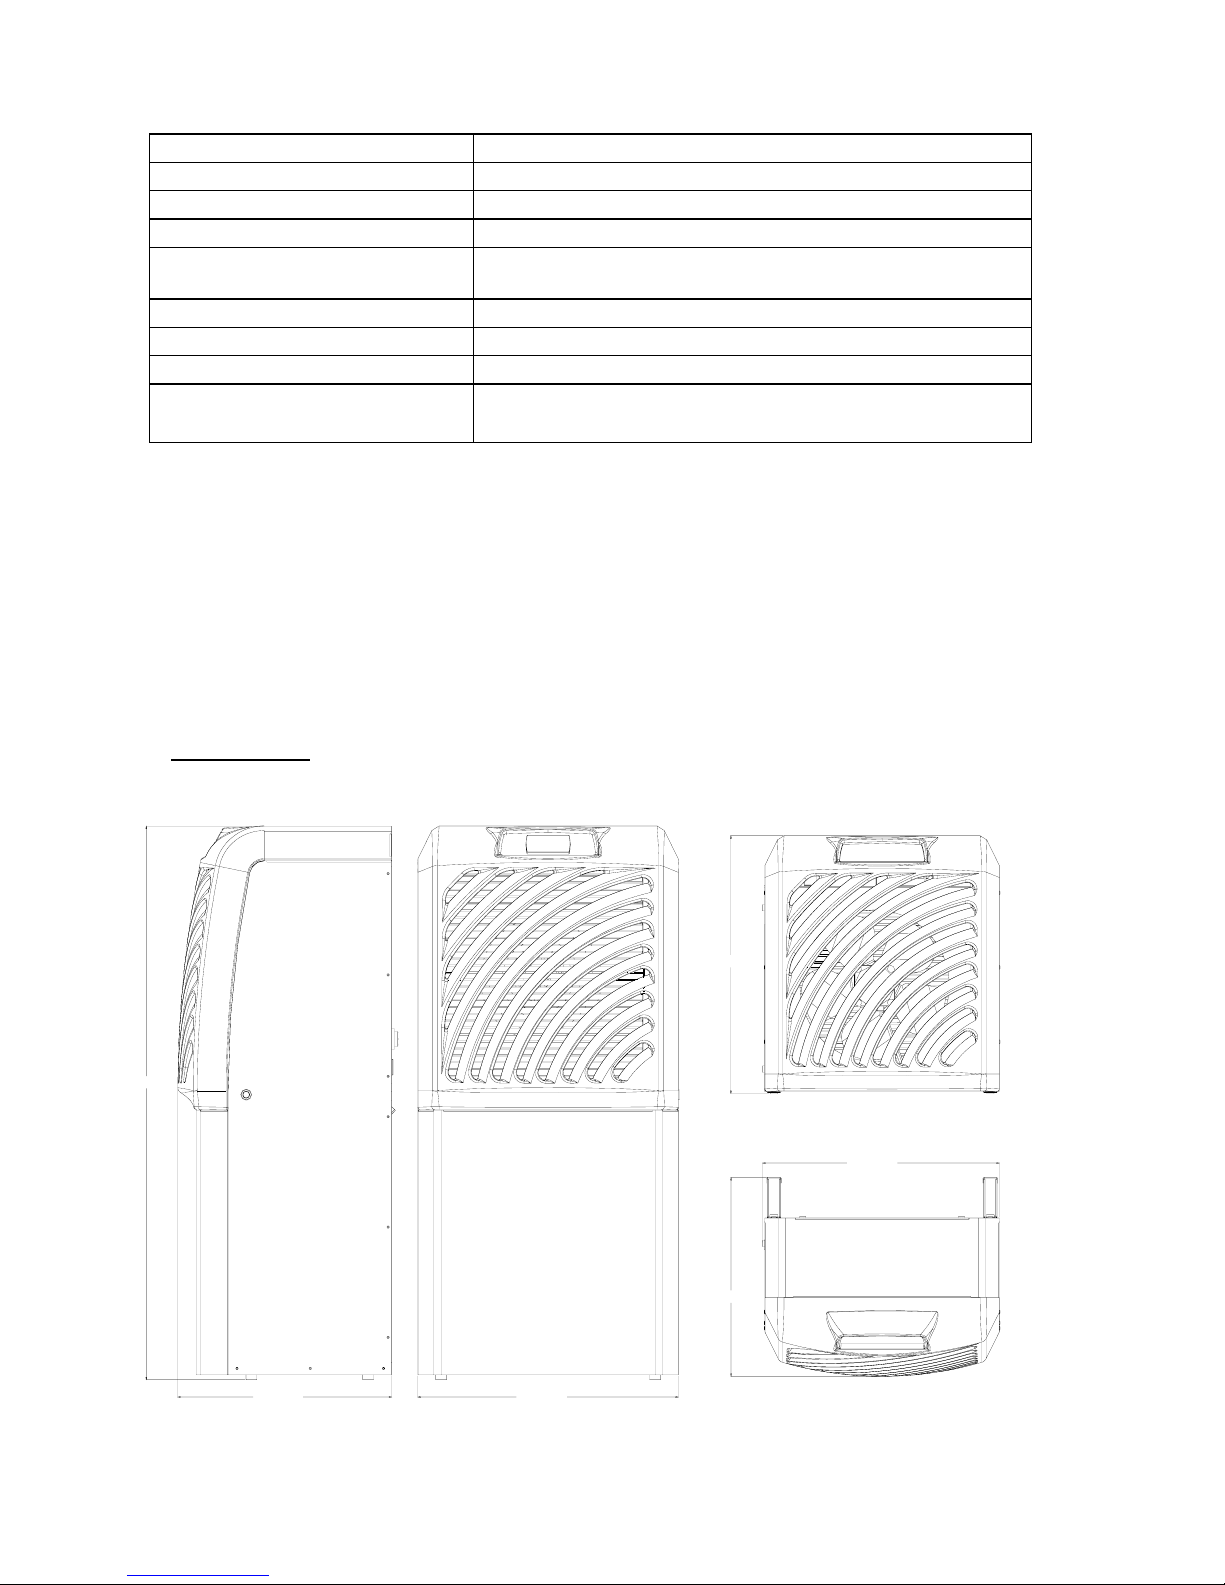
1.1 DIMENSIONS :
360mm
435mm
465mm
480mm395mm
1005mm

5
2 LAYOUT OF PREMISES
The air-conditioner is composed by two separate units which are connected by an electric and refrigerant flexible
cable of 5 mts. The distance between the two units cannot be more than 5 mts.
2.1 INDOOR UNIT
The indoor unit is entirely installad inside the cellar directly on the floor or fixed on the wall with adapted special
brackets.
2.2 OUTSIDE UNIT
The outside unit must be fixed on an outside wall in an area free from obstruction which may cause irregular air
distribution and/or return in front and back of the unit.
2.3 THE CELLAR
2.3.1 INSULATION
Insulation of the 4 walls, the door, the ceiling and the floor is essential for the Winemaster to work properly.
Adequate insulation helps to obtain the stability of the temperature and the humidity.
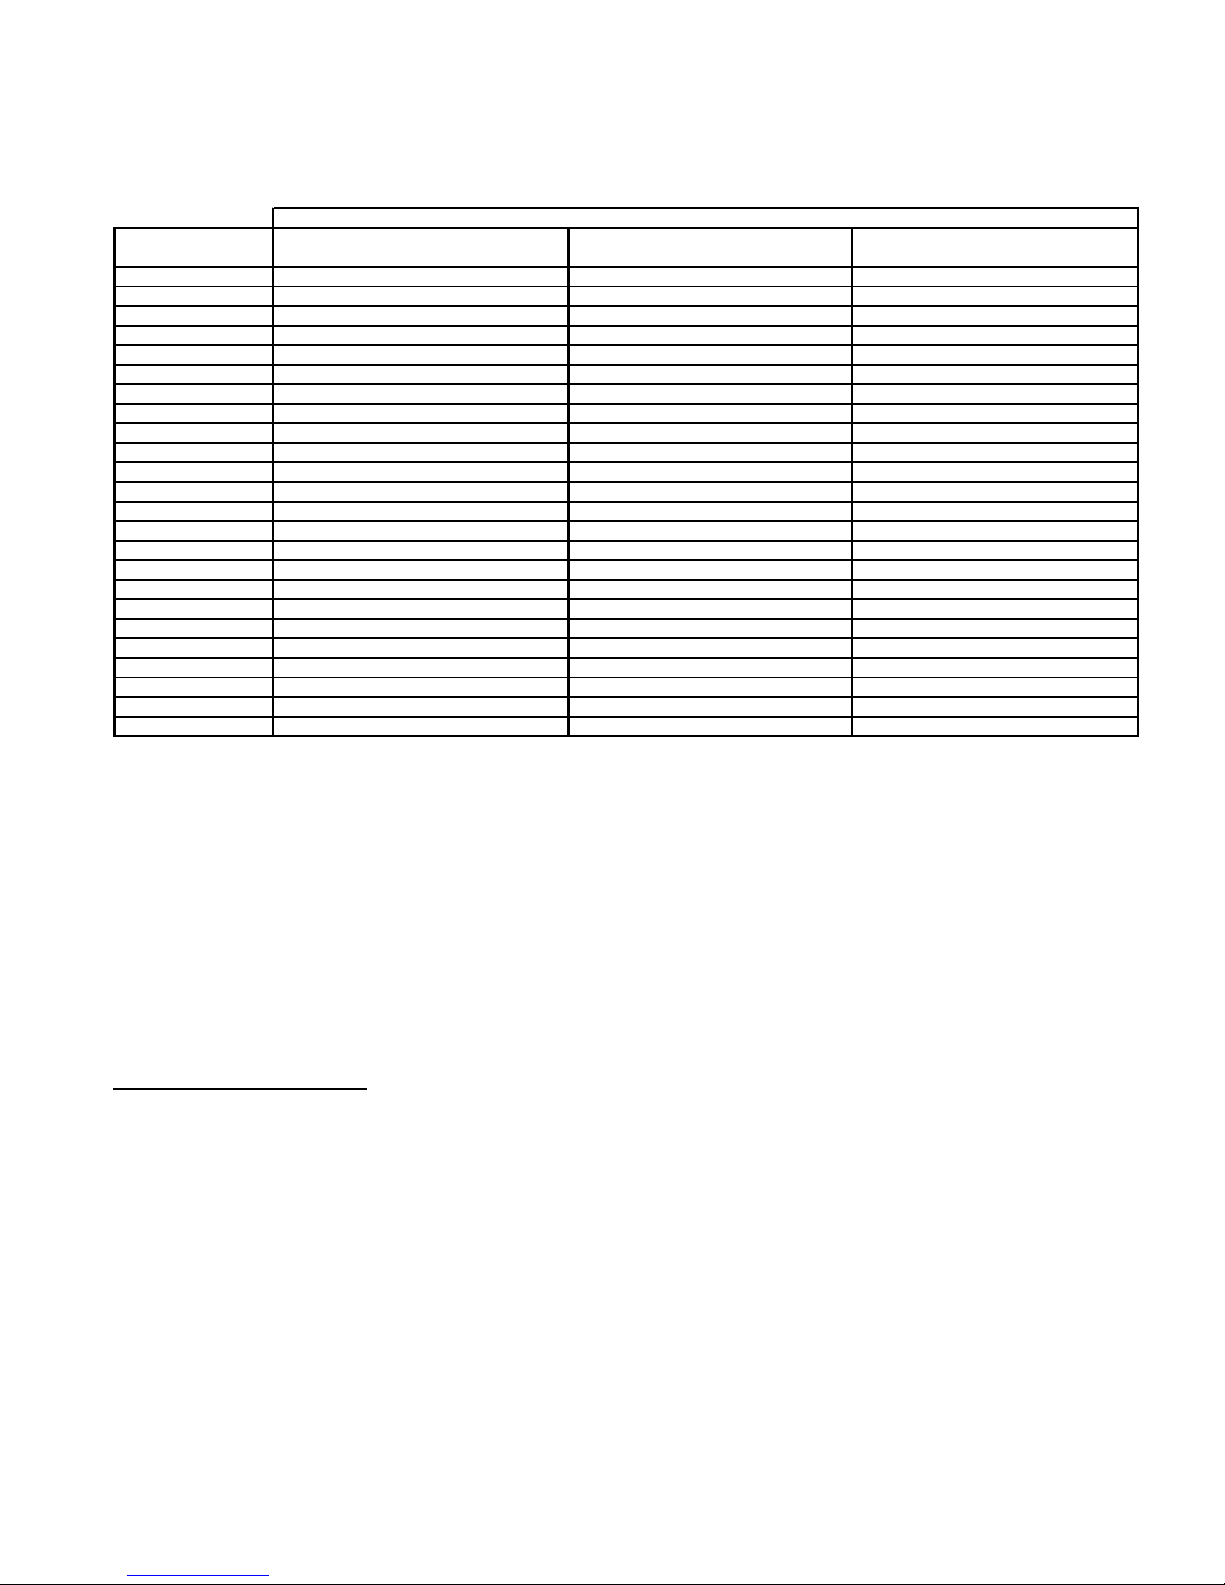
The board on the next page ( choice of insulation ) can be used to determine the type and the thickness of
insulation needed according to the internal volume of the cellar and a cellar temperature of 12°C.
Insulation continuity :
Insulation components must be assembled preferably by interlocking panels or glueing the panels together, to
ensure perfect continuity of insulation.
This is very important : it prevents heat and humidity entering from the outside which would counter the effects
of regulation.
IMPORTANT
The validity of the WINEMASTER guarantee depends on the values in the "Choice of insulation"
table being strictly respected, for all the cellar walls, including floor and ceiling + door, as well as
perfect continuity of insulation and installation in accordance to the user guide.

6
2.3.2 CHOICE OF INSULATION
CELLAR
VOLUME (m3)
EXPANDED POLYSTYRENE
λ=0,044 W /m °C
EXTRUDED POLYSTYRENE
λ=0,030 W /m °C
POLYURETHANE
FOAM λ= 0 ,0 2 5 W /m °C
14 60 40 30
16 60 40 40
18 70 50 40
20 70 50 40
22 70 50 40
24 80 60 50
26 80 60 50
28 90 60 50
30 90 60 50
32 100 70 60
34 100 70 60
36 100 70 60
38 110 80 60
40 110 80 70
42 120 80 70
44 120 80 70
46 120 90 70
48 130 90 70
50 130 90 80
60 150 100 90
70 170 120 100
80 190 130 110
90 200 140 120
100 220 150 130
MINIMUM THICKNESS OF INSULATION (mm)for 12°C cellar temperature
2.3.3 WALL AND CEILING INSULATION
The manufacturers propose their insulation panels in several forms :
- insulation alone
- "complexes" : the insulation is lined with a facing ( plaster, mineral ….)
- “ sandwiches “ : the insulation is lined on each side with a wooden or plaster panel
The panel facing is important : it protects the insulation from shocks and guarantees long life.
Do not use mineral fibre insulation ( glasswool, stonewool…) because it stores humidity and loose its
insulation capacity.
Protection against rodents
Some insulating materials are damaged by rodents ( mice, rats…). It is therefore essential to make sure that
the walls of the cellar do not contain holes whichf would allow rodents access to the insulation.
This insulation must be lined, on the inner surface of the cellar, with a protective facing.
Polyurethane insulation, because of its chemical composition, is not attacked by rodents.
2.3.4 FLOOR INSULATION
The cellar floor must be able to support shelves and the wine stored on them.
You should therefore choose an insulating material with adequate compression resistance for this part.
Manufacturers recommend appropriate insulation or materials designed specifically for floor insulation, in their
documentation.
Puncture resistance ( feet of shelves in particular ) is provided :
- in using "complex" insulation panels lined, on the upper surface, with a strong panel .
- by facing the insulation with a panel of chipboard ( approx. 15 mm thick), or any other suitable covering
plaster and slab, for example

7
2.3.5 THE DOOR
It is part of the continuity of insulation.
There are two possible solutions :
- to insulate the existing door using the same type as insulation as was used for the cellar walls. Insert a
seal such a foam, between the door panel and the frame all around the edge.
- Use a FONDIS isothermal door, lined with polyurethane foam. It includes a seal around its periphery,
with a magnetic closure..
2.3.6 INSULATION OF OTHER ITEMS
A fridge or another appliance producing heat must not be placed inside the cellar. For example, any hot water
pipe going through the cellar must also be insulated.
3 INSTALLING THE OUTSIDE UNIT
Make sure you have chosen the best place for fitting the outside unit :
- Chose the best place in order that the length of the flexible connection will be shorter as
possible.
- There should not be any obstacle in front of the ventilation grid and the back of the unit, to
facilitate air flow
- The wall structure should be strong enough to carry the unit weight and avoid deformations
rupture, or vibration during operation
3.1 DRILLING THE WALL
Drill one hole of diametre 70mm to allow the connection of the flexible refrigerant tube to the unit.
3.2 FLEXIBLE DISMOUNTING
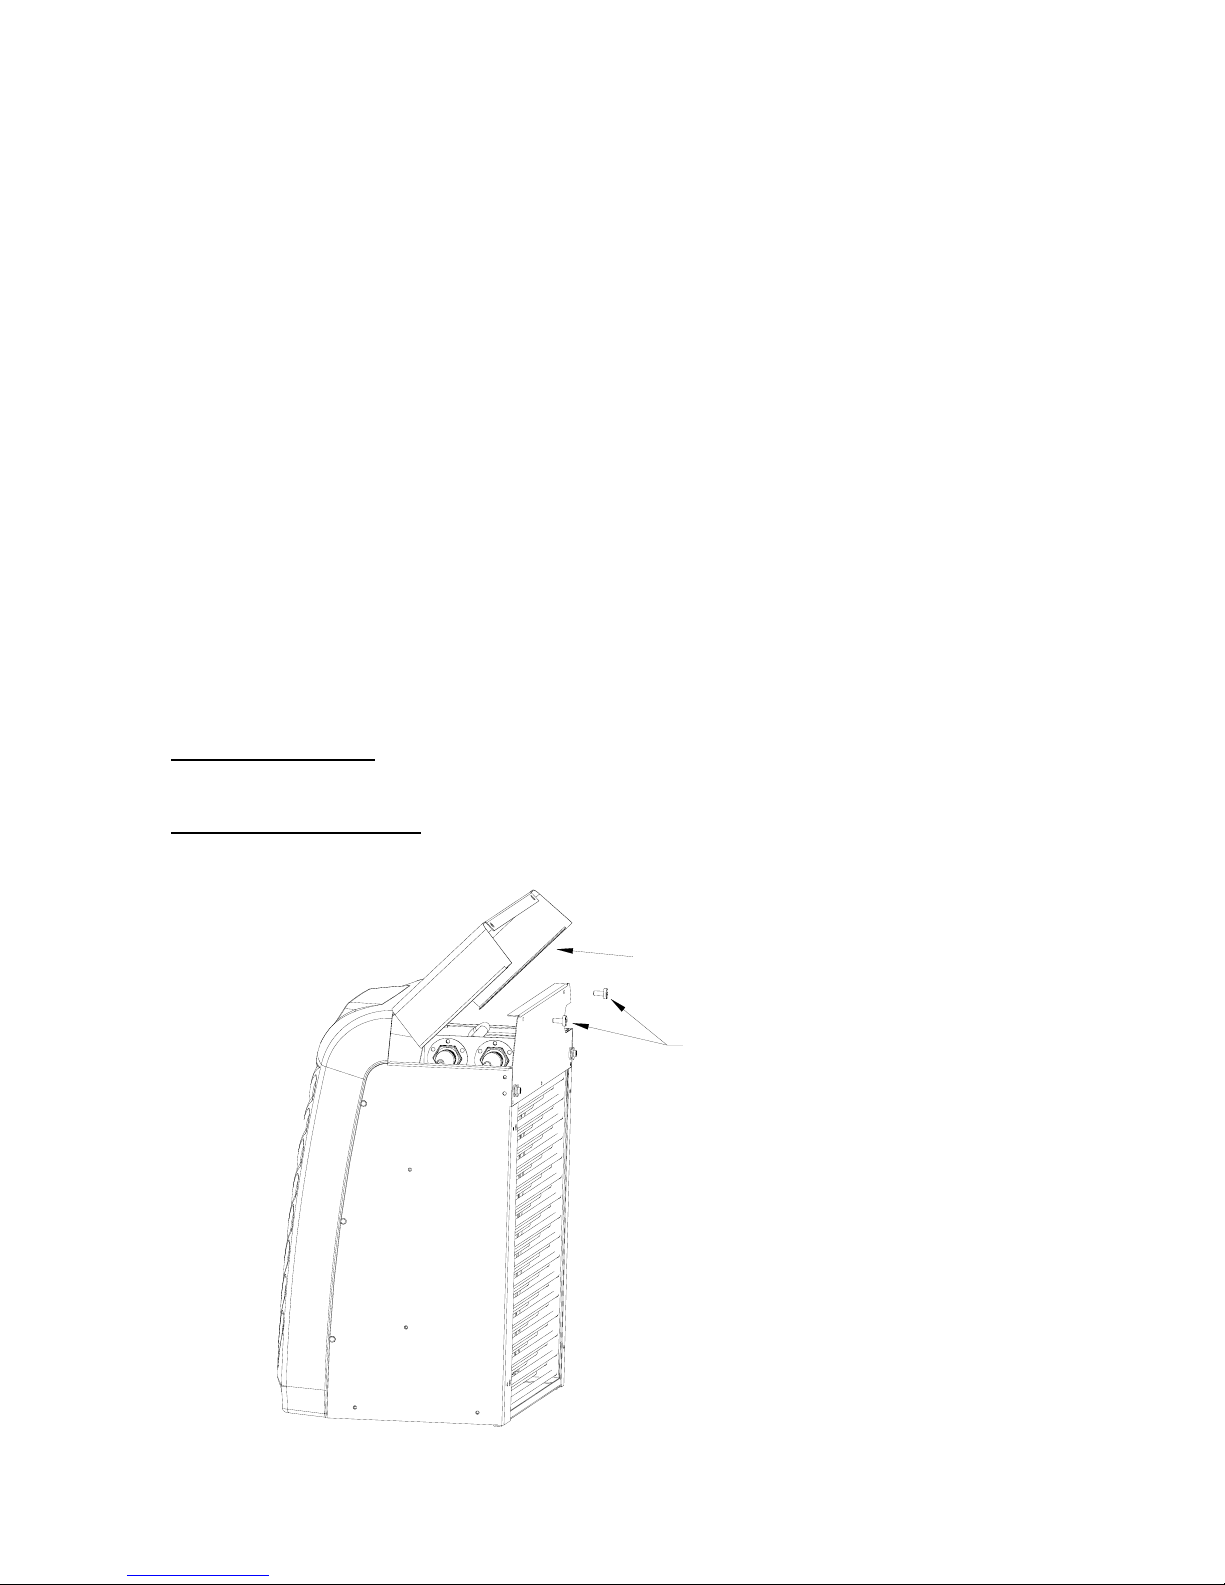
3.2.1 THE COVER
2
1
• Unscrew the two black platic screws 1.
• Open the cover like shown on the picture 2.

8
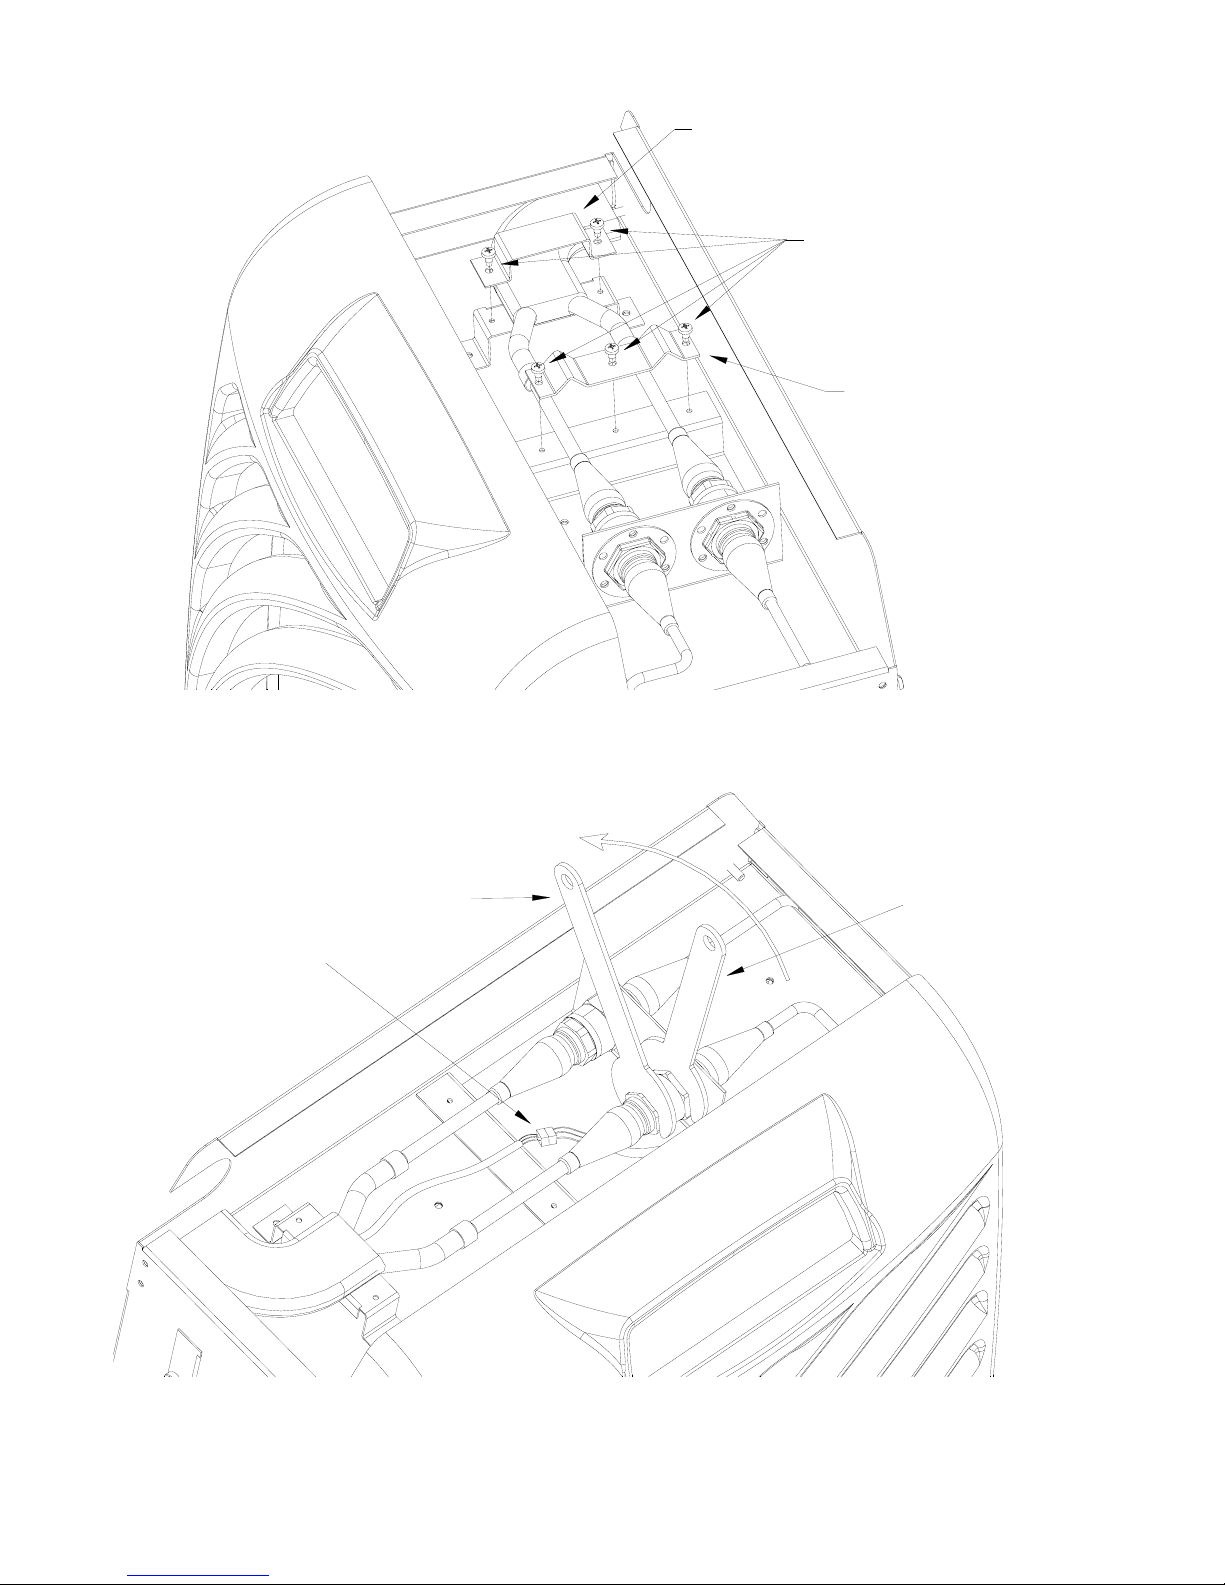
3.2.2 THE FIXING BRACKETS
1
3
2
- Unscrew the 5 screws 1 with a screwdriver PZ2 for unmounting the brackets 2et 3.
3.2.3 THE REFRIGERANT CONNECTIONS
2
1
3
- Two wrenches 1& 2are supplied with the unit.
- Maintain the connection with the wrenche 1and unscre with the wrenche 2.

9
Attention : don’t stop unscrewing while gas leaks until the 2 elements are separated.The gas leak will
stop then ! Before and during remounting operations, protect the end of the flexible connection in order
to avoid dust goes out.
3.2.4 ELECTRICAL CONNECTOR
The ventilator of the outside unit is connected by an electric cable.
Disconnect the connector 3.
3.3 INSTALLATION OF THE OUTSIDE UNIT
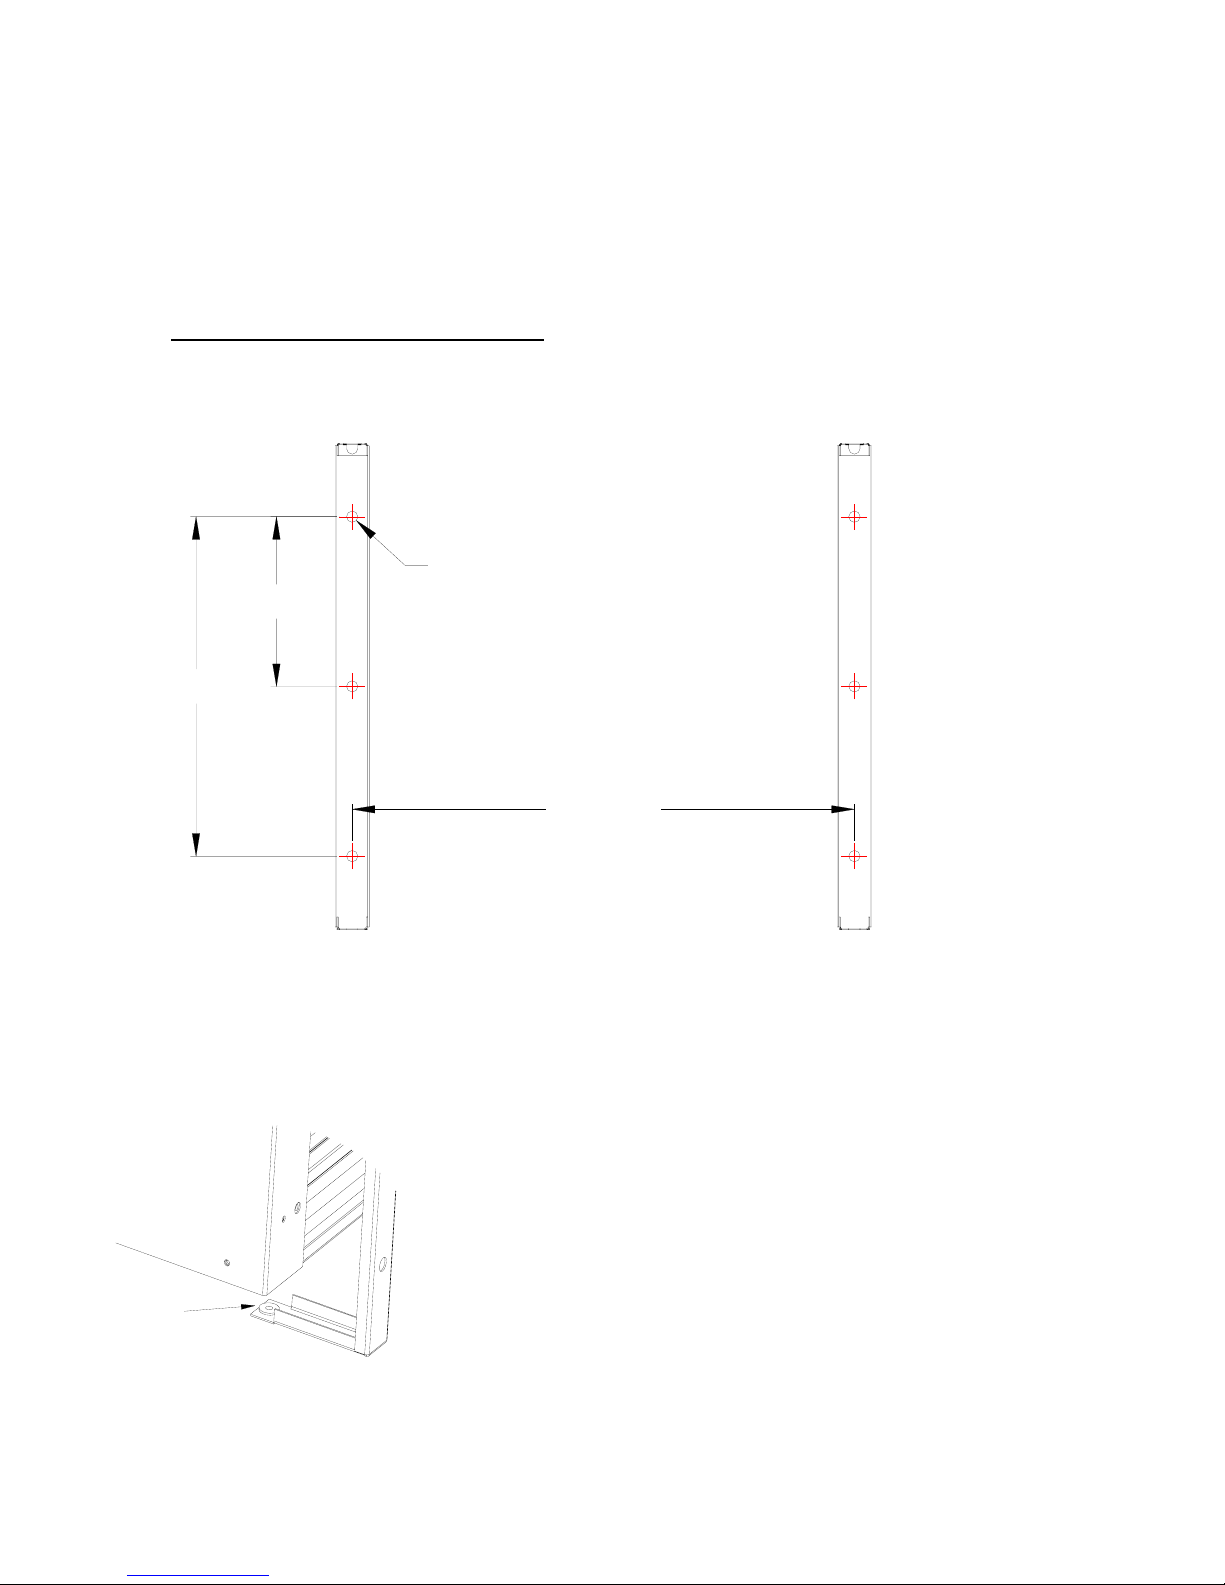
3.3.1 INSTALLATION OF THE WALL MOUNTING BRACKETS
443mm
300mm
150mm
Ø10mm
3.3.2 ATTACHING THE OUTSIDE UNIT
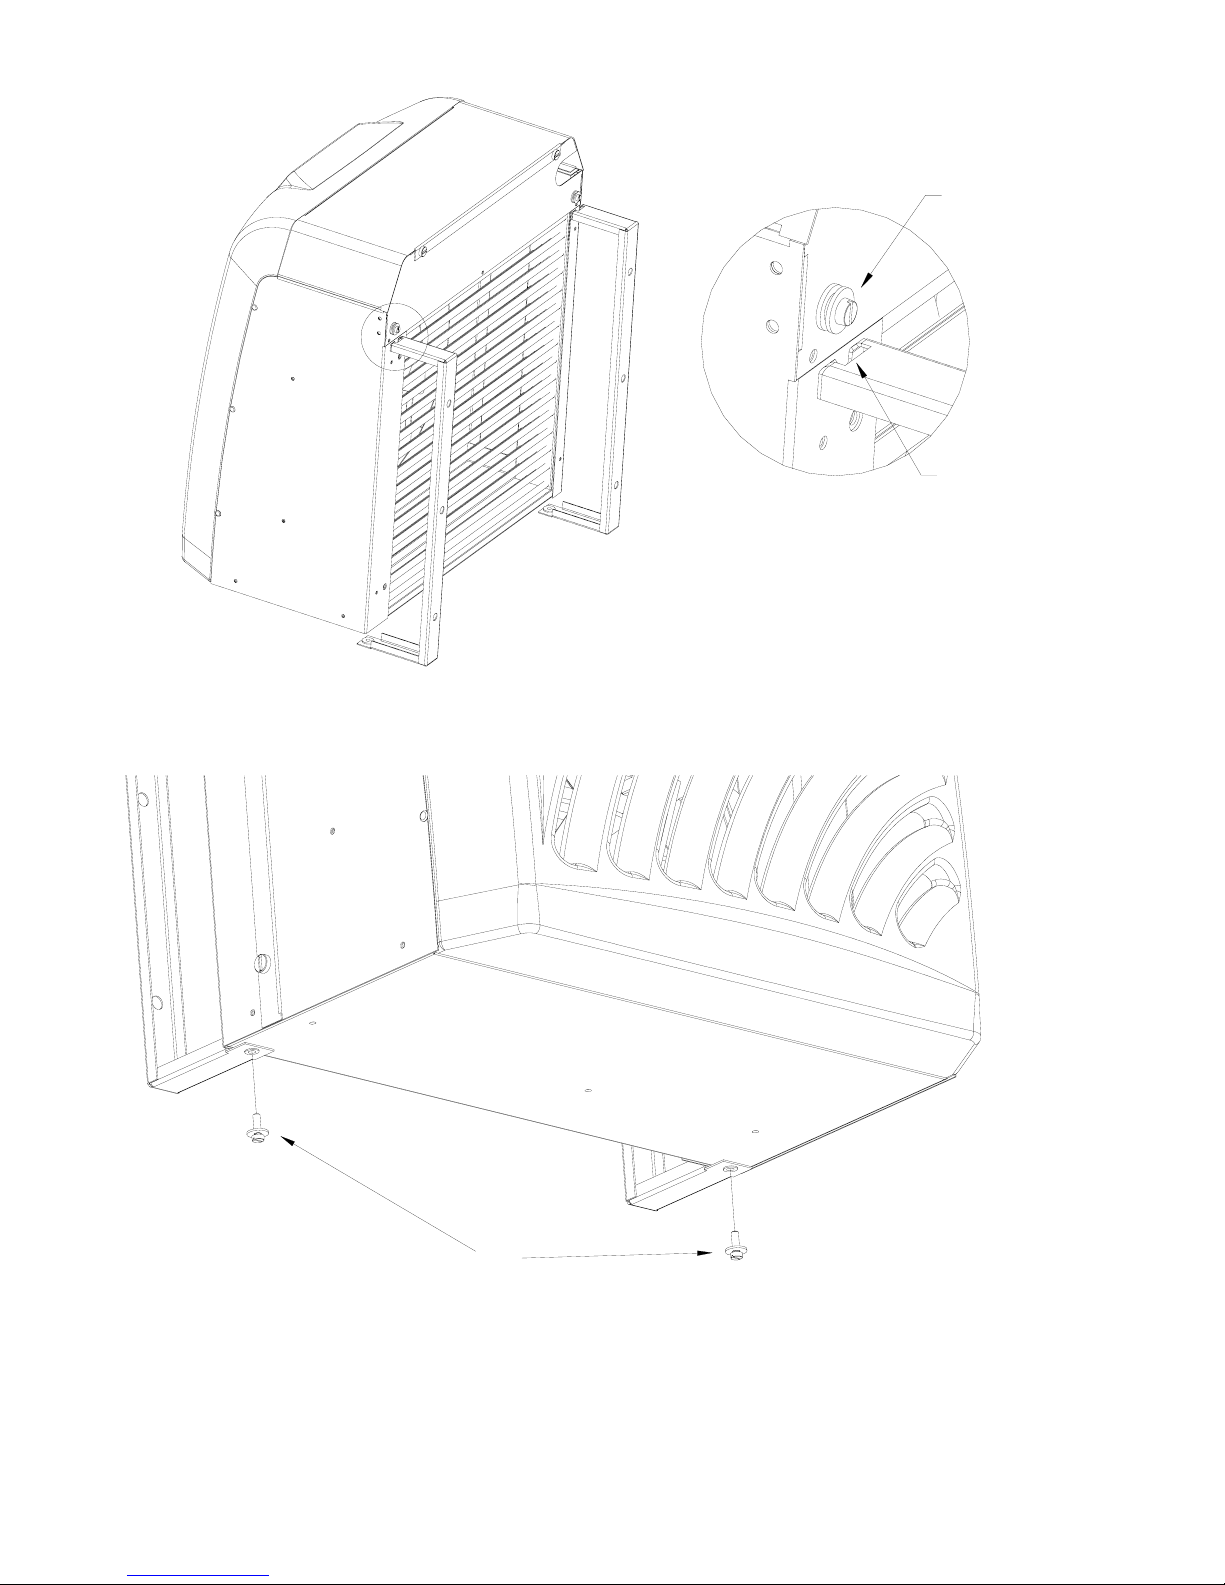
Before attaching the outside unit, position two nylon washers 1 in the brackets holes.
1

10
1
2
• Position the outside unit so that the screws and washers 1are engaged in the slot 2
1
• To finish, screw the kit screws and washer 1 under the unit.
Indice
Altri manuali Fondis Condizionatore d'aria