Forma Scientific 3980 Manuale utente

Forma Scientific, Inc.
P.O. Box 649
Marietta, Ohio 45750
U.S.A.
Telephone: (740) 373-4763
Telefax: (740) 373-4189
________________________________________
Model:
3980/3986
Reach-In Incubator
29 cu. ft. capacity
Manual No. 7023980 Rev. 0
Read this Instruction Manual
Failure to read, understand and follow the instructions in this manual may result in
damage to the unit, injury to operating personnel and poor equipment performance.
Caution: All internal adjustments and maintenance must be performed by
qualified service personnel.
Forma Scientific, Inc.
ii
NOTE:
The material in this manual is for information purposes only. The contents and the
product it describes are subject to change without notice. Forma Scientific, Inc. makes no
representations or warranties with respect to this manual. In no event shall Forma
Scientific, Inc. be held liable for any damages, direct or incidental, arising out of or
related to the use of this manual.
MANUAL NO. 7023980
- SI-5967 10/11/96 Added remote alarm warning heg
- IN-2155 10/11/96 Increased door heater wattage heg
- IN-2143 9/23/96 Corrected wire colors and grounding heg
0 IN-2111 7/24/96 Product release (5) add Watlow 982 control
REV ECN DATE DESCRIPTION

Forma Scientific, Inc.
iii
Table of Contents
Section 1 - Receiving
1.1 Preliminary Inspection ..................................................................................1-1
1.2 Visible Loss or Damage................................................................................1-1
1.3 Responsibility for Shipping Damage ............................................................1-1
Section 2 - Installation
2.1 Location ........................................................................................................2-1
2.2 Connecting the Water (Humidity) System....................................................2-1
2.3 Attaching the Drain Lines .............................................................................2-2
2.4 Connecting the CO2Source..........................................................................2-2
2.5 RS-232 Interface and Remote Alarm Connection ........................................2-4
2.6 Power Connection.........................................................................................2-5
2.7 Start-Up.........................................................................................................2-5
2.8 Setting the Overtemperature Safety Thermostat ...........................................2-5
2.9 Setting the Undertemperature Safety Thermostat .........................................2-6
2.10 Setting the Undertemperature Safety Thermostat .......................................2-6
2.11 Preparing the (optional) Cobex Recorder .................................................2-7
a. Changing the Chart Paper ......................................................................2-8
b. Changing the Pen ...................................................................................2-8
c. Calibrating the Chart Recorder ..............................................................2-8
2.12 Controller Configuration.............................................................................2-6
Temperature Configuration.........................................................................2-7
Humidity Configuration..............................................................................2-8
Section 3 - Control Panel Operation
3.1 Main Power Switch and Indicator Light .......................................................3-1
3.2 Refrigeration Switch and Indicator Light......................................................3-1
3.3 Defrost Switch and Indicator Light...............................................................3-1
3.4 Overtemp Safety Control, Indicator Light and Audible Alarm.....................3-2
3.5 Undertemp Safety Control, Indicator Light and Audible Alarm...................3-3

Forma Scientific, Inc.
iv
3.6 Temperature/Humidity Controllers...............................................................3-4
3.7 Audible Humidity Alarm and Indicator ........................................................3-5
3.8 Dehumidify Switch and Indicator Light........................................................3-5
3.9 Humidify Switch and Indicator Light ...........................................................3-6

Forma Scientific, Inc.
v
3.10 Setting the CO2Flowmeter ........................................................................3-6
3.11 CO2Sample Port .........................................................................................3-6
3.12 Purge Level Dial ..........................................................................................3-6
3.13 Purge Button ................................................................................................3-7
3.14 Purge Indicating Light..................................................................................3-7
3.15 Air Pressure Gauge ......................................................................................3-7
3.16 Recorder (Optional) .....................................................................................3-7
Section 4 - Maintenance
4.1 Cleaning the Incubator ................................................................................4-1
4.2 Cleaning the Humidity Generator and Immersion Heaters ..........................4-1
Section 5 - Service
5.1 Access to Electrical Components..................................................................5-1
5.2 Replacing the Overtemp and Undertemp Probe and Thermostat..................5-1
5.3 Replacing the Humidity/Temperature Sensor...............................................5-2
5.4 Replacing the Optional Recorder and Probe(s).............................................5-3
5.5 Removing the Top Section............................................................................5-4
5.6 Setting the Door Heater Control ...................................................................5-6
5.7 Replacing the Air Pump(s) ...........................................................................5-6
Section 6 - Specifications
Section 7 - Parts Lists
Section 8 - Electrical Schematics
Section 9 - Supplements and Warranty Information

Forma Scientific, Inc.
1-1
Section 1 - Receiving
1.1 Preliminary Inspection
This item was thoroughly inspected and carefully packed prior to shipment and all
necessary precautions were taken to ensure safe arrival. Immediately upon receipt, before the
unit is moved from the receiving area, carefully examine the shipment for loss or damage.
Unpack the shipment and inspect both interior and exterior for any in-transit damage.
1.2 Visible Loss or Damage
If any loss or damage is discovered, note any discrepancies on the delivery receipt and
call the delivering carrier and request that their representative perform an inspection. Do not
discard any of the packing material and do not move the shipment from the receiving area.
1.3 Responsibility for Shipping Damage
For products shipped F.O.B. Marietta, Ohio, the responsibility of Forma Scientific, Inc.
ends when the merchandise is loaded onto the carrier's vehicle.
On F.O.B. Destination shipments, Forma Scientific's and the carrier's responsibility ends
when your Receiving Department personnel sign a free and clear delivery receipt.
Whenever possible, Forma Scientific, Inc. will assist in settling claims for loss or in-
transit damage.

Forma Scientific, Inc.
______________________________________________________________________________
2-1
Section 2 - Installation and Start-Up
2.1 Location
Locate the unit on a firm, level surface in an area of minimum ambient temperature
fluctuation. A minimum of 12 inches clearance is required at the top of the incubator
and a minimum of three inches clearance is required at the rear of the incubator to
facilitate adequate air flow around the refrigeration system.
2.2 Removing the Shipping Tape
Adhesive shipping tape is applied to the screws securing the perforated duct sheet to
the rear side wall of the chamber. Remove this tape when preparing the incubator for
operation.
2.3 Connecting the Water (Humidity) System
Do not attempt to operate the humidity system without filling
it with water. The humidification heater will overheat, and
the overtemp safety thermostat will shut the humidification
system down.
The humidity reservoir will require approximately one quart (.946 liter) of water on the
initial filling. To ensure continuous satisfactory operation of the incubator, only distilled
water should be used in the humidity system. Purity of the distilled water used in the
incubator humidifier reservoir must be within the 50K Ohm to 1 Meg Ohm range to protect,
and prolong the life of the stainless steel unit.
Important
Use of tap water, or distilled water outside the specified range,
will decrease the operating life of the unit and will void the warranty.
The water inlet is the 1/8" NPT connection located on the rear top left corner of the
incubator. Water inlet pressure at the unit should be from 15 to 40 PSI. A manual shut-off
valve should be installed between the main water supply and the incubator.

Forma Scientific, Inc.
______________________________________________________________________________
2-2
To prevent mineral buildup on heater coils and
humidity generator walls, it may be necessary to clean the
humidity generator and immersion heaters with a non-
metallic abrasive pad and flush thoroughly every two or three
months. Refer to Section 4.2, Cleaning the Humidity
Generator and Immersion Heaters.
2.4 Attaching the Drain Lines
Note: For location of drain line connection, refer to Figure 2-2 on the following page.
The Condensate Drain is located at the rear of the cabinet on the lower left side (labeled
DRAIN). A 3/8" MPT connection is required. The Door Condensate Drain (flexible tubing
connected to the door condensate eliminator) should be fed into the hole in the rear of the
chamber floor panel to return the condensate to the humidification reservoir.
The Chamber Drain (overflow from the humidification reservoir) is located on the rear
of the cabinet in the lower center area. This drain must be trapped to prevent CO2drainage
from the chamber. A copper p-trap (Figure 2-1 and Item A of Figure 2-2) is provided with
the Model 3980 and must be installed. Attach vinyl tubing to the p-trap and route it to an
open drain.
2.5 Connecting the CO2Source
For the most economical use, the liquid CO2
should be supplied from tanks without siphon
tubes, so that only CO2gas enters the incubator
injection system. Two tanks may be joined
together with a manifold to ensure a continuous
supply of CO2.
A two-stage pressure regulator, with indicating gauges, should be installed at the
supply cylinder outlet. The high-pressure gauge should have an indicating range of 0 to
2000 PSIG to monitor tank pressure. The low-pressure gauge should have an indicating
range of 0 to 30 PSIG to monitor input pressure to the incubator injection system. A
suitable two-stage pressure regulator is available from Forma Scientific, Inc.
Figure 2-1
Cabinet drain p-trap

Forma Scientific, Inc.
______________________________________________________________________________
2-3
The CO2source must be regulated at a pressure level between 5 and 10 PSIG.
Higher pressure levels may damage the CO2control system. The user should determine
the most economical pressure level, between 5 and 10 PSIG appropriate for the desired
CO2percentage in the chamber. Forma Scientific, Inc. recommends only sufficient
pressure to maintain recovery time after door openings.
To connect the CO2supply:
•Insert the copper tubing provided with the unit as far as it will go into the nut of the
CO2connection.
Figure 2-2
Front and side views of the Model 3980

Forma Scientific, Inc.
______________________________________________________________________________
2-4
•Turn the nut until it is finger tight.
•For reference, scribe the nut at the 6:00 position.
•While holding the fitting body steady with a wrench, tighten the nut 1-1/4 turn until
the mark is at the 9:00 position.
•Securely attach the CO2line to the open end of the copper tubing.
•Check the tubing connection for leaks.
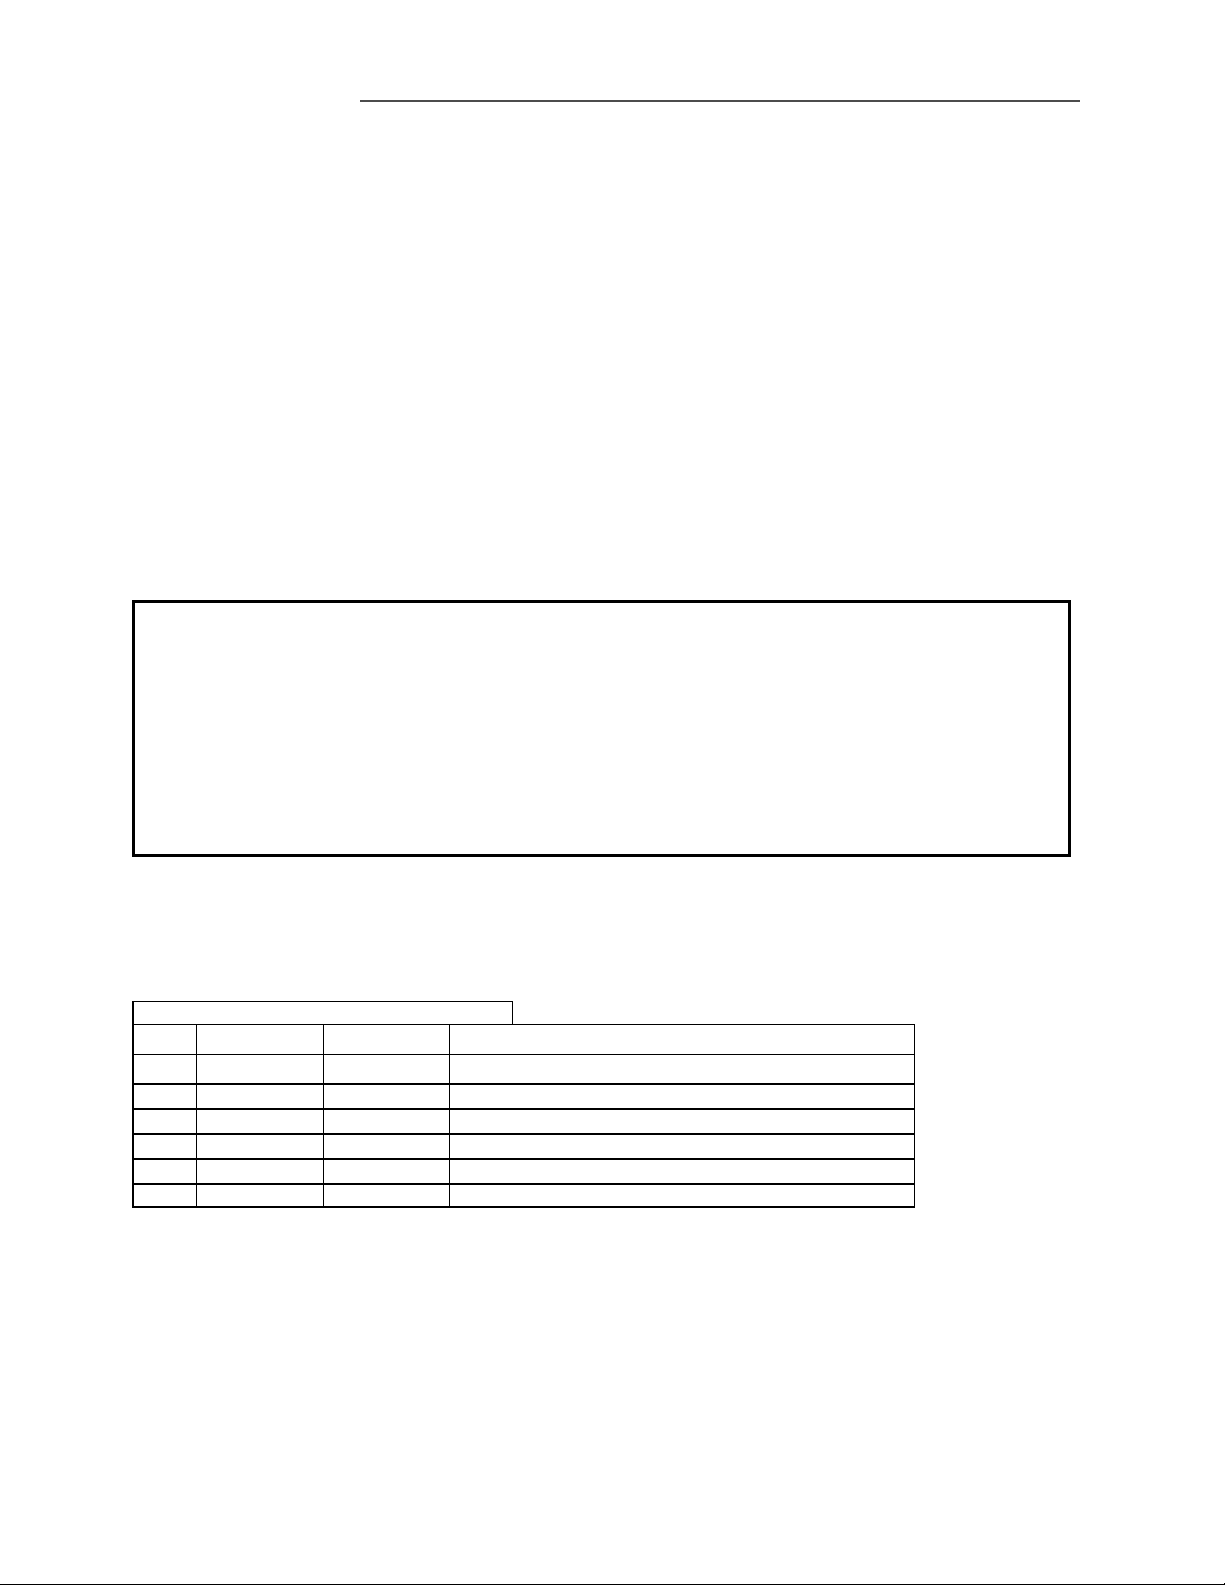
2.6 RS-232 Interface and Remote Alarm Connector
The Model 3980/3986 is equipped with with an RS-232 Serial Communication Interface
for the remote transmission of temperature and humidity data. A remote alarm connector is also
included on the terminal strip.
Key
1 2 3 4 5 6 7 8 9
Pin
#
Description
1
2
3
4
5
6
7
8
9
temperature, Transmit Data
temperature, Receive Data
temperature, Common
humidity, Transmit Data
humidity, Receive Data
humidity, Common
temperature, Common
temperature N.O.
temperature N.C.
Terminal Pin Descriptions, RS-232 (1-6) and Remote Alarm Connector (7-9)
Figure 2-2
Altri manuali per 3980
2
Questo manuale è adatto per i seguenti modelli
1
Indice
Altri manuali Forma Scientific Accessori

Forma Scientific
Forma Scientific 3940 Istruzioni operative

Forma Scientific
Forma Scientific 3546 Manuale utente

Forma Scientific
Forma Scientific 3250 Manuale utente

Forma Scientific
Forma Scientific 3920 Istruzioni operative

Forma Scientific
Forma Scientific 3940 Manuale utente

Forma Scientific
Forma Scientific 3158 Manuale utente

Forma Scientific
Forma Scientific 310 Series Istruzioni operative

Forma Scientific
Forma Scientific 3980 Manuale utente

Forma Scientific
Forma Scientific 3980 Manuale utente

Forma Scientific
Forma Scientific 3911 Istruzioni operative


