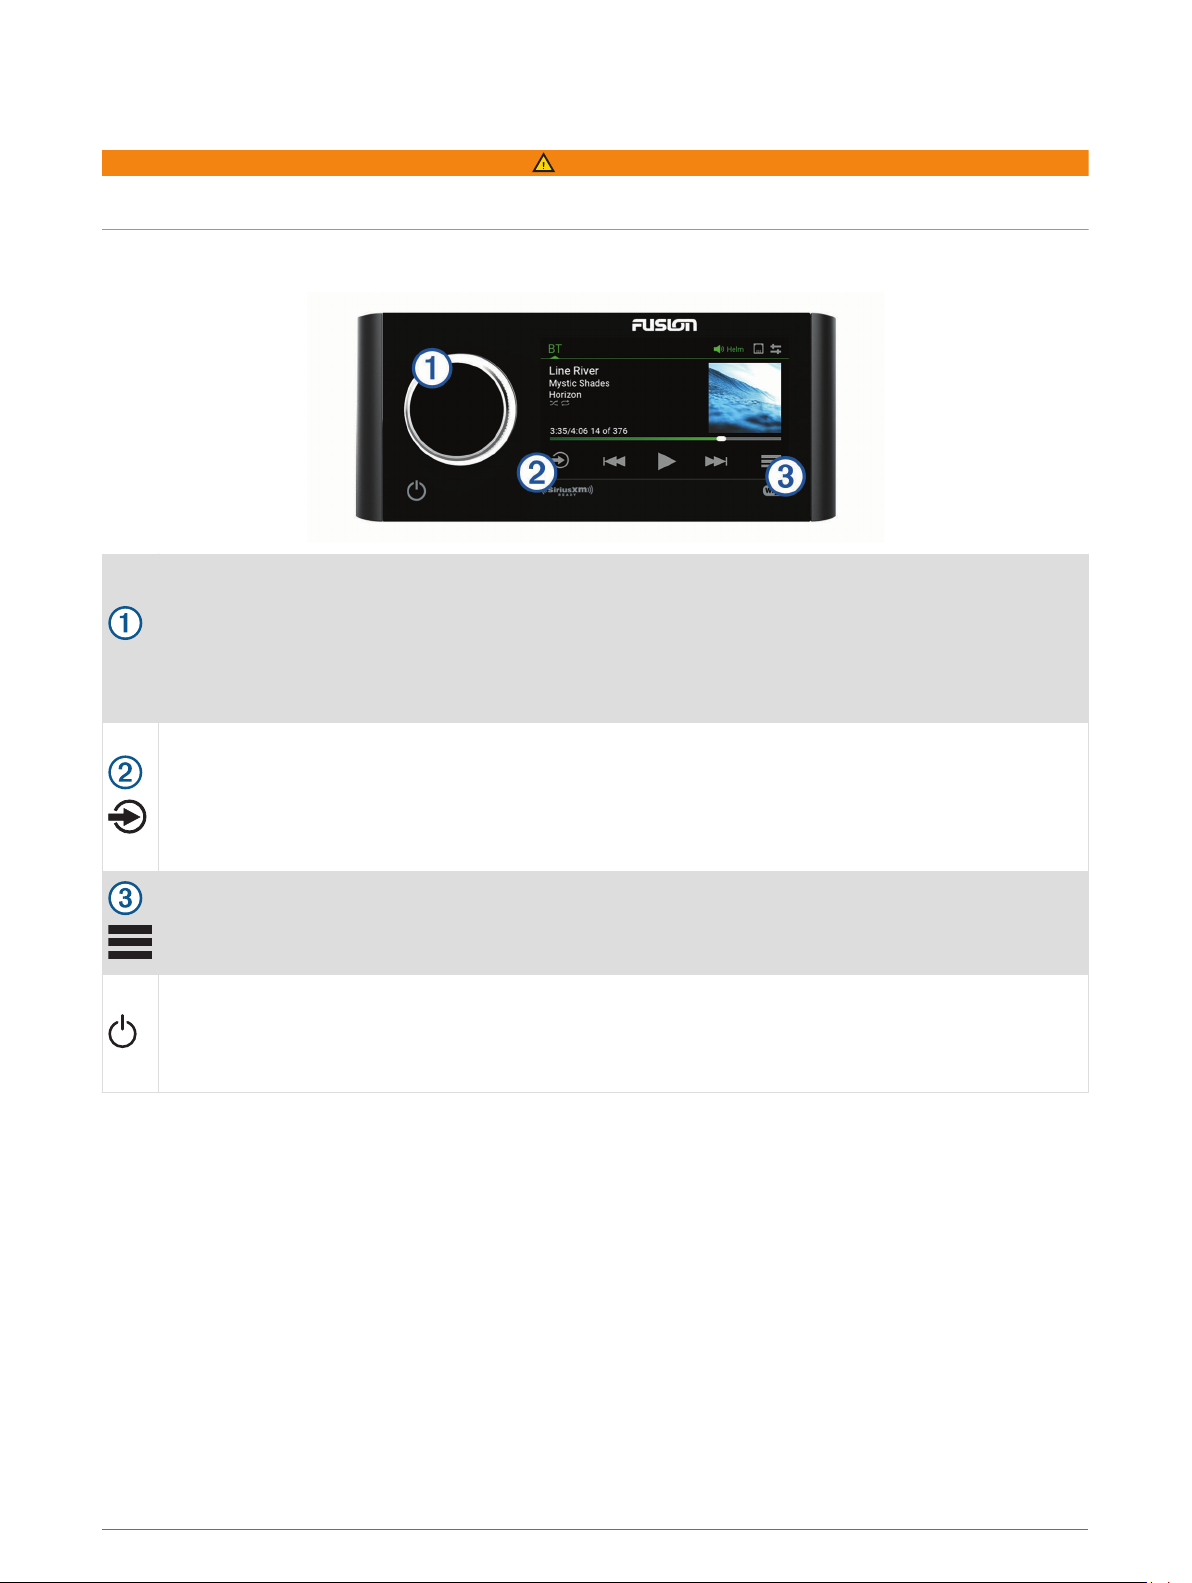
Garmin Fusion Apollo MS-RA770 Manuale utente

FUSION®
Apollo™MS-RA770
O W N E R ’ S M A N U A L
ENGLISH

© 2019 Garmin Ltd. or its subsidiaries
All rights reserved. Under the copyright laws, this manual may not be copied, in whole or in part, without the written consent of Garmin. Garmin reserves the right to change or
improve its products and to make changes in the content of this manual without obligation to notify any person or organization of such changes or improvements. Go to
www.fusionentertainment.com for current updates and supplemental information concerning the use of this product.
Garmin®, ANT®, Fusion®, and the Fusion logo are trademarks of Garmin Ltd. or its subsidiaries, registered in the USA and other countries. Apollo™, Connect IQ™, Fusion-Link™,
Fusion-Link Lite™, and Fusion PartyBus™ are trademarks of Garmin Ltd. or its subsidiaries. These trademarks may not be used without the express permission of Garmin.
Apple®,AirPlay®, iPhone®, and iPod touch® are trademarks of Apple Inc., registered in the USA and other countries. App StoreSM is a service mark of Apple Inc., registered in the USA
and other countries. Android™ and Google Play™ are a trademarks of Google Inc. Bluetooth® word mark and logos are owned by the Bluetooth SIG, Inc. and any use of such marks
by Garmin is under license. NMEA 2000®, and the NMEA 2000 logo are registered trademarks of the National Marine Electronics Association. SiriusXM®, SportsFlash™, TuneMix™,
TuneStart™, and all related marks and logos are trademarks of Sirius XM Radio Inc. All rights reserved. Wi‑Fi® is a registered mark of Wi-Fi Alliance Corporation. Other trademarks
and trade names are those of their respective owners.

Table of Contents
Getting Started 1
Stereo Controls 1
Playback Controls 2
Gesture Screen 3
Entering Text 3
Using the Dial to Select Items 3
Stereo Screen 4
Status Icons 4
Naming the Device 4
Setting the Home Zone 5
Selecting a Source 5
Adjusting the Backlight and Dial
Brightness 5
Audio Control 5
Adjusting the Volume 5
Muting all Connected Stereos 5
Adjusting the Subwoofer Level 6
Adjusting the Tone 6
Disabling the Loud Setting for a
Zone 6
Adjusting the Gain for an Auxiliary
Device 6
Speaker Zones 6
DSP Settings 6
Configuring the DSP Settings 7
Automatic Volume Adjustment Based on
Speed 7
Media Player Connection 7
Bluetooth Device Playback 8
Connecting a Compatible Bluetooth
Device 8
Bluetooth Range Information 8
Selecting a Different Bluetooth
Device 8
Bluetooth Source Menu and
Settings 9
Disabling Bluetooth Auto
Connection 9
USB Device Playback 9
USB Device Compatibility 10
Connecting a USB Device 10
Controlling Music Playback on a USB
Flash Drive or Media Player 10
Controlling Music Playback on a
Connected Android Device 10
Controlling Music Playback on a
Connected Apple Device 11
USB Source Settings 11
Radio 11
Setting the Tuner Region 11
Changing the Radio Station 12
Apple AirPlay 12
Connecting an Apple Device Using
AirPlay 12
Setting an AirPlay Password 12
UPnP Playback 12
Connecting a UPnP Device 13
Connecting an Auxiliary Device 13
Optical Audio Connection 13
SiriusXM Satellite Radio 13
Setting the Tuner Region for the
SiriusXM Source 13
Locating the SiriusXM Radio ID 13
Activating a SiriusXM Subscription 14
Selecting a Category 14
Using Replay Mode 14
Alerts 14
Adding an Artist or Song Alert 14
Adding Teams for Game Alerts 15
Adding Teams from a Live
Game 15
Viewing Active Alerts 15
Managing Alerts 15
TuneMix™ Feature 15
Starting and Stopping a TuneMix
Collection 16
Creating and Customizing a TuneMix
Collection 16
SportsFlash Feature 16
Adding Teams to Receive
SportsFlash Alerts 16
Changing SportsFlash Team
Priority 16
Table of Contents i

Enabling the TuneStart™ Feature 17
Parental Controls 17
Unlocking the Parental Controls 17
Locking Channels 17
Clearing All Locked Channels 17
Changing the Parental Control Passcode 17
SiriusXM Troubleshooting 18
Clearing SiriusXM Data 18
DAB Playback 19
Setting the Tuner Region 19
Scanning for DAB Stations 19
Changing DAB Stations 19
Selecting a DAB Station from a List 19
Selecting a DAB Station from a Category 19
Presets 20
Saving a Station or Channel as a Preset 20
Selecting a Preset from a List 20
Removing Presets 20
Fusion PartyBus Networking 20
Creating a Group 21
Editing a Group 21
Leaving a Group 21
Grouped Stereo Functions 21
Grouped Stereo Source Considerations 22
General Settings 22
Speaker Zone Settings 23
Disabling the Internal Amplifier 23
Setting the Home Zone 23
Synchronizing the Source and Zone Volume Levels 23
Adjusting the Power-On Volume Limit 23
Maintaining Individual Zone Volume Levels 23
Enabling Automatic Volume Adjustment Based on Speed 23
Automatic Volume Control Settings 24
Disabling a Zone 24
Setting a Zone Name 24
Linking Zones 25
Enabling Volume Control of Zone 3 or 4 from a Connected Amplifier 25
Adjusting the Subwoofer Filter 25
Adjusting Additional Audio Settings for a Zone 25
Power Options 26
Source Settings 26
Network Settings 26
Connecting the Fusion PartyBus Device to a Wireless Access Point 26
ii Table of Contents

Connecting the Device to a Wireless Access Point Using Wi‑Fi Protected Setup 27
Connecting the Device to a Wireless Access Point Using Apple Wireless Accessory
Configuration 27
Setting the Fusion PartyBus Device as a Wireless Access Point 27
Wireless Access Point Settings 28
Advanced Network Configuration 28
Setting the Fusion PartyBus Device as the DHCP Server 29
Configuring the Stereo for use with a Garmin Marine Network 29
Setting a Static IP Address 30
Resetting Network Settings 30
Update Options 30
Additional Stereo Control Options 31
Connecting to a Garmin Watch 31
Connecting to an ARX70 Remote Control 31
Fusion-Link Wireless Remote Control App 31
FUSION-Link™ Network Technology 32
NMEA 2000 Remote Control and Display 32
Configuring an Optional Wired NRX Remote Control 32
NMEA 2000 Information 33
Appendix 33
Registering Your Fusion Device 33
Cleaning the Device 33
Software Updates 33
Updating the Software Using a USB Flash Drive 33
Updating the Software Using the Fusion Link App 34
Troubleshooting 34
The stereo does not respond to key presses 34
My Bluetooth audio is interrupted by short breaks 34
The stereo does not display all song information from my Bluetooth source 34
Network Troubleshooting 35
Network Status Icons 35
The stereo keeps locking up when connected to an Apple device 35
The stereo is not finding my connected Apple device 35
My Apple AirPlay audio is interrupted by short breaks 36
Specifications 37
Stereo Dimension Drawings 38
Side Dimensions 38
Top Dimensions 38
Index 39
Table of Contents iii


Getting Started
WARNING
See the Important Safety and Product Information guide in the product box for product warnings and other
important information.
Stereo Controls
Dial
• Turn to adjust the volume.
• When adjusting the volume, press to switch between zones.
• Turn to move through the menus or adjust a setting.
• When in a menu, press to select the highlighted option.
• Press and hold to activate certain functions such as opening the radio presets or muting all connected
stereos from the mute screen (Muting all Connected Stereos, page 5).
Press to change the source.
TIP: You can turn the dial to browse, and press the dial to select the source. You can also swipe the
screen up and down, and touch a source on the screen.
Press and hold to open the GROUPS menu when connected to a Fusion PartyBus™ network (Fusion
PartyBus Networking, page 20).
Press to open the menu.
• Press to turn on the stereo.
• Press to mute the audio.
• Press and hold to turn off the stereo or all stereos on the network.
• Press and hold for longer than 10 seconds to reset the stereo.
Getting Started 1

Playback Controls
The on-screen playback controls may change depending on the source selected.
NOTE: After about fifteen seconds, the playback controls are hidden by the gesture screen feature. You can
swipe down on the screen to view the playback controls (Gesture Screen, page 3).
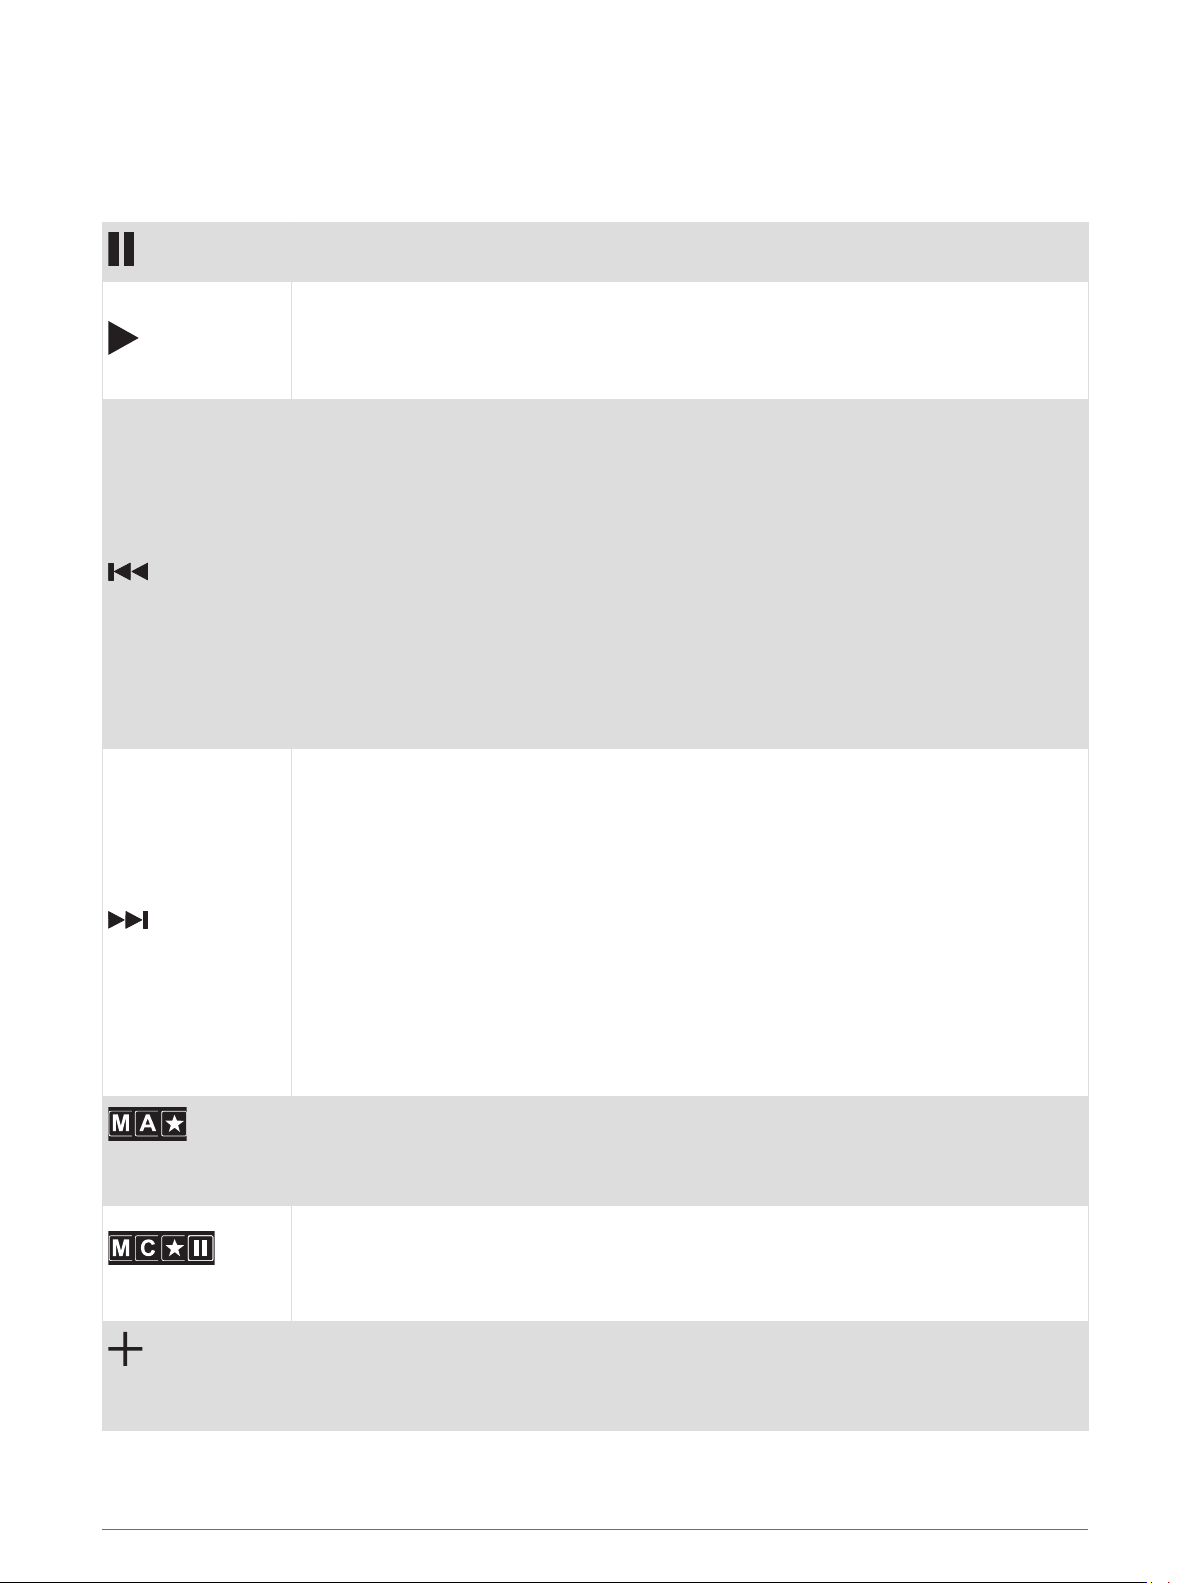
Press to pause media playback.
• Press to play media or resume media playback.
• DAB source:
◦ Press to scan for DAB stations.
◦ Press and hold to save the current station as a preset.
• Press to skip to the previous track, when using an applicable source.
• Press and hold to rewind the track when using an applicable source.
• AM, FM, or SiriusXM (in Live Mode) source:
◦ Press to tune to the previous station or preset.
◦ Press and hold for faster tuning (manual mode only).
• SiriusXM (in Replay Mode) source:
◦ Press to skip to the previous track.
◦ Press and hold to rewind the current track.
• DAB source:
◦ Press to return to the previous DAB station in the ensemble. When you reach the
beginning of the current ensemble, the stereo automatically changes to the last
available station in the previous ensemble.
◦ Press and hold to return to the previous DAB ensemble.
• Press to skip to the next track, when using an applicable source.
• Press and hold to fast-forward the track when using an applicable source.
• AM, FM, or SiriusXM (in Live Mode) source:
◦ Press to tune to the next station or preset.
◦ Press and hold for faster tuning (manual mode only).
• SiriusXM (in Replay Mode) source:
◦ Press to skip to the next track, if applicable.
◦ Press and hold to fast-forward the current track, if applicable.
• DAB source:
◦ Press to advance to the next DAB station in the ensemble. When you reach the end
of the current ensemble, the stereo automatically changes to the first available
station in the next ensemble.
◦ Press and hold to advance to the next DAB ensemble.
(AM and FM
sources)
Press to cycle through the tuning modes (auto or manual) and presets.
Press and hold to save the current station as a preset.
(SiriusXM source)
Press and hold to switch between Replay Mode and Live Mode (Using Replay Mode,
page 14).
Replay Mode: press to pause and play the channel.
Live Mode: press to cycle through the tuning modes (manual or category) and presets.
(Aux and Optical
sources)
Press to increase the gain.
2 Getting Started

(Aux and Optical
sources)
Press to decrease the gain.
Gesture Screen
After about fifteen seconds, a screen appears showing media information and album art only. You can use the
touchscreen to interact with this screen.
• You can swipe left or right to change the track or preset.
• You can touch the screen for about one second to pause playback or mute the audio, depending on the
source.
• You can swipe down to return to the playback controls screen.
NOTE: You can disable this screen in the settings (Power Options, page 26).
Entering Text
1In a field that allows you to enter text, select to erase the existing characters.
2If necessary, select or to use numerals, symbols, or lower-case letters when available.
3Touch a character to select it.
4Select to save the new text.
Using the Dial to Select Items
You can use the dial to highlight and select items on the screen.
• Turn the dial to highlight an item on the screen.
• Press the dial to select the highlighted option.
Getting Started 3

Stereo Screen
The information displayed on the screen varies depending on the source selected. The on-screen playback
controls may change depending on the source selected (Playback Controls, page 2). This example shows a
track playing on a device connected using Bluetooth® wireless technology.
Source name
Active zone, status icons, and shortcuts (Status Icons, page 4)
TIP: Touch an icon to open the applicable page.
Track details (if available)
Album art (if available from a compatible source)
Elapsed time, track duration, and the current track number out of the total number of tracks in the playlist
(if available)
Status Icons
You can touch a status icon to open the relevant screen.
Opens the volume screen.
Opens the PRESET screen.
Opens the network settings.
NOTE: You cannot access the network settings if this stereo is part of a group.
Naming the Device
You should enter a unique name for this device so you can easily identify it when viewing devices on the
Fusion PartyBus network.
NOTE: You should provide unique names to all of the devices and zones on the network to avoid confusion
when grouping, controlling, and setting up stereos and zones. You should also turn off zones that are not in use
(Speaker Zone Settings, page 23).
For further customization, you can provide unique names for the sources on each stereo and turn off unused
sources (General Settings, page 22).
1Select > SETTINGS.
2Select DEVICE NAME, and enter a unique name for the device.
4 Getting Started
Indice
Altri manuali Garmin Impianto stereo

Garmin
Garmin Fusion Apollo SRX400 Manuale utente

Garmin
Garmin GMA 340 Manuale del proprietario

Garmin
Garmin GMA 340 Manuale utente

Garmin
Garmin FUSION Apollo MS-WB670 Manuale utente

Garmin
Garmin Fusion Apollo RA770 Manuale utente

Garmin
Garmin Fusion MS-BB100 Manuale utente

Garmin
Garmin FUSION Manuale utente

Garmin
Garmin GMA 342 Manuale utente

Garmin
Garmin Fusion APOLLO RV-RA770 Manuale utente

Garmin
Garmin Meteor 300 Manuale utente


