Genovation MacroMaster684 Manuale utente

GENOVATION
MacroMaster684
User Guide
Revision 4.30
August 2009

WARRANTY REPAIR SERVICE AND LICENSE
Genovation, Incorporated ("Genovation") warrants this product to be in good
working order and free of defects in materials and workmanship under normal
use for a period of one year from the date of purchase. Any implied warranties,
including warranties of merchantability and fitness for a particular purpose, are
limited in duration to a period of thirty (30) days from date of purchase. Any
abuse including opening the case will void the warranty. Your sole remedy and
Genovation's entire liability for this product will be repair or replacement as
provided for above, or at Genovation's option, the refund of your purchase price.
A RETURN MATERIAL AUTHORIZATION (RMA) number is absolutely
required before returning a product. Any shipment received without an
RMA will be returned unopened. Please contact Customer Service for
instructions before returning any product. Genovation makes software
available and licenses its use to you for world wide for use.
FCC CERTIFICATION
This product has been certified to comply with FCC, EC, TUV and other test
standards. See label on the product for confirmation.
FCC CERTIFICATION REQUIRED STATEMENT WARNING:
This equipment has been certified to comply with the limits for a Class B
Computing Device, pursuant to Subpart J of Part 15 of the FCC rules. Only
peripherals (computer, computer input/output devices, terminals, printers, etc.)
certified to comply with the Class B limits may be attached to this device.
Operation with non-certified peripherals is likely to result in interference to radio
and TV reception.
NOTE: This equipment generates and uses radio frequency energy and if not
installed and used properly, that is, in strict accordance with the manufacturer's
instructions, may cause interference to radio and television reception. It has been
type tested and found to comply with the limits for Class B computing devices in
accordance with the specifications in Subpart J of part 15 of the FCC Rules,
which are designed to provide reasonable protection against such interference in
a particular installation. If this equipment does cause interference to radio or
television reception, which can be determined by turning the equipment off or on,
the user is encouraged to try to correct the interference by one or more of the
following measures:
o Reorient the receiving antennas
o Relocate the computer with respect to the receiver
o Move the computer away from the receiver
o Plug the computer and receiver into different circuits

If necessary, the user should consult the dealer or an experienced
radio/television technician for additional suggestions. The user may find the
following booklet prepared by the Federal Communications Commission helpful:
“How to identify and Resolve Radio-TV Interference Problems". This booklet is
available from the U.S. Government Printing Office, Washington, DC 20402.
(Stock #004-000-00345-4).
TECHNICAL SUPPORT
If you require technical support or if you wish to make suggestions about the
product, don’t hesitate to contact us. We can be reached Monday though Friday
from 7:30 AM to 11:00 AM and from 11:30 AM to 4:00 PM Pacific Time. If the
customer support lines are busy or after hours, leave a message or send a FAX
or E-MAIL and a representative will respond typically within 24 hours.
VOICE NUMBER: (949) 833-3355 ext. 112
FAX NUMBER: (949) 833-0322
WEB: http://www.genovation.com
FORUM: http://www.genovation.com/forum

CONTENTS
1: Installation and Quick Start Guide............................................ 5
Install Software..................................................................................................... 5
Install Hardware................................................................................................... 6
Set the COM Port................................................................................................ 6
Test Keypad Connection................................................................................. 8
Restoring Factory Defaults............................................................................. 9
Un-Installing and Re-Installing...................................................................... 9
2: Using MacroMaster68x...................................................................... 10
Running MacroMaster68x............................................................................. 10
Creating and Saving your first CKD file................................................... 12
The Green Keys................................................................................................. 13
Correcting Mistakes......................................................................................... 13
Key Codes............................................................................................................ 13
Control Codes..................................................................................................... 14
Inserting Delays................................................................................................. 15
Two-Level Programming................................................................................ 15
Keypad Properties............................................................................................ 16
Keycap Labels.................................................................................................... 18
Customization Is Standard............................................................................ 18
3: Technical Specifications................................................................... 19

1: Installation and Quick Start Guide
Your 684 ControlPad or Bump Bar package should include the following items:
o Quick Start Guide
o Product CD
o Genovation 684 keypad with attached RS-232 cable (and optionally a 5v
DC adapter). The standard cable has a DB-9 connector. Other
connectors are available.
The MacroMaster684 configuration software is designed to work with computers
running Microsoft Windows 2000/XP/Vista operating systems (32-bit). The 684
keypad itself will work with any OS.
Install Software
Insert the CD into the target computer’s CD drive. If the Installation program
does not start immediately, navigate to the CD using Explorer and run Setup.exe.
You should see the following screen:
Click on Next as required and choose the path you would like to use for storing
the PC applications.

Install Hardware
You may plug in new hardware at any time. If you have not already
plugged in your 684 device, do so now. If supplied, plug the 5v DC
power adapter as well. It is recommend to configure (program) the
keypads with only one plugged in at time.
Set the COM Port
You will need to set the COM port so that the Windows PC can communicate
with the 684. This will allow the PC to communicate with the keypad in order to
configure it the way you want.
Run the MacroMaster684 application. Normally it is installed in the following path:
Start >> Programs >> Genovation >> MacroMaster684
You should see the following:
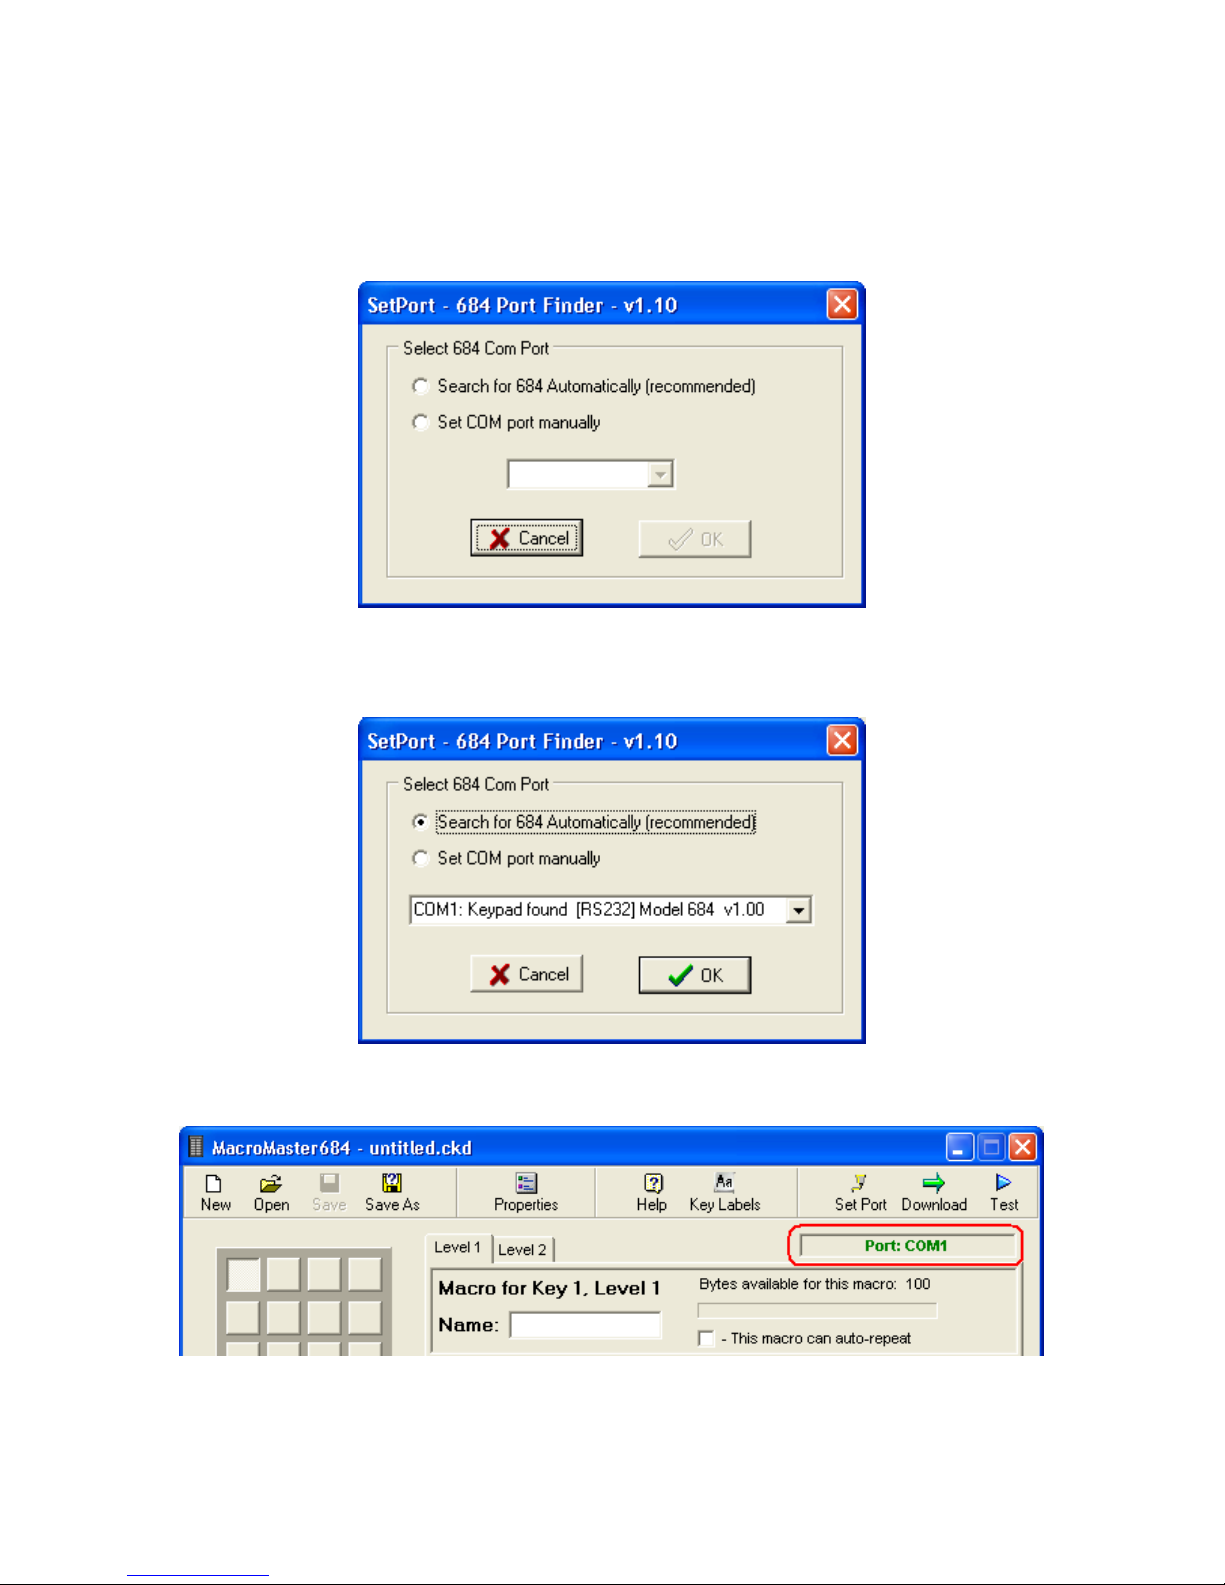
Select one of the No options followed by OK to dismiss the tutorial and then click
on Set Port.
Click on the “automatic” option (the top one) in SetPort and then OK.
SetPort will now start scanning your system COM ports for the 684. Once it
completes, your 684 COM port should be automatically selected. Click OK.
The COM Port number should appear at the top right of MacroMaster.

Test Keypad Connection
At the top right of MacroMaster684, click on Test. This will launch the key test
program.
If you click on Get Version, the 684 will respond with it’s version string. You may
also press the keys on the 684. You should see some characters appear in the
[Data from Keypad] area. Depending on what key codes have been
programmed, this information may appear as nonsense. Also if the baud rate
does not match between the keypad and the test program, you might see only
gibberish.
Restoring Factory Defaults
At any time your keypad can be returned to factory defaults. In order to wipe out
the user configuration, press and hold two key switches down while plugging
the keypad power in. Continue to hold them down until the keypad is
completely plugged in and then release the two keys. Note: If you have
double-width key caps, only hold one down.
Default684.ckd key table:
0xA1 0xA2
0xB1 0xB2
0xC1 0xC2
0xD1 0xD2
0xE1 0xE2
0xF1 0xF2
The Bump Bar version has 24 key switches under 12 double-wide key caps.
Only one of each pair of keys is programmed by default. You can choose the
codes you want on whatever keys you want. You may also move the key caps
around (E.g. make them vertical instead of horizontal).
Un-Installing and Re-Installing
It’s a quick and simple matter to remove, re-install or upgrade MacroMaster. To
un-install MacroMaster, click on:
Start >> Programs >> Genovation >> MacroMaster684 >> Uninstall MacroMaster684
The un-installer will NOT remove any macro files you have created. If you are not
installing a newer version, you may delete the macro files and directories
manually.
If you are installing a newer version (upgrading), your macro files will be saved
automatically for you.

2: Using MacroMaster68x
Running MacroMaster68x
To program the key codes or change the keypad properties such as baud rate,
use the MacroMaster application. To begin, click on the following (assumes
default installation directory):
Start >> Programs >> Genovation >> MacroMaster684 >> Genovation MacroMaster684
The title bar contains the name of the application and the name of the file that is
opened. If the file had been modified but not saved, a * character follows the
filename. The * will go away once the file is saved or a new file is loaded.
Indice
Altri manuali Genovation Tastiera

Genovation
Genovation v0.73 Manuale utente

Genovation
Genovation Micropad 630 Manuale dell'operatore

Genovation
Genovation MiniTermPro 909 Guida di sicurezza

Genovation
Genovation AddPoint 628 Manuale utente

Genovation
Genovation Controlpad 681 Manuale utente

Genovation
Genovation MICROPAD 637 Istruzioni per l’uso


