Glorious GZ5 Manuale utente

GZ5
Operation
Manual
5-Axis
Zirconia Dental Cutting Machine

CONTENT
Equipment Introduction..................................................................................................1
1.1 Equipment Destription................................................................................... 1
1.2 Equipment Features........................................................................................1
1.3 Equipment Parameters....................................................................................4
Installation Environment................................................................................................ 5
2.1 GZ5`s Installation Environment and Conditions........................................... 5
Equipment Accessories and Installation.........................................................................6
3.1 Whiteth GZ5 Accessories List........................................................................6
3.2 Installation guide of GZ5............................................................................... 6
Equipment Operation Guidance..................................................................................... 9
4.1 How To Use....................................................................................................9
4.2 Precautions..................................................................................................... 9
4.3 Solution After An Alarm Occurs.................................................................. 10
4.4 Material Saving Mode Fixture Adjustment Method.................................... 12
4.5 CERCON Φ105mm Large Size Fixture Adjustment Method...................... 12
4.6 Accuracy Calibration Method...................................................................... 13
4.7 GZ5 Typesetting Software Post-Processing (Only for reference by CAM
software application engineers).............................................................................16
4.8 Tool size........................................................................................................18

Glorious GZ5 Operation Manual/
1
Equipment Introduction
1.1 Equipment Destription
Glorious GZ5 is a 5-axis 5-linkage denture cutting machine ,mainly used for cutting
zirconia materials. The structure of the equipment is compact and powerful. It can cut
various types of dentures to fit the individual needs of customers.
1.2 Equipment Features
Feature one Comprehensive Alarm System
This equipment has a comprehensive alarm system, it can provide warning during the
process, remind some kinds of behaviors which may damage materials, tools, or
machines, such as:
A) Low pressure of the air cooling;
B) Low pressure of the changing knife and wait the air pressure enough;
C) Unsuccessful grasping knife and returning knife;

Glorious GZ5 Operation Manual/
2
D) Automatic tool calibration, when the tool attrition exceeds 0.05mm in a tool
path;
E)Tool breaks during cutting ;
F)When tool number is wrong ; Force the spindle not to clamp the tool before the
program is run; put the tool back to the tool library after processing,prevent the user
placing the wrong knife。
Feature two Friendly Human-Computer Interface
The equipment comes with a touchable operation panel and WIFI built in,which can
be remotely controlled,and convenient for training,diagnosis and maintain。
Each equipment has an independent ID. When the equipment has a problem, the
manufacturer can perform remote diagnosis and maintenance based on the ID; these
can reduce the issue solving time.
Feature three Open CAM System
The equipment is compatible with any CAM system on the market,such as:WorkNC、
Millbox,Sum3D,Hyperdent,etc.
Feature four Large-Angle 5-Axis 5-Linkage Cutting
The angle of the A-axis can be ±25; the angle of the B-axis can be 0~360; and 5-axis
5-linkage processing.

Glorious GZ5 Operation Manual/
3
Feature five Automatic Calibration and Automatic Processing
The equipment has an automatic calibration function, which ensures the accuracy of
the equipment and avoids errors when it begins to formal cut. These can save time and
materials.
Feature six Various Fixture Modes
The equipment fixture can be adjusted to a material-saving mode, and a large-size
plate material (such as CERCON) can also be installed.
【Material-Saving Fixture Φ98mm】 【CERCONΦ105mm】

Glorious GZ5 Operation Manual/
4
Feature seven Excellent Cleaning Effect
The equipment has a good dust suction effect, and there is an air duct in the working
chamber to avoid vacuuming during processing, causing dust to be unable to be
completely sucked out.
Feature eight Long-Term Maintenance Accuracy and Longer Service Life
The equipment is a box structure, each axis has 4 sliders, with high rigidity, which can
ensure that the body is not deformed during use or transportation, maintain the
accuracy of the equipment for a long time, and make the life of the machine longer.
1.3 Equipment Parameters

Glorious GZ5 Operation Manual/
5
Installation Environment
2.1 GZ5`s Installation Environment and Conditions
As some parts of the equipment have certain requirements on the environment, please
confirm the following installation environment and conditions before installing the

Glorious GZ5 Operation Manual/
6
machine to ensure the normal use of the machine.
Equipment Accessories and Installation
3.1 Whiteth GZ5 Accessories List
3.2 Installation guide of GZ5

Glorious GZ5 Operation Manual/
7
1)Equipment Size
2)Package Size
3)Installation instructions of GZ5
Glorious GZ5 Operation Manual/
8
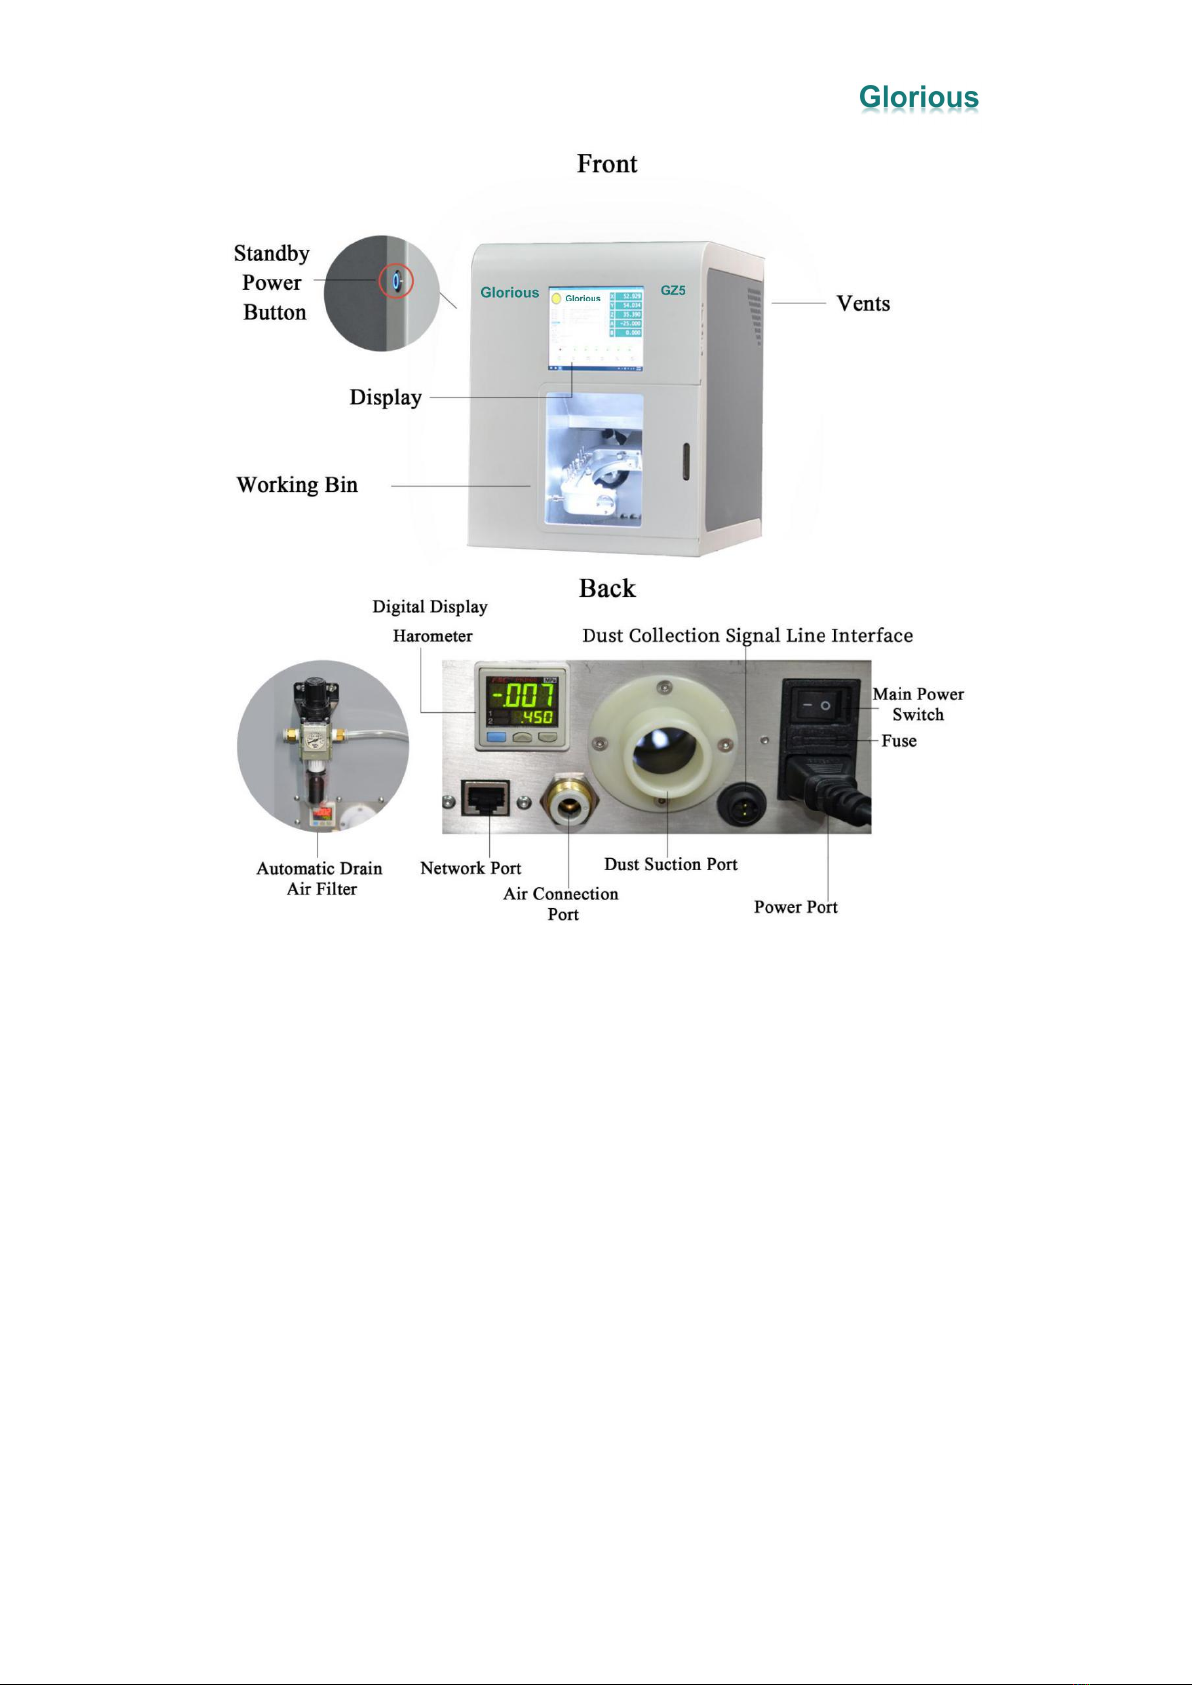
A.Automatic Drain Air Filter: Pull up and turn the upper knob to adjust the air
pressure, and automatically filter the water and oil in the discharged air.
B.Digital Display Barometer: Display the size of the barometric pressure, and an
alarm will be issued if it is lower than the set value.
C.Air Connection Port: Connect the Φ8mm air pipe from the OUT end of the
automatic drain filter.
D.Dust Suction Port: Connect the Φ31mm vacuum tube from the air outlet of the
vacuum cleaner
E.Dust Collection Signal Line Interface: When the equipment starts roughing, it
outputs 24V as start signal of the vacuum cleaner. If the vacuum cleaner doesn`t have
these mechanism, connect a 24V relay.
F.Power port: Connect to 220V power supply. You can replace the spare fuse when it
needs.
G.Standby power button: For the daily use of the equipment, and only controls the
power supply of components except the computer.
Indice


