Google Nest Hello Manuale utente

2019 | Condential and Proprietary | Do not distribute
Nest Hello
Nest Pro Guide

2019 | Condential and Proprietary | Do not distribute
Any Qs?
Pro line: 855-VIP-NEST or 855-847-6378
For footnotes - head to the back of this guide
Got Feedback? Tell us what you think here.
Hey there!
Welcome to the Google Nest Hello Pro Guide.
Here you will nd everything you need to install
Nest Hello for customers so they know who’s knocking.
Section Page
Technical specs
Get to know Nest Hello on a deeper level.
4
Installation guides
A step-by-step guide to installing Nest Hello.
5
Category expeise
Find out how Nest Hello does it beer.
11
Beer Together
Explore the benets of using Nest Hello along with other Google
Nest products.
14
Additional resources 15

2019 | Condential and Proprietary | Do not distribute
Status light
Speaker
Light ring
4:3 HD video with HDR
and 160º eld of view
Microphone
Buon
Infrared LEDs
4.6 in
(11.7 cm)
1.7 in
(4.3 cm)
●Google Nest Hello
video doorbell
●Chime connector
●15° wedge
●Release tool
●Masonry drill bit
●Window decal
●Wall plate
●Extension wires
●Wall anchors
●Screws
●Quick Sta Guide
Let’s take a closer look at Nest Hello to see what it takes to be a beer doorbell.
1.0 in
(2.6 cm) What’s in the box
Meet Nest Hello

2019 | Condential and Proprietary | Do not distribute
Weight Power requirements Camera Video
Field of view Lights Night Vision
Weather resistance
12V AC–24V AC; requires
a 10VA transformer and
wired doorbell
HD UXGA 1600 x 1200,
up to 30 frames/sec,
H.264 encoding, HDR
850nm infrared LEDs
RGB light ring
and status light
IPx4 rating
Sensors
Ambient light
Operating temperature
5˚F to 104˚F (-15
˚C to 40˚C)
Audio
High-quality speaker
and microphone
160° diagonal
1/3-inch, 3-megapixel
(2K) color sensor, 8x
digital zoom
4.55 oz
(129 g)
Security
128-bit AES with TLS/SSL
Wireless
●802.11a/b/g/n/ac (2.4GHz/5GHz) 2x2 MIMO Wi-Fi; WEP, WPA, WPA2 encryption suppoed
●802.15.4 (2.4GHz)
●Bluetooth Low Energy
Product requirements
●Requires a wired doorbell.
Connectivity requirements
●Wi-Fi 802.11a/b/g/n/ac, 2.4GHz or 5GHz (WEP, WPA, WPA2 encryption suppoed).
●Working broadband Internet connection with at least 2 Mbps upload speed (DSL may not qualify).
●Requires a compatible phone or tablet with the free Nest app and Bluetooth 4.0. For more info visit
nest.com/requirements.
Bandwidth requirements
●At 1600 x 1200, Nest Hello requires 800 to 2000 Kbps of upload bandwidth while streaming video. Nest Hello will
use more bandwidth to stream video when there is more motion in the scene. If you subscribe to Nest Aware,
your Nest Hello streams all video to the cloud for secure osite storage. At 1600 x 1200, each Nest Hello could
use 150GB to 600GB of upload bandwidth per month depending on the video quality seing.
All the specs

2019 | Condential and Proprietary | Do not distribute
This is your comprehensive guide to installing Nest Hello.
Don’t have time to read through the steps? Go to the Additional Resources section to watch
the installation video.
Get Prepared:
Nest Hello needs to be powered by wires delivering 16 - 24 V AC, and at least 10 VA.
Check with a meter or visit the voltage requirements suppo page here or the compatibility widget here.
Step 1: Gather what you’ll need
Tools:
●Phillips screwdriver
●Power drill with Phillips bit
●Ladder
●Bubble level
●Voltage meter
●Transformer
Nest app and Internet requirements:
●Customer’s compatible phone or tablet, check here
for requirements
●Wi-Fi network password
●Broadband Internet connection with minimum of 2
Mbps upload speed for each camera in the home
●Check Wi-Fi signal at doorbell location
Step 2: Have customer sign into account or create one
●To download the Nest app and create a free account direct them to Google Play or the Apple App Store.
If Nest products are already in the household the customer should be signed in already.
Step 3: Scan the QR code
●If the customer is new to Nest: Tap Add New + on the app home screen.
●If the customer already has account: Tap Seings in the top right corner of the
home screen then select Add product.
●Scan the QR code on the back of the camera body. This helps the app know what
you’re installing.
●Scan the code in good lighting with no shadows. Sta with the phone about a foot
away and move closer to the code till it scans.
●If you can’t scan the code, tap Continue Without Scanning and type in the
numbers above the QR code.
Installation guide
Step by step

2019 | Condential and Proprietary | Do not distribute
Step 4: Turn o power
●Before turning o the power, test the existing doorbell to conrm the
wired system is intact.
●Locate the home’s breaker or fuse box and turn the power o to the
doorbell and chime. Turn o the main power switch if need be.
●Ring the doorbell to conrm it is turned o.
Geing staed:
Step 5: Remove the chime cover if applicable
●Find the doorbell’s chime and remove the cover. You may need the
ladder to reach.
●Covers vary, some pull or slide o while others use screws.
Tip: If there is no existing chime recommend a Google Home Mini
speaker to announce door guests.
Step 6: Take a picture of the chime’s wires on your phone
This will help with future troubleshooting.
Step 7: Tell the app about your chime wires
Using the app, select the number of wires in your chime and tap on the
wire labels. These labels are usually on or next to the wire connectors or
even on the inside of the chime cover.
Step 8: Connect the chime wires
The app will walk you through the steps with custom instructions
depending on what wires you entered into the app. Follow the specic
wiring the app instructs.
Step 9: Mount the chime connecter
Once the wiring is done, nd a place to put the chime connector. Make
sure the connector and wires don’t touch the chime or any moving
pas, or it may not sound right or work at all. If space is very tight, it
may be easier to aach the connector to the outside of your chime
cover.

2019 | Condential and Proprietary | Do not distribute
Step 13: Mark holes for the wall plate
●Now mark screw holes for installation with the backplate.
Impoant: You may not be able to re-use the screw hole from your old
doorbell. The doorbell wires must come through the boom of Hello’s
wall plate hole (as pictured). If they don’t, they can prevent Nest Hello
from locking onto the wall plate.
●Again, make sure the Nest logo is at the boom.
●Use a bubble level to check that the wall plate is straight.
Step 14: Install the wall plate
●Drill pilot holes with either a 3/32nd drill bit, hammer drill, or use
the included masonry bit and wall anchors if you’re drilling into
stone, stucco, or other hard materials.
●Install the screws. Make sure the Nest logo is at the boom. The
wall plate is not reversible.
●Use a bubble level to double check that the plate is level. The
horizontal screw hole on the plate’s boom will let you
straighten the backplate if needed.
Step 10: Replace the chime cover
Now put the chime’s cover back on.
Step 12: Use the wedge if needed
If the doorbell is located in a corner, you can use the included wedge to
change the viewing angle. This will point Nest Hello away from the wall
and help prevent the IR night vision light from washing out the video.
You can ip the wedge to angle the camera in the opposite direction.
The wedge has adhesive strips. Just stick it onto the wall plate.
Step 11: Disconnect the current doorbell
Remove your current doorbell and disconnect the wires. You’ll need a
screwdriver for this step.

2019 | Condential and Proprietary | Do not distribute
Step 15: Connect the wires
●Before connecting, make sure the wires are clean.
●Connect the wires to Nest Hello. It doesn’t maer which terminal
you connect a wire to. Make sure the wires point down, not up,
so any excess can be tucked back into the wall.
●If the wires are too sho, use the wire extenders that are
included in the box.
Step 17: Switch the power on
Go to the home’s breaker or fuse box and turn on the power to
the doorbell and chime.
Step 16: Mount the doorbell
●To aach Nest Hello, simply slide the top of the doorbell into the
backplate. Then press until the doorbell clicks into place.
●If it doesn’t seat properly or you don’t hear a click, re-check that
you’ve fully tucked any excess wire back into the hole.
●If you ever need to remove Nest Hello, push the included release
tool (or a thumbtack) into the hole on the boom to release it.
Step 18: Check that Hello is on
Nest Hello will take a few seconds to turn on. You’ll hear a chime and the light ring should sta pulsing
blue. If it’s not, select “No, it’s not blue” in the app and it will help you troubleshoot.

2019 | Condential and Proprietary | Do not distribute
Solve it:
Check Internet service or router. Extreme
temperatures can cause the Nest Hello to shut o
Wi-Fi for protection.
Try restaing Hello by:
- Disconnecting the back plate with the provided
tool and leaving Hello connected to the wires.
- Inse the tool into the hole near the top of Hello
and hold for about 10 secs until the light turns
o. Then release.
- Hello will then resta and try reconnecting to
the previous Wi-Fi.
-Note: Holding the doorbell buon down will
reset to factory seings.
Solve it:
The Nest Hello shares the same errors as other Nest
cameras. For a comprehensive list of these error
codes visit here.
You receive an error
message in the app Nest Hello is oine
Take a look at how to solve some of the most common issues that can arise with Nest Hello.
Visit here to nd additional Nest Pro’s.
Troubleshooting tips
2019 | Condential and Proprietary | Do not distribute
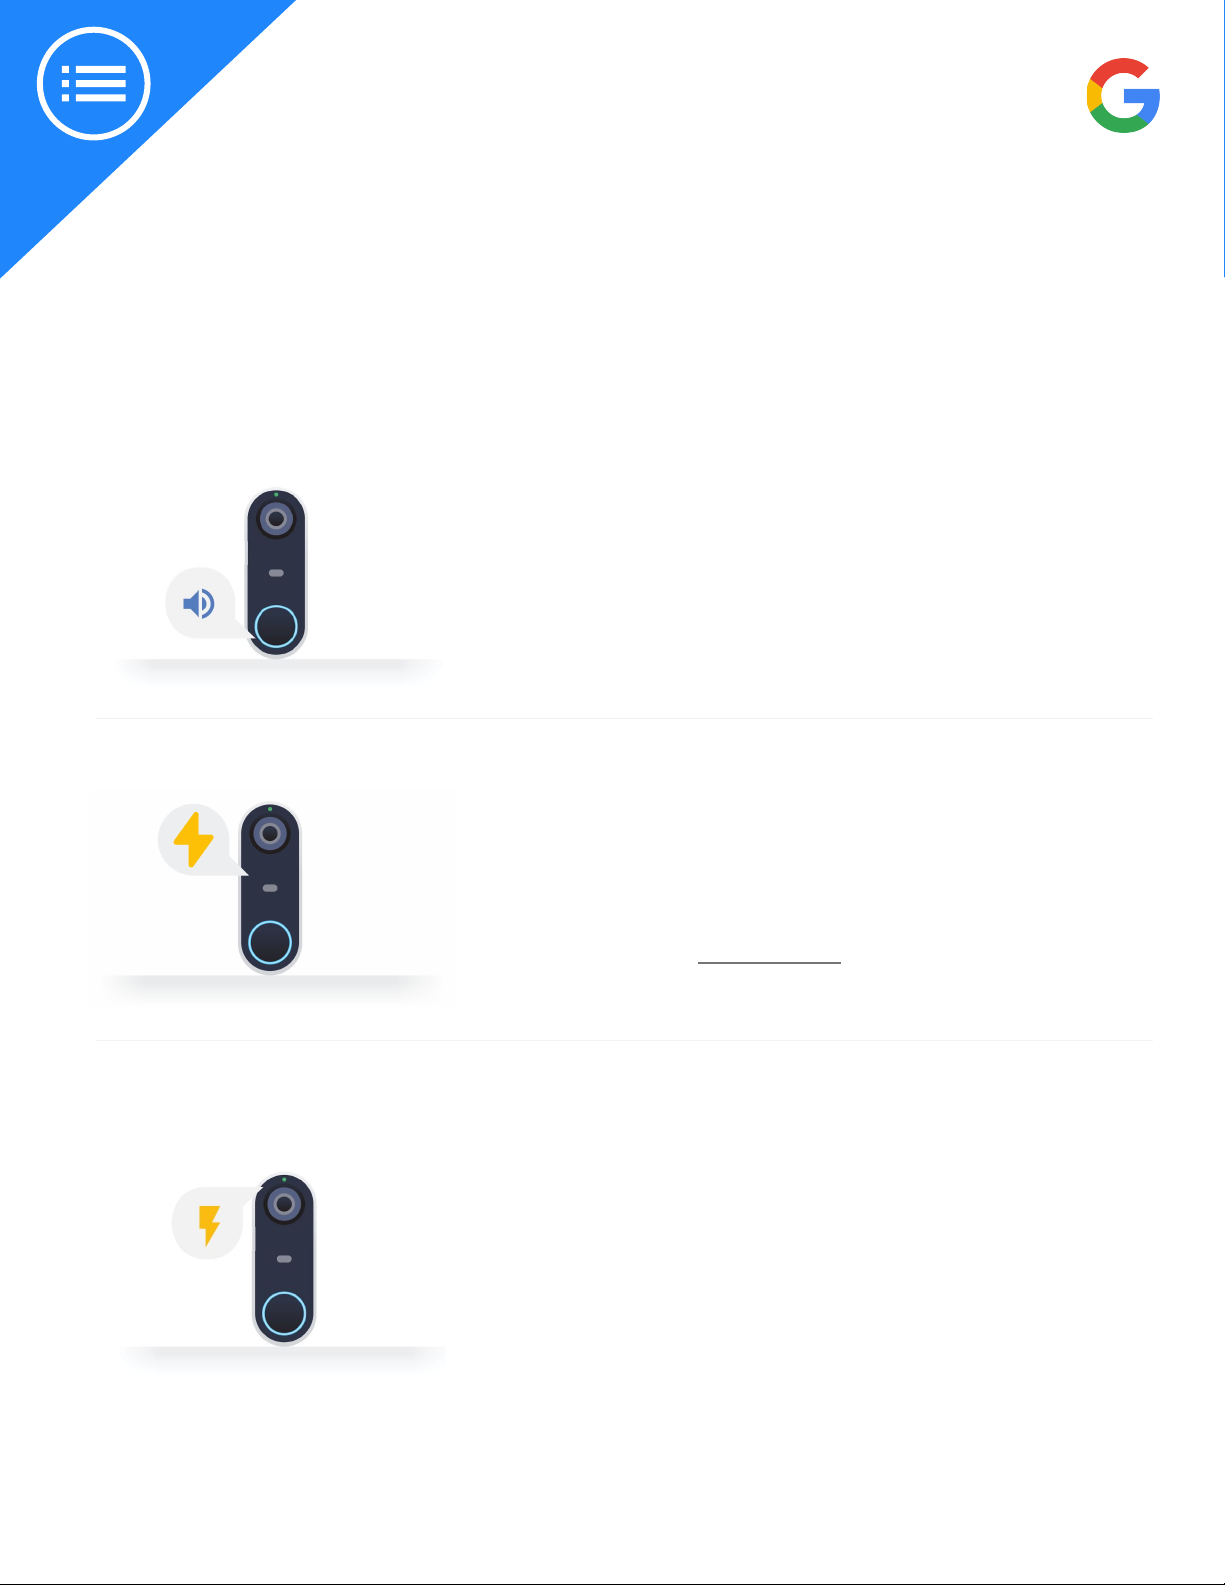
Solve it:
This light indicates that Hello isn’t geing enough power. It
will continue to work as a standard doorbell but will likely
turn o video stream to preserve power. Check the voltage,
you may need to upgrade the transformer the chime’s wires
are connected to.
Chime won’t stop ringing
There is a blinking
yellow light
Take a look at how to solve some of the most common issues that can arise with Nest Hello.
Solve it:
Electronic chimes might ring unexpectedly. At a rst glance, it
might seem like this is due to a faulty chime as a small amount
of voltage can be present. This is normal as there’s a 3 ohm
resistance in series in the puck during steady state.
The leading cause is mis-wiring, especially with more complex
chimes that use 3 wires. Note if chimes are connected to
intercoms, gates that open and close, or other devices. Return
to the app and re-wire (Step 8).
Troubleshooting tips
Solve it:
Nest Hello requires 16-24V. Some homes, especially older
homes, may require the installation of a transformer. It’s
recommended that Nest Pros have a Voltage Meter and
Transformer available to allow for a seamless install. Nest Hello
replaces your existing wired doorbell. Customers can check
compatibility at nest.com/works.
Installing a transformer
Questo manuale è adatto per i seguenti modelli
1
Indice


