
Goosky GTS Manuale utente

Flight Control Settings
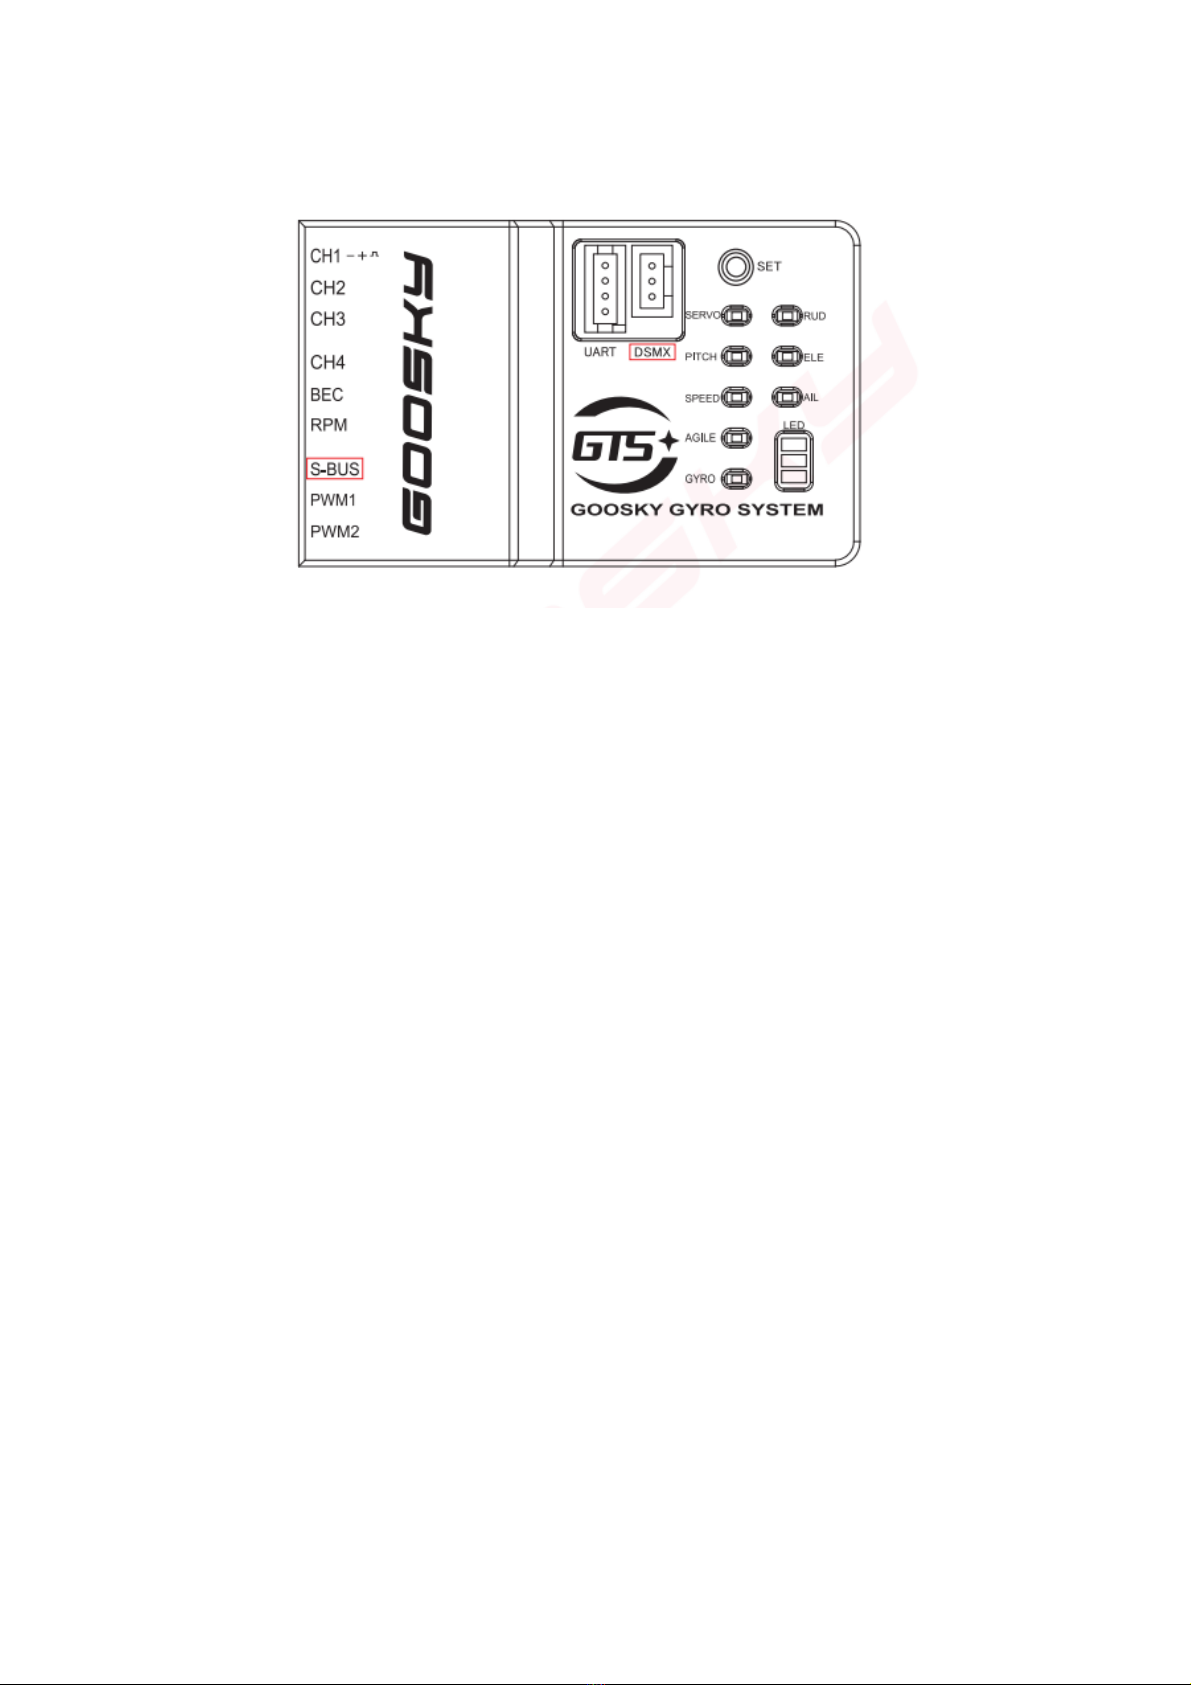
The external receiver of the remote control is connected to the flight control
S-BUS interface is compatible with PPM, S-BUS, iBUS, EBUS
T-DSMX interface is compatible with DSM, DSM2, DSMX, DMSS

Schematic diagram of flight control parameter adjustment
SET - Setting menu button
S0 – reserved button
S1 - On/Off Attitude Mode button
LEDs:
SERVO - Servo midpoint settings (swash levelling)
PITCH - Pitch setting (Positive and negative pitch)
SPEED - Speed indicator (Rotation rate)
AGILE - Sensitivity indicator (Feed forward)
GYRO - Sensitivity indicator (Gyro gain)
RUD - Rudder parameter adjustment mode
ELE – Elevator cyclic parameter adjustment mode
AIL – Aileron cyclic parameter adjustment mode
Note 1: Bind the transmitter with the aircraft, wait for the flight controller initialization to
complete, and then perform changes to the flight control settings.
Note2: Parameters can be adjusted manually or via BT adaptor and App on iOS or Android.

Rudder speed setting (rotation rate)
To enter the menu, press and hold SET for 3 seconds → RUD light is solid-on → SPEED light
flashes
With the RUD light solid-on in white and the SPEED blue light flashing, you are reading the rudder
speed setting. The factory default rudder speed is 5, you will see the BLUE light flashing 5 times.
followed by a pause.
You can use the Elevator stick of the transmitter to raise and lower the setting, forward stick
giving a higher setting (faster rotation rate) and back stick to give a lower setting. The number of
consecutive flashes represents the setting level. The highest setting is 9 and the lowest setting is
1 flash (slowest rotation rate).
After completing setting changes, press and hold the SET button for 3 seconds to exit and save,
then the indicator light turns off and you are ready to fly. Or to move to the next setting, click the
SET button.

Rudder gyro gain setting
RUD light is solid-on → click SET → GYRO light flashes
Press and hold the SET button for 3 seconds to enter the adjustment mode, short
press the SET button until the indicator light RUD is solid-on and the GYRO light
flashes. The factory default rudder gain is 5 and you will see the BLUE light flashing 5
times followed by a pause.
You can use the Elevator stick of the transmitter to raise and lower the setting, forward
stick giving a higher setting (higher gain) and back stick to give a lower setting. The
number of consecutive flashes represents the setting level. The highest setting is 9
and the lowest setting is 1 flash (lowest gain).
After completing setting changes, press and hold the SET button for 3 seconds to exit
and save, then the indicator light turns off and you are ready to fly. Or to move to the
next setting, click the SET button.

Elevator speed setting (rotation rate)
ELE light is solid-on → click SET → SPEED light flashes
Press and hold the SET button for 3 seconds to enter the adjustment mode, short
press the SET button until the indicator light ELE is solid-on and the SPEED light
flashes. The factory default elevator speed is 5 and you will see the BLUE light
flashing 5 times followed by a pause.
You can use the Elevator stick of the transmitter to raise and lower the setting, forward
stick giving a higher setting (faster rotation rate) and back stick to give a lower setting.
The number of consecutive flashes represents the setting level. The highest setting is
9 and the lowest setting is 1 flash (slowest rotation rate).
After completing setting changes, press and hold the SET button for 3 seconds to exit
and save, then the indicator light turns off and you are ready to fly. Or to move to the
next setting, click the SET button.

Elevator agility setting (feed forward)
ELE light is solid-on → click SET → AGILE light flashes
Press and hold the SET button for 3 seconds to enter the adjustment mode, short
press the SET button until the indicator light ELE is solid-on and the AGILITY light
flashes. The factory default elevator agility is 5 and you will see the BLUE light
flashing 5 times followed by a pause.
You can use the Elevator stick of the transmitter to raise and lower the setting, forward
stick giving a higher setting (higher agility) and back stick to give a lower setting. The
number of consecutive flashes represents the setting level. The highest setting is 9
and the lowest setting is 1 flash (lower agility).
Agility or feed forward controls how much of the direct stick input is acted on by the
FBL when the Transmitter stick is moved. Higher levels will give a more reactive
control feel.
After completing setting changes, press and hold the SET button for 3 seconds to exit
and save, then the indicator light turns off and you are ready to fly. Or to move to the
next setting, click the SET button.

Elevator gain setting
ELE light is solid-on → click SET → GYRO light flashes
Press and hold the SET button for 3 seconds to enter the adjustment mode, short
press the SET button until the indicator light ELE is solid-on and the GYRO light
flashes. The factory default elevator gain is 5 and you will see the BLUE light flashing
5 times followed by a pause.
You can use the Elevator stick of the transmitter to raise and lower the setting, forward
stick giving a higher setting (higher gain) and back stick to give a lower setting. The
number of consecutive flashes represents the setting level. The highest setting is 9
and the lowest setting is 1 flash (lowest gain).
After completing setting changes, press and hold the SET button for 3 seconds to exit
and save, then the indicator light turns off and you are ready to fly. Or to move to the
next setting, click the SET button.

Aileron speed setting (rotation rate)
AIL light is solid-on → click SET → SPEED light flashes
Press and hold the SET button for 3 seconds to enter the adjustment mode, short press the SET
button until the indicator light AIL is solid-on and the SPEED light flashes. The factory default
aileron speed is 5 and you will see the BLUE light flashing 5 times followed by a pause.
You can use the Elevator stick of the transmitter to raise and lower the setting, forward stick
giving a higher setting (faster rotation rate) and back stick to give a lower setting. The number of
consecutive flashes represents the setting level. The highest setting is 9 and the lowest setting is
1 flash (slowest rotation rate).
After completing setting changes, press and hold the SET button for 3 seconds to exit and save,
then the indicator light turns off and you are ready to fly. Or to move to the next setting, click the
SET button.

Aileron agility setting (feed forward)
AIL light is solid on → click SET → AGILE light flashes
Press and hold the SET button for 3 seconds to enter the adjustment mode, short press the SET
button until the indicator light AIL is solid-on and the AGILITY light flashes. The factory default
aileron agility is 5 and you will see the BLUE light flashing 5 times followed by a pause.
You can use the Elevator stick of the transmitter to raise and lower the setting, forward stick
giving a higher setting (higher agility) and back stick to give a lower setting. The number of
consecutive flashes represents the setting level. The highest setting is 9 and the lowest setting is
1 flash (lower agility).
Agility or feed forward controls how much of the direct stick input is acted on by the FBL when
the Transmitter stick is moved. Higher levels will give a more reactive control feel.
After completing setting changes, press and hold the SET button for 3 seconds to exit and save,
then the indicator light turns off and you are ready to fly. Or to move to the next setting, click the
SET button.
Altri manuali Goosky Controllori


