Harbor Freight Tools TRAILER JACK 41006 Manuale utente

2000 Lb. Ring Mount
Trailer Jack
Model
4100641006
4100641006
41006
Assembly & Operating Instructions
For technical questions and replacement parts, please call 1-800-444-3353.
www.HarborFreight.com
Copyright 1999 by Harbor Freight Tools®.All Rights Reserved.
No portion of this manual or any artwork contained herein may be reproduced in any
manner, shape or form without the express written consent of Harbor Freight Tools.

WeightCapacity: 2000 Lbs.
Minimum Height: 9-7/8”
MaximumHeight: 20-3/4”
LiftDistance: 10-7/8”
SkidDimensions: 7-5/8” x 4-1/16”
SwivelCapacity: 360o
Material: Zinc-platedSteel
OverallDimensions: 29-7/8”H x 7-5/8”L x 4-3/4”W
NetWeight: 13.38 Lbs
SPECIFICATIONS MODEL# 41006TRAILER JACK
FEATURESOFTHISTRAILERJACK
1. Strong steelconstruction, with enclosedgear.
2. Lockableswivelbaseforconvenienttowingandjacking.
3. Topcrankmakesliftingtrailerveryeasy.
4. Skid footdistributestrailerweighttoresistsurface damage.
5. Permanentweld-onmountenhancesweightcapacity.
SAVE THIS MANUAL
You will need this manual for the safety warnings and cautions, assembly instructions, operating
procedures, maintenance procedures, trouble shooting, parts list, and diagram. Keep your invoice
with this manual. Write the invoice number on the inside of the front cover. Keep both this manual
and your invoice in a safe, dry place for future reference.
Page 2 SKU # 41006
NOTICE
The Warnings, Cautions, and Instructions discussed in this instruction manual cannot
cover all possible conditions and situations that may occur. It must be understood by
the operator that common sense and caution are factors which cannot be built into this
product, but must be supplied by the operator.

Page 3 SKU # 41006 REV03/04
SPECIALWARNINGS WHENUSINGTHIS TRAILERJACK
Using this Jack may create special hazards.
Take particular care to safeguard yourself and those around you.
1. RollAway.Avoid situations which allowthetrailer to rollawayon the skidand trailer wheels.If
usingthetrailerjack onanincline,be suretochockthe wheels.Neverleavethe trailerunattendedwhileon
thejackifpossibilityofroll-awayexists.
2. Overloading. Neverattemptto lift orsupport loads inexcess ofthe rated strengthof thisTrailer
Jack.Suddenfailure of theJackmay result inseriouspersonal or propertyinjury.
3. Re-positiontheTrailerJack beforedriving.Always re-position theTrailerJack intoa
horizontalposition(paralleltothetrailer’stongue)beforemovingthevehicleandtrailer.Makesurethe
LockingPinisinplace. DrivingwiththeTrailerJackinthe vertical, down positioncancauseserious
damageto property.
4. Dollyingonunevensurfaces. TheSkid onthisJack makesmovingyour trailerwithout a vehicle
possible.However,movingthe trailer onunevensurfaces cancausepotential damage totheJack or other
property.
5. Notto be used for aircraft purposes.
NOTICE: No list of warnings can be all inclusive. The operator must
supply common sense, and operate this tool in a safe manner.
MAINTENANCE
If you discover any damage, repair or replace any damaged parts before using your Trailer Jack.
1. KeeptheCrankmechanismandinnertubelightlygreased.Assurethatthis mechanism functions
smoothly.
2. Check theTongueAdapter’smountingweldregularly to assure thatitremainssolid.
3. Inspect theentireunit forcorrosion which maybe caused byexposure tosaltwateror weather.
Rinsethoroughlyandre-lubricateiftrailerjack has been immersed insaltwater.
4. Keep allmovingpartslightlylubricatedtopreventcorrosion. If corrosion develops, youmaypaint
exteriorparts of the Jack to arrest and prevent furtherdamage.
PLEASE READ THE FOLLOWING CAREFULLY
THE MANUFACTURER AND/OR DISTRIBUTOR HAS PROVIDED THE PARTS DIAGRAM IN
THIS MANUAL AS A REFERENCE TOOL ONLY: NEITHER THE MANUFACTURER NOR
DISTRIBUTOR MAKES ANY REPRESENTATION OR WARRANTY OF ANY KIND TO THE BUYER
THAT HE OR SHE IS QUALIFIED TO MAKE ANY REPAIRS TO THE PRODUCT OR THAT HE
OR SHE IS QUALIFIED TO REPLACE ANY PARTS OF THE PRODUCT: IN FACT THE
MANUFACTURER A ND/OR DISTRIBUTOR EXPRESSLY STATES THATALL REPAIRS AND
PARTS REPLACEMENTS SHOULD BE UNDERTAKEN BY CERTIFIED AND LICENSED
TECHNICIANS AND NOT BY THE BUYER. THE BUYER ASSUMES ALL RISK AND LIABILITY
ARISING OUT OF HIS OR HER REPAIRS TO THE ORIGINAL PRODUCT OR REPLACEMENT
PARTS THERETO, ORARISING OUT OF HIS OR HER INSTALLATION OF REPLACEMENT PARTS
THERETO.

Page 4 SKU # 41006
INSTALLATION
NOTE: Do not drill holes or otherwise damage the trailer tongue when installing this Jack. Failure
of the trailer tongue may result.
NOTE: Installing this Jack is most easily done with the Trailer mounted on the towing vehicle hitch.
1. Measure thetrailertongue forthe best locationto mount theJack. Remember thatthe Jack mustnot
interferewith theVehicleortrailer when turningorpassing over speedbumps,boat ramps, etc.
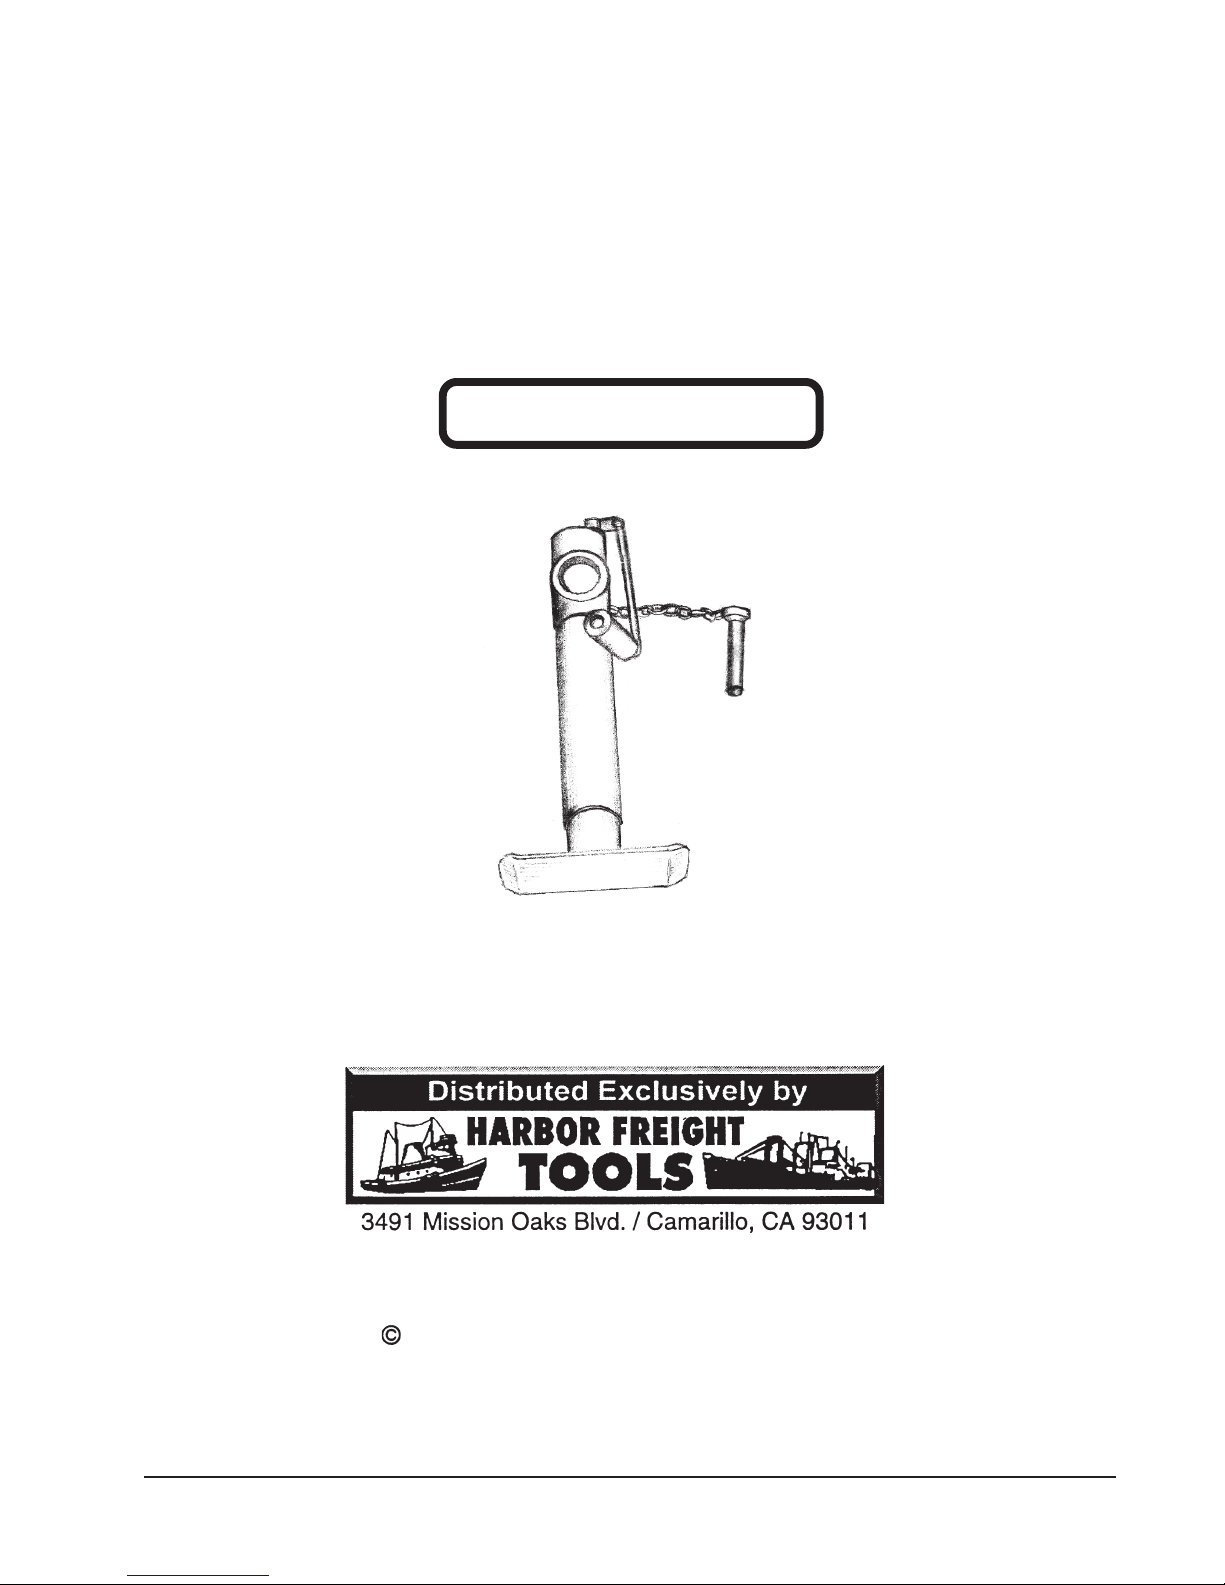
2. Adjust theCouplingTubesothe Jack isinthe loweredposition.
3. Hold theJackagainst the trailertongue, and usingtheCrank Handle(#5),lower the InnerTube
(#3)and Skid Plate (#7) to the ground.
4. Using asuitablewelder,weld the TongueAdapter (#8)to the trailertongue.
WARNING: Only a qualified and certified welder should attempt this. A poor weld may cause the
trailer to fall suddenly, potentially causing serious personal or property damage.
5. AttachtheTrailer Jackbyfitting theCouplingTube (#1) overtheTongueAdapter(#8). Slide the
LockingPin(#6) through theappropriatehole in theCouplingTubeand theTongueAdapter to
securetheTrailer Jack tothetrailer tongue.
6. Test the operationof theTrailer Jack. Place theLocking Pin ineach of theholes of theCoupling
Tube/TongueAdapterto make sureit holdstheTrailer Jackin each ofthe posiblepositions. Make
adjustmentsifnecessary. Tightenthemountinghardwarefirmly.
OPERATION
Dismounting the trailer from the towing vehicle.
WARNING: Before dismounting, make sure the trailer wheels are properly chocked to prevent the
trailer from rolling.
1. Withthe trailer onthehitch,support the weightoftheJack with onehandandpull the Locking Pin
(#6)out of theCouplingTube (#1)/TongueAdapter (#8),allowing theJack torotate downwards.
WARNING: Keep your fingers away from the Coupling Tube area, and do not allow the Skid
Plate to strike your foot as the Jack rotates downward.
2. Replace theLockingPinintothe CouplingTube/TongueAdapter, locking theJackintothelowered
position.
3. RotatetheCrank Handle (#5)counterclockwise tolower the Skid Plate (#7)to the
ground.Continuetocrankjust enough fortheTrailerJack totaketheweight of thetrailer.Thiswill
makeiteasiertodisengagethetrailerhitch.
4. Disengagethetrailerhitch.Remembertodisengageanysafetychains,electricalconnectionsand
otherconnectionsbetweenthevehicleandthe trailer.
5. When thevehicleiscompletely clear, and itissafe to doso,drivethe vehicle awayfromthe trailer.
WARNING: Be sure to have a spotter watch this operation to be sure the trailer is clear of the
vehicle, and that the trailer does not roll away.
Using the Jack to mount the trailer to the towing vehicle.
WARNING: Do not attempt to move the trailer tongue if it is too heavy for you.
NOTE: You will need assistance for some parts of this operation.
1. Makesurethe trailer’s wheelsare properly blockedto prevent unwantedtrailer movement.
2. Movethetowingvehicleinplacesothat the vehicle’shitchisin close proximity tothetrailer’shitch.
3. Rotatethe Crank Handle(#5) to raiseor lowerthe trailer tothe level ofthe towingvehicle’shitch.
4. Haveanassistant spotfor you asyou move thevehicle incloseto thetrailer’s hitch. Mountthe trailer
ontothetowingvehicle’shitch.

MODEL# 41006 TRAILER JACK
Page 5 SKU # 41006
MODEL# 41006 TRAILER JACK PARTSLIST
Part# Description
1 CouplingTube
2 Outer Tube
3 Inner Tube
4 Screwed Shaft
5 Crank Handle
6 LockingPin
7 Skid Plate
8 Tongue Adapter
9 Hitch Pin
10 SnapRing
Using the Jack to mount the trailer to the towing vehicle (continued)
5. TurntheCrankHandle (#5) counterclockwisetolowertheJack slightly,transferringthetrailer’sweight
ontothetowingvehicle.
6. Pulloutthe Locking Pin(#6)and rotate theJackinto itsuprightposition. Reinsert the LockingPininto
theCouplingTube/TongueAdapter.
7. Checkallconnectionsand remove wheelblocksbeforedriving the vehicle.
#8 Tongue Adapter
#10 Snap Ring (not shown)
#9 Hitch Pin
Rev06/00
Questo manuale è adatto per i seguenti modelli
1
Indice
Altri manuali Harbor Freight Tools Accessori

Harbor Freight Tools
Harbor Freight Tools 90402 Manuale utente

Harbor Freight Tools
Harbor Freight Tools 91736 Guida di riferimento rapido

Harbor Freight Tools
Harbor Freight Tools 92579 Manuale utente

Harbor Freight Tools
Harbor Freight Tools 38335 Manuale utente

Harbor Freight Tools
Harbor Freight Tools ARMSTRONG Istruzioni per il montaggio

Harbor Freight Tools
Harbor Freight Tools 3394 Manuale utente


