
Healthmark FIS-001 Manuale utente

FIS-001 Page 1 of 33
Instructions for Use
Healthmark Inspection Scope Camera FIS-001

FIS-001 Page 2 of 33
TABLE OF CONTENTS
1.0 Introduction......................................................................................................................................3
2.0 Purpose.............................................................................................................................................3
3.0 General Description .........................................................................................................................3
4.0 Software Installation ........................................................................................................................5
5.0 Mitigating Residual Device Risks..................................................................................................15
6.0 Troubleshooting .............................................................................................................................16
7.0 Mounting The Handle on a Tripod.................................................................................................22
8.0 Preparation & Power-Up................................................................................................................22
9.0 Graphical User Interface (GUI)......................................................................................................24
10.0 Accessories.....................................................................................................................................33
11.0 Maintenance...................................................................................................................................33
12.0 User Notices...................................................................................................................................33

FIS-001 Page 3 of 33
1.0 INTRODUCTION
The Healthmark Inspection Camera is intended for inspection of medical and surgical
instrumentation after cleaning, and prior to sterilization, or post sterilization. It may be used on
the outside or inside surfaces of instruments including devices such as arthroscopy routers,
shavers, reamers, and Yankauer etc….
2.0 PURPOSE
This Instructions For Use (IFU) manual describes how the camera device is to be used. Software
installation instructions are also included.
This IFU contains essential information on using this device safely and effectively. Before use,
thoroughly review and be familiar with this manual and the manuals of all equipment that will be
used during the inspection procedure. Use the devices as instructed. Keep this and all related
instruction manuals in a safe, accessible location. If you have any question or comment about
any information in this IFU, please contact Healthmark at (800) 521-6624 x6657 or e-mail at
hmitdesk@hmark.com.
3.0 GENERAL DESCRIPTION
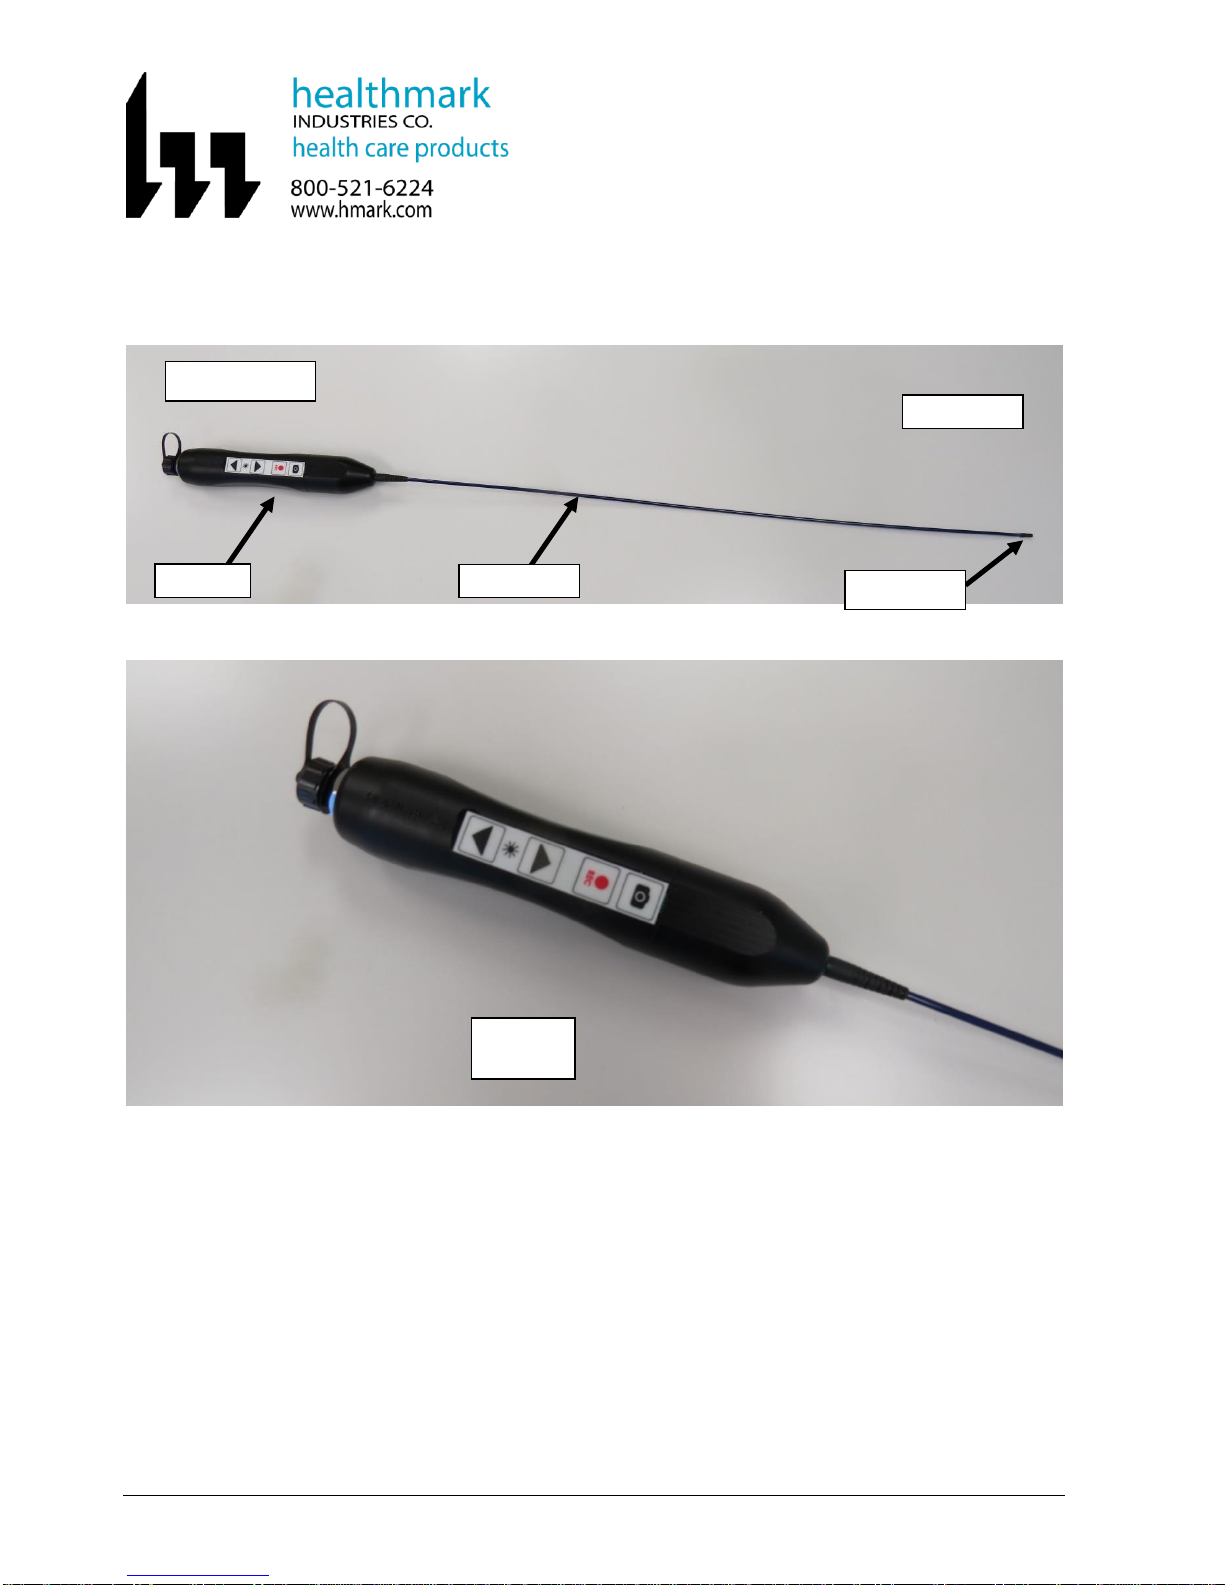
The Healthmark Inspection Camera has an extrusion with a light source and camera lens at the
distal tip. The outer diameter of the extrusion and camera head is 3.1mm max. The device
should never be inserted into a lumen or working space smaller than 3.2mm in diameter. Any
smaller lumen may cause the device to become stuck, rendering the inspected equipment
unusable, and possibly damaging the camera device.
Use this device only in spaces 3.2mm or larger in diameter.
The camera extrusion is 50cm from the distal tip to the control handle. Using the camera device
in lumens longer than this may lead to inadequate inspection because the target areas to be
inspected may be beyond the effective focal length of the device.
Ensure that all areas of equipment to be inspected are accessible by the inspection
camera; failure to do so may lead to inadequate inspection.
FIS-001 Page 4 of 33
Healthmark Inspection Camera
Handle
Extrusion
Proximal End
Distal End
Distal Tip
Camera
Handle

FIS-001 Page 5 of 33
4.0 SOFTWARE INSTALLATION
4.1 System Requirements:
The computer in which the software will be installed must meet the following
requirements:
- Platform: Windows XP or Windows 7 (32-bit or 64-bit)
- RAM: 4GB minimum
- One USB 2.0 port
4.2 Procedures:
The Healthmark Inspection Camera software installation consists of two (2) steps:
1) Device Driver Installation, and
2) Application Software Installation.
4.3 Device Driver Installation
4.3.1 Turn on the Target Computer.
4.3.2 Proceed to log into the Windows desktop environment.
4.3.3 Do not connect any Healthmark camera device to the computer during the
installation process unless instructed to do so.
4.3.4 Obtain the Installation software on the USB flash drive provided and insert it into
the USB port of the computer. Then open “My Computer” and look for the
external device drive.
4.3.5 Double click on the Healthmark drive to open the software folder.
FIS-001 Page 6 of 33
4.3.6 Determine System Architecture of target computer:
Determine whether your computer is running a 32-bit version or 64-bit version of
the Windows operating system. If you need more information regarding how to
check, you may refer to http://support.microsoft.com/kb/827218 for more details.
4.3.7 Locate the proper device driver installer:
Open the Healthmark folder. Depending on 32-bit or 64-bit system architecture,
double click and open the “32bit_driver” or “64bit_driver” folder accordingly.
4.3.8 Initiating the driver installer - double click and run the following file:
4.3.8.1 For 32-bit system: Cy2510Installation.msi
4.3.8.2 For 64-bit system: Cy2510Installation_x64.msi
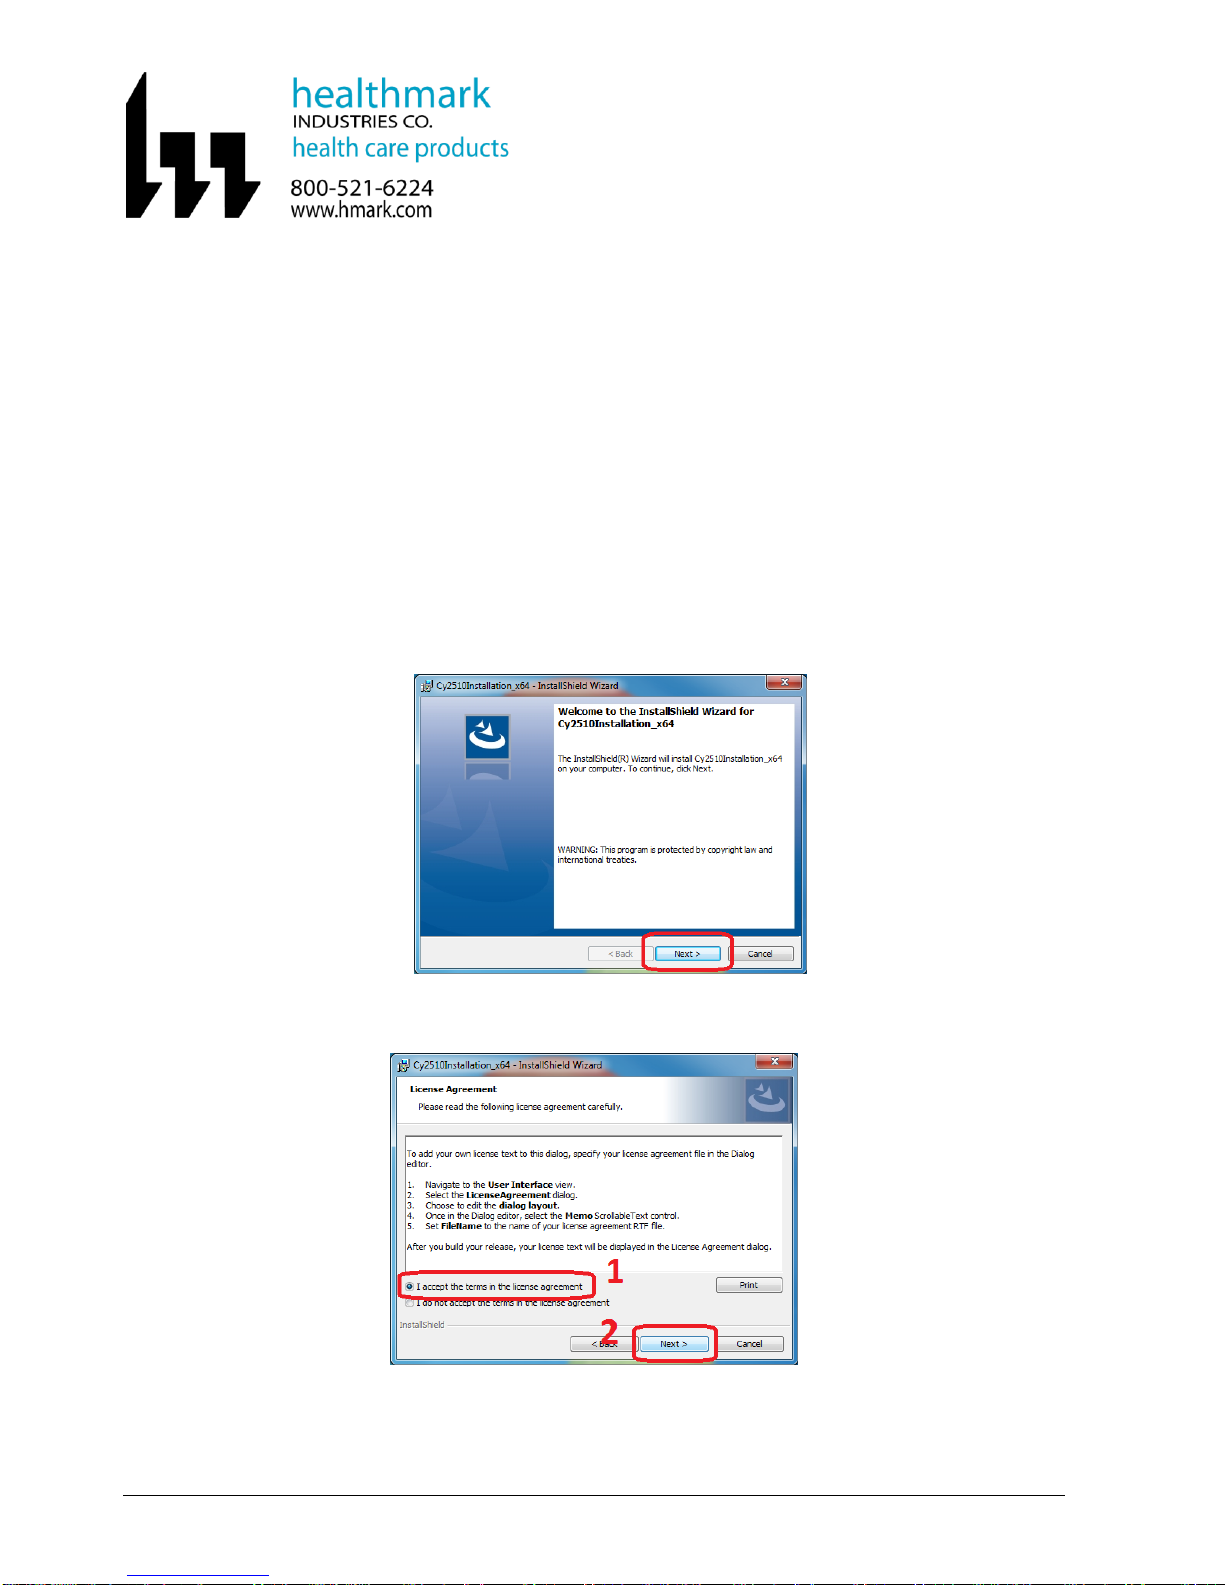
4.3.8.3 Then proceed as guided by a series of pop-up dialog boxes from the
InstallShield Wizard. Click the “Next” Button to continue.
4.3.8.4 Review and accept the License Agreement. Click the “Next” Button to
continue.
FIS-001 Page 7 of 33
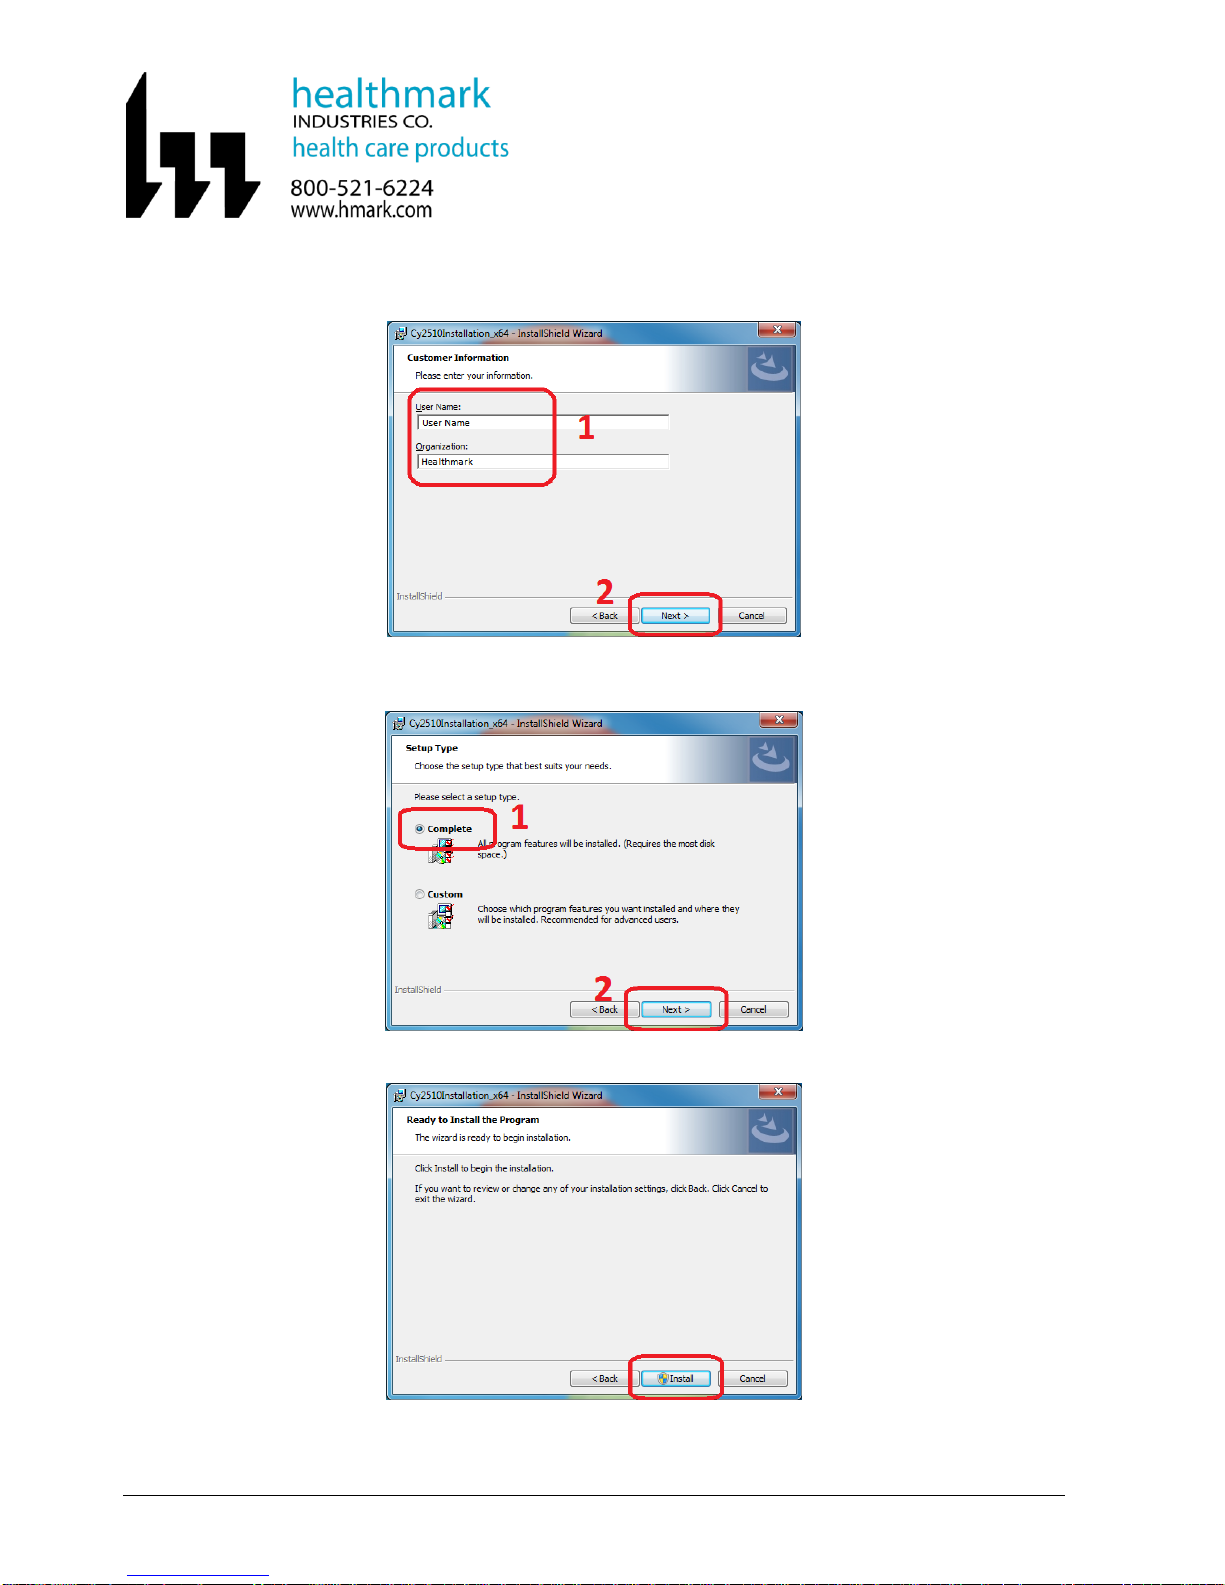
4.3.8.5 On the “Customer Information” page, enter the desired information.
Then click the “Next” button.
4.3.8.6 On the “Setup Type” page, choose “Complete” option to install all
necessary components. Then click the “Next” Button.
4.3.8.7 Click the “Install” Button on the next dialog box screen.
FIS-001 Page 8 of 33
4.3.8.8 After clicking “Install” on the “Ready to Install the Program” screen, a
Windows dialog box with the title “User Account Control,” may pop
up and display a question similar to:
“Do you want to allow the following program from an unknown
publisher to make changes to this computer?”
“Program name:…Cy2510Installation_x...msi”
In case this Windows dialog box pops up, click the “Yes” Button to
continue.
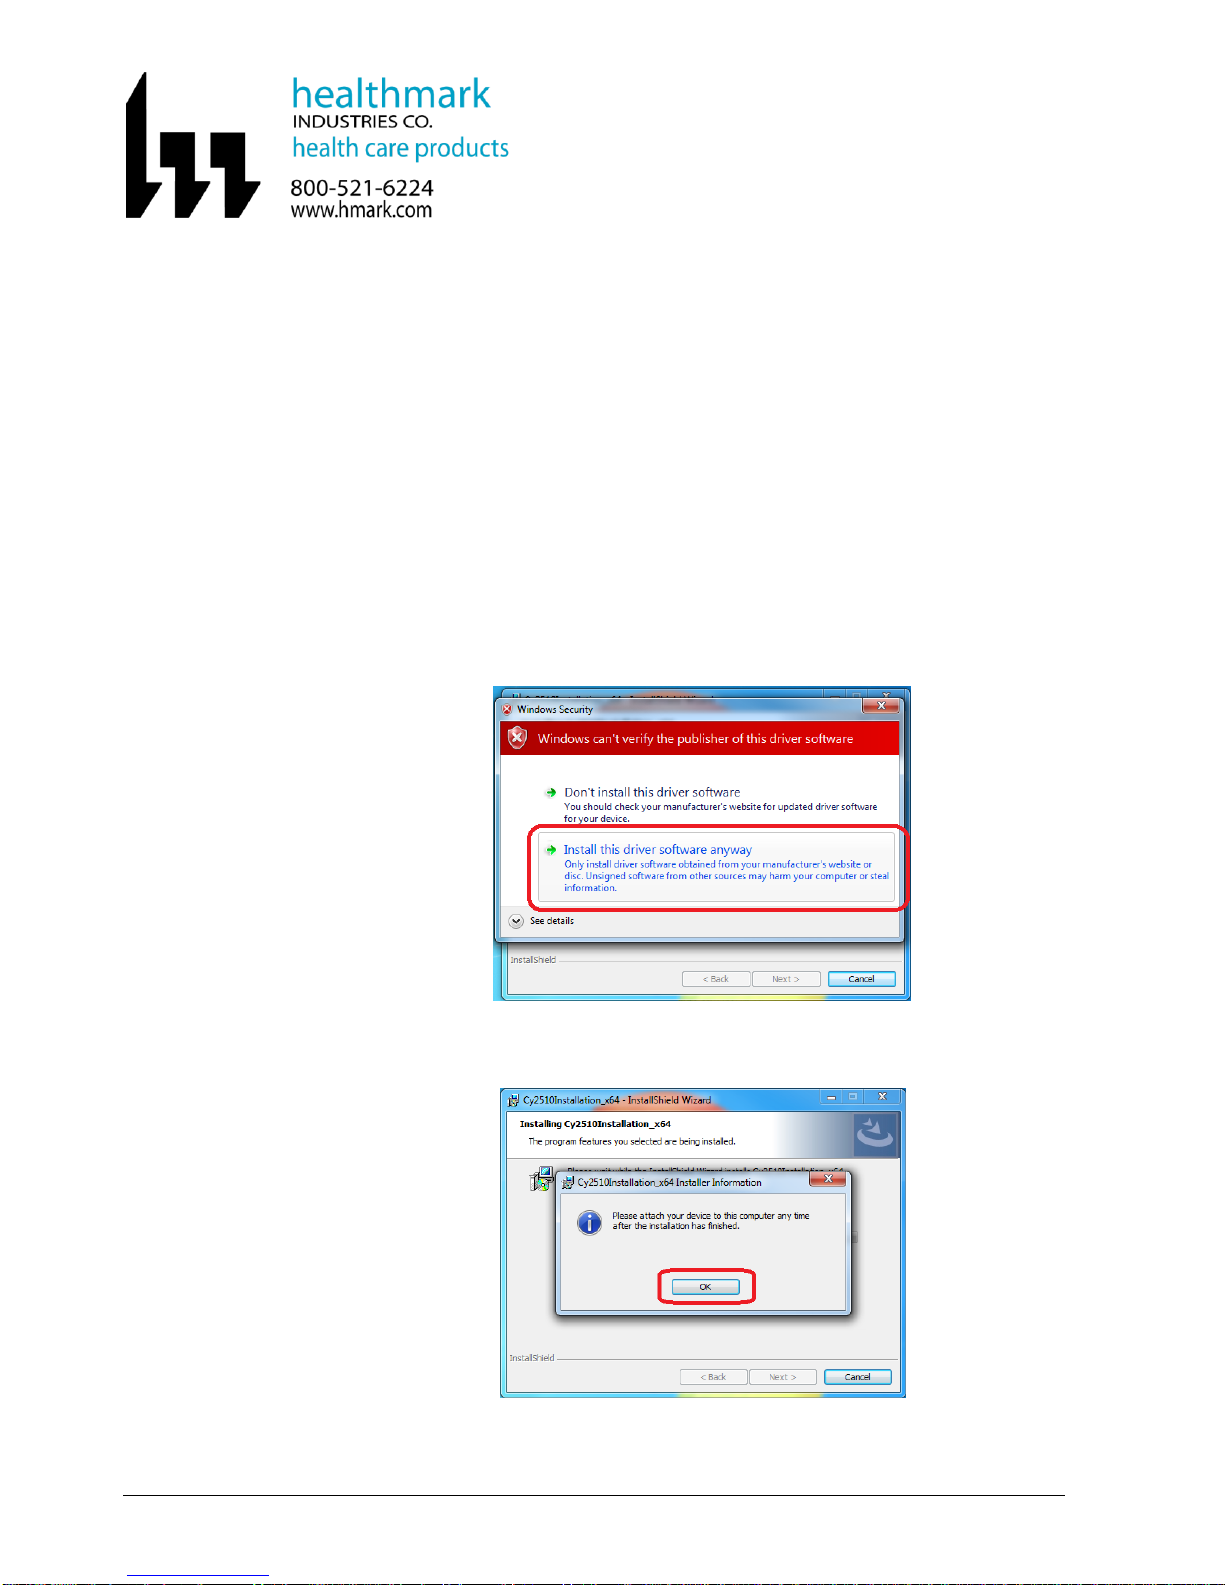
4.3.8.9 Another Windows Security pop-up dialog box (shown below) may
appear and display a question:
“Windows can’t verify the publisher of this driver software.”
Choose the option, “Install this driver software anyway.”
4.3.8.10 Review the next pop-up dialog box. Then click the “OK” Button to
proceed.
FIS-001 Page 9 of 33
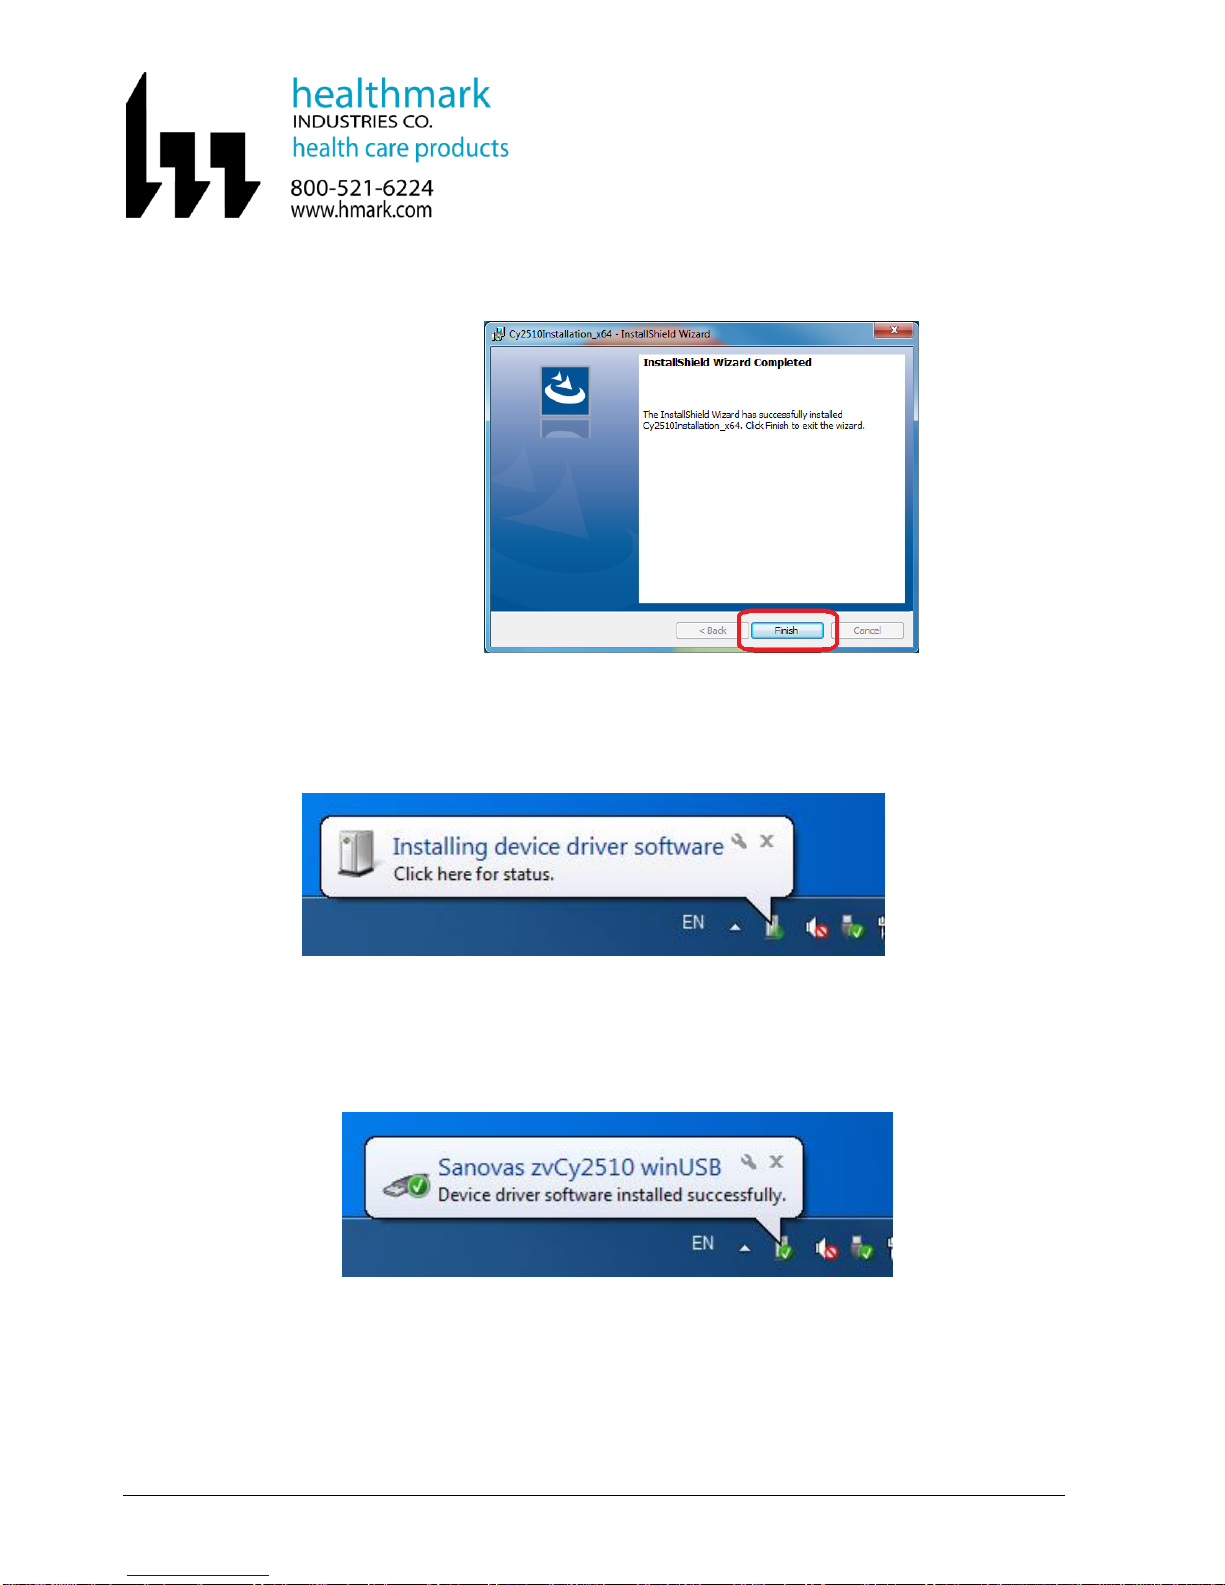
4.3.8.11 At the InstallShield Wizard Completed screen, click the “Finish”
Button to proceed.
4.3.9 Connect a Healthmark Inspection Camera to USB2.0 port of the computer using
the provided USB cable.
4.3.10 A Windows balloon message may pop up at the lower right-hand corner and
display a message: “Installing device driver software”.
4.3.11 When the Windows finishes installing the device driver, another balloon message
may pop up at the lower right-hand corner and display a message:
“Sanovas zvCy2510 winUSB” and “Device driver software installed
successfully.”
FIS-001 Page 10 of 33
4.4 Application Software Installation
If the Healthmark Application Software has been installed on the computer before,
continue to install the new application software to obtain the latest software update.
4.5 Locate the application software installer on software CD:
Open the HealthMark_Install_Package folder, and locate the file “setup.exe”.
4.6 Double click and run the file “setup.exe”from the “HealthMark_Install_Package” folder.
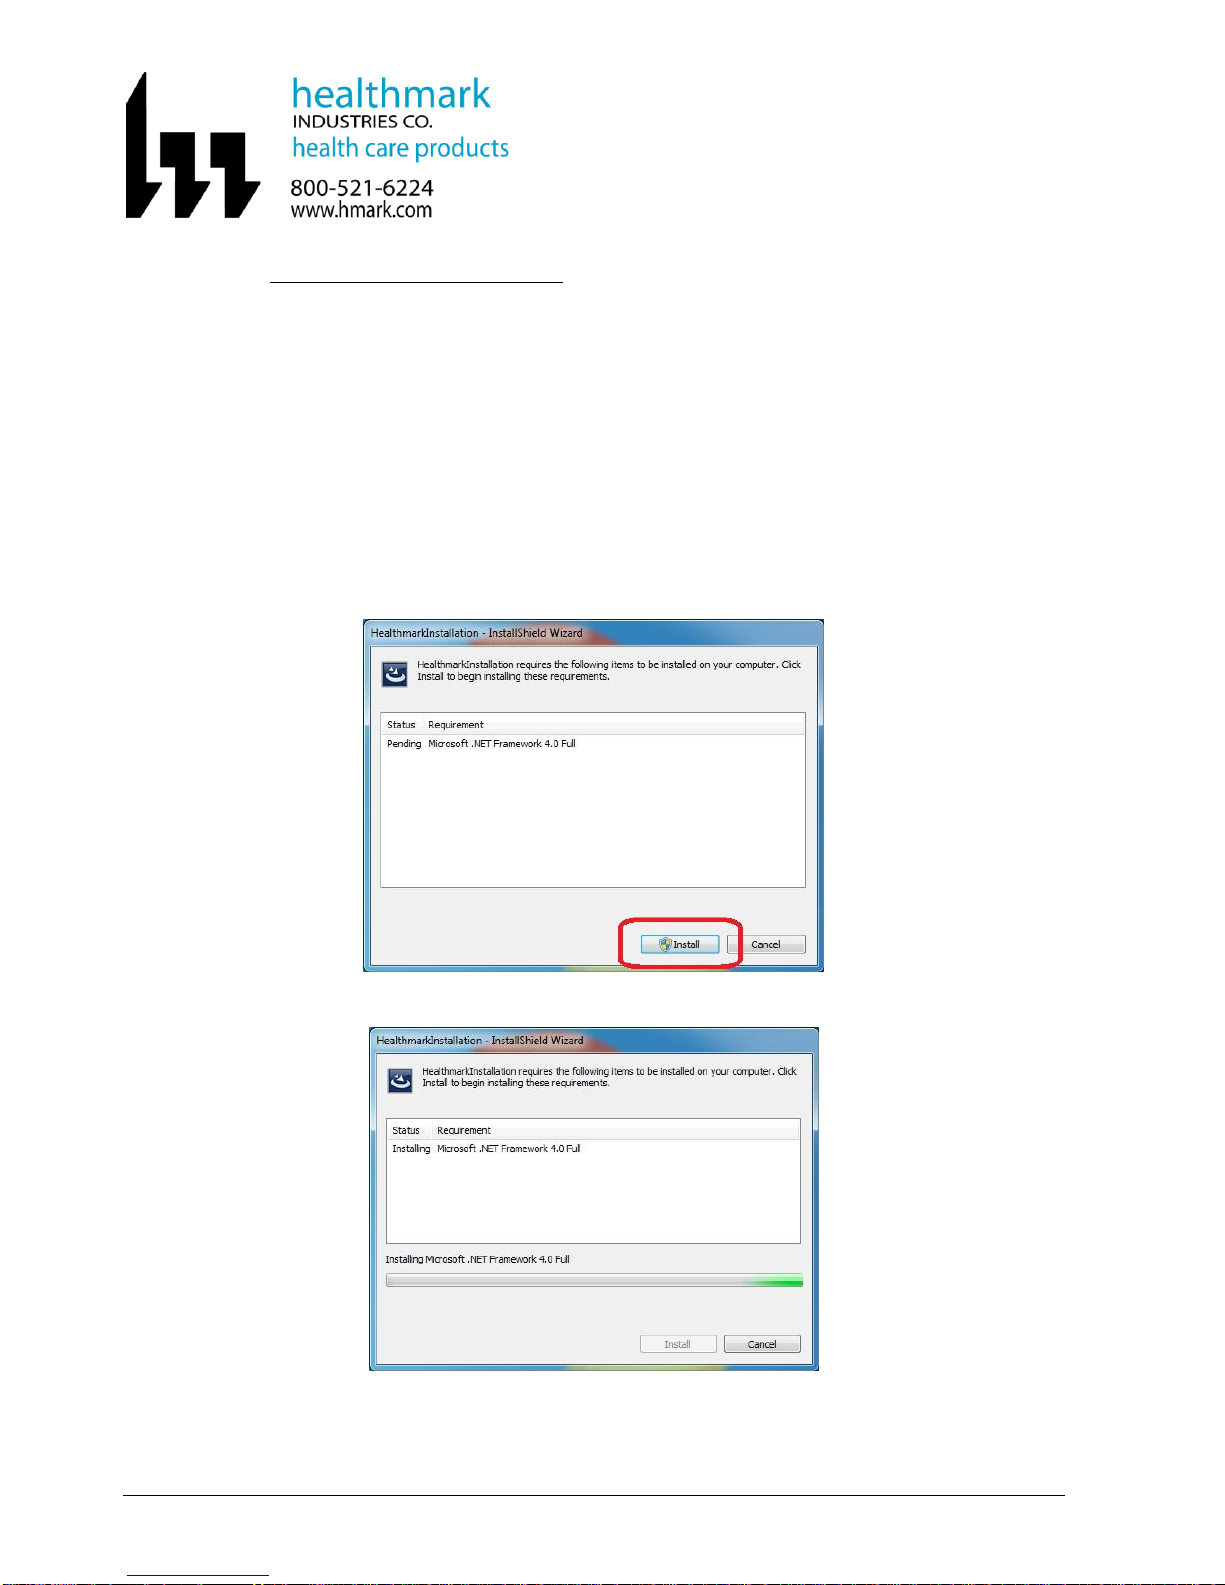
4.7 Install .NET Microsoft Framework 4.0 if prompted.
If the computer has not previously been installed with Microsoft .NET framework 4.0 or
above, a pop-up dialog box will appear to install the required .NET framework files.
Click on the “Install” Button to install .NET Microsoft framework 4.0.
The installing process for Microsoft .NET Framework 4.0 may take a few minutes.
Indice


