
HomeAware BLINK HA360B Manuale utente

BLINK
USER GUIDE FOR MODELS
HA360B HA360BDB
Copyright © 2019 Sonic Alert. All right reserved.
HA360B user guide.pdf 1 10/8/2019 1:52:53 PM

2
IMPORTANT SAFETY INSTRUCTIONS
When using your HomeAware™HA360B / HA360BDB, basic safety precautions should
always be followed to reduce the risk of fire, electric shock or injury to persons
including the following:
1. Read and understand all instructions, if there is something you do not understand
please call our customer service.
2. Do not use any electrical product near a bathtub, washbasin, kitchen sink or
laundry tub, in a wet basement, or close to a swimming pool or anywhere else
there is water.
3. Always unplug this product from the wall power outlet before cleaning. Do not use
liquid cleaners or aerosol cleaners on the product. Use a damp cloth for cleaning
only.
4. Always place this product on a stable surface. Serious damage and/or injury may
result if the product falls.
5. This product should never be placed near or over a radiator or heat register. This
product should not be placed in a built-in installation unless proper ventilation is
provided.
6. Always operate this product using electrical voltage as specified on the base unit or
in the user guide. This product can work on any power supply, AC100-240V.
7. Do not overload wall outlets or extension cords as this can increase the risk of fire
or electrical shock.
8. Unplug this product from the wall outlets and refer servicing to the manufacturer
under the following conditions:
A. If water or liquid has been spilled into or on the product.
B. If the product has been exposed to rain or water.
C. If the product has been dropped or if the case has been damaged in any way.
9. To reduce the risk of electrical shock, do not take this product apart. Opening or
removing covers may expose you to dangerous voltages or other risks. Incorrect
reassembly can cause electric shock when the appliance is subsequently used.
Opening the product or alteration will void the warranty.
10. Use only the batteries indicated in this manual. Do not dispose of batteries in a fire.
They may explode. Check with local codes for possible special disposal instructions.
11. This product should not be exposed to dripping or splashing and that no objects
filled with liquids, such as vases, shall be placed on or near the product.
12. Batteries shall not be exposed to excessive heat, such as sunshine or fire or any
other heat source.

3
FEATURES
HomeAware Blink - HA360B
•The brightest and most colorful signaling receiver.
•Connects to the HomeAware main unit, transmitters, and
receivers.
•Blinks five unique colors to alert you to five differing alerts
when used with optional transmitters.
•Ultra-high brightness strobe for maximum visibility.
•Works even when the power is out for two days.
HomeAware Blink Doorbell - HA360BDB
•The most vivid and vibrant doorbell receiver.
•The HA360B links to the HomeAware Doorbell (HA360DB),
which is included.
•Works even when the power is out for two days.
The HomeAware Blink is normally left plugged into an AC
outlet. It has an internal battery so it will work for up to two
days when the power is out.
Colors and meanings:
Red – Fire / CO / Alert
Orange - Telephone / Cell phone
Yellow Single blink - Low battery in HA360B
Double blink - Lost connection to HA360M
Green - Door
Cyan - Universal sound signaler
Blue - Baby
4
FEATURES
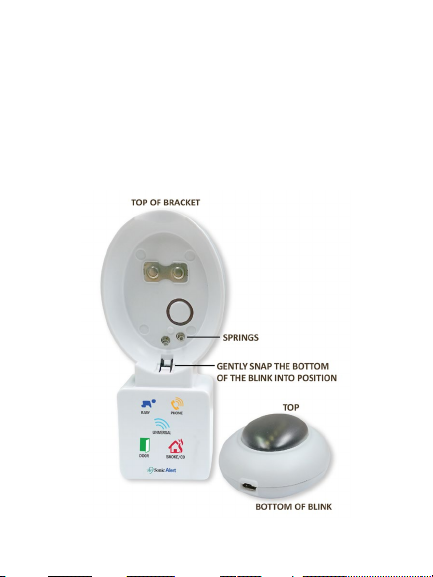
Note for models HA360B / HA360BDB:Please be
careful when removing and replacing the blink unit to
minimize damage to the springs on the bracket. Place
the top of the Blink into the top of the bracket and
then gently push the blink on the bottom into place on
the bracket until you hear it snap into place.

5
BATTERY FEATURES
• Charging the battery fully takes approximately 2.5
hours.
•When not plugged in, the Blink will start flashing
yellow when the battery has less than 20 percent
charged. The blinking stops immediately after being
plugged in but will start again four minutes after
removing the power if the battery is still less than 20
percent.
•If the internal rechargeable battery’s charge in the
HomeAware Blink is low, it will flash yellow every
eight seconds. Plug the unit back into its cradle and
into an AC outlet to recharge the battery.
•If the HomeAware Doorbell’s battery is low, the
HomeAware Blink will flash green every eight
seconds. Replace the two batteries in the
HomeAware Doorbell with #357 Silver Oxide-type
batteries only. DO NOT USE Alkaline batteries of the
same size. Some Alkaline batteries say that they can
replace 357-type Silver Oxide-type batteries, but
they will only last a few months instead of more
than 1-2 years that the 357 Silver Oxide type will
last.

6
TO USE THE HOMEAWARE BLINK HA360B AS A
RECEIVER OF THE HOMEAWARE SYSTEM
Linking:
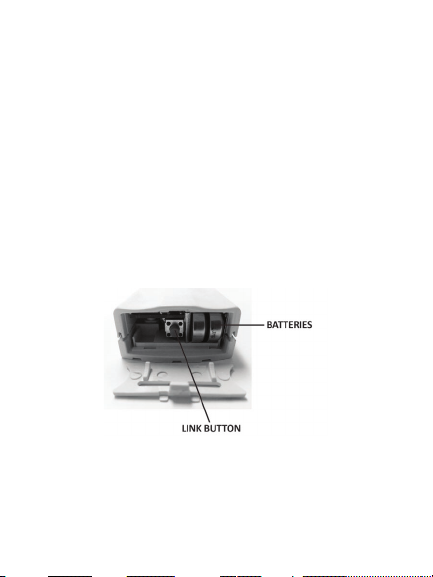
•Remove the Blink from the bracket. See illustration
for the location of the Main / Receiver switch.
• Set the Main / Receiver switch to Receiver.
•Set the HomeAware Main to link mode by press Set
Up button on the HomeAware Main and the word
LINK will be shown on the display.
• Press the LINK button on the HomeAware Blink. It
will glow purple for one second to confirm that it is
linked to the HomeAware Main.
7
TO USE THE HOMEAWARE BLINK DOORBELL
HA360BDB AS A DOORBELL SIGNALER
Before linking please install batteries in your
HomeAware doorbell.
Install Batteries
The HomeAware™ doorbell transmitter comes with
two #357 silver oxide long-lasting batteries that need
to be installed into the bottom of the unit. Once
installed the red light should light when the button is
pushed. If the light does not show, you may have the
batteries in backward.

8
TO USE THE HOMEAWARE BLINK DOORBELL
HA360BDB AS A DOORBELL SIGNALER
Linking:
•Place Main/Receiver switch into the Main position.
•Using a toothpick or paper clip, press the switch
under the hole labeled LINK on the bottom of the
HomeAware Blink. It is now in link mode and will
blink purple for 10 seconds. RGB LEDs will turn
orange for one second if there is no link after 10
seconds.
• Press the LINK button on the HomeAware Doorbell.
The HomeAware Blink will glow purple for one
second. The Doorbell button and Blink are now
linked.
• When the HomeAware Doorbell is pressed, the
HomeAware Blink will flash four times and glow
green for 10 seconds.
The HomeAware Blink can be linked to any of the
HomeAware Family, such as the smoke/CO
Transmitter, Baby Cry Sensor, Telephone Transmitter,
and Universal Sound Transmitter. It cannot be used
with the Smart Phone Transmitter as that needs to be
connected directly to the HomeAware Main unit.

9
SET-UP FOR HOMEAWARE DOORBELL HA360BDB
The Placement of the Doorbell Transmitter
Proper placement of the HomeAware™ doorbell
transmitter is important because it uses Digital RF
frequencies to send its signal. It’s important to not
place or install it on anything made of metal because
RF signals cannot transmit through anything made of
metal.
Installation and Set-Up of the Doorbell Transmitter
Note: There are two methods to install/set up the
doorbell transmitter, both require batteries.
1. Without the existing chime box. With this
method, no existing doorbell chime box is
available. Placement of the transmitter should be
within 50ft of the HomeAware Blink. (See Step 1
for doorbell transmitter set up below).
2. With the existing chime box. This is the preferred
method as it keeps the transmitter out of the
elements and in closer range to the main unit (See
step 2 for doorbell transmitter to the existing
chime box set up below).
Please determine which method you will use and
continue with the following installation directions.

10
THE DOORBELL TRANSMITTER SET UP
Step 1) The Installation Without an Existing Doorbell
Chime Box
For this method, you will need the provided connector
wire to install. We provide screws, and a mounting
block (see diagram for transmitter installation on the
next page), also see step by step instructions.
To install to a hard surface using the provided
hardware follow these steps:
a) Install the mounting block using the provided
short screw. Install the small side to the surface
(side without the arrow). This will provide a
space for the unit to slide over to attach to the
mounting block.
b) Remove the screw cover at the top of the
doorbell unit, the cover has the Sonic Alert logo
on it; this will slide up to remove. Once removed,
you’ll see the top screw mounting hole.
Questo manuale è adatto per i seguenti modelli
1
Indice


