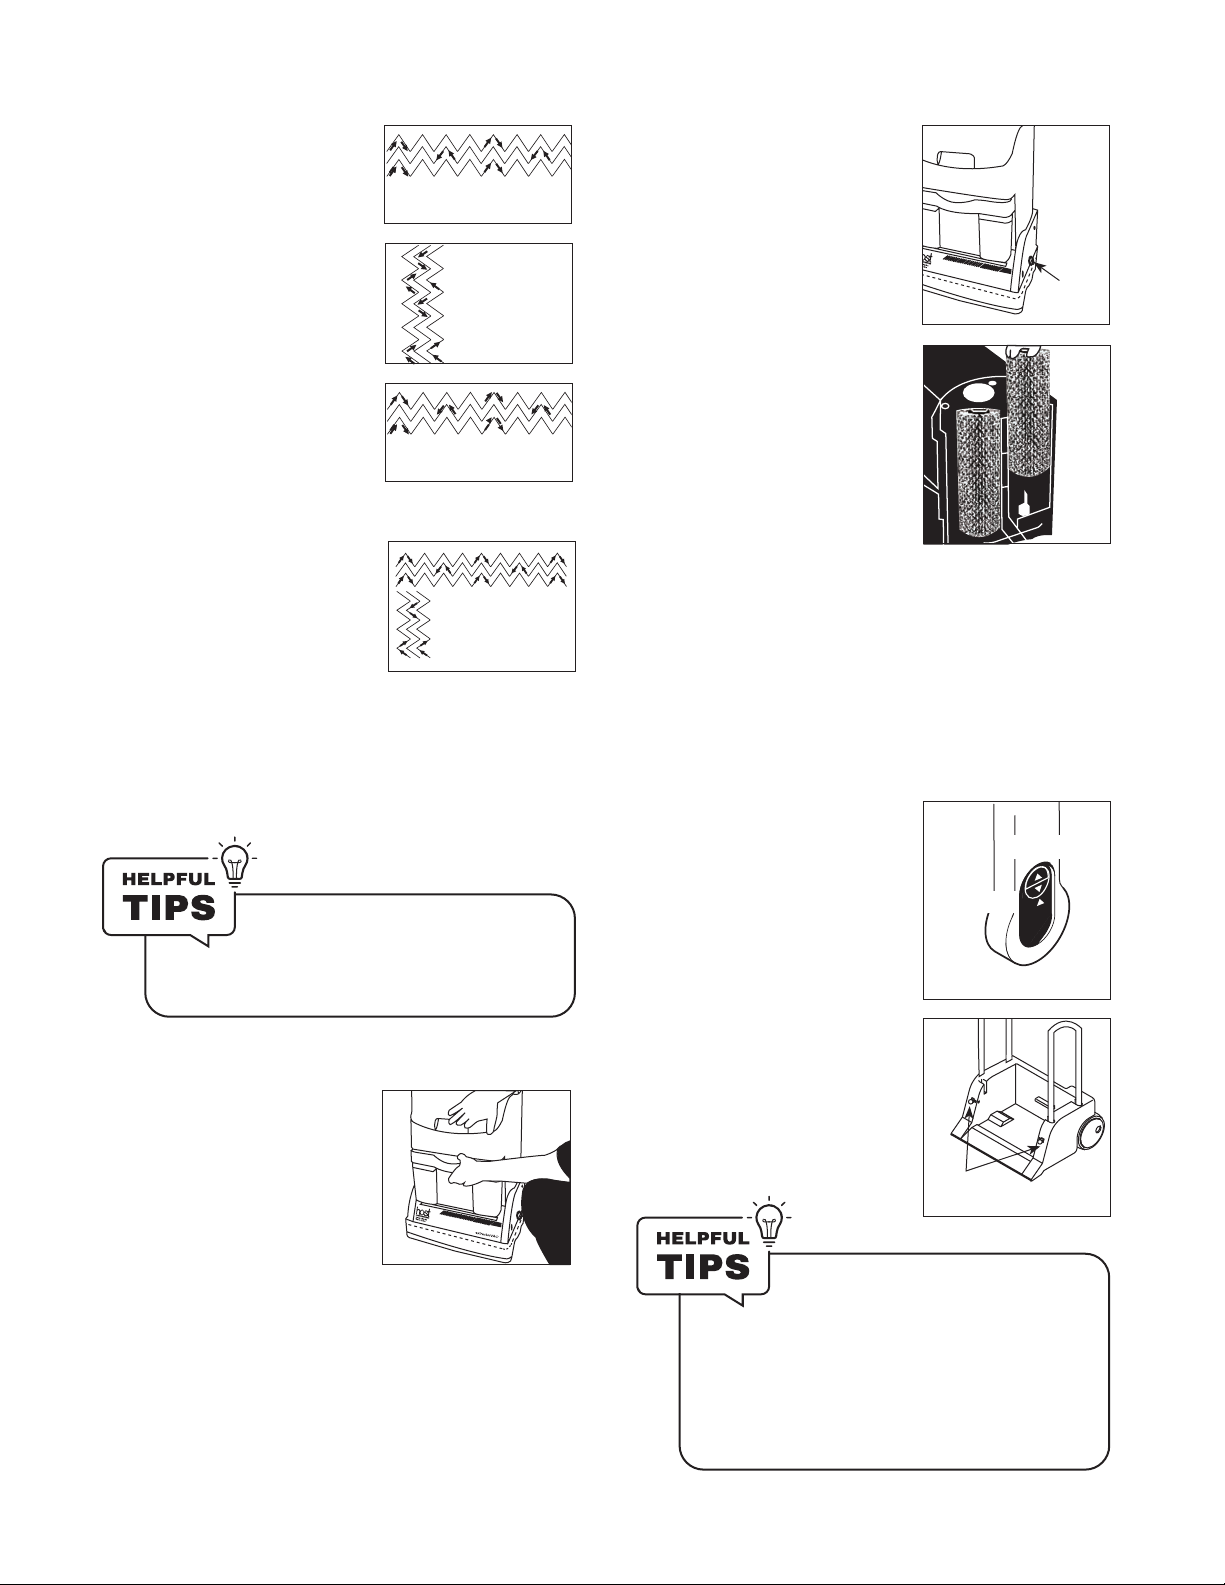
Host Liberator Manuale utente

The Dry Extraction
Cleaning System
INSTRUCTION MANUAL
HOST®System
IMPORTANT: READ CAREFULLY BEFORE USE.
Questions or concerns? For assistance, please call Customer Service
at 800-558-9439 Mon-Fri 8am-4:30pm CST.
Español-página E1

2
TABLE OF CONTENTS
SAFETY INSTRUCTIONS ..........................................
WHAT’S IN THE BOX?..............................................
GETTING STARTED.................................................
ASSEMBLY ............................................................
USING THE LIBERATOR........................................ -
MACHINE MAINTENANCE
Replacing the Primary & Secondary Filter ........................9
Replacing HEPA-Type Filter................................................9
Replacing the Liberator Belts............................................9
Replacing the 3-Piece Particle Filter .................................9
Cleaning the Motor Vents & Filter....................................10
Cleaning the Interior of the Liberator.............................. 10
GROUNDING INSTRUCTIONS..................................
TROUBLESHOOTING .............................................
WARNING
! ! To reduce the risk of personal injury -
Unplug before cleaning or servicing.
Easy Disposal of Used HOST
For easy disposal of used HOST Dry Extraction Cleaner or any trash you may come across when cleaning,
simply stretch a 50 gallon trash bag over the top of your organizers/caddy. You have a rolling trash container!
As the Liberator’s bagless hopper fills, empty it into the trash container. When you’re finished cleaning,
remove the trash bag, tie the top closed and throw it away! No mess, no fuss and the job is done!
WARRANTY
LIMITED WARRANTY FOR
LIBERATOR EXTRACTORVAC
SYSTEM
This limited warranty applies only to
products purchased in the U.S. When
used and maintained in normal use and in
accordance with the instruction manual,
this product is warranted against original
defects in material and workmanship
for TWO years from the date of original
purchase on rotationally molded pod, filter
housing and cover and ONE year warranty
on all other parts, excluding expendable
parts subject to normal wear.
IMPORTANT: READ CAREFULLY BEFORE USE.
Questions or concerns? For assistance, please call Customer Service
at 800-558-9439 Mon-Fri 8am-4:30pm CST.

3
THE CLEANING SYSTEM that makes A DIFFERENCE hostdry.com | 800-558-9439
SAVE THESE INSTRUCTIONS. READ ALL INSTRUCTIONS BEFORE USING THIS MACHINE.
When using electrical equipment, basic precautions should always be followed, including the following:
WARNING—TO REDUCE THE RISK OF FIRE, ELECTRIC SHOCK, OR INJURY:
1. Do not leave machine when plugged in. Unplug from outlet when not in use and before servicing.
2. Do not use outdoors or on wet surfaces.
3. Do not allow to be used as a toy. Close attention is necessary when used by or near children.
4. Use only as described in manufacturer’s Instruction Manual. Use only manufacturer’s recommended attachments.
5. Inspect cord for damage before each use. Do not use with damaged cord or plug. If machine is not working as it should, has
been dropped, damaged, le outdoors, or dropped into water, return it to the manufacturer or authorized repair center.
6. Do not pull or carry by cord, use cord as a handle, close a door on cord, or pull cord around sharp edges or corners. Do not
run machine over cord. Keep cord away from heated surfaces.
7. Do not unplug by pulling on cord. To unplug, grasp the plug not the cord.
8. Do not handle plug or machine with wet hands.
9. Do not put any object into openings. Do not use with any opening blocked; keep free of dust, lint, hair, and anything that may
reduce air flow.
10. Keep hair, loose clothing, fingers, and all parts of body away from openings and moving parts.
11. Turn o all controls before unplugging.
12. Do not use the Liberator to clean stairs.
13. Do not use to pick up flammable or combustible liquids such as gasoline or use in areas where they may be present.
14. Do not use to pick up anything that is burning or smoking, such as cigarettes, matches, or hot ashes.
15. Do not use to pick up health-endangering dust such as asbestos.
16. Do not use as a wet vacuum.
17. Do not use without filters or bagless hopper in place.
18. Connect to a properly grounded outlet only. See Grounding Instructions.
SAFETY INSTRUCTIONS
WARNING
To reduce the risk of fire and electric shock due to internal component damage, use only
HOST products intended for use with the machine. Non-HOST products may harm the
machine and void the warranty.
:
HOST Products
HOST Handy
Bag HOST Handy
Jar HOST
Bucket HOST
SJ HOST
Spot Remover HOST PREP®
Traic Lane Booster HOST Odor
Exploder HOST Pre-Clean
for Carpet

4
WHAT’S IN THE BOX?
Liberator Wheeled Storage Caddy Cleaning Products Organizer Vacuum Tool Organizer
Primary & Secondary Filters 3-Piece Fine Particle Filter
Two White Standard Nylon
Carpet Brush
Vacuum Tools
NOTE: When Liberator is o, do not allow Liberator to sit in one location for an extended period of time, as damage to
brushes can result. Place Liberator on its side or in the caddy when not in use.

5
THE CLEANING SYSTEM that makes A DIFFERENCE hostdry.com | 800-558-9439
ASSEMBLY
Your HOST Liberator comes with no
assembly required. The Liberator
caddy organizers keep all needed
supplies and tools right at the job site.
Just take the cleaning product organizer
and vacuum tool organizer and slide the
back pocket of each organizer over and
down the mounting bar.
How to Get the Best Results Using the HOST Liberator®
GETTING STARTED
1. Operating Handle
2. Filter Housing
3. Filter Housing Latch
4. Handle Locking Knobs
5. Li Grip
6. Bagless Hopper
7. Gear Case Cover Plate
8. Velcro® Skirt
9. Velcro Strap for Power Cord
10. Power Cord
11. Filter Housing Latch
12. Power Switch Control Panel
13. Vacuum Hose
14. Pigtail Twist Lock for Power Cord
15. Crevice Tool
16. Motor Filter & Vents
17. Spring Lock Button
18. Brush Guard/End Cover Plate
19. Back Cover Plate
1
2
3
4
5
6
7
8
9
10
11
12
13
14
15
16
17
18
19

6
Vacuum/Vacío Brushes/Cepillos
Filter Light/ Filtro de luz
800-558-9439
HOSTDRY.com
Plug the Liberator power
cord into electrical outlet.
Do not use an extension
cord.
When removing the
Liberator from the caddy
lock Liberator handle in
position by pointing red
arrowhead down (1.1).
Note that there are 2
handle locks, one on
each side of machine.
Next unlock locking bolts
on front of caddy (1.2).
Locate the switch control
panel on the back of
the Liberator (1.3). Turn
ON machine brushes by
pressing the black switch
and drive the Liberator o
the caddy. Turn power OFF
and move the caddy out of
the way.
(1.2)
Black brush
switch
White vacuum
switch
Filter light
(1.3)
USING THE LIBERATOR
1
2
Handle Locking Knob (1.1)
Locking
Bolts
Note: Standard (white) and firm (zebra) brushes must be broken in before using for the
first time. To break in brushes, run the Liberator on hard surface for three minutes.
3Turn the white vacuum
switch and black brush
switch ON. Vacuum and
pile li carpet thoroughly
before applying HOST Dry
Extraction Cleaner. Vacuum
the area in 2 directions:
north/south and east/west
(1.4). The more vacuuming
the better to remove as
much dry dirt as possible.
In hallways and open areas,
vacuum lawnmower style
in 2 directions: north/south
and east/west (1.5).
4Apply HOST Dry Extraction
Cleaner to the floor,
either by hand or with the
Applicator. If applying HOST
cleaner by hand use about
one handful size for each
square yard (3' x 3') (1.6). Do
not apply more than 100 to
200 square feet at a time or
the HOST cleaner could dry
out and not clean as well.
For the HOST Applicator,
place HOST cleaner into
the applicator and choose
light, medium, or heavy
setting. Then guide the
HOST Applicator over the
area to be cleaned. As it
rolls, it dispenses the chosen
amount of micro-sponges
(1.7).
Before Applying HOST Dry Extraction Cleaner
Before applying HOST Dry Extraction Cleaner to the floor, place bucket on its side for 10 minutes. This will
help to distribute the liquid ingredients evenly throughout the cleaner. Be sure to wipe o the edge of bucket
before replacing the lid. This will prevent leaking.
(1.4)
(1.5)
(1.6)
(1.7)
Green/Unlocked
Red/Locked

7
THE CLEANING SYSTEM that makes A DIFFERENCE hostdry.com | 800-558-9439
NOTE: CLEAN AND ROTATE
BRUSHES HOURLY. The
brush bristles acquire a
“set” in the direction they
revolve unless switched
regularly. Unplug machine
from power and remove
the Velcro skirt. Turn lock
on brush cover plate 1/4
turn counter-clockwise
until it pops out. Pull up
on ring to remove brush
cover plate (1.9). Remove
brushes and clean out
underside. Replace brushes
on opposite hex brush shas
(2.0). Liberator brushes can
also be switched end-to end
if desired. Replace brush
side plate. Press brush
guard against brushes while
replacing side plate. If brush
plate does not engage,
rotate hex sha slightly until
brush side plate slips in
place. Lock the lock on side
plate and replace
Velcro skirt.
6Turn both machine brushes
and vacuum switches
ON. Vacuum the area in
2 directions: north/south
and east/west. The more
vacuuming the better to
remove as much dirt as
possible. The Liberator
vacuums best of HOST
is a bit damp. Repeat if
necessary.
5Turn the black brush switch
ON. Work HOST into the
soiled area, using push-pull
strokes just like when you
vacuum, make three passes
over the area (1.8). This
brushing action distributes
the HOST micro-sponges
and brings them in contact
with the dirty surfaces of
what you are cleaning.
1st Pass
2nd Pass
3rd Pass (1.8)
If Flooring is Still Dirty
If flooring is still dirty, reapply HOST
and brush again.
9Return the Liberator to the
caddy by locking the handle
in place (2.1) and turn
machine brushes ON and
guide it back into the caddy.
Lock bolts back into place
(2.2). Simply wheel
the Liberator away.
(2.2)
Handle Locking Knob (2.1)
Red/Locked
Blue/Unlocked
Locking
Bolts
7Empty the bagless hopper
before storing the Liberator.
Pull out the hopper, empty
into trash container and
replace the hopper and
insure that it is completely
closed to avoid vacuum
power loss. You may need to
empty the bagless hopper
in between vacuuming, this
avoids clogging the filters.
Overloading of the hopper
will cause rapid filter
clogging as well as HOST
Dry Extraction Cleaner to
accumulate on the inner
cone assembly.
8
Removing Spots with the
HOST spotZAPPER®
Spots can also be removed using the
HOST spotZAPPER. Apply HOST Dry
Extraction Cleaner and brush in many
directions. The more brushing, the better.
Aer brushing, let dry and then vacuum.
Spring
Lock Button
(1.9)
(2.0)

8
Unlatch filter
housing and
swing to the
side.
The burnt
orange primary
filter is inserted
first, followed by
the black
secondary filter.
Black
Burnt orange
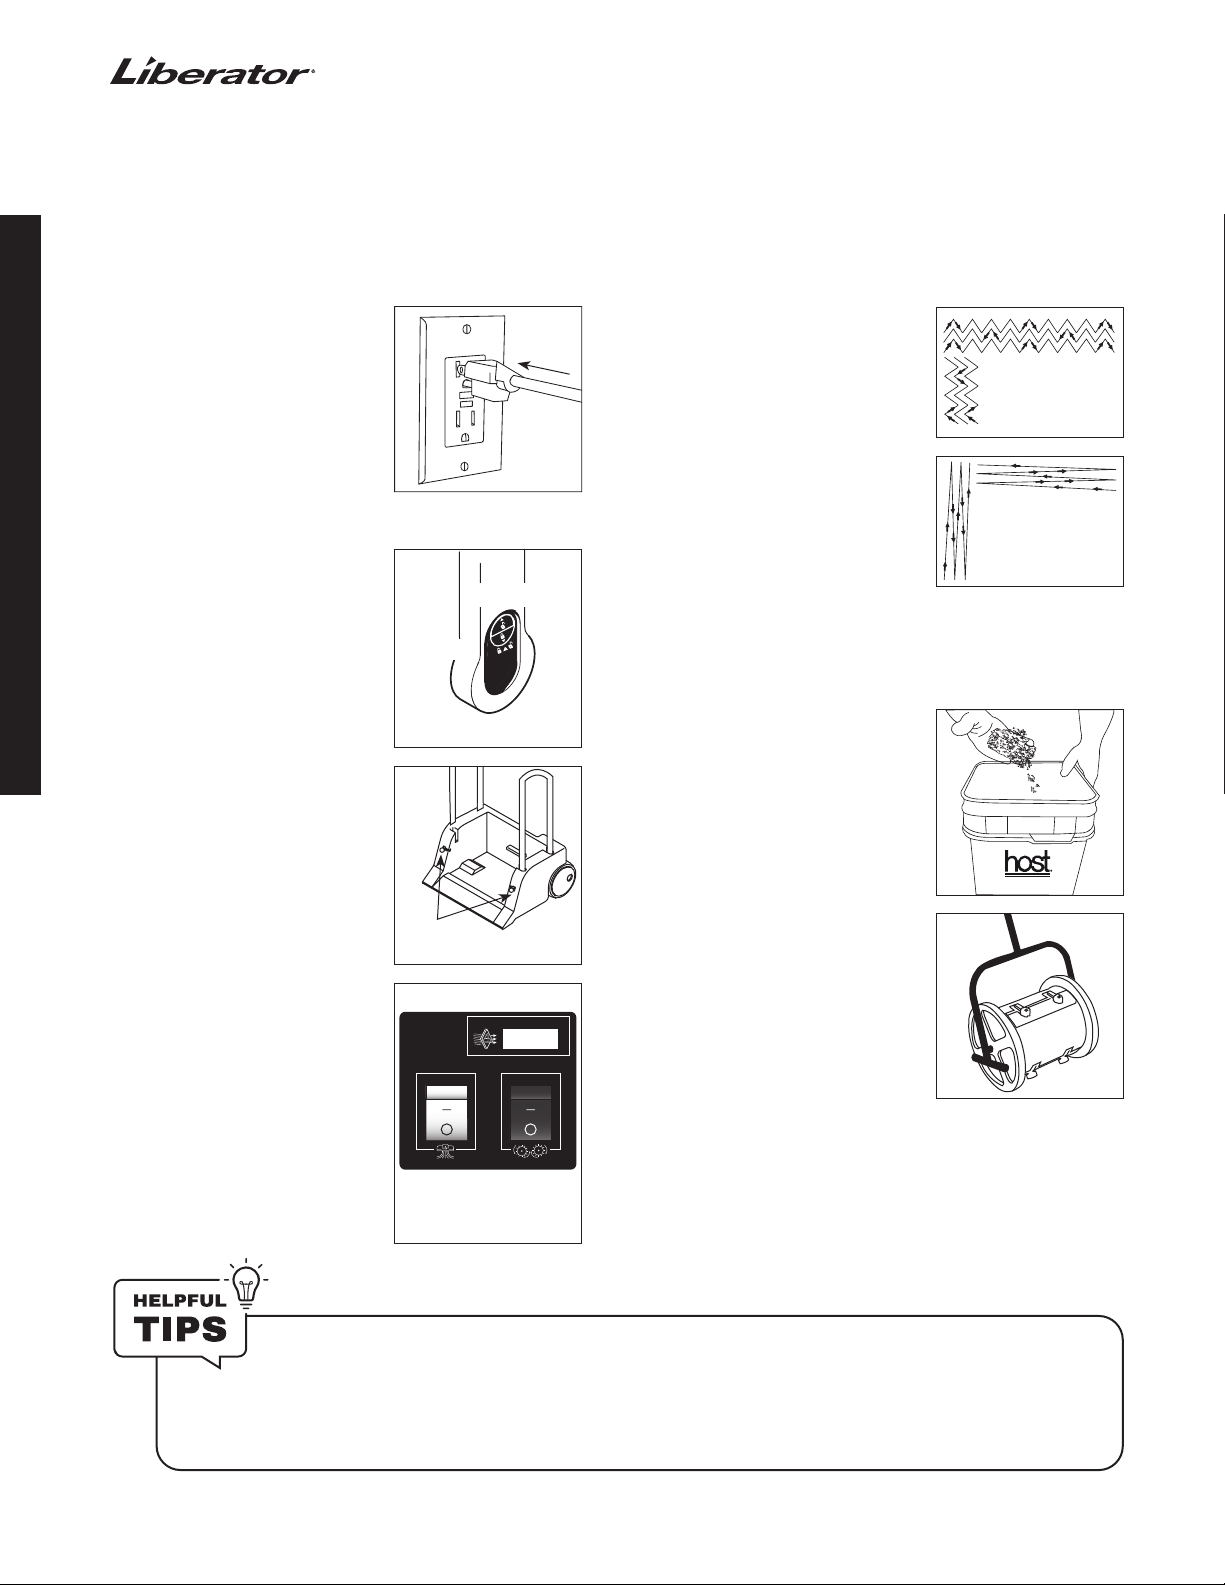
10 To always get the best
performance from your
Liberator, it is important to
regularly clean the primary
and secondary filters. We
recommend that you use a
tank vacuum and vacuum
the primary and secondary
filters aer every use. Turn
the Liberator o, unplug and
unlatch the filter housing. Li
the filter housing lid up and
swing it to one side (2.3). (If
needed, li it all the way o.)
Take out filters and vacuum
them and properly place
them back in the correct
order, burnt orange first then
the black filter (2.4).
NOTE: The Liberator filters
are designed to capture
fine dust particles. If you
are cleaning in healthcare
environments or other areas
where IAQ is a concern, do
not remove and clean the
filters in the room being
cleaned. Take the Liberator
out of the room and clean
the filters. You may even
want to clean the filters
outside of the building. You
may want to have several
extra filters on board the
Liberator so you do not have
to leave the area to clean
the filters. Just replace the
dirty filters with clean filters
and continue cleaning. Then
you can clean the dirty filters
later.
NOTE: When Liberator is o, do not allow Liberator to sit in one location for an extended period of time, as damage to
brushes can result. Place Liberator on its side or in the caddy when not in use.
Primary and Secondary
Filter Cleaning
Once a month wipe the primary and
secondary filters with a damp cloth and
let air dry before placing filter back into
the Liberator filter housing.
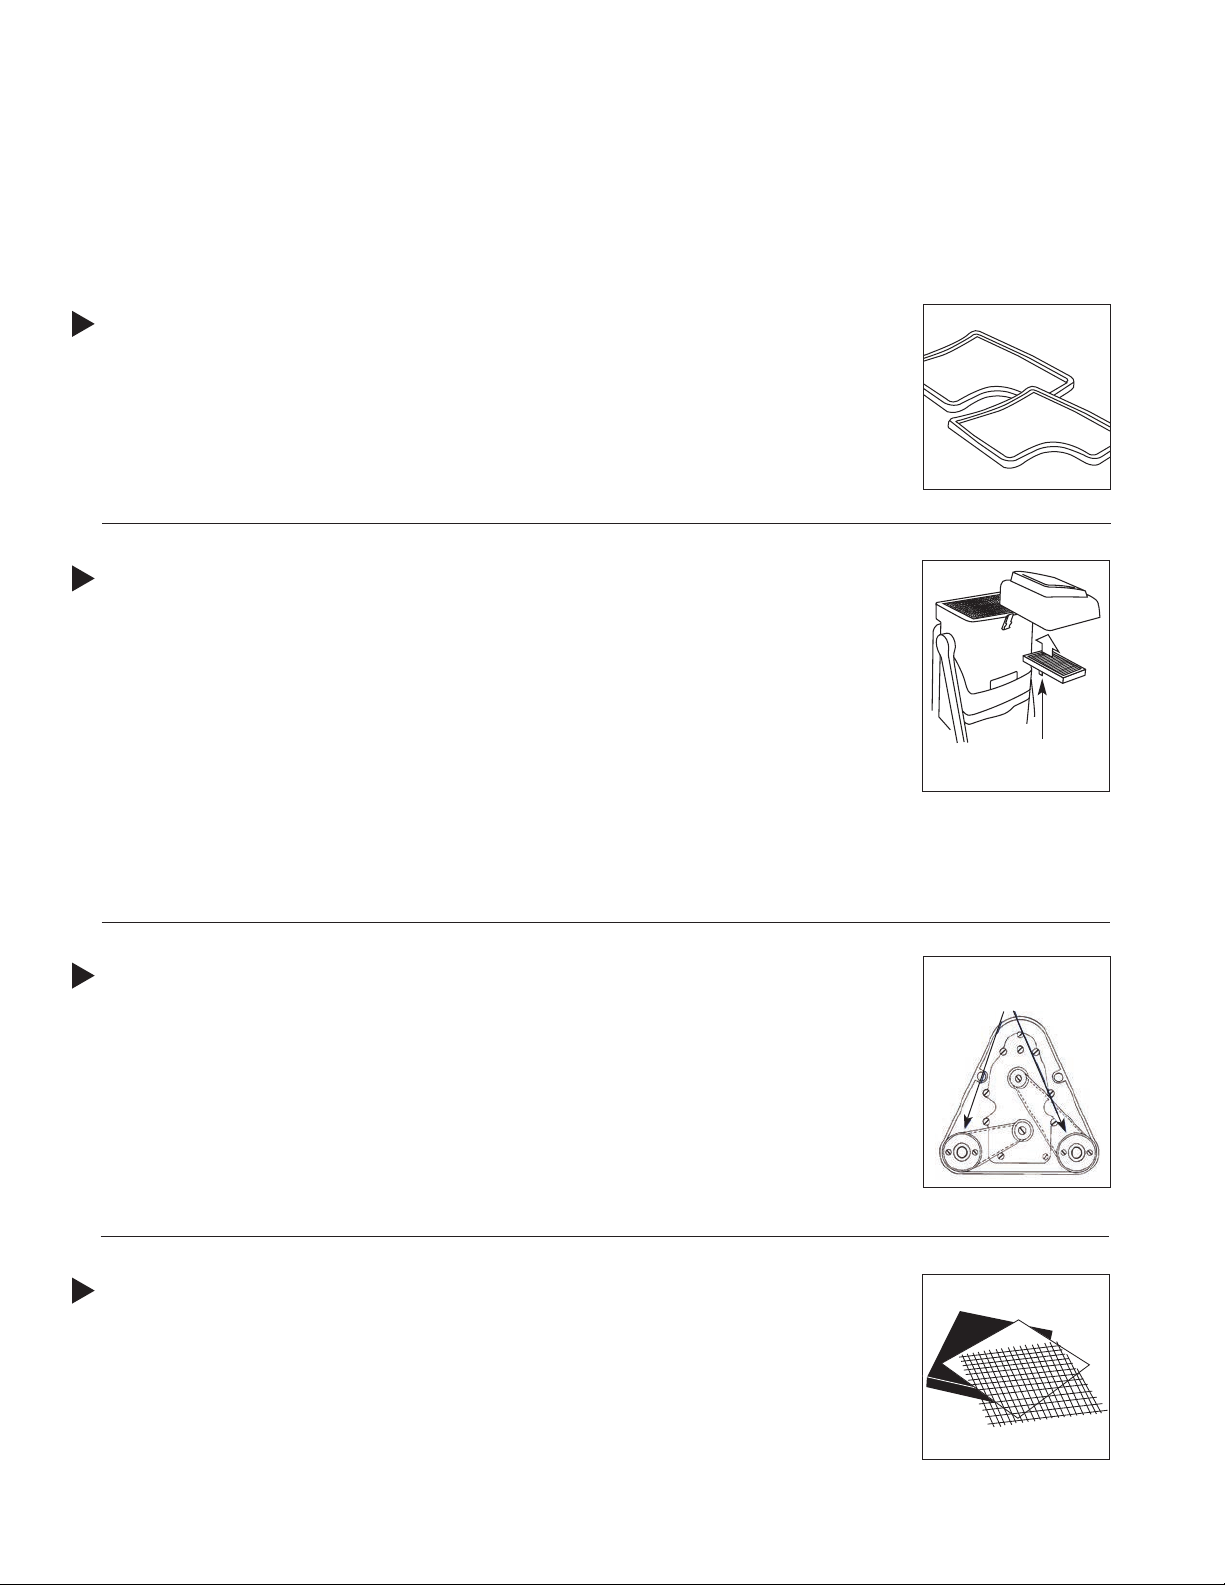
11 ONLY APPLIES WHEN
USING THE 3-PIECE FINE
PARTICLE FILTER NOT
THE HEPA-TYPE FILTER.
The 3-piece filter should be
cleaned frequently; daily
under high use conditions,
weekly if used less. For best
results, vacuum filters with
a tank vacuum at the end of
each day. Remove the foam
and felt filters and screen
from the filter housing lid.
Inspect the filters for soil.
If they are soiled, vacuum
both sides of each filter.
Place the filters in this order:
screen, felt filter, foam filter.
The foam filter has a snug fit
and will hold the felt filter
and screen in place.
NOTE: When cleaning with
HOST SJ, the filter light will
come on more frequently
and you will have to clean
the filters more oen.
Felt Filter
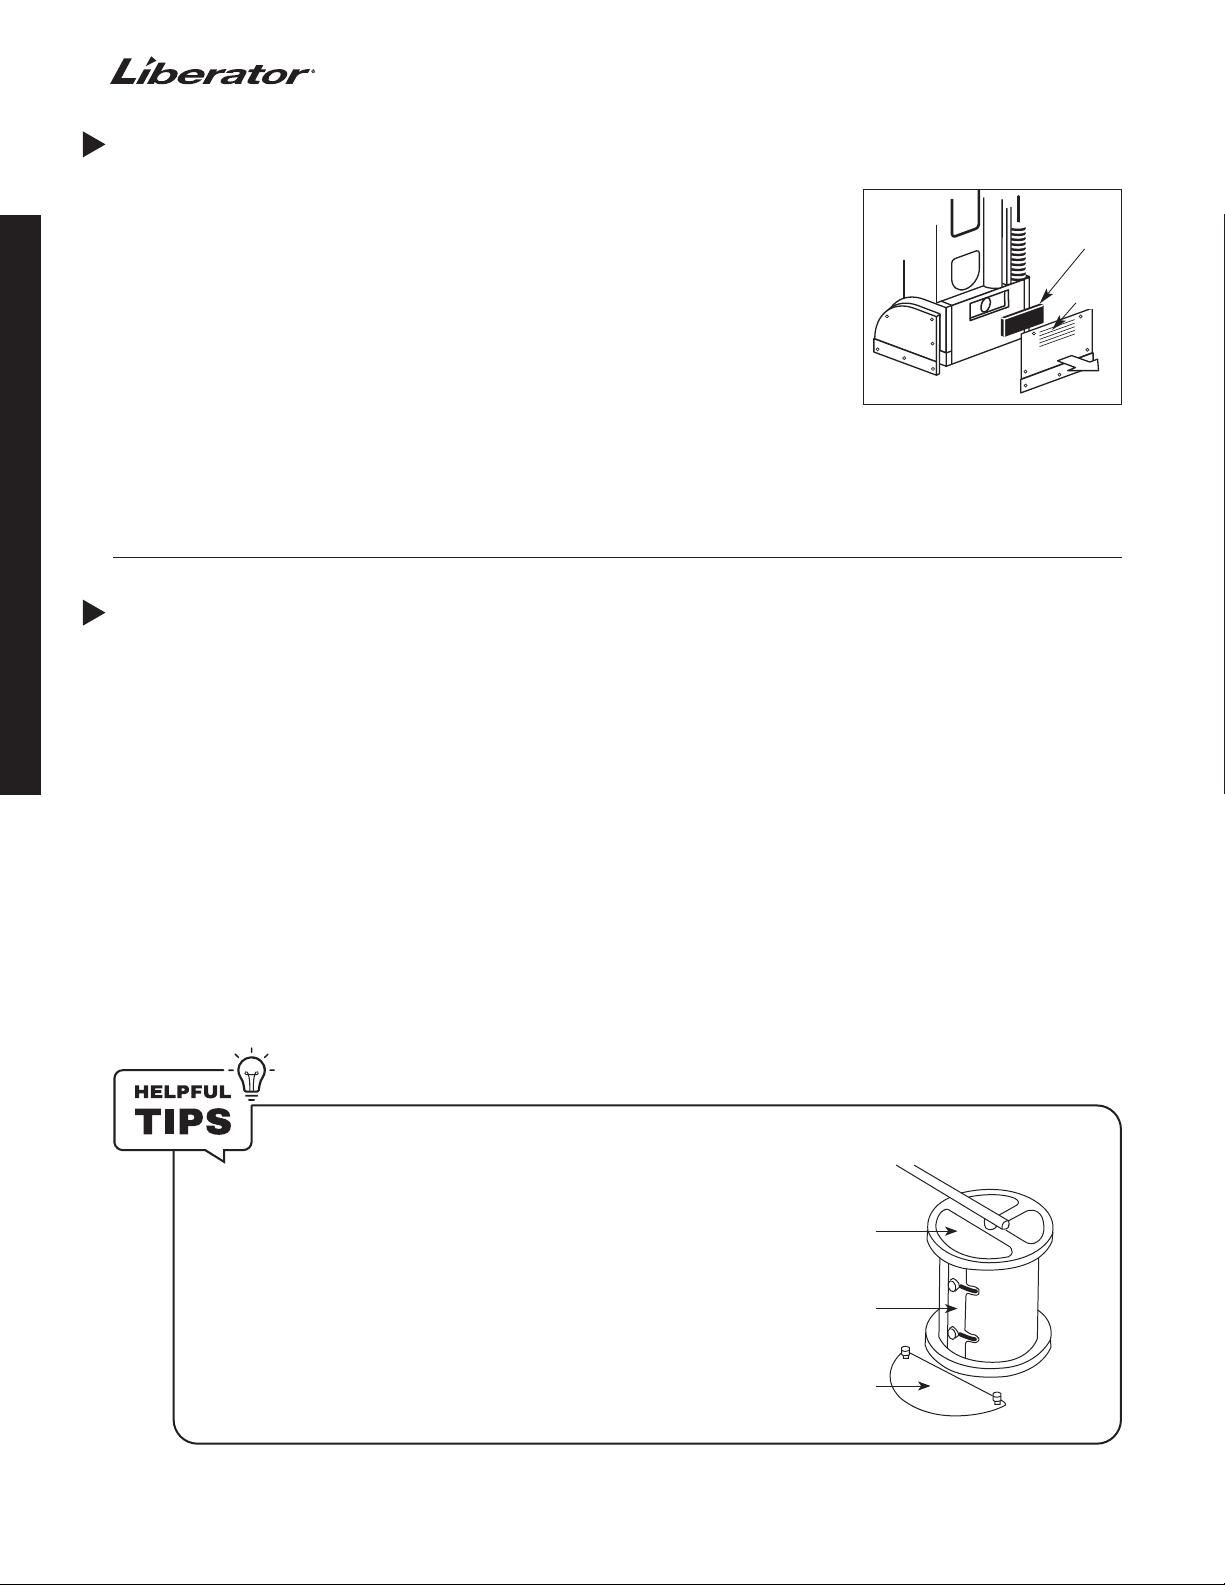
Prepare the spot, for dry spots and spills,
vacuum area first, or for wet spots and spills
blot or scrape area first. Scatter HOST Dry
Extraction Cleaner on the spot. Concentrate
the brushing in a circle over the spot. Brush
an area slightly larger than the area with the
spot. Aer brushing, vacuum up the HOST
with the Liberator.
If carpet is very dirty or has tough spots and
spills, PREP® Traic Lane Booster may be
necessary. To use PREP mix 1 part PREP in
4 parts water in a trigger spray bottle, then
mist PREP lightly on dirty carpet/spot. Apply
HOST Dry Extraction Cleaner as before and
brush with Liberator then vacuum.
CAUTION: Improper use or dilution may cause
damage to surface and increased risk of health
eects.
How to Remove Tough Spots &
Spills with the Liberator
(2.3)
(2.4)

9
THE CLEANING SYSTEM that makes A DIFFERENCE hostdry.com | 800-558-9439
USE EITHER THE -PIECE FINE PARTICLE FILTER OR THE HEPA-TYPE FILTER. HEPA-type filters
are not cleanable and must be replaced when dirty. The HEPA-type filter should be replaced
frequently in high use conditions. Here’s a quick and easy way to check the HEPA-type filter.
1. Pull on the small tab to remove the filter.
2. Hold filter up to a strong light. If you can see light through the filter, it’s still usable. If not,
replace with a new HEPA-type filter (available from your HOST Distributor).
3. Insert the filter in the lid, with tab facing you, and replace the filter housing lid. Be sure it is
centered properly and that all the filters are lined up. Fasten the latches.
NOTE: To avoid damage to the HEPA-type filter, always empty the bagless hopper before storing
the Liberator.
REPLACING THE LIBERATOR BELTS
1. Disconnect Liberator from power.
2. Remove the Velcro skirt.
3. Remove the gear case cover by
removing 6 screws.
4. Remove the 2 screws on the large
pulley and li o flange.
5. Cut damaged belt with scissors and
remove it.
6. Put new belt onto small pulley first
and work it onto the large pulley by
turning the cleaning brushes by hand.
7. Replace pulley flange, screws, gear
case cover and Velcro skirt.
Insert the HEPA-type filter
in the filter housing with
the small tab facing you.
To always get the best performance from your Liberator, it is important to replace the primary
and secondary filters when they look dirty and can no longer get clean. The filters are designed
so they can only be replaced in the correct order. The lower primary filter is burnt orange. The
upper secondary filter is black.
Follow these guidelines for routine maintenance on your Liberator to obtain optimal
performance of both the HOST equipment and cleaning system.
MACHINE MAINTENANCE
REPLACING THE PRIMARY & SECONDARY FILTERS
REPLACING HEPA-TYPE FILTER (OPTIONAL USAGE)
REPLACING THE -PIECE FINE PARTICLE FILTER
Large Pulley Flange &
Screws for Flange
To always get the best performance from your Liberator, it is important to replace the 3-piece
fine particle filters when they look dirty and can no longer get clean. We recommend replacing
the white felt filter every three months and the black foam filter once a year.

10
CLEANING THE MOTOR VENTS AND FILTER
It’s important that the motor vents and lter on the lower back of the Liberator are
kept free of any buildup. Failure to keep the lter clean could cause the Liberator
to overheat.
Vacuum the motor vents with the Liberator hose frequently. Remove and clean
the motor lter frequently.
1. Vacuum the motor vents.
2. Remove the Velcro skirt.
3. Remove the screws from the side cover plates and then the back cover plate.
4. Take the cover plates o the Liberator and remove the foam lter underneath
the back cover plate. Vacuum or rinse the lter. Allow to dry completely
before replacing.
5. Replace the motor lter, cover plates, screws, and Velcro skirt.
Remove and
clean filter
Vacuum
vents
CLEANING THE INTERIOR OF THE LIBERATOR
1. Check the vacuum hose for clogs.
a. Unplug both ends of the vacuum hose and check for
any buildup of HOST or dirt.
b. If buildup exists, plug straight end of the vacuum hose
into the vacuum connection.
c. Turn the vacuum motor on and loosen buildup from the
vacuum hose elbow.
2. Check the vacuum shoe between the cleaning brushes
on the underside of the Liberator for buildup. Remove any
material clogging the shoe. Wipe out the underside of the
Liberator with a cloth or brush, or use a vacuum.
3. Check under the separator assembly and in the vacuum
cone for buildup. Buildup will occur more frequently if
you have not emptied the bagless hopper as oen as
needed.
a. With bagless hopper in place, unlatch the top of the
machine, swing the filter housing to the side and
remove the filters.
b. Li out the separator assembly and wipe the underside
of the separator assembly and the inside of the
vacuum cone with a clean, dry cloth. If there is a thick
accumulation on the cone, use a damp cloth to loosen
the soil. The loosened soil will drop into the bagless
hopper.
c. Replace the separator assembly and push down firmly
until it seals tightly.
Applying HOST Dry Extraction Cleaner with the Applicator
Fill the Applicator with up to 12 pounds (5.4 kilos) of
HOST. DO NOT OVERFILL. Open hole covers for the HOST
application. Choose light (1 cover open), medium (2 covers
open) or heavy (3 covers open). Walk the Applicator over the
area of dirty flooring. DO NOT apply to an area larger than 10
feet x 50 feet (approx. 50 sq. meters). Keep Applicator 2 foot
away from wall. It is not necessary to apply HOST next to
the wall or to areas which do not appear dirty. Apply only to
dirty areas of the flooring.
Fill Here
Hole Cover
Fill Port Cover
Altri manuali per Liberator
2
Indice
Lingue:
Altri manuali Host Attrezzature per la pulizia


