Housewatch 55-244 Manuale utente

20W Model: 55-244 & 55-245
40W Model: 55-240 & 55-241
20W & 40W SENSOR SPOTLIGHT
INSTRUCTIONS
20 & 40W sensor lights instructions_A6_Oct18.qxp_Layout 1 7/11/18 9:19 am Page 1

CONTENTS
INTRODUCTION .........................................................................................3
IMPORTANT SAFETY INSTRUCTIONS .......................................................3
INSTALLING THE SPOTLIGHT ...............................................................4-7
OPERATION AND TESTING...................................................................8-10
SETTING UP FOR AUTOMATIC OPERATION ............................................11
MANUAL OVERRIDE MODE .....................................................................11
MAINTENANCE PROGRAM ......................................................................12
TROUBLESHOOTING ..........................................................................12-13
SPECIFICATIONS......................................................................................14
WARRANTY INFORMATION .....................................................................16
2
INTRODUCTION
The Housewatch LED spotlight is a
The LED spotlight is suitable for in
locations including entrances, garde
IMPORTANT SAFETY
Please follow these instructions c
operate this spotlight.
Ensure the voltage marked on
power supply to be used.
DO NOT direct the light into a
intensive light output, which if
WARNING: Risk of fire. Do no
within 1m
CAUTION: Keep the sensor at le
Must be installed by a lic
AS3000:2007.
20 & 40W sensor lights instructions_A6_Oct18.qxp_Layout 1 7/11/18 9:19 am Page 2

NTS
....................................................3
....................................................3
................................................4-7
..............................................8-10
ON ............................................11
..................................................11
..................................................12
............................................12-13
..................................................14
..................................................16
3
INTRODUCTION
The Housewatch LED spotlight is a low-energy, high powered outdoor fitting.
The LED spotlight is suitable for installation on walls in a range of outdoor
locations including entrances, gardens, staircases, garages and parking areas.
IMPORTANT SAFETY INSTRUCTIONS
Please follow these instructions carefully before attempting to install and
operate this spotlight.
Ensure the voltage marked on the product is the same as the electrical
power supply to be used.
DO NOT direct the light into a person’s eyes. This spotlight has a very
intensive light output, which if incorrectly used could cause eye damage.
WARNING: Risk of fire. Do not aim the fitting at a combustible surface
within 1m
CAUTION: Keep the sensor at least 51mm away from the lamps.
Must be installed by a licensed electrician in accordance with
AS3000:2007.
20 & 40W sensor lights instructions_A6_Oct18.qxp_Layout 1 7/11/18 9:19 am Page 3
4
INSTALLING THE SPOTLIGHT
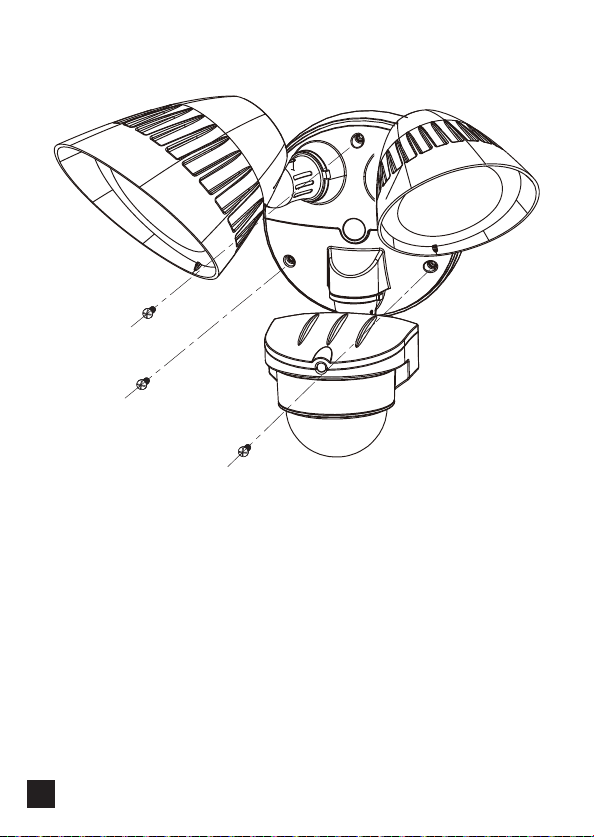
1. REMOVE FRONT COVER
Use a Phillips head screwdriver to unscrew the three screws on the front
cover, then open the back junction box.
INSTALLING THE SPO
2. FIX THE SPOTLIGHT JUNCTION
Using the screws and screw plugs
to the wall.
20 & 40W sensor lights instructions_A6_Oct18.qxp_Layout 1 7/11/18 9:19 am Page 4
5
GHT
rew the three screws on the front
INSTALLING THE SPOTLIGHT
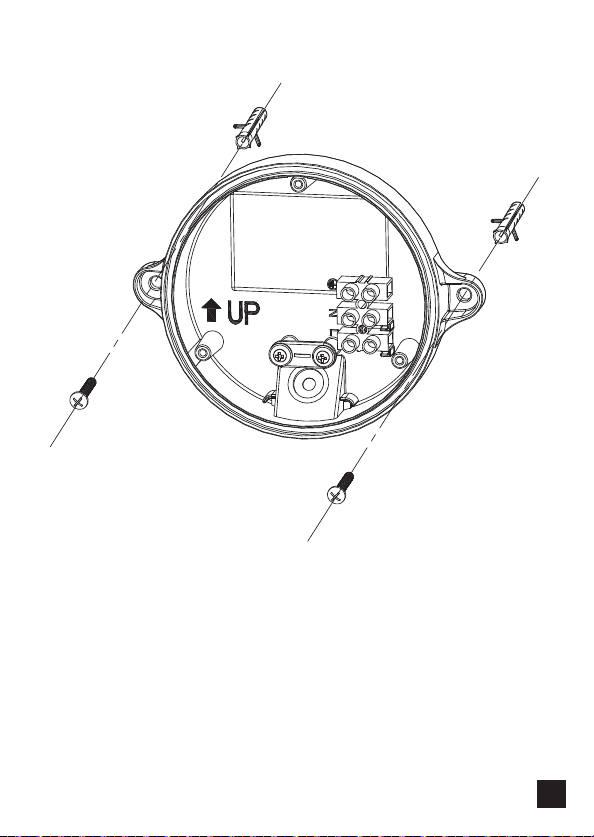
2. FIX THE SPOTLIGHT JUNCTION BOX TO THE WALL
Using the screws and screw plugs provided, secure the spotlight horizontally
to the wall.
20 & 40W sensor lights instructions_A6_Oct18.qxp_Layout 1 7/11/18 9:19 am Page 5

6
INSTALLING THE SPOTLIGHT INSTALLING THE SPO
4. REPLACE FRONT COVER
Rescrew the front cover in place with a Phillips head screwdriver.
3. CONNECTION
Connect the cable to the terminal block on the wall plate as above.
NEUTRAL (Blue)
LIVE (Brown)
EARTH (Yellow/Green)
OUTDOOR WALL INS
TOP
BOTTOM
20 & 40W sensor lights instructions_A6_Oct18.qxp_Layout 1 7/11/18 9:19 am Page 6
7
GHT INSTALLING THE SPOTLIGHT
hillips head screwdriver.
n the wall plate as above.
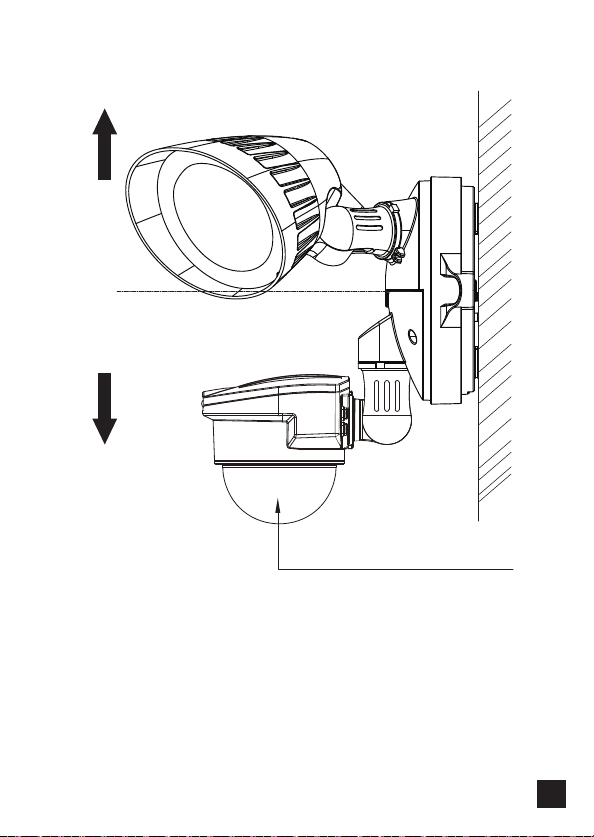
OUTDOOR WALL INSTALLATION REQUIREMENT
TOP
BOTTOM
Lens must face down
20 & 40W sensor lights instructions_A6_Oct18.qxp_Layout 1 7/11/18 9:19 am Page 7

8
3. Walk across the detection area
you walk across the detection '
still until the lamp extinguishes (t
SENSOR DETECTION RANGE
NOTE: If the fitting is mounted high
reduce coverage distance. The det
towards it (see Figure 3 below)
340º
90º
90º
180º
FIGURE 1
FI
FI
OPERATION & TESTING
WALK TESTING PROCEDURE
The sensor will rotate from left to right and up and down. Adjust the sensor
to point in the desired direction (see Figure 1 &2) for the sensor patterns.
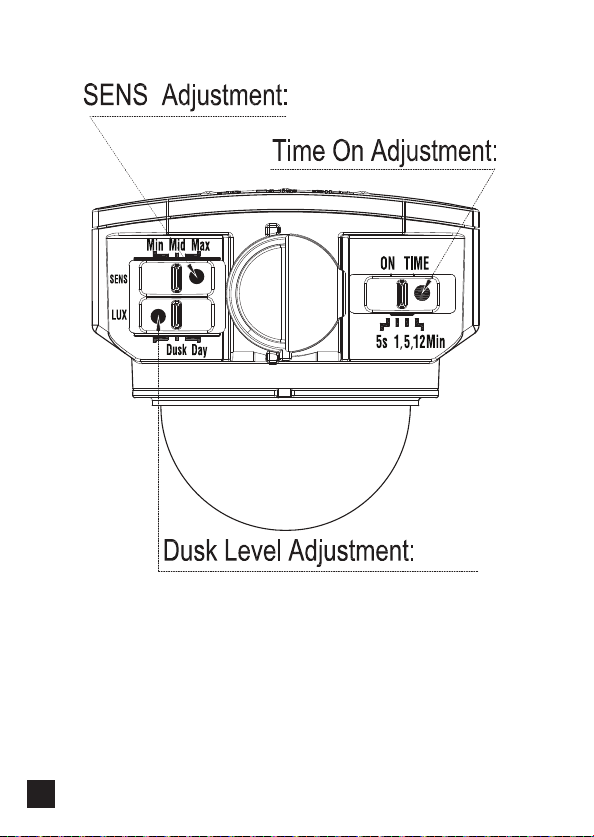
1. Set the three adjustment controls on the bottom of the sensor, (see Figure
4on page 10) to the following positions:
TIME - Slide switch: 5 seconds, 1 min, 5 mins & 12 mins
LUX - Slide switch: Day
SENS - Slide switch: Max
The unit will now operate during daytime as well as night, illuminating the
lamps for approximately 5 seconds each time. This allows testing to be carried
out to establish the best position for the sensor.
2. Switch on the mains power. The lamp will immediately illuminate as the
unit goes through its 'warm-up' period. After approximately 1 to 2 minutes,
the lamp will extinguish. Try to remain outside the detection area during
the warm-up period.
20 & 40W sensor lights instructions_A6_Oct18.qxp_Layout 1 7/11/18 9:19 am Page 8

9
3. Walk across the detection area approximately 5 metres from the unit. As
you walk across the detection 'zone' the lamp will illuminate. Now stand
still until the lamp extinguishes (this should take approximately 5 seconds).
SENSOR DETECTION RANGE
NOTE: If the fitting is mounted higher than 2.4m, aiming the sensor down will
reduce coverage distance. The detector is less sensitive to motion directly
towards it (see Figure 3 below)
40º
180º
1
FIGURE 2
FIGURE 3
nd up and down. Adjust the sensor
re 1 &2) for the sensor patterns.
e bottom of the sensor, (see Figure
ns:
, 5 mins & 12 mins
e as well as night, illuminating the
me. This allows testing to be carried
sensor.
p will immediately illuminate as the
After approximately 1 to 2 minutes,
n outside the detection area during
20 & 40W sensor lights instructions_A6_Oct18.qxp_Layout 1 7/11/18 9:19 am Page 9
OPERATION & TESTING
10
Night
FIGURE 4
SETTING UP FOR AUT
Once the walk tests are completed
operation. The TIME setting contro
following activation and after all m
switch) is approximately 5 secon
approximately 12 minutes. Set the
between these limits (see Figure 4
The LUX slide switch control dete
the unit to start operating. The settin
Set the slide switch to the 'Night' p
Set the slide switch to the 'Dusk' p
Set the slide switch to the 'Day' po
The SENS slide switch control dete
The setting is best achieved by the
Set the slide switch to the 'Min' po
Set the slide switch to the 'Mid' po
Set the slide switch to the 'Max' po
MANUAL OVERRIDE M
1. To switch into manual overrid
ON/OFF/ON.
2. To reset it back to Automatic mo
before switching the power back
cycle before resuming normal o
20 & 40W sensor lights instructions_A6_Oct18.qxp_Layout 1 7/11/18 9:19 am Page 10
Questo manuale è adatto per i seguenti modelli
3
Indice
Altri manuali Housewatch Riflettore


Manuali Riflettore popolari di altre marche

Guangzhou Yinhe Lighting&Sound Equipment Factory
Guangzhou Yinhe Lighting&Sound Equipment Factory NE-204 Manuale utente

LIVARNO home
LIVARNO home 375304 2101 Istruzioni originali

Cameo
Cameo CLQS40WW Manuale utente

Leviton
Leviton Ellipsoid 5/50 Manuale utente

Monacor
Monacor img Stage Line PARL-56PDX/CR Manuale utente

Vector
Vector SL3AKV Manuale utente


EuroLite
EuroLite Akku flat light 1 Manuale utente

Commercial Electric
Commercial Electric SPTM-1401 Manuale utente

Vision & Control
Vision & Control SLB-500-W5K7-P-SL Manuale utente

Teknik
Teknik FLEXI Manuale utente

Craftsman
Craftsman CMXLSB10 Manuale utente

EuroLite
EuroLite LED SLS-144 UV Floor Spot Manuale utente