
Howard Miller Seville Manuale utente

FLOOR CLOCK
INSTRUCTION MANUAL
VIDEO AVAILABLE ON ONLINE!
“How to Set Up a Floor Clock”
go to www.howardmiller.com

BASIC OPERATION OF A FLOOR CLOCK
At the heart of every oor clock is the movement. The movement controls the hour strike, time keeping, and
chime. The pendulum and weights are critical components to operation of the clock movement.
The pendulum provides the ability to regulate and adjust the time keeping. As described within these
instructions, adjustments to the pendulum to achieve accurate time keeping is easily accomplished.
The three weights provide power to the hour strike (left weight), time (center weight), and chime melody (right
weight). Without these weights, the clock would not operate. Each weight is different and must be properly hung
from the movement (left, center, right) to ensure proper operation. Weights are hung from the movement by a
cable or chain. The weights must be raised at least every 7 days or the clock will stop. Raising cable driven
weights is accomplished through use of a crank. Raising chain driven weights is accomplished by pulling down
on the loose end of the chain.
The strike and chime sounds are made by a series of hammers hitting various length rods. Each rod makes a
different sound when hit by a hammer. Specic chime melodies are achieved by controlling the sequence that
each hammer hits a corresponding rod.
IMPORTANT INFORMATION
• Please take a moment to record the clock model number and serial number in the space provided in the Service
Information section on page 12.
• The product information label lists the clock model number and serial number. The clock model number and
serial number are essential for obtaining parts or service. The product information label may be located in several
locations: outside the shipping carton, back of door, back of the clock, top of the clock, inside the top back corner
of the clock, or inside the clock above the back of the dial. Refer to this label when contacting us or your dealer.
• Attach your sales receipt to this manual for future reference, and record the information from the Product
Information Label, as indicated on page 7.
• Please keep any original packing that came with your oor clock.
English
Espanol Francais Deutsch
1 - 13
15 - 38

2
TABLE OF CONTENTS
FLOOR CLOCK: CABLE
Setting Up Your Clock . . . . . . . . . . . . . . . . . . . . . . . 3
Hanging Pendulum . . . . . . . . . . . . . . . . . . . . . . . . . .3
Hanging Weights . . . . . . . . . . . . . . . . . . . . . . . . . . . 4
Setting Moon Dial . . . . . . . . . . . . . . . . . . . . . . . . . . .4
Setting Time . . . . . . . . . . . . . . . . . . . . . . . . . . . . . . . .4
Starting Clock . . . . . . . . . . . . . . . . . . . . . . . . . . . . . . 4
FLOOR CLOCK: CHAIN
Setting Up Your Clock . . . . . . . . . . . . . . . . . . . . . . . 5
Hanging Pendulum . . . . . . . . . . . . . . . . . . . . . . . . . .5
Hanging Weights . . . . . . . . . . . . . . . . . . . . . . . . . . . 6
Setting Moon Dial . . . . . . . . . . . . . . . . . . . . . . . . . . .6
Setting Time . . . . . . . . . . . . . . . . . . . . . . . . . . . . . . . .6
Starting Clock . . . . . . . . . . . . . . . . . . . . . . . . . . . . . . .6
GENERAL INFORMATION
Product Information Label . . . . . . . . . . . . . . . . . . . .7
Moving Your Clock . . . . . . . . . . . . . . . . . . . . . . . . . . 7
Installing / Removing Top Side Panel . . . . . . . . . . 7
Glass Features . . . . . . . . . . . . . . . . . . . . . . . . . . . . . . 7
Raising Weights . . . . . . . . . . . . . . . . . . . . . . . . . . . . .8
Regulating Timekeeping . . . . . . . . . . . . . . . . . . . . . 8
Automatic Night-Time Silencing Option . . . . . . . .8
Chime Selection . . . . . . . . . . . . . . . . . . . . . . . . . . . . .9
Care And Maintenance . . . . . . . . . . . . . . . . . . . . . . .9
TROUBLE SHOOTING
Difculty Rotating The Moon Dial . . . . . . . . . . . . . 9
Clock Does Not Chime At Proper Time . . . . . . . . 9
Clock Does Not Strike The Correct Hour . . . . . . . 10
Clock Will Not Chime or Strike . . . . . . . . . . . . . . . .10
Chimes Have The Incorrect Tone . . . . . . . . . . . . . .10
Weights Do Not Drop at the Same Level . . . . . . . . . . .11
Clock Will Not Run . . . . . . . . . . . . . . . . . . . . . . . . . .11
WARRANTY . . . . . . . . . . . . . . . . . . . . . . . . . . . . . . . . . . . . 12
SERVICE INFORMATION . . . . . . . . . . . . . . . . . . . . . 12
ELECTRICAL SAFETY INSTRUCTIONS. . . . . . . . . . . . . 13
3
FOLLOW THESE SIX STEPS TO SET UP CLOCKS THAT REQUIRE WEIGHTS
SUSPENDED FROM A PULLEY AND CABLE
STEP 1
SETTING UP YOUR CLOCK
Located in the bottom of the shipping carton will be a box. This box contains:
a) a key to t your clock door, b) a crank which will be used to wind your clock and,
c) weights which operate the clock movement. Also, within the shipping carton will
be the clock pendulum packaged in a separate box.
WARNING: KEEP PLASTIC BAGS AND SMALL PARTS AWAY FROM CHILDREN.
Move the clock close to its nal location.
WARNING: ENSURE CLOCK IS POSITIONED SQUARE AND FIRM ON THE
FLOOR SO THAT IT WILL NOT FALL OVER. ADJUST LEVELERS FOR MAXIMUM
STABILITY AND PROPER ALIGNMENT.
Access to the clock movement, chimes and cables is made in three possible ways;
through the front door(s), through the top side panels (or side doors on some
clocks), or through the back access panel. The top side panels are held from the
inside by tape or a plastic clip. The plastic clip may be turned or tape may be
removed permanently. Refer to the General Information section on page 7 for
proper instructions to remove and install top side panels.
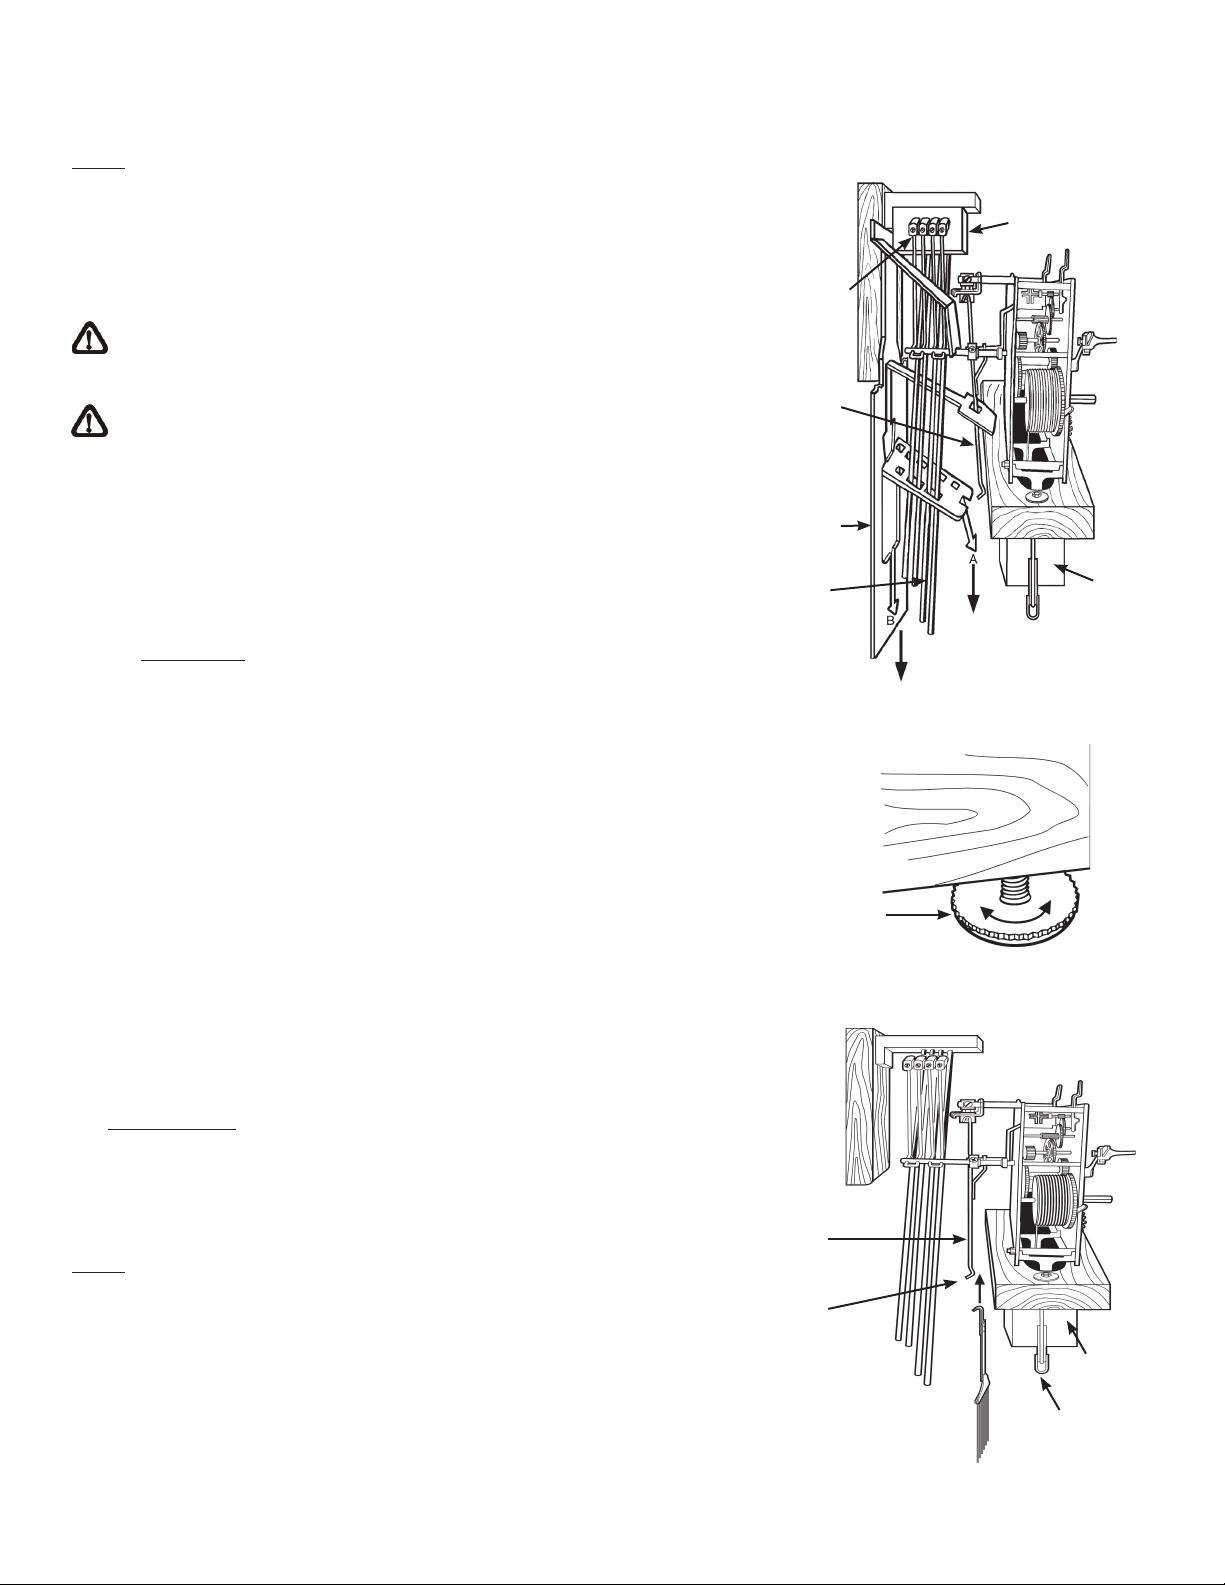
Remove the cardboard sleeve, from around the chime rods and pendulum guide,
by holding the cardboard sleeve at points ‘A’ and ‘B’ and pulling straight down.
Pull straight down and off the ends of the chime rods and pendulum guide. (See
gure 1).
Remove the foam pads from between the chime hammers and chime rods. Care
should be taken to avoid bending the chime hammers. The chime hammers will be
free to move after the cardboard sleeve has been removed, thereby allowing easy
removal of the foam pads.
DO NOT REMOVE THE STYROFOAM BLOCKS from above the cable pulleys. This
is one of the most critical points in the entire set-up operation.
Removing the styrofoam blocks at this time could cause the cables to overlap and
bind the movement. You can remove the styrofoam blocks AFTER they become
loose through normal operation, which typically occurs after eight (8) hours of run
time.
Position the clock into its nal location. Once in place, your clock cabinet must be
leveled, as the clock may not operate if it is not level. There are four (4) levelers
under the cabinet on each corner that can be screwed in (up) or out (down) to
make adjustments. Place a level alongside the clock cabinet from front to back and
side to side, adjusting the levelers until level. It may be necessary to periodically
check your cabinet after initial set-up, (especially if the clock is on carpet), as it
might settle after original leveling. (see gure 2). Ensure clock is positioned square
and rm on the oor so that it will not fall over.
Illuminated cases: Some clocks have lights illuminating the inside of the clock case.
Check that all packaging materials have been removed from the light bulb before
operating the light.
NOTE: To perform the following steps we suggest wearing cotton gloves or using
a soft cloth when handling parts.
STEP 2
HANGING PENDULUM
Some pendulums have a colored protective plastic lm covering the pendulum
disk. Carefully remove this lm before hanging the pendulum. To hang the
pendulum, locate the pendulum guide through the front door, or any of the side
or back access panel
locations. While holding the pendulum guide with one hand, slip the pendulum in
through the front door with your other hand. Place the pendulum hook through
the slot on the pendulum guide, and lower the pendulum until it is hanging
securely on the pendulum guide. (See gure 3).
FIGURE 1
FIGURE 2
FIGURE 3
LEVELER
CABLE
PULLEYS
STYRO-
FOAM
BLOCKS
FOAM PADS
CHIME
HAMMERS
PENDULUM
GUIDE
CARDBOARD
SLEEVE
CHIME
RODS
PENDULUM
GUIDE
PENDULUM
HOOK
PENDULUM
CABLE
PULLEYS
STYRO-
FOAM
BLOCKS
4
STEP 3
HANGING WEIGHTS
DO NOT REMOVE THE STYROFOAM BLOCKS until after your clock has been
operating. You can remove the styrofoam blocks AFTER they become loose
through normal operation, which typically occurs after eight (8) hours of run time.
Most clocks use three weights. The bottom of each weight is labeled as to its
proper hanging position as you view your clock from the front. The total weight
of each weight is slightly different and each WEIGHT MUST BE INSTALLED IN
ITS CORRECT LOCATION FOR THE CLOCK TO OPERATE PROPERLY. Check the
weights to ensure that they are tightly assembled.
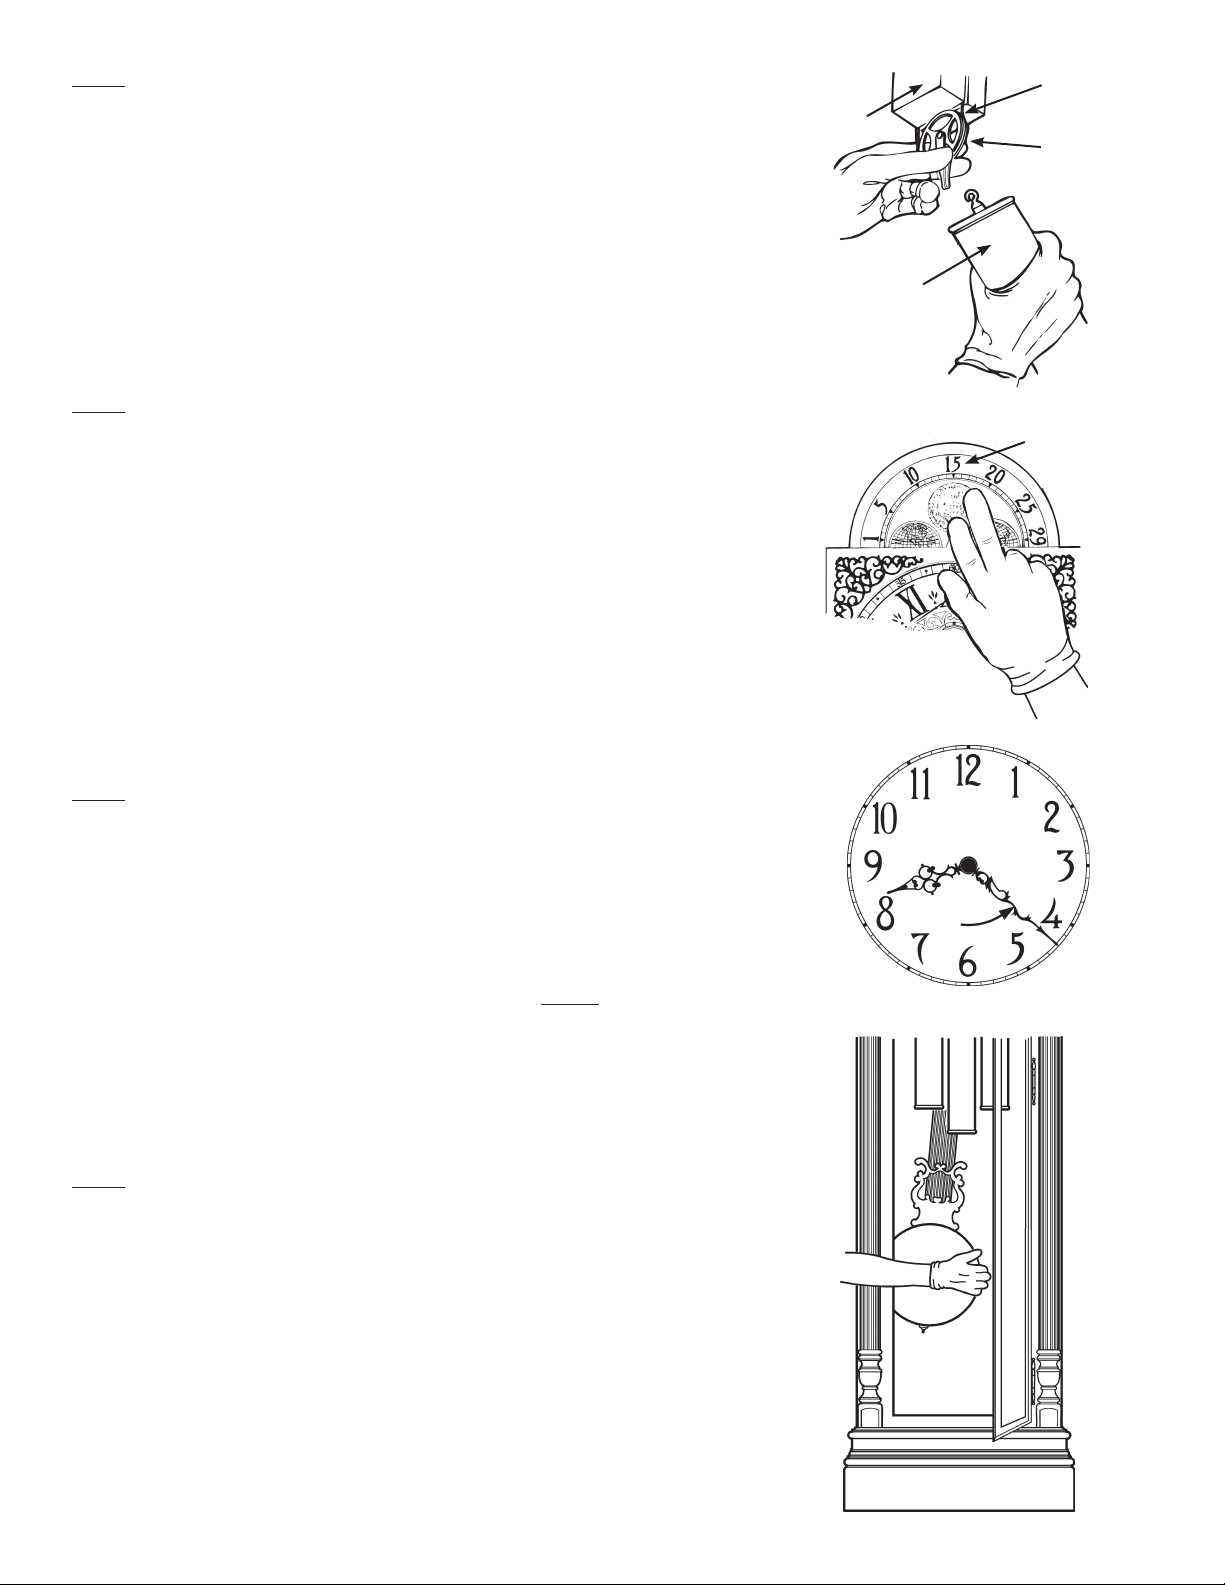
Check to make sure that the cable is in the cable pulley. Hang the weights on the
pulleys. (See gure 4).
STEP 4
SETTING MOON DIAL (available on some models)
With your ngertips, apply slight pressure to the front of the moon dial and rotate
the moon dial clockwise until the moon is directly below the #15 lunar day mark
(each mark represents a lunar day) on the lunar arch (See gure 5).
If the moon dial will not rotate, see the Trouble Shooting Section.
Refer to an almanac or calendar and determine the date of the last full moon.
Count the number of days past the last full moon.
Rotate the moon dial clockwise 1 lunar day for every day past the full moon.
Example: If the last full moon was 3 days ago, rotate the moon dial clockwise 3 lunar
days so that the moon is centered at lunar day 18 on the lunar arch.
The moon dial is now set and will indicate the proper moon phases as long as the
clock operates continuously. If the clock stops the moon dial will also stop and can
be reset when the clock is started again.
STEP 5
SETTING TIME (moving the hands)
CAUTION ON MOVEMENTS WITH AUTOMATIC CHIME SEQUENCING:
The chime selection lever should not be in the “Auto” position when moving the
hands. Moving the hands in either the clockwise or counterclockwise direction while
the automatic chime sequencing is in operation could damage the chime mechanism.
CAUTION ON MOVEMENTS WITH DAY/NIGHT SHUT-OFF FEATURES:
The Day/Night lever must be in the strike position (all the way up) when moving the hands.
To set the time, slowly move ONLY THE MINUTE HAND counterclockwise (back-
wards) until hour and minute hand are at the correct time. (See gure 6). DO NOT
MOVE THE HOUR HAND WHEN SETTING THE TIME. The hour hand will move
automatically when the minute hand is moved. If the clock begins to chime while
setting the time, stop moving the hands until chiming is complete (See gure 6). The
movement has a self correcting feature which synchronizes the chimes with the time.
If after setting the clock on time, it does not chime properly, permit it to operate 2
hours to correct itself.
STEP 6
STARTING CLOCK
Reach through the front door of the clock and place your hand on the side of the
pendulum disk.
Move the pendulum to the far left of center and release. Let the clock operate a
few minutes until the pendulum settles into an even swinging motion. (See gure 7).
If your clock gains or loses time after twenty-four (24) hours, see General
Information Section to regulate the timekeeping of your clock.
AFTER the styrofoam blocks become loose through normal operation, which typically
occurs after eight (8) hours of run time, you can remove the styrofoam blocks. Remove
the styrofoam blocks by lifting the blocks straight up until they clear the cable pulley.
Then gently push them back, through the cables. Do not use tools to remove the
blocks. Do not permit the cable to overlap on the drum.
FIGURE 7
FIGURE 6
FIGURE 5
FIGURE 4
HOUR
HAND MINUTE
HAND
COUNTER
CLOCKWISE
#15 LUNAR
DAY MARK
STYROFOAM
BLOCK
CABLE
CABLE
PULLEY
WEIGHT
5
FOLLOW THESE SIX STEPS TO SET UP CLOCKS THAT REQUIRE WEIGHTS
SUSPENDED FROM A CHAIN
STEP 1
SETTING UP YOUR CLOCK
Located in the bottom of the shipping carton will be a box. This box contains:
a) a key to t your clock door and, b) weights which operate the clock movement.
Also, within the shipping carton will be the clock pendulum packaged in a sepa-
rate cardboard box.
WARNING: KEEP PLASTIC BAGS AND SMALL PARTS AWAY FROM CHILDREN.
Move the clock close to its nal location.
WARNING: ENSURE CLOCK IS POSITIONED SQUARE AND FIRM ON THE
FLOOR SO THAT IT WILL NOT FALL OVER. ADJUST LEVELERS FOR MAXIMUM
STABILITY AND PROPER ALIGNMENT.
Access to the clock movement, chimes and chains is made in three possible
ways; through the front door(s) through the side or back access panel. The rear
access panel is held in place with plastic clips. Turn the top clips to remove the
rear access panel. The side access panels are held from the inside by tape or a
plastic clip. The clip may be turned or tape may be removed permanently. Refer
to the General Information section on how to properly remove and install side
access panels.
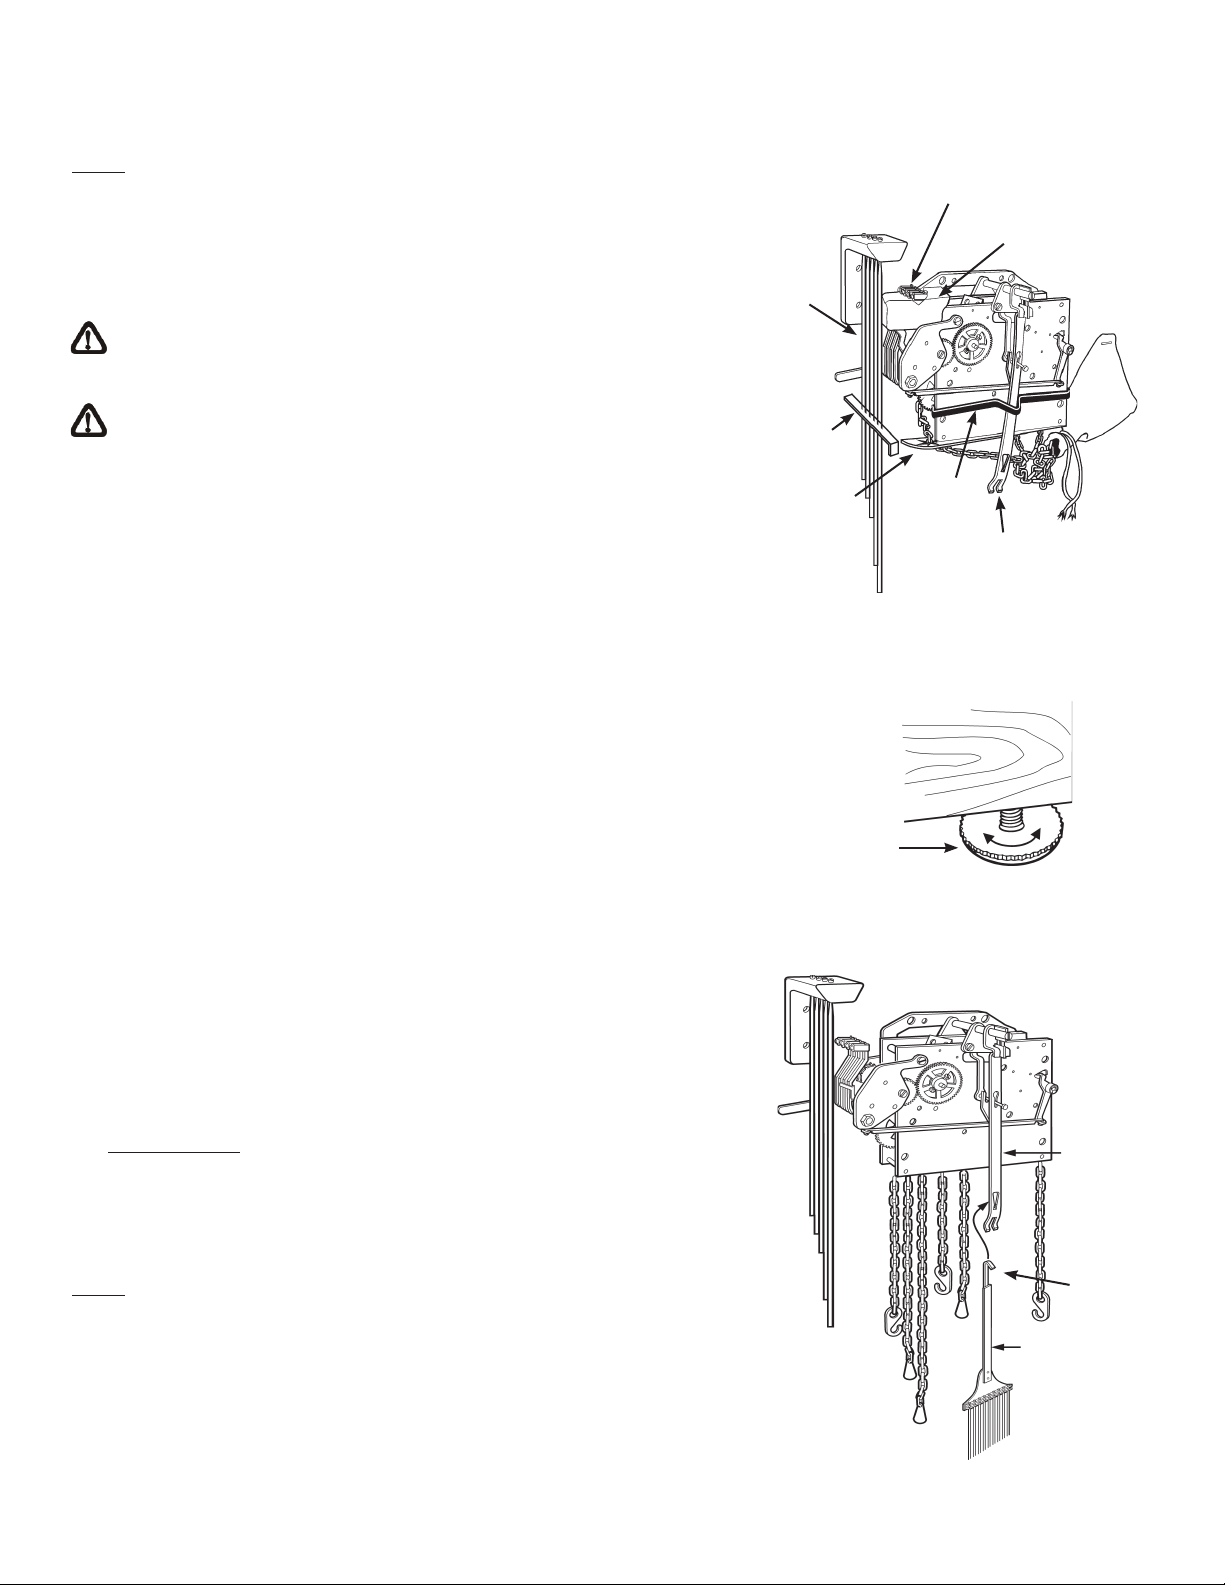
Remove the plastic retainer from the chime rods by carefully tilting and sliding
the retainer down off the ends of the chime rods. Remove the foam pads from
between the hammers and chime rods. Care should be taken to avoid bending
the chime hammers and chime rods.
The chains have been packed for shipment in a bag and are located near the clock
movement. Pull the bag free and cut the string with scissors. Allow the chains to hang.
CAUTION: Take great care not to pull the chains through the movement or
off the sprockets while removing the plastic retainer from the chains.
Carefully remove the plastic retainer by sliding the retainer down off the chains.
Remove the spring clip from the back side of the movement by rst pulling one
end free. (See gure 8).
Position the clock into its nal location. Once in place, your clock cabinet must be
leveled, as the clock may not operate if it is not level. There are four (4) levelers
under the cabinet on each corner that can be screwed in (up) or out (down) to
make adjustments. Place a level alongside the clock cabinet from front to back
and side to side, adjusting the levelers until level. It may be necessary to
periodically check your cabinet after initial set-up, (especially if the clock is on
carpet), as it might settle after original leveling. (See gure 9). Ensure clock is
positioned square and rm on the oor so that it will not fall over.
Illuminated cases: Some clocks have lights illuminating the inside of the clock
case.
Carefully remove the paper sleeve from the light bulb before operating the light.
NOTE: To perform the following steps we suggest wearing cotton gloves or using
a soft cloth when handling parts.
STEP 2
HANGING PENDULUM
Some pendulums have a colored protective plastic lm covering the pendulum
disc. Carefully remove this lm before hanging the pendulum.
To hang the pendulum, locate the pendulum guide through the front door, or any
of the side or back access panel locations. While holding the pendulum guide with
one hand, slip the pendulum in through the front door with your other hand. Place
the pendulum hook through the slot on the pendulum guide, and lower the
pendulum until it is hanging securely on the pendulum guide. (See gure 10).
REAR VIEW
FIGURE 8
FIGURE 9
FIGURE 10
CHIME HAMMERS
FOAM PAD
CHAIN
BAG
PENDULUM
GUIDE
SPRING
CLIP
PLASTIC
RETAINER
(chains)
PLASTIC
RETAINER
(chime rods)
CHIME
RODS
LEVELER
PENDULUM
GUIDE
PENDULUM
HOOK
PENDULUM
6
STEP 3
HANGING WEIGHTS
Most clocks use three weights. The bottom of each weight is labeled as to its
proper hanging position as you view your clock from the front. The total weight of
each weight is slightly different and each WEIGHT MUST BE INSTALLED IN ITS
CORRECT LOCATION FOR THE CLOCK TO OPERATE PROPERLY. Check the
weights to ensure that they are tightly assembled.
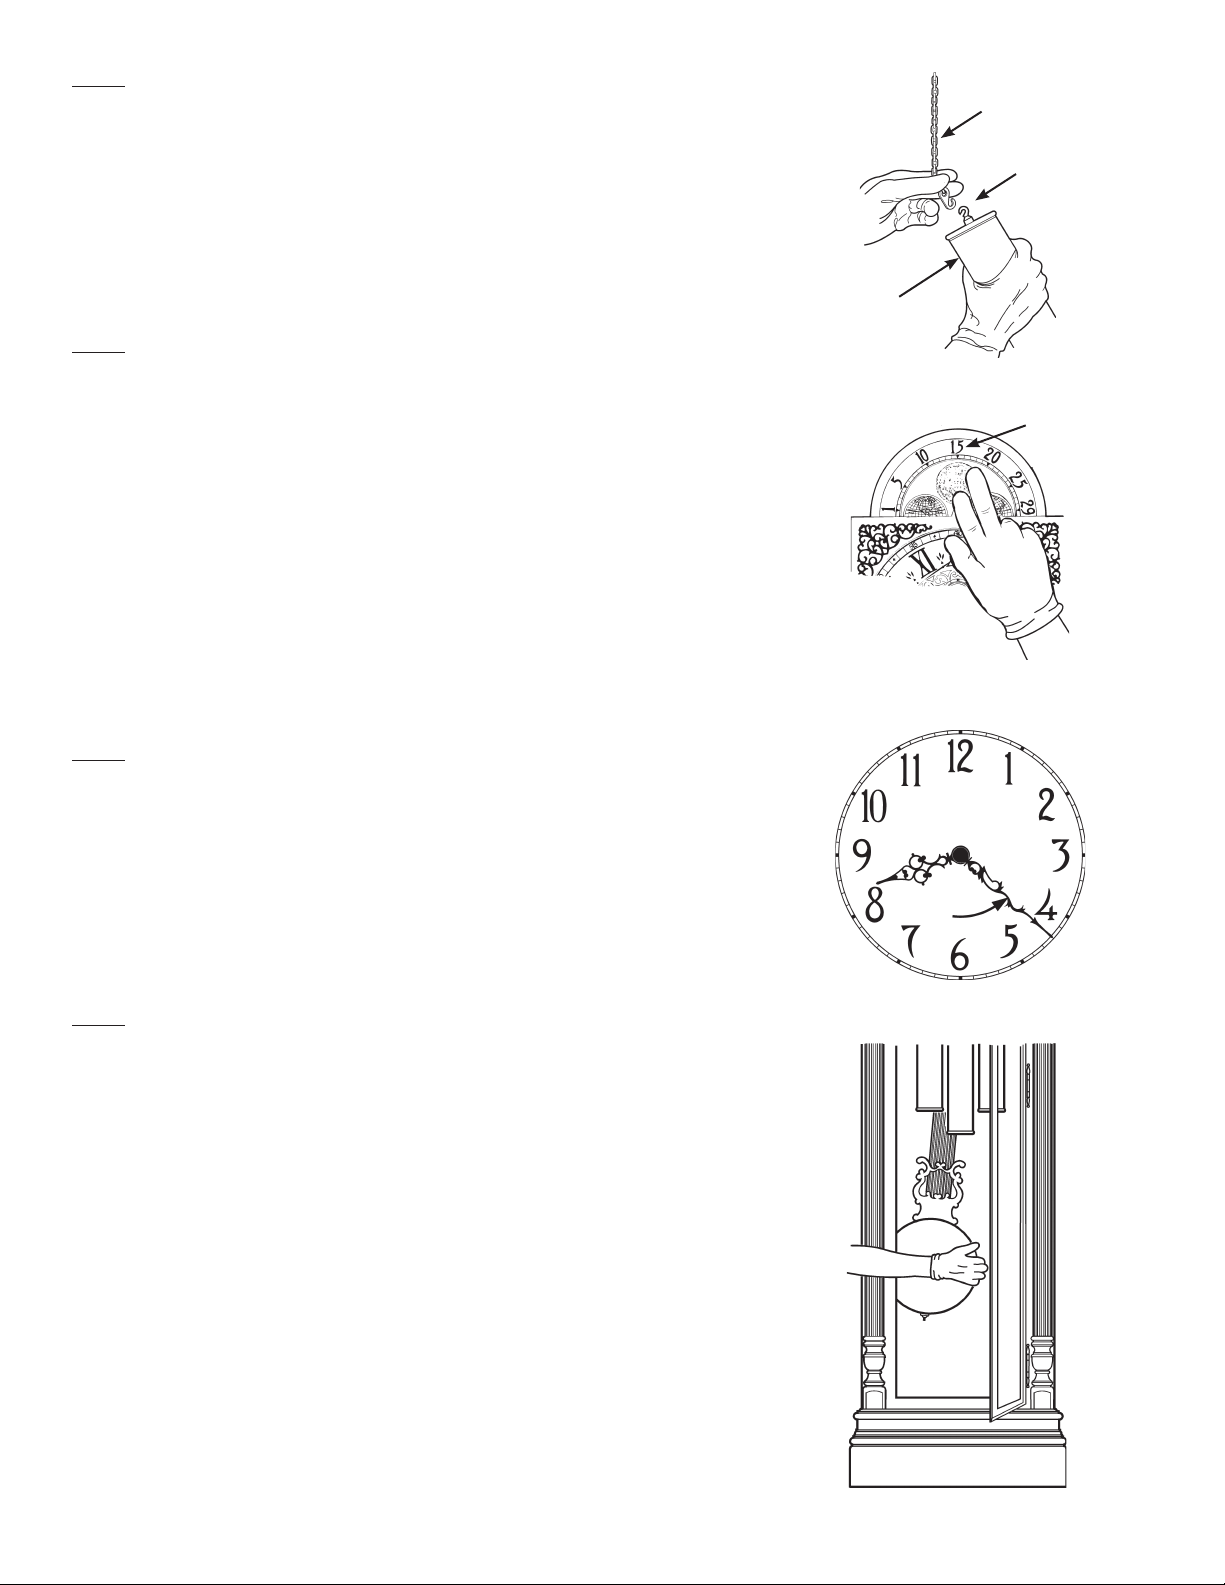
CAUTION: Ensure that each link of each chain is properly positioned on the
teeth of the sprocket. Hang each weight on the solid hook at the end of the
chain, never on the chain links. (See gure 11).
STEP 4
SETTING MOON DIAL (available on some models)
With your ngertips, apply slight pressure to the front of the moon dial and rotate
the moon dial clockwise until the moon is directly below the #15 lunar day mark
(each mark represents a lunar day) on the lunar arch (See gure 12).
If the moon dial will not rotate, see the Trouble Shooting Section.
Refer to an almanac or calendar and determine the date of the last full moon.
Count the number of days past the last full moon.
Rotate the moon dial clockwise 1 lunar day for every day past the full moon.
Example: If the last full moon was 3 days ago, rotate the moon dial
clockwise 3 lunar days so that the moon is centered at lunar day 18 on the lunar
arch.
The moon dial is now set and will indicate the proper moon phases as long as the
clock operates continuously. If the clock stops the moon dial will also stop and
can be reset when the clock is started again.
STEP 5
SETTING TIME (moving the hands)
To set the time, slowly move ONLY THE MINUTE HAND counterclockwise (back-
wards) until hour and minute hand are at the correct time. (See gure 13).
DO NOT MOVE THE HOUR HAND WHEN SETTING THE TIME. This hand will
move automatically when the minute hand is moved. If the clock begins to chime
while setting the time, stop moving the hands until chiming is complete. The
movement has a self correcting feature which synchronizes the chimes with the
time. If after setting the clock on time, it does not chime properly, permit it to
operate 2 hours to correct itself.
STEP 6
STARTING CLOCK
Reach through the front door of the clock and place your hand on the side of the
pendulum disk.
Move the pendulum to the far left of center and release. Let the clock run a few
minutes until the pendulum settles into an even swinging motion. (See gure 14).
If your clock gains or loses time after 24 hours, see General Information Section
to regulate the timekeeping of your clock.
FIGURE 11
FIGURE 12
FIGURE 13
FIGURE 14
CHAIN LINKS
SOLID HOOK
WEIGHT
#15 LUNAR
DAY MARK
HOUR
HAND MINUTE
HAND
COUNTER
CLOCKWISE
7
PRODUCT INFORMATION LABEL
The product information label identies the clock model number and serial number.
The clock model number and serial number are essential for obtaining parts or service.
The product information label is located in several locations: outside the shipping
carton, back of door, back of the clock, top of the clock, inside the top back corner
of the clock, or inside the clock above the back of the dial. Refer to this label when
contacting us or your dealer. For easy reference in the future, take a moment to record
these numbers in the space provided in the Service Information Section (page 12.)
Attach your sales receipt to this manual for future reference.
MOVING YOUR CLOCK
Care should be taken whenever you move your clock to insure that all accessory parts
such as the pendulum and weights, are removed and packed properly to prevent
damage. NEVER wind a cable drive movement without weights installed.
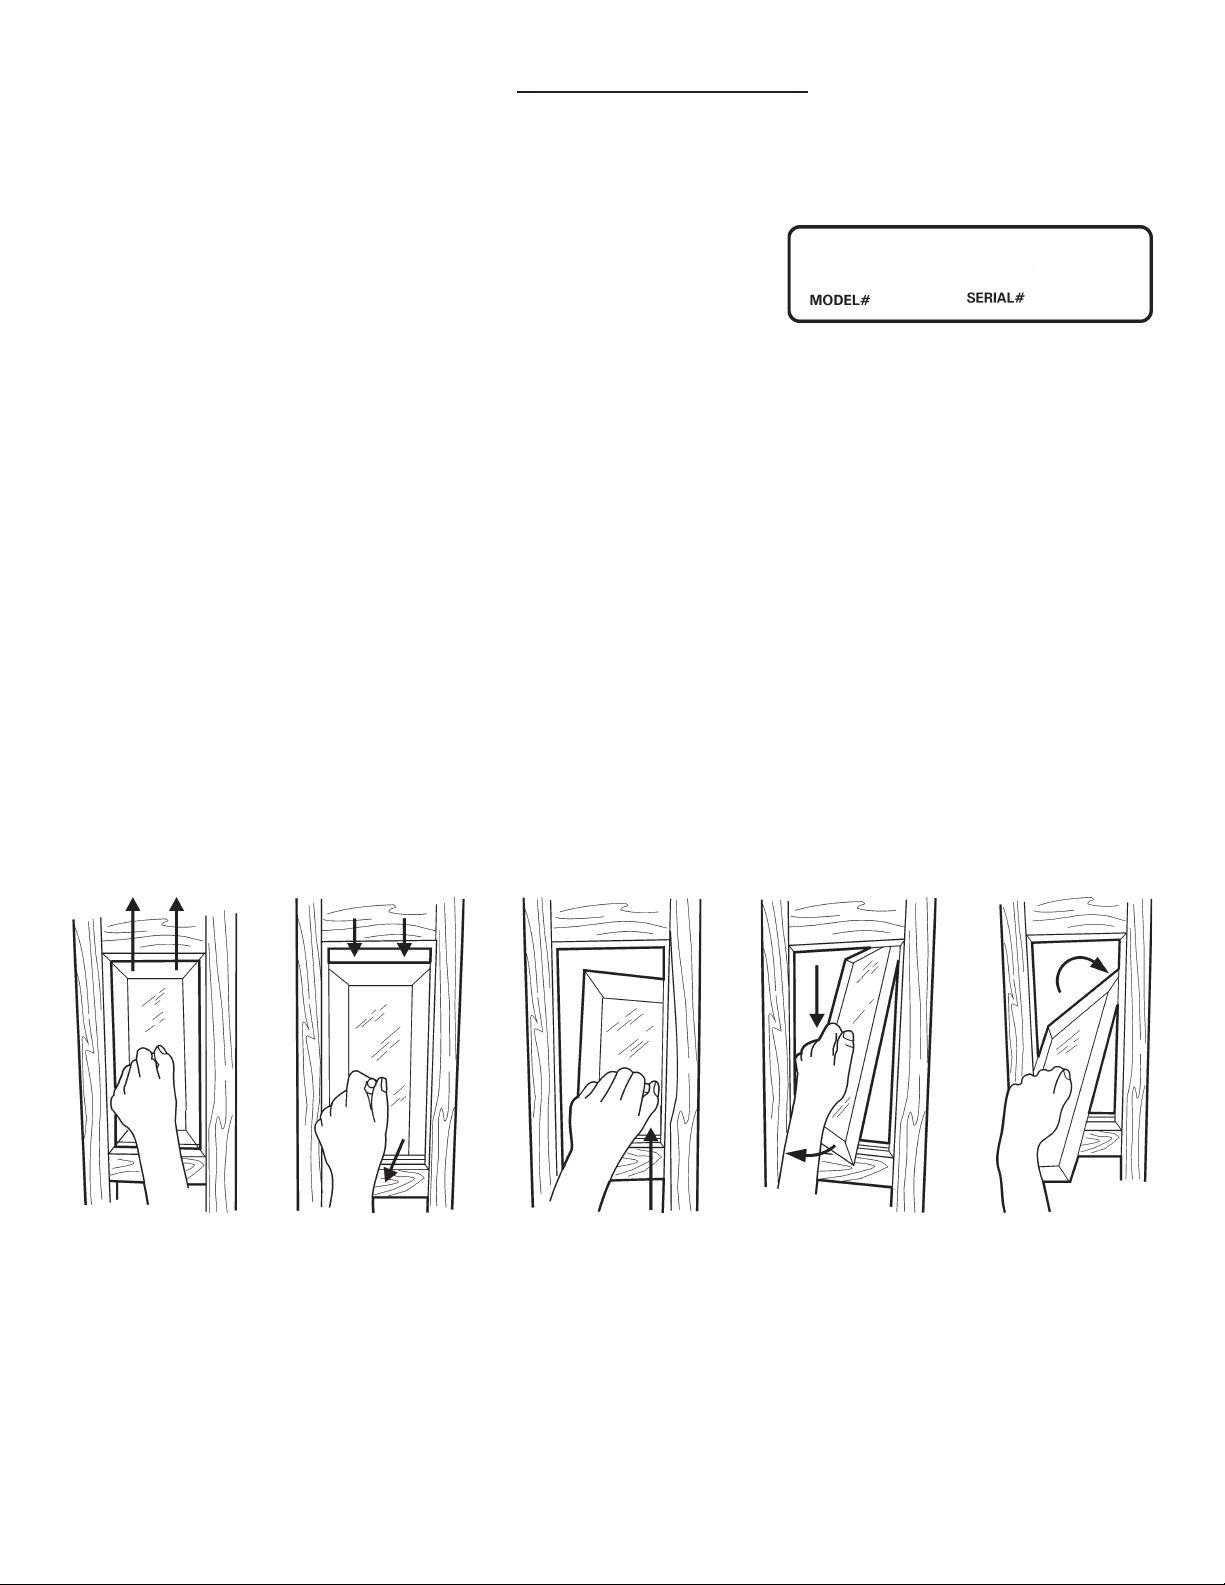
HOW TO REMOVE/INSTALL THE TOP SIDE PANELS FROM THE CLOCK
Your clock may have wood or glass top side panels. When removed, you have access
to the clock movement and chime area. The panels may be held in place during
shipment by tape or a plastic clip. In order to remove the panel, reach in through the
front door and turn the plastic clip or remove the tape. Then follow these steps:
1. Grasp the wood slats or knob with the tips of your ngers. Be careful not to push on
the grill cloth or glass as you might separate it from the wood top side panel.
2. Lift the top side panel up. It rests in a groove on the bottom edge.
3. Push the bottom edge of the top side panel toward the center of the case while
at the same time, pull the top edge down and out of the groove in the top of the
opening.
4. Tilt the top edge of the top side panel toward the case center.
5. Remove the top side panel from frame opening, bottom end rst.
When installing wooden or glass top side panels reverse steps 1 thru 5.
GENERAL INFORMATION
PRODUCT INFORMATION LABEL
GLASS FEATURES
Note that minor character marks are created by the glass making processes such as
heat bending, cutting, or polishing. These character marks are visible to the eye. They
are natural and are not considered as aws.
When cleaning glass, use a non-ammonia glass cleaner. Never spray the cleaner
directly on the clock.
STEP 1 STEP 2 STEP 3 STEP 4 STEP 5
8
RAISING WEIGHTS
The weights must be raised every seven (7) days or the clock will stop.
FLOOR CLOCK: Cables with pulleys
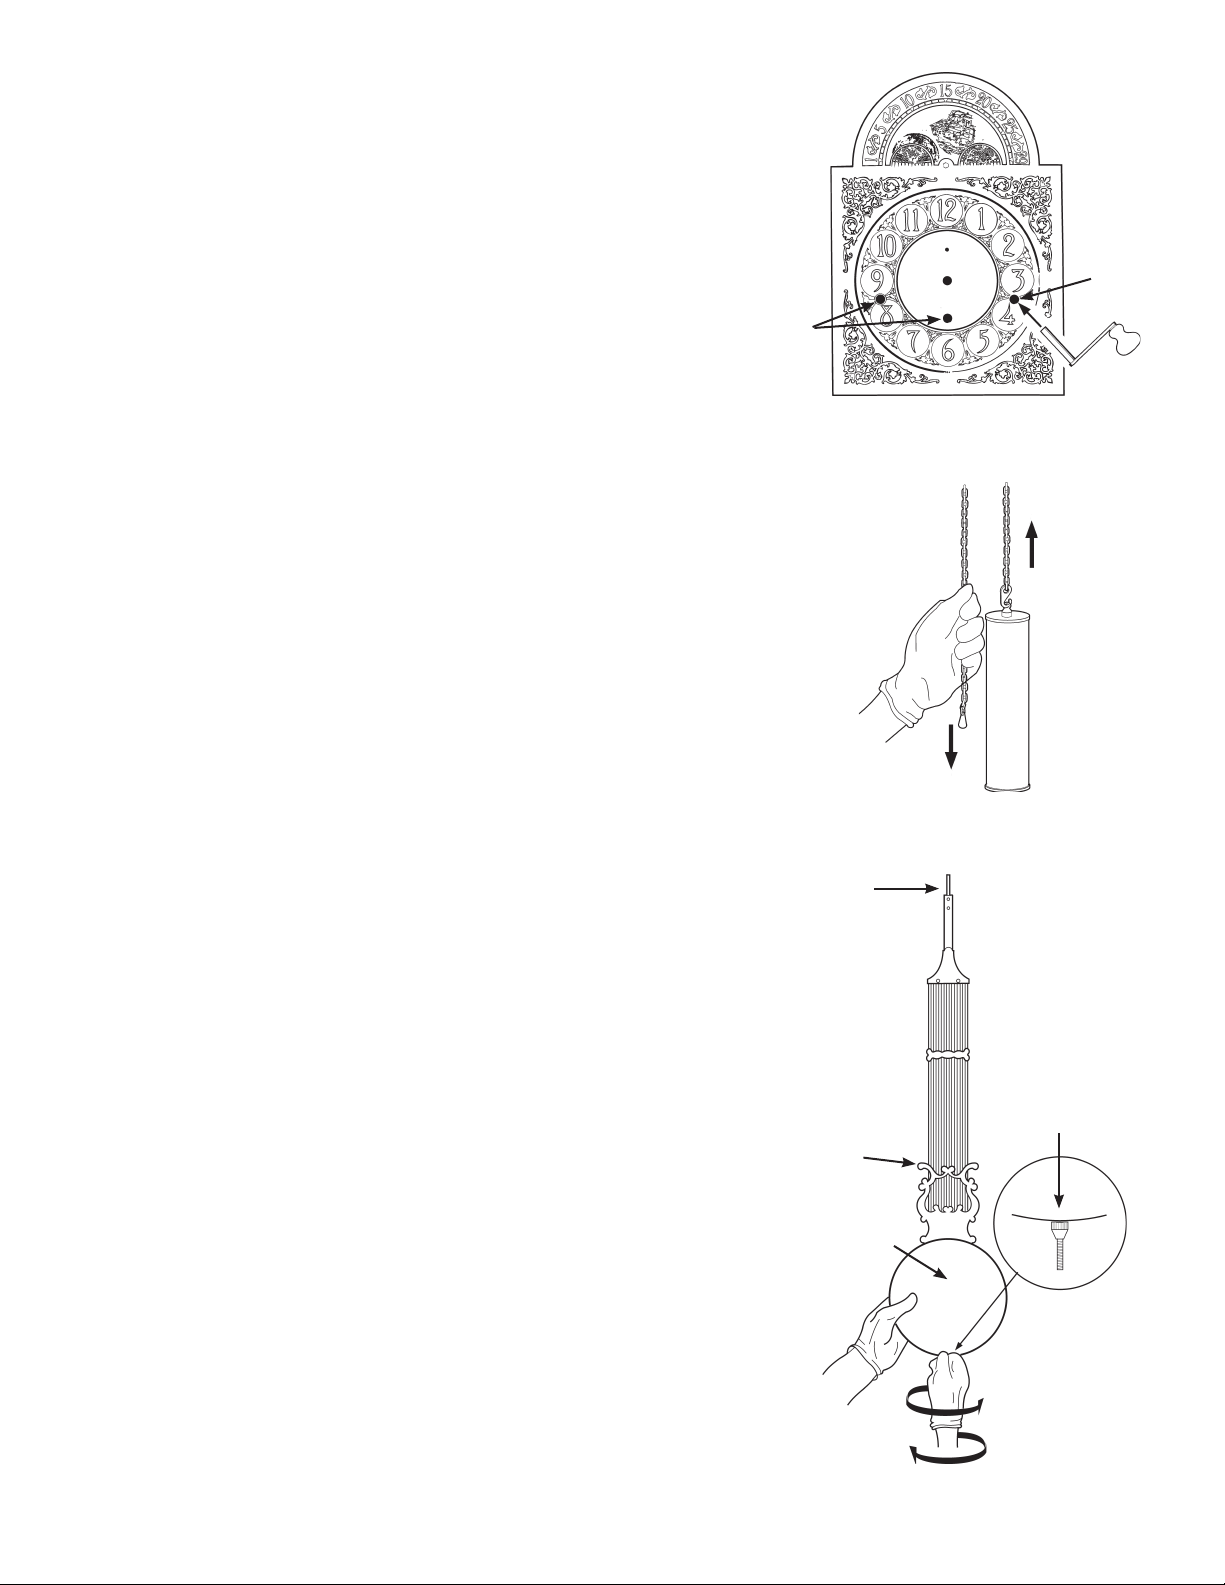
Weights that are suspended by cables with pulleys should be raised by using the
crank provided. DO NOT lift the weights by hand while cranking. Insert the crank
into the crank holes located in the dial face (See gure 15), and turn the crank
counterclockwise. This will raise the weights.
FLOOR CLOCK: Chains
IMPORTANT: PULL STRAIGHT DOWN ON THE CHAIN.
DO NOT lift up on the weights as this could cause the weights to come unhooked
from the chains. Pull down on the loose end of the chain until the weight is
approximately 2” from the bottom of the wood movement mounting board. (See
gure 16).
REGULATING TIMEKEEPING
Changing the speed of time keeping is accomplished by moving the pendulum
disk up or down. The pendulum disk is moved up or down by turning the
adjustment nut. To slow the clock down, move the pendulum disk down by turning
the adjustment nut to the left.
To speed the clock up, move the pendulum disk up by turning the adjustment nut
to the right. (See gure 17).
Day One
1. Select a time of day that will allow you to check your clock at
the same time for at least six days.
2. Record time selected __________________________________.
3. Check correct time.
4. Re-set the minute hand to the exact, correct time.
Day Two, Three, Four, Five, Six (If Necessary)
1. Check correct time.
2. Compare time shown on your clock with correct time. Is your
clock fast or slow?
3. Turn the adjustment nut on the pendulum . One complete
revolution equals approximately one half (1/2) minute fast or slow per
day. (24 hours). Accurate time adjustment varies for every pendulum.
4. Check correct time.
5. Re-set the minute hand to exact, correct time.
AUTOMATIC NIGHTTIME SHUT OFF (available on some models)
Some clock models feature an option which will automatically silence the chime
and hour strike during the nighttime hours. This feature (available on some models)
is activated either by a lever on the left hand side of the dial, or by pushing up on a
rod located under the dial. The model of your clock will determine if it has the lever
or rod.
If your clock remains silent during the daytime hours, you need to re-set the clock
hands back 12 hours. First, take the movement out of nighttime shutoff, then move
the hands backwards 12 hours, rotate the minute hand (only) counterclockwise to
the correct time.
To allow the clock to chime and strike 24 hours, move the lever out of nighttime
silence or pull down on the rod located under the dial.
ILLUMINATED CASES (available on some models)
Some clocks have lights illuminating the inside of the clock case. Carefully remove
the paper sleeve from the light bulb before operating the light.
CRANK
CRANK
HOLE
CRANK
HOLE
FIGURE 15
FIGURE 16
FIGURE 17
HOOK
ADJUSTMENT
NUT
LYRE
PENDULUM
DISK
SLOW
DOWN
SPEED UP

9
CHIME SELECTION
Selecting the chime melody is accomplished by a selection lever on the clock dial.
Some models play only the Westminster chime, while others give you a selection of
three melodies. Some models also have an automatic chime sequencing feature. This
feature allows the movement to automatically change the chime selection every hour.
Selection of the chime sequencing feature or one of the three chime melodies is done
with the selector lever.
If the dial states “Chime-Silent,” your clock has only the Westminster chime. If your
clock has a triple chime movement, the chime lever identies the melody choices.
All oor clock movements have the Big Ben hour gong which will count the hour, on
the hour. DO NOT attempt to move the chime selection lever while the clock is chim-
ing. Doing so could damage the chime mechanism. See gure 18 for when it is safe to
move the chime selection lever without damaging the movement.
CARE AND MAINTENANCE
Your clock requires little care and maintenance.
Listed below are steps you can take to maintain the exceptional quality of your clock.
• Wind your clock every seven (7) days.
• Keep the door locked.
• Wax and polish your clock cabinet as frequently as you do your other furniture.
Use a non-silicone liquid or paste wax.
• Avoid exposing the clock to direct sunlight and protect from extreme temperatures
and humidity changes. Prolonged exposure to direct sunlight may fade the nish while
extreme temperature and humidity changes may cause the wood to split or crack.
• Check periodically to ensure that your clock rests rmly on all four levelers. This is
especially important the rst few months if the clock is on carpet. As the clock’s feet
settle into the carpet, it could become unbalanced. Adjustment to any of the four
levelers may be needed.
• Check the weights occasionally to ensure that they are still tightly assembled.
• It is recommended that your clock movement be oiled every two (2) years from the
date of purchase and thoroughly cleaned every ve (5) to ten (10) years depending
on climatic conditions. Extremely dry, humid or salty air, heat or cold may necessitate
more frequent servicing. We do not recommend that you service the clock movement
yourself. Contact an Authorized Service Center. (See Service Information Section)
TROUBLE SHOOTING
Ensure that all instructions provided with your product have been carefully followed.
These instructions will provide detailed information to answer most questions. Contact
our web site for a list of frequently asked questions that may conveniently resolve your
problem or answer your questions.
DIFFICULTY ROTATING THE MOON DIAL
If the moon dial will not rotate (as described in the set up operations STEP 4), this
may indicate that the gears which automatically advance the moon dial are engaged.
To correct this situation, rotate the minute hand backward 3-1/2 hours as described
in STEP 5 of the set up operation, set the moon dial, and then set the time as
described in STEP 6.
CLOCK DOES NOT CHIME AT PROPER TIME
If the clock chimes more than one minute before or after the proper time, the minute
hand should be removed and adjusted.
CAUTION: When performing this operation be careful not to scratch the hand nut,
hand or dial.
MOVE CHIME SELECTION LEVER ONLY
WHEN
MINUTE HAND IS IN SAFE TIME AREA
SAFE
TIME
SAFE
TIME
SAFE
TIME
FIGURE 18
Questo manuale è adatto per i seguenti modelli
57
Indice
Altri manuali Howard Miller Orologio

Howard Miller
Howard Miller 615-052 Manuale utente

Howard Miller
Howard Miller MYDay 625-488 Manuale utente

Howard Miller
Howard Miller 615-069 Manuale utente

Howard Miller
Howard Miller 615010 Manuale utente

Howard Miller
Howard Miller 615114 Manuale di installazione

Howard Miller
Howard Miller 615088 Manuale di installazione

Howard Miller
Howard Miller 615100 Manuale di installazione

Howard Miller
Howard Miller 611274 Manuale di installazione

Howard Miller
Howard Miller 611319 Manuale di installazione

Howard Miller
Howard Miller 615116 Manuale di installazione


