Hubble Skyvision AI Pro Manuale utente
US EN
QUICK START GUIDE
For a full explanation of all features and instructions, please refer to the User’s Guide (available for
download from support.hubbleconnected.com).
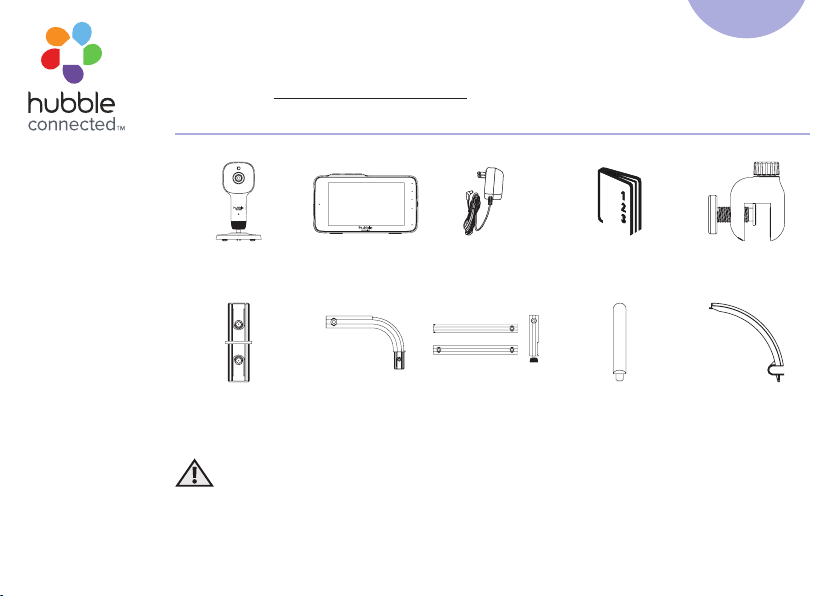
1. Contents Inside Box
x 2
Baby Unit *
(Camera Unit)
Parent Unit Power Adapters * Quick Start Guide Base
Middle Tube
Lower Tube
Camera T
ube
Tube Connectors
x 2
Elbow Tube Tubes Cable Cover
x 4
Lid
Note: In multi-camera packs, you will find one or more additional Baby Units with power adapters.
WARNING:
Strangulation hazard. Children have STRANGLED in cords. Keep this cord out
of the reach of children (more than 3 feet away). Do not remove the tags from
the AC Adapters. Only use the AC Adapters provided.
Models:
Skyvision AI Pro
Skyvision AI Pro Twin

2. Setting up your Digital Video Baby Monitor
2.1 Connecting the Power Supply for the Baby Unit
• Insert the DC plug of the power adapter into
the DC socket on the back of the Baby Unit.
• Connect the other end of the power adapter
to a suitable electrical outlet.
• The baby unit turns on and the power
indicator lights in Green colour.
Note
Only use the supplied power adapter
(DC5V/1000mA).
2.2 Installing the camera mount on a wall
• Mark the position of the screw holes on the
wall.
• Install wall anchors (Not provided) suitable for
the wall type and mounting screws if needed.
• Fasten the mounting screws (Not provided) on
the wall.
• Position the cable behind the base as shown
in the picture before attaching the base on the
wall.
Pair button

2.3 Connecting the Power Supply of the Parent Unit.
• Connect the USB Type-C plug of the power adapter to the parent
unit and the other end to the electrical outlet. Only use the
enclosed adapter (5V DC / 1500mA).
• A rechargeable battery (Lithium-ion battery 2100mAh) inside
the Parent Unit allows you to move it without losing the link and
picture from the Baby Unit. We recommend charging for at least
4 hours before first use, and when the Parent Unit indicates the
battery is low.
• Press and hold the POWER button on the top of the Parent Unit
to turn it ON.
• Flip out the stand on the back of the Parent Unit and rotate it by
90 degrees to set up the desktop stand.
3. Overview of Parent Unit
Antenna Vol + / -
Flash light
Touch screen display
Reset pin hole
Power socket Power button
Speaker
Ring stand
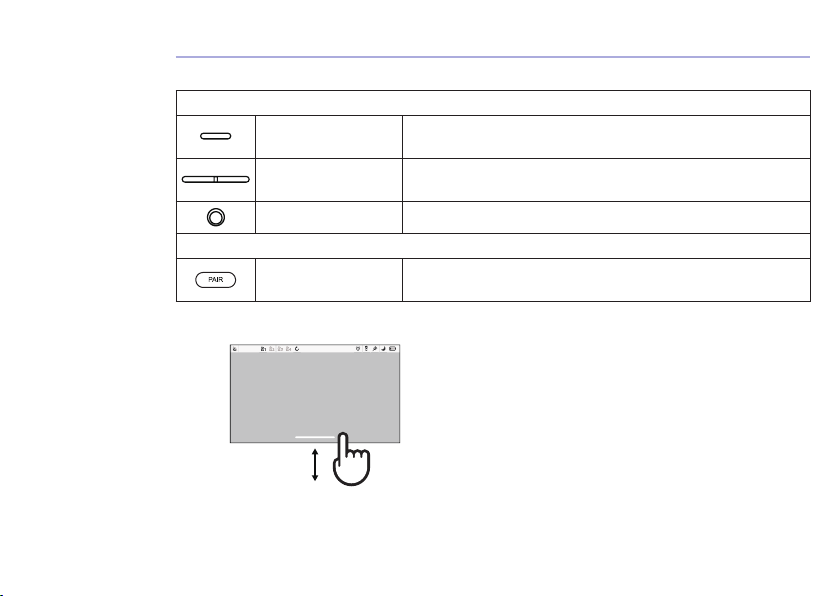
4. Basic operation of the keys
Parent unit
Power button Press and hold to switch the Parent Unit ON/OFF.
Toggle once at standby mode to switch video on/off.
Vol+ and Vol-
buttons
Press -/+ to select volume level of the Parent Unit.
Reset pin hole Press and hold with a small pin to reset the unit.
Baby Unit
PAIR button Press and hold to pair with the parent unit or for Hubble
Wi-Fi®Setup. Located on the side of the camera.
5. Touch screen operation
25 °C
Swipe up at the screen bottom to pop up the
menu bar.
Swipe down at the screen bottom to hide
the menu bar.
Scroll left/right on the menu bar to see all the
options.

Menu Icons
Tap to access Hubble Baby entertaining games and videos.
LCD Brightness Level Control (8 Levels).
Zoom Level Control.
Audio Media selection - Personal Recordings , Lullabies/Soothing Sounds , Audio
Books , Volume control of media playback .
Tap to turn flashlight on or off.
Alarm Setting
On status bar, indicates alarm set, and when flashing, that alarm time has been
reached or missed.
Tap to talk to Baby Unit.
Tap to turn Night Light on or off.
Camera Control (add , del , view , scan ).
Set Screen Off Timer (Off, 5 mins, 15 mins, 30 mins).
Temperature scale select (°C/°F)
Readings display in grey, but turns RED if > 29 °C / 84 °F or < 14 °C / 57 °F.
Displays HH °C / °F if >36 °C / 97 °F.
Displays LL °C / °F if < 1 °C / 34 °F.
Note: The feature is not available in this version when the icons appear grayed out.

* The playlist appears only if you make the audio recording via Hubble app.
Audio Media Playback menu icons
Tap to display personal recording*playlist.
Tap to display soothing sound or lullaby playlist.
Tap to display audio book playlist.
Volume control of media playback.
Play selected audio media on the playlist.
Stop playing audio media.
6. Display icons
Signal Level (5 Levels).
Night Vision Mode (Video also changes to Black/White).
Indicates the screen off timer is set.
Volume Level Control (8 Levels).
No Baby Unit detected.
Battery Level Indicator (4 Levels).
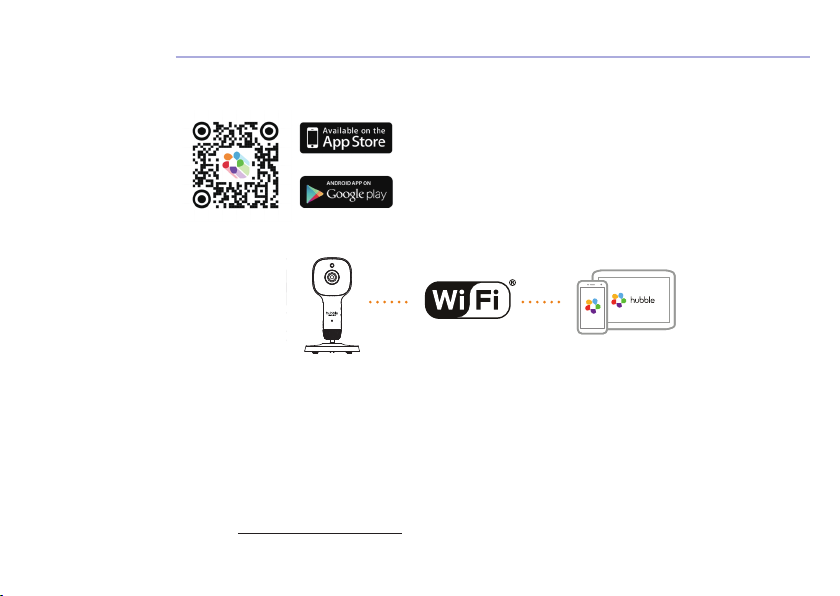
7. Setting up the Camera Unit for Wi-Fi®internet viewing
7.1 Install HubbleClub by Hubble Connected App.
• Scan the QR code with your smart device and download
HubbleClub by Hubble Connected App from the App Store
for iOS devices or from the Google Play™ Store for Android™
devices.
• Install HubbleClub by Hubble Connected App on your device.
7.2 View on Compatible Smartphones and Tablets.
Camera Unit Connect to Internet
via Wi-Fi®
Compatible
Viewing Devices
1. Open the HubbleClub by Hubble Connected App on your compatible smartphone or tablet.
2. Follow the in-app instructions to create your Hubble account and connect to your device.
Please take note of the following minimum system requirements:
Smartphones/Tablets: iOS 13.0, Android™ 8.0
Wi-Fi®requirements:
At least 1.5 Mbps dedicated upload bandwidth per Smart Monitoring Companion, test your Internet
speed at: http://www.speedtest.net/
8. Installation of Crib mount
Ensure the finest viewing experience with the included crib mount featuring a cable management
system. This mount is designed to attach directly to most crib top rails. Follow these instructions to
assemble and install the crib mount.
8.1 Assembling the Crib Mount
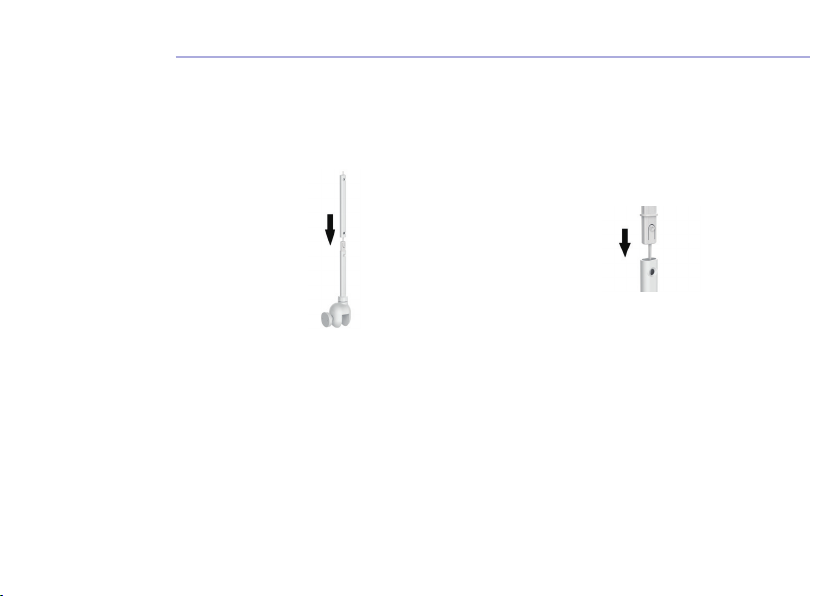
8.1.1 Lower Tube Assembly
• Thread the power cord through the lower tube.
• Loosen the base nut and insert the lower tube's end into the base, ensuring it is fully seated.
• Tighten the base nut securely. Refer to Fig. 1 & Fig. 2 for guidance.
Fig. 1 Fig. 2
8.1.2 Connecting Tubes
• Thread the power cord through the connector and plug it into the lower tube until you hear a
"Click" sound. Refer to Fig. 3 & Fig. 4.
Fig. 3 Fig. 4
8.1.3 Middle Tube Assembly
• Thread the power cord through the middle tube.
• Insert the middle tube into the lower tube connector until a "Click" sound confirms the connection.
Refer to Fig. 5.
• Thread the power cord through the connector and insert it into the upper end of the middle tube,
securing with a "Click" sound. Refer to Fig. 6.
Fig. 5 Fig. 6
8.1.4 Elbow Tube and Camera Tube
• Thread the power cord through the elbow tube.
• Insert the elbow tube into the upper tube connector until you hear a "Click" sound. Refer to Fig. 7.
• Thread the power cord through the camera tube with the power cord slot facing upward.
• Insert the camera tube into the connector, securing with a "Click" sound. Refer to Fig. 8 & Fig. 9.

Fig. 7 Fig. 9
8.1.5 Locking the Lid
• Place the tab end into the lower open section of the elbow.
• Rotate the lid down into the elbow tube, pressing until you hear a "Click" to ensure a secure fit.
Refer to Fig. 10 & Fig. 11.
Fig. 10 Fig. 11
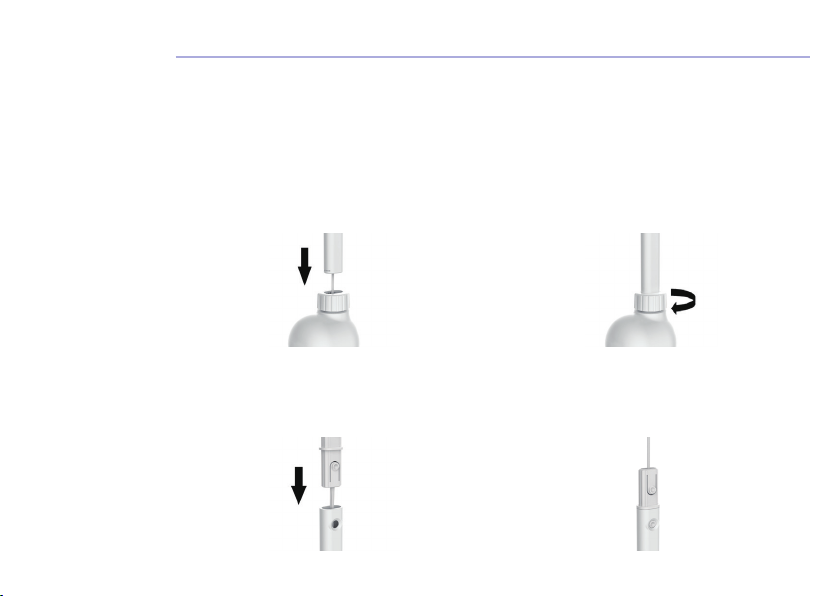
8.1.6 Camera Locking
• Press the lock nut over the ball and attach the camera to it.
• Tighten the lock nut securely to hold the camera in place. Refer to Fig. 12 & Fig. 13.
Fig. 8
Questo manuale è adatto per i seguenti modelli
1
Indice
Altri manuali Hubble Accessori per fotocamere


