Huddly GO Manuale utente

Huddly AS
Troubleshooting guide
Version #4 - 09/19
700 Support
Created by
Lene Walther Johnsen
First Line Support & Customer Relation Consultant

Table of contents
Support flow 2
1.0 Introduction 2
1.1 Connecting your Huddly camera 3
1.1.1 Connecting your camera to a USB 2.0 port 3
1.1.2 Camera plugged in but no image 3
1.2 The Huddly App 4
1.2.1 Huddly App installation 4
2.0 Troubleshooting 5
2.1 First troubleshooting steps 5
2.2 Cables 6
2.2.1 Which cable to use? 6
2.2.2 Can I use a USB-C to USB-C cable? 6
2.2.3 Can I use a third party USB-C connector cable? 7
2.3 USB ports 7
2.3.1 How do I know if my computer has a USB 3.0 certified port? 8
2.3.1.1 Windows 8
2.3.1.2 Mac OS X 10
2.3.2 Can I connect the huddly camera to a USB 3.1 certified port? 10
2.4 Software updates 11
2.4.1 Update camera or update app 11
2.4.2 How to check the camera software 12
2.4.3 Huddly App error message: Sorry, seems like we are stuck 13
2.4.4 Huddly App error message: Replug the included cable 14
2.4.5 Huddly App error message: Check your network 15
2.5 Video Client Applications (VCA) 16
2.5.1 Huddly camera does not work with video client application 16
2.6 Before contacting Tier 2 Support (Huddly Level 1 Support) 17
2.6.1 Huddly Log File 17
3.0 Return policy and procedures 18
1
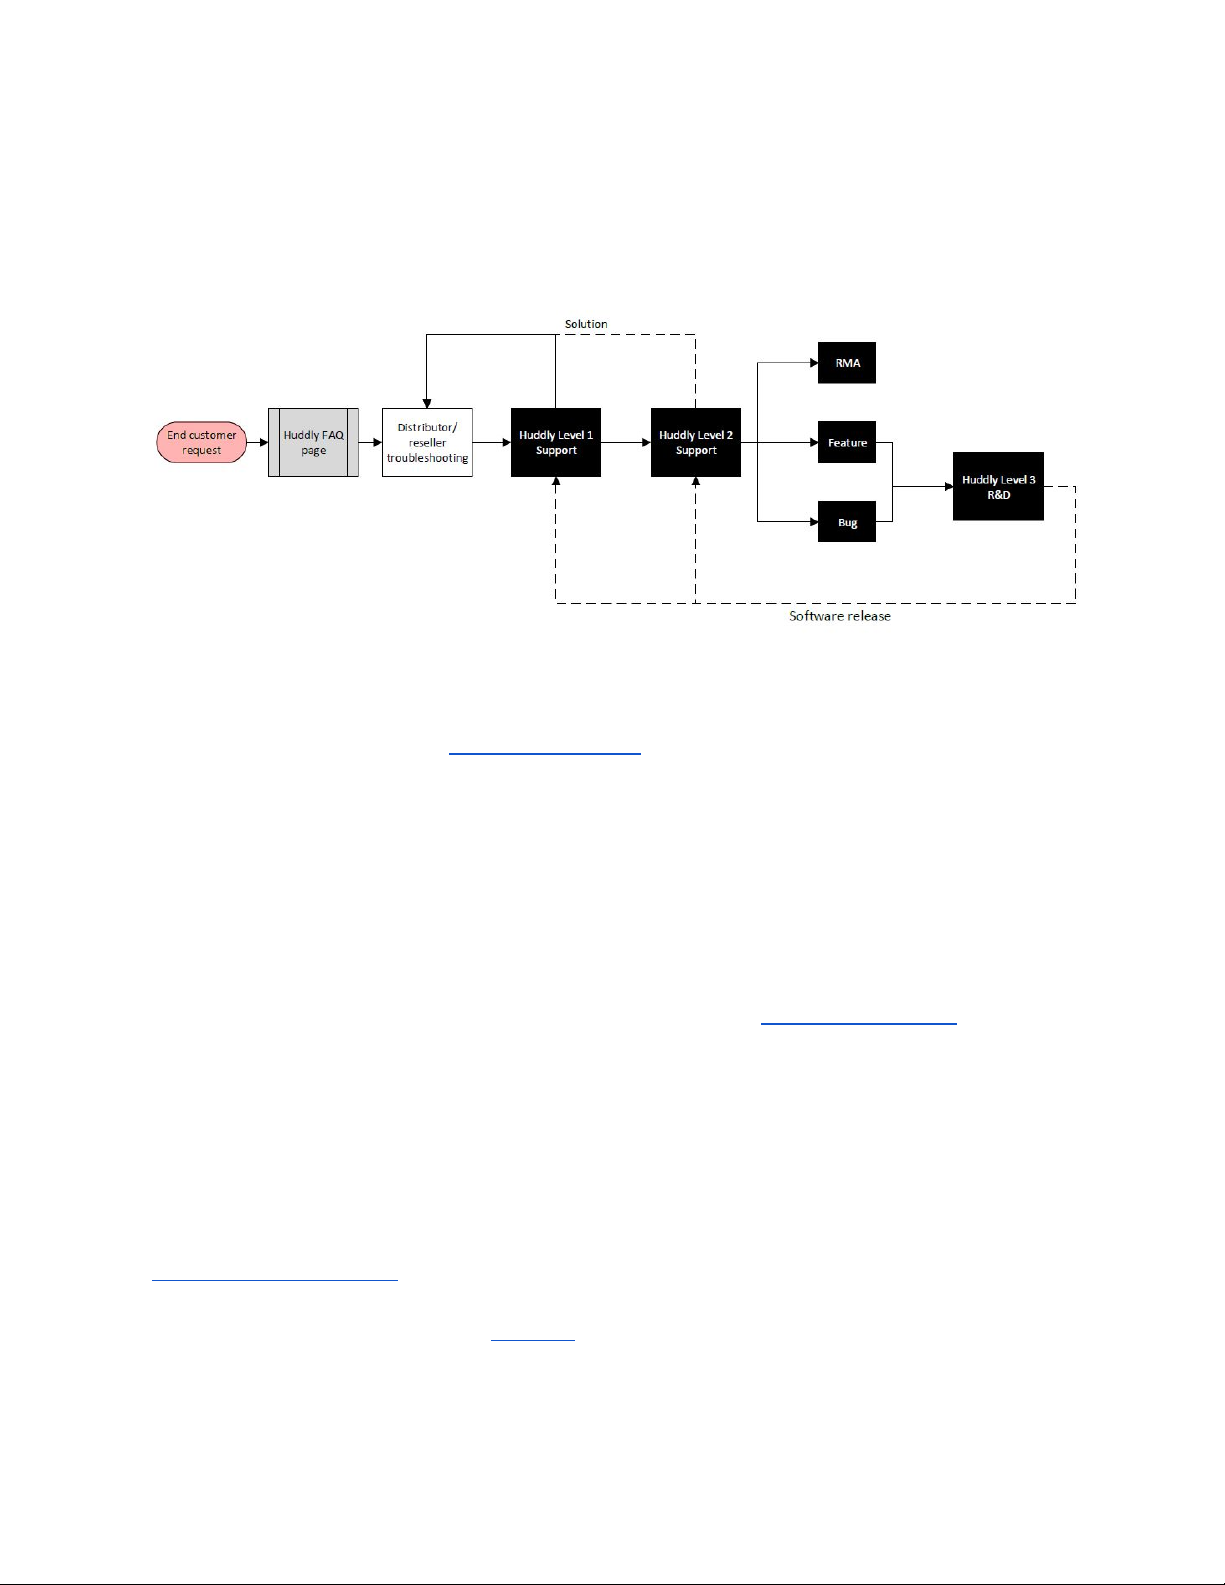
Support flow
When an end user has a request/inquiry, this is the flow of support:
● The Huddly FAQ page (support.huddly.com). This also doubles as a support guide as it
contains information and troubleshooting help for resellers/distributors.
● End user contacts the reseller/distributor for Tier 1 support.
● If the issue is not resolved after Tier 1 troubleshooting, the reseller/distributor contacts
Huddly for Tier 2 support (Huddly Level 1 Support). Huddly will work with the
reseller/distributor to resolve the end user’s issue.
● If it requires further help, the case will be escalated to Tier 3 support with Huddly Level 2
Support. At this point it will be determined if the issue is a software issue that will be
solved with a future update (resolving in a Feature Request or a Bug Fix), or a technical
issue that requires an RMA. For more details on RMAs, please see point 3.0.
1.0 Introduction
This document is a basic troubleshooting guide made for Huddly Partners for the Huddly
products, and will have links to certain FAQ articles on Huddly’s Support pages
(http://support.huddly.com) with information and troubleshooting help that you can always refer
to when helping a customer. Point 1.0 is an introduction to how to use the Huddly camera, and
the troubleshooting help starts with point 2.0.
Huddly cameras are plug-and-play cameras. You connect the camera to your device, and it is
ready to go. You use the Huddly App to control the features of the camera, such as
pan/tilt/zoom and the Genius Framing feature on the Huddly IQ.
2

1.1 Connecting your Huddly camera
Connecting your Huddly camera to your device could not be easier. Just plug the included
USB-C cable into your device and connect it to a USB 3.0 certified port and you are good to go!
Make sure the right cable is used. For more information on what cables you can use, click here.
1.1.1 Connecting your camera to a USB 2.0 port
Here is the link to the full FAQ.
The Huddly GO is USB 2.0 compatible and will show constant light that should be visible when
plugged-in, and should be properly operational.
Huddly IQ is not yet fully compatible with USB 2.0 port, but works perfectly with a USB 3.0 & 3.1
certified port. In a recent software update (v.1.3.1), Huddly IQ can be used with USB 2.0 in
combination with Crestron Mercury. For more information about the correct setup, please see
this FAQ.
1.1.2 Camera plugged in but no image
On rare occasions, it might happen that despite having the correct cables and having them
correctly connected to the USB ports, the camera screen is active but no image is displayed.
The camera might work with third-party cables, but as there is such a high number of extenders
and cable brands out there, we cannot guarantee that the Huddly camera works perfectly with
all of them. For more information on third-party hubs and cables that are certified to work with
Huddly, please see this FAQ.
General note:
Windows and Mac OS X does not allow you to have several video streaming applications
running simultaneously. Therefore, please close all open or in use video programs, restart or
refresh the program you want to use. Please be aware that you need to open a camera or
video conference application to actually use the Huddly camera. The Huddly App is not a video
conference tool.
The first time any device is plugged into your Windows device it will automatically try to search
and install new or additional drivers. The time varies for each device and internet connection,
give it some time and try again. Make sure that you have connected the cable correctly to the
correct port and no interference between video conference tools. If you still encounter the same
situation, please contact support for further assistance.
3

1.2 The Huddly App
The Huddly App is used to update the software on the camera itself, and is needed to have
access to the latest features that are being introduced, such as enabling Genius Framing. Other
features such as pan/tilt/zoom (PTZ) and Dynamic Light Optimization can easily be adjusted
through the app.
The best part is, the Huddly camera has no moving parts. We recommend installing the app
where Huddly Vision Software© updates are performed on a regular basis to always keep you
up-to-date and on the go. Our team constantly work to give you the most high-end video
communication like no other and the best user experience.
Please note, the Huddly App does not show a preview of the video. The video will be shown in
your chosen video client application.
● We also recommend subscribing to our Software Releases page, where we publish
the latest release notes as soon as a new app or camera software version is available.
1.2.1 Huddly App installation
The process is identical for Windows and Mac OS machines. For illustrations of each step,
please see the FAQ.
Please take note: It might happen on rare occasions that your browser does not recognize your
system and you would have to choose manually.
The view might slightly differ depending on the operating system but the steps remain identical.
1. Go to our download the app page.
2. Your browser will automatically propose the download link accordingly.
3. You will be prompted with the Huddly Privacy Policy upon download. By clicking Accept
and download, you indicate that you have read, understood and agreed to the Huddly
policy.
4. The file will now be downloaded, double-check to get started and move to applications.
5. The application will now be installed on your device. Please follow the camera setup
instructions.
6. Please make sure that your Huddly camera is connected and try the app.
7. Turn on Genius Framing.
8. Built-in microphone for Huddly IQ only.
9. Turn on automatic updates to constantly receive the latest feature of your Huddly
camera.
10. Open the app and enjoy!
NB: The Huddly App will NOT show a preview of the video after the initial installation.
4

2.0 Troubleshooting
This part of the document contains information and certain FAQs for the most common issues
users might face.
When troubleshooting, please make sure the user is testing with the provided Huddly
cable. The camera might work with other cables, but if the camera is experiencing an issue,
always ask the user to test with the provided Huddly cable to rule out cable issues.
2.1 First troubleshooting steps
Initial troubleshooting consists of checking the following things:
● Is the customer using the provided Huddly cable?
○ If not, please test with the Huddly cable. Third-party cables are sometimes the
issue.
○ For more help on cables, please see point 2.2.
● Is the camera plugged in to the correct USB port?
○ Sometimes there are only certain USB ports that will work with the camera.
Please ask the customer to test different USB ports.
○ For more help on USB ports, please see point 2.3.
● Is the camera software up to date?
○ You can check our Software Releases website for information about the latest
stable version. The customer should always aim to have the newest software
version available on their camera.
○ For more help on software updates, please see point 2.4.
● Does the Huddly App show any error messages?
○Please see point 2.4 for details about handling the different error messages.
● Is the camera working in different video client applications (VCAs?)
○ Please also have the customer check if the camera works on the camera app on
their device and other VCAs, to rule out the different applications as the cause of
the issue.
○ For more help on supported VCAs, please see point 2.5.
5

2.2 Cables
2.2.1 Which cable to use?
The Huddly cameras can be used in different scenarios and setups, depending on, one of these
different cables might be needed. The Huddly camera is shipped in a box that includes a
0.6-meter cable, perfect for laptop scenarios.
There are many different cable producers, with different qualities and variations.
The USB-C cable that comes packaged with the Huddly products have been tested to ensure it
functions optimally. Please take note, cables need to be used in proper conditions, no knots, not
exposed to heating sources and no weight restraints on the cable.
For all other cables, which have not been provided through an official Huddly reseller or have
not been purchased through us, we can not guarantee an optimal functionality and Huddly will
not provide any support on these.
For distances above 2.0 meters, you would need an Active USB 3.0 cable, a cable which
includes a chip to boost its performance. These cables, in general, are seen in Huddle room
setups, fixed/stationary meeting rooms. These cables can be obtained through a Huddly reseller
near you, or by contacting our sales team through the form in the top right-hand corner of our
home page.
The cable lengths we have available at the moment are 2-meter, 5-meter and 15-meter
extender cables. You can order them from our Amazon page here.
2.2.2 Can I use a USB-C to USB-C cable?
Huddly cameras includes a 0.6-meter USB 3.0 to USB-C cable, perfect for laptop scenarios.
The cable that comes packaged with the Huddly camera has been fully tested to ensure high
video quality experience. Huddly has USB-C to USB-C cables available, please contact Huddly
through the same channels your order cameras through, to order this.
In the newer versions of Mac computers, USB-C and Thunderbolt 3 (USB-C)
ports are most commonly available. Some Mac users prefer to use USB-C to
USB-C cable when using the Huddly camera.
Image courtesy: Belkin USB-C to USB -C cable
6

This cable type can be used and perhaps should work, however, there is no guarantee that
you'll experience optimal functionality as it has not been fully tested yet. To use the cable
provided, an adapter is required for old versions of Mac computers and Huddly will not provide
any support for this.
2.2.3 Can I use a third party USB-C connector cable?
Huddly cameras uses a USB-C cable. There are many different cable producers, with different
qualities and variations that you can use. The Huddly USB-C connector cable that comes
packaged with your Huddly camera has been tested to ensure it functions optimally. Please take
note, cables need to be used in proper conditions, no knots, not exposed to heating sources
and no weight restraints on the cable, for optimal use.
For all other cables, which have not been provided through an official Huddly reseller, we
cannot guarantee an optimal functionality and Huddly will not provide any support on these.
2.3 USB ports
It is important to note that one of the most common situations users experience is that the
Huddly camera has been plugged into the wrong USB port.
Always ask the user to try unplugging the cable and replugging it, as well as connecting the
camera to a different USB port, and making sure it is a USB 3.0 certified port.
7

2.3.1 How do I know if my computer has a USB 3.0 certified port?
Huddly GO works on both USB 2.0 and USB 3.0 certified ports, while Huddly IQ works on USB
3.0 certified ports only. The major difference between the two is the transfer rates, in which USB
3.0 is 10 times faster than USB 2.0. To understand more, please read the information below.
2.3.1.1 Windows
1. The SuperSpeed Logo. In general, computer manufacturers used this to differentiate
between ports which is usually blue in color for USB 3.0. You can find the SS mark along
with the USB port.
2. Device Manager. You can identify the USB port by checking the Universal Serial Bus
controllers.
a. Right-click on the button and go to Device Manager. You can also type
Device Manager on as shown below.
8

b. Go to Universal Serial Bus Controllers and check for USB Root Hub (USB 3.0).
You can also see Huddly GO under Imaging Devices (as seen below).
9
Questo manuale è adatto per i seguenti modelli
1
Indice
Altri manuali Huddly Webcam


