Humanscale Nova Manuale utente

Nova
North America: +1 800 400 0625
Europe: +353 (0)1 858 0910
Asia Pacic: +852 2581 0570 KO 25
EN
FR
ES
DE
NL
JA
IT
2
10
12
15
17
22
20
Assembly Instructions

2
FCC Notice
Applies to USA
Model: N
Note: This equipment has been tested and found to comply with the limits for a Class B digital device, pursuant to
part 15 of the FCC Rules. These limits are designed to provide reasonable protection against harmful interference in a
residential installation. This equipment generates uses and can radiate radio frequency energy and, if not installed and
used in accordance with the instructions, may cause harmful interference to radio communications. However, there is no
guarantee that interference will not occur in a particular installation. If this equipment does cause harmful interference to
radio or television reception, which can be determined by turning the equipment off and on, the user is encouraged to try
to correct the interference by one or more of the following measures:
• Reorient or relocate the receiving antenna.
• Increase the separation between the equipment and receiver.
• Connect the equipment into an outlet on a circuit different from that to which the receiver is connected.
• Consult the dealer or an experienced radio/TV technician for help.
Changes or modications made to this device that are not expressly approved by Humanscale may void the user’s
authority to operate the equipment.
Innovation, Science and Economic Development Canada ICES-005 Compliance Notice:
CAN ICES-005 (B) / NMB-005 (B)
Product Information
Power Consumption: 7 watts
Input Power: 24V, 0.75A
Dimming Range:14% - 100%
Lifespan: 50,000 hours (10 years)
Maximum Reach: Standard: 28.85" / XL: 32.75"
Working Height: Standard: Lower Arm: 13.8" Upper Arm: 13"
XL: Lower Arm: 15.8"Upper Arm: 15"
3
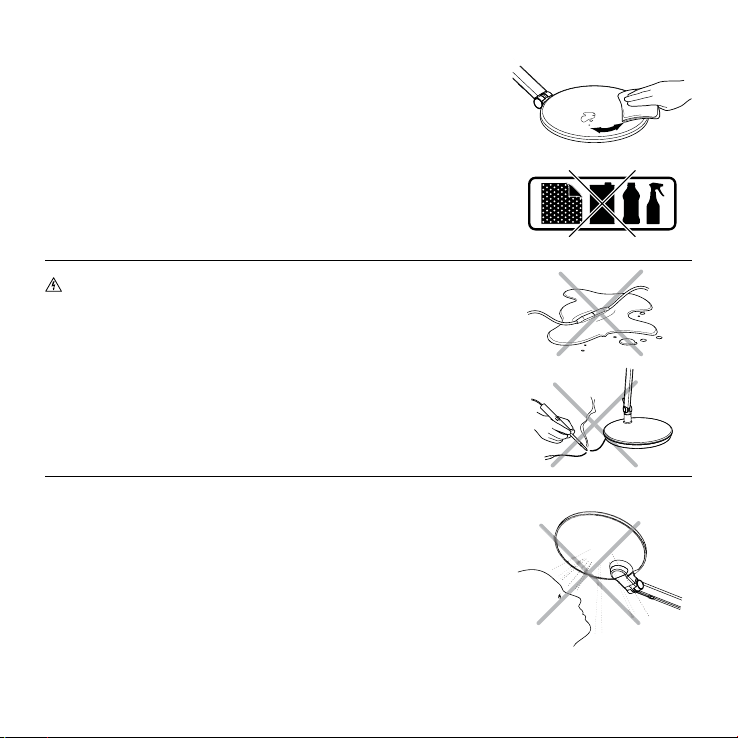
Important Safety and Care Instructions
Unplug from power source before cleaning.
Wipe clean with a soft damp cloth. Avoid amonia-based
cleaners and abrasives.
Do not expose power cord to liquids or high
temperatures.
The external exible cable or cord of this luminaire
cannot be replaced; if the cord is damaged,
the luminaire shall be destroyed.
Avoid staring directly at light source.
The light source of this luminaire is not replaceable;
when the light source reaches its end of life
the whole luminaire shall be replaced.
(1.)
(2.)
(3.)

4
AC Adapter
(Only included for USA/Canada)
(1.)
(7.)
(4.)
(2.)
(8.)
(5.)
(3.)
(9.)
(6.)
AC Adapter
(Only included for EU/UK)
AC Adapter
(Only included for Asia-Pacic/Oceania*)
#10 Mounting Screws
(For Wall Mount)
Drywall Anchors
(For Wall Mount)
3mm Allen Wrench
(For Wall Mount and Slatwall Mount)
Pencil Drill with #2 Philips
Head Driver Bit
5/16” (7.9mm) Drill Bit for Drywall
or
1/8” (3.2mm) Drill Bit for Hardwood
EU
UK
For Wall Mount
Tools Required
Included Parts
*Plug types are only designated for use in the countries listed.
Type A
(Japan)
Type C
(Korea)
Type F
Type A
(China)
Type I (Australia,
New Zealand)
Type G

5
Optional Mounts
Desktop Base Installation
Insert the Light Body into the Destop Base.
(1.)
(2.)
(3.)
For the Slatwall Mount, Wall Mount, and Clamp
Mount, remove the rotational stop collar (A)
before installing the Light onto the Mount.
Slatwall Mount Installation
Using a 3 mm allen wrench, adjust the universal
clamp bracket (B) to align with the openings on
the slatwall, place the mount on the slatwall, and
then tighten by turning the bolt clockwise.
A
or or
A
B

6
(#10)
+
(#10)
C
(1.)
(2.)
(3.)
Wall Mount Installation
Hook the Wall Mount onto its Bracket and
tighten by turning the bolt clockwise using
the 3mm allen wrench.
Using the Wall Mount Bracket (C), trace the
mounting holes onto the desired location
with the arrow pointing upward.
Secure the Bracket to the wall with the
provided hardware.
• If mounting to drywall, use a 5/16”(7.9mm)
drill bit for drywall anchor pilot holes.
• If mounting to hardwood, use a
1/8”(3.2mm) drill bit for the #10 screw pilot
holes.
3
2
1

7
The clamp mount can easily be converted for
use on thicker work-surfaces by disassembling
its components, rotating the L Bracket (D), and
reassembling.
Condition 1:
Condition 2:
Note:
Clamp Mount Installation
If installing onto a worksurface that is 2” (51mm)
or less, orient the attachment bracket as depicted.
If installing onto a worksurface that is greater
than 2” (51mm), orient the attachment bracket as
depicted.
.36” - 2”
(9.2mm - 51mm)
2” - 3.75”
(51mm - 95.3mm)
D
(1.)
(2.)
(3.)

8
User Interface Behavior
To increase or decrease brightness, slide nger up
or down on the touchpad.
To turn the light ON and OFF, lightly tap the
touchpad. The luminaire will remember the last
brightness level it
was set to.
Dimming
LED
(1.)
(2.)

9
Deactivating the Sensor
Occupancy Sensor
Nova is equiped with an occupancy sensor that
detects when the user is within range
(1 meter), and turns on automatically. It will turn
off after 15 min of user vacancy.
Touch and hold the center of the touchpad for 5
seconds. The luminaire will ash and the Indicator
LED will turn orange.
Touch and hold the center of the touchpad for 5
seconds. The luminaire will ash and the Indicator
LED will turn white.
Activating the Sensor
1 m
5 sec. OFF
5 sec.
ON
(1.)
(2.)
(3.)
10
FR Instructions de
montage Français
Consultez la page4
Consultez la page4
Pièces incluses
(1.) Adaptateur CA (uniquement inclus pour États-
Unis/Canada)
(2.) Adaptateur CA (uniquement inclus pour Asie-
Pacique/Océanie*)
(3.) Adaptateur CA (uniquement inclus pour
UE/R.-U.)
(4.) Vis de xation no10 (pour montage mural)
(5.) Ancrages pour cloison sèche (pour montage
mural)
(6.) Clé hexagonale de 3mm (pour montage mural
et sur panneau rainuré)
*Les types de prises ne sont conçus que pour une utilisation dans les
pays répertoriés.
(7.) Crayon
(8.) Mèche pour cloison sèche 5/16po (7,9mm) ou
mèche pour bois franc 1/8po (3,2mm)
(9). Perceuse avec embout cruciforme no2
Pour montage mural
Outils nécessaires
Informations sur le produit
Consultez la page3 (2.)
Consultez la page3 (1.)
Consultez la page3 (3.)
Instructions importantes de
sécurité et d'entretien
Débranchez l'appareil de la source d'alimentation
avant de nettoyer.
Nettoyez-le à l'aide d'un chiffon doux et humide.
Évitez les nettoyants abrasifs et à base d'ammoniac.
N'exposez pas le câble d'alimentation à des
liquides ou à des températures élevées.
Le câble ou cordon exible de ce luminaire
ne peut pas être remplacé; si le câble est
endommagé, le luminaire doit être détruit.
Évitez de regarder directement la source lumineuse.
La source lumineuse de ce luminaire ne peut
pas être remplacée; lorsque la source lumineuse
atteint sa n de vie, le luminaire entier doit être
remplacé.
Consommation électrique: 7watts
Puissance d’entrée: 24V, 0,75A
Gamme de gradation: 14% à 100%
Durée de vie: 50000heures (10ans)
Portée maximale: Standard: 732,8 mm
XL: 831,9 mm
Hauteur utile: Standard: bras inférieur: 350,5 mm
bras supérieur: 330,2 mm
XL: bras inférieur: 401,3 mm
bras supérieur: 381 mm
Altri manuali per Nova
2
Indice
Altri manuali Humanscale Attrezzatura di illuminazione


