Husky AT18503-10C Manuale utente

Item # 1008654646
Model # AT18503-10C
We appreciate the trust and condence you have placed in Husky through the purchase of this vacuum. We strive to continually
create quality products designed to enhance your home. Visit us online to see our full line of products available for your home improvement needs.
Thank you for choosing Husky!
THANK YOU
USE AND CARE GUIDE
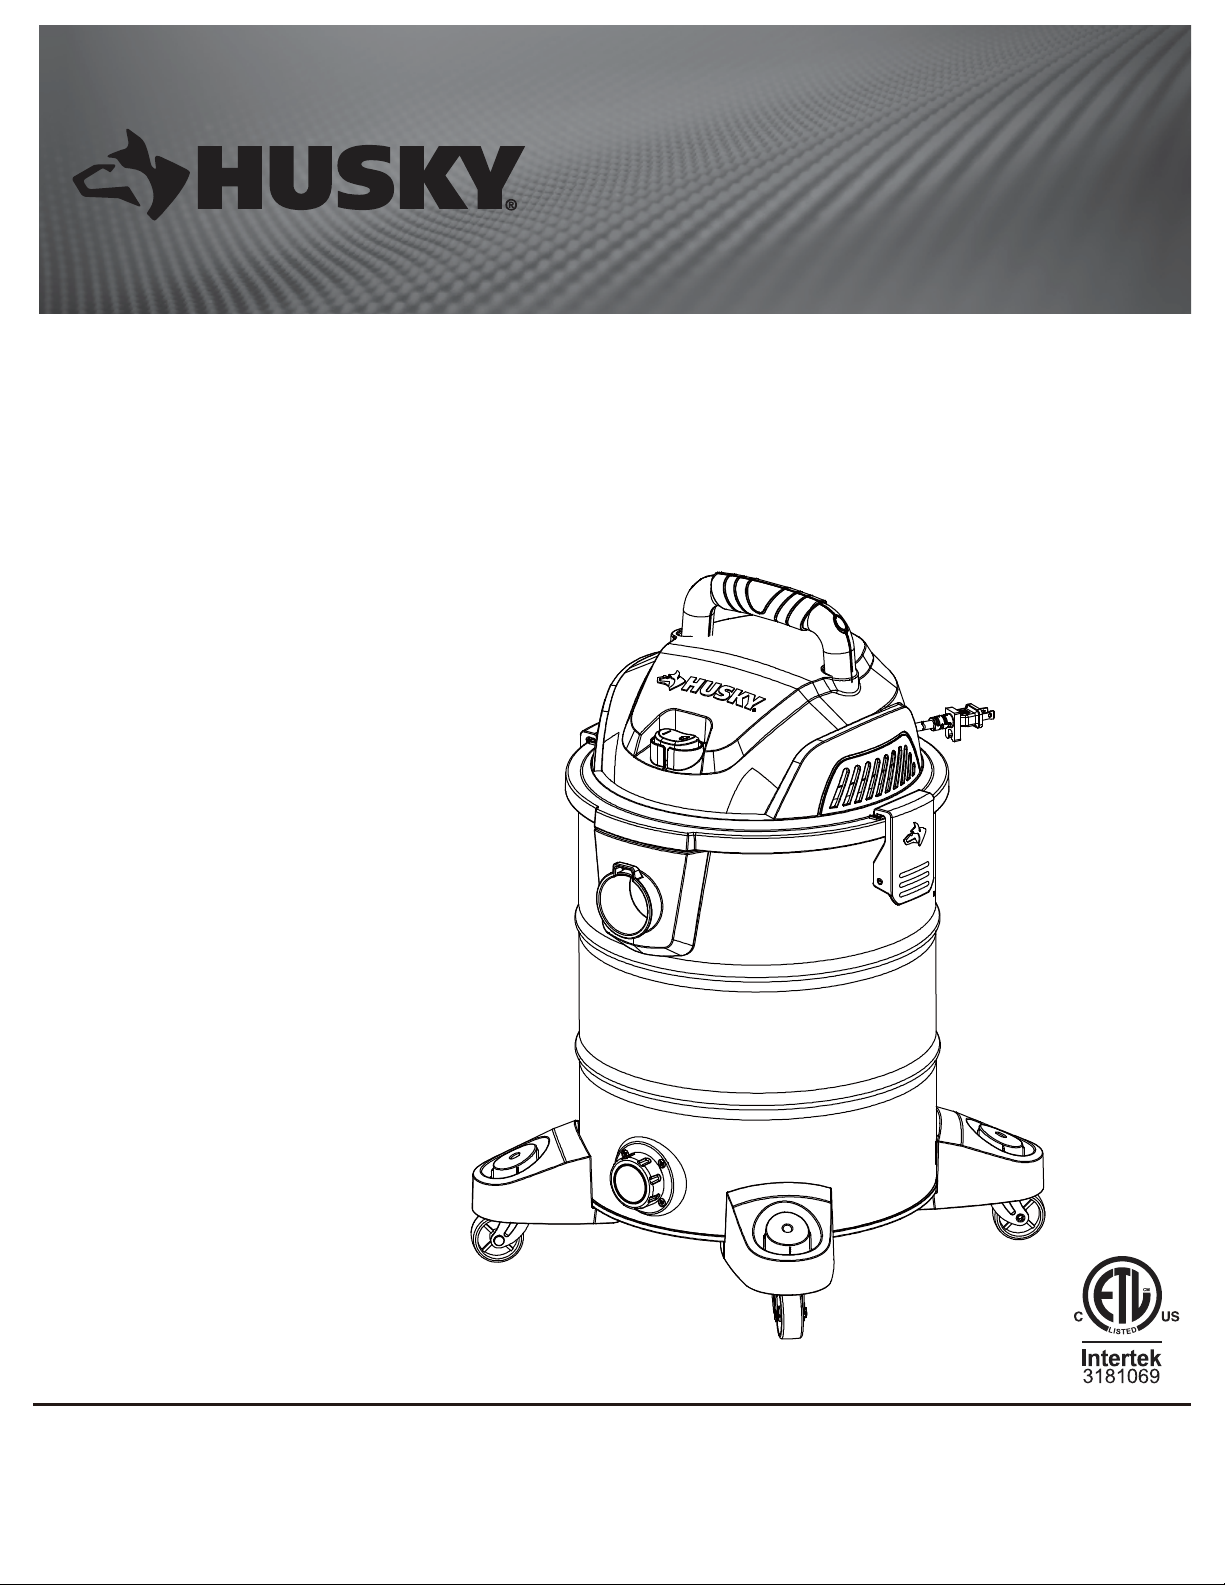
10 GALLON STAINLESS STEEL WET/DRY VACUUM
Questions, problems, missing parts?
Before returning to the store, call
Husky Customer Service
8 a.m. – 7 p.m., EST, Monday-Friday,
9 a.m. – 6 p.m., EST, Saturday
1-888-HD-HUSKY
HUSKYTOOLS.COM

2
Table of Contents
Safety Information.........................................................2
Warranty.........................................................................3
Pre-Assembly
................................................................
4
Assembly........................................................................5
Operation
.......................................................................
6
Maintenance..................................................................7
Care and Cleaning........................................................8
Troubleshooting............................................................8
Service Parts.................................................................9
Safety Information
SAVE THIS MANUAL FOR FUTURE USE.
When using an electrical appliance, basic precautions should
always be followed, including the following: READ ALL
INSTRUCTIONS BEFORE USING THIS APPLIANCE.
IMPORTANT SAFETY INSTRUCTIONS
1. Do not leave appliance when plugged in. Unplug from outlet
when not in use and before servicing.
2. Do not expose to rain. Store indoors.
3. Always disconnect the plug from the wall outlet before
removing the top cover.
4. Do not use as a toy. Close attention is necessary when used
by or near children.
5. Do not use with a damaged cord or plug. If appliance is not
working as it should, has been dropped, damaged, left
outdoors or dropped into water, contact the service center
for assistance.
6. Do not pull or carry by cord, use the cord as a handle, close
a door on the cord or pull the cord around sharp edges or
corners. Do not run appliance over cord. Keep cord away
from heated surfaces.
7. Do not unplug by pulling on the cord. To unplug, grasp the
plug, not the cord.
8. Do not handle the plug or appliance with wet hands.
9. Do not put any object into openings. Do not use with any
openings blocked; keep the openings free of dust, lint, hair
and anything that may reduce airow.
10. Keep hair, loose clothing, ngers and all parts of body away
from openings and moving parts.
11. Do not pick up anything that is burning or smoking, such as
cigarettes, matches or hot ashes.
12. Do not use without dust bag and/or lters in place.
13. Turn off all controls before unplugging.
14. Take extra care when cleaning on stairs.
15. Do not use to pick up ammable or combustible liquids such
as gasoline or use in areas where they may be present.
16. Do not use your cleaner as a sprayer of ammable liquids
such as oil-based paint, lacquers, etc.
17. Do not vacuum toxic, carcinogenic, combustible or other
hazardous materials such as asbestos, arsenic, barium,
beryllium, lead, pesticides or other health endangering
materials.
18. Do not pick up soot, cement, plaster or drywall dust without
a lter and dust bag in place. These are very ne particles
that may affect the performance of the motor or be
exhausted back into the air. Additional dust bags are
available.
19. Do not leave the cord lying on the oor once you have
nished the cleaning job. It can become a tripping hazard.
20. Use special care when emptying heavily loaded tanks.
21. To avoid spontaneous combustion, empty the tank after
each use.
22. The operation of a utility vacuum can result in foreign
objects being blown into eyes, which can result in eye
damage. Always wear safety goggles when operating
vacuum.
23. STAY ALERT. Watch what you are doing and use common
sense. Do not use vacuum cleaner when you are tired,
distracted or under the inuence of drugs, alcohol or
medication causing diminished control.
24. This appliance is provided with double insulation. Use only
identical replacement parts. See instructions for servicing
double insulated appliances.
25. Unplug before connecting the hose, nozzles, lters, or other
accessories.
DANGER: Never operate this unit when ammable
materials or vapors are present because electrical devices
produce arcs or sparks that can cause a re or explosion.
WARNING: Read all safety rules carefully before
attempting to operate. Retain for future reference. NEVER
LEAVE OPERATING VACUUM UNATTENDED!
CAUTION: If the supply cord is damaged, it must be
replaced by the manufacturer or its service agent or a
similarly qualied person in order to avoid a hazard.

3
Safety Information (continued)
Warranty
SERVICING OF A DOUBLE-INSULATED
WET/DRY VACUUM
SAVE THIS MANUAL
CAUTION: Remove the plug from the socket before
performing maintenance. Before using the machine make
sure that the frequency and voltage shown on the rating
plate correspond with the mains voltage. Specications
and details are subject to change without prior notice.
The accessories shown in the pictures may vary from
model to model.
NOTICE: Use only as described in this manual. Use only
manufacturer's recommended attachments. This wet/dry vacuum
is intended for household use only.
In a double-insulated wet/dry vacuum, two systems of insulation
are provided instead of grounding. This means that no grounding
is provided on a double-insulated appliance, nor should a means
for grounding be added. Servicing a double-insulated wet/dry
vacuum requires extreme care and knowledge of the system and
should be done only by qualied service personnel. Replacement

parts for a double-insulated wet/dry vacuum must be identical to
the parts they replace. Your double-insulated wet/dry vacuum is
marked with the words "DOUBLE-INSULATED" and the symbol
(square within a square) may also be marked on the appliance.
To reduce the risk of injury from electrical shock:
1. This appliance has a polarized plug (one blade is wider than
the other). This plug will t in a polarized outlet only one
way. If the plug does not t fully in the outlet, reverse the
plug. If it still does not t, contact a qualied electrician to
install the proper outlet. Do not change the plug in any way.
2. Unplug the power cord before servicing the electrical parts
of the wet/dry vacuum.
HUSKYTOOLS.COM
Please contact 1-888-HD-HUSKY for further assistance.
HUSKY LIMITED LIFETIME WARRANTY
If this Husky product ever fails due to a defect in material or workmanship, return the product to any Home Depot retail store for replacement
with an item of equal or greater value. This warranty excludes incidental/inconsequential damages and failures due to misuse, abuse or normal
wear and tear. This warranty gives you specic rights, and you may also have other rights, which vary from state to state.
Contact the Customer Service Team at 1-888-HD-HUSKY or visit www.HUSKYTOOLS.COM.

Pre-Assembly
4
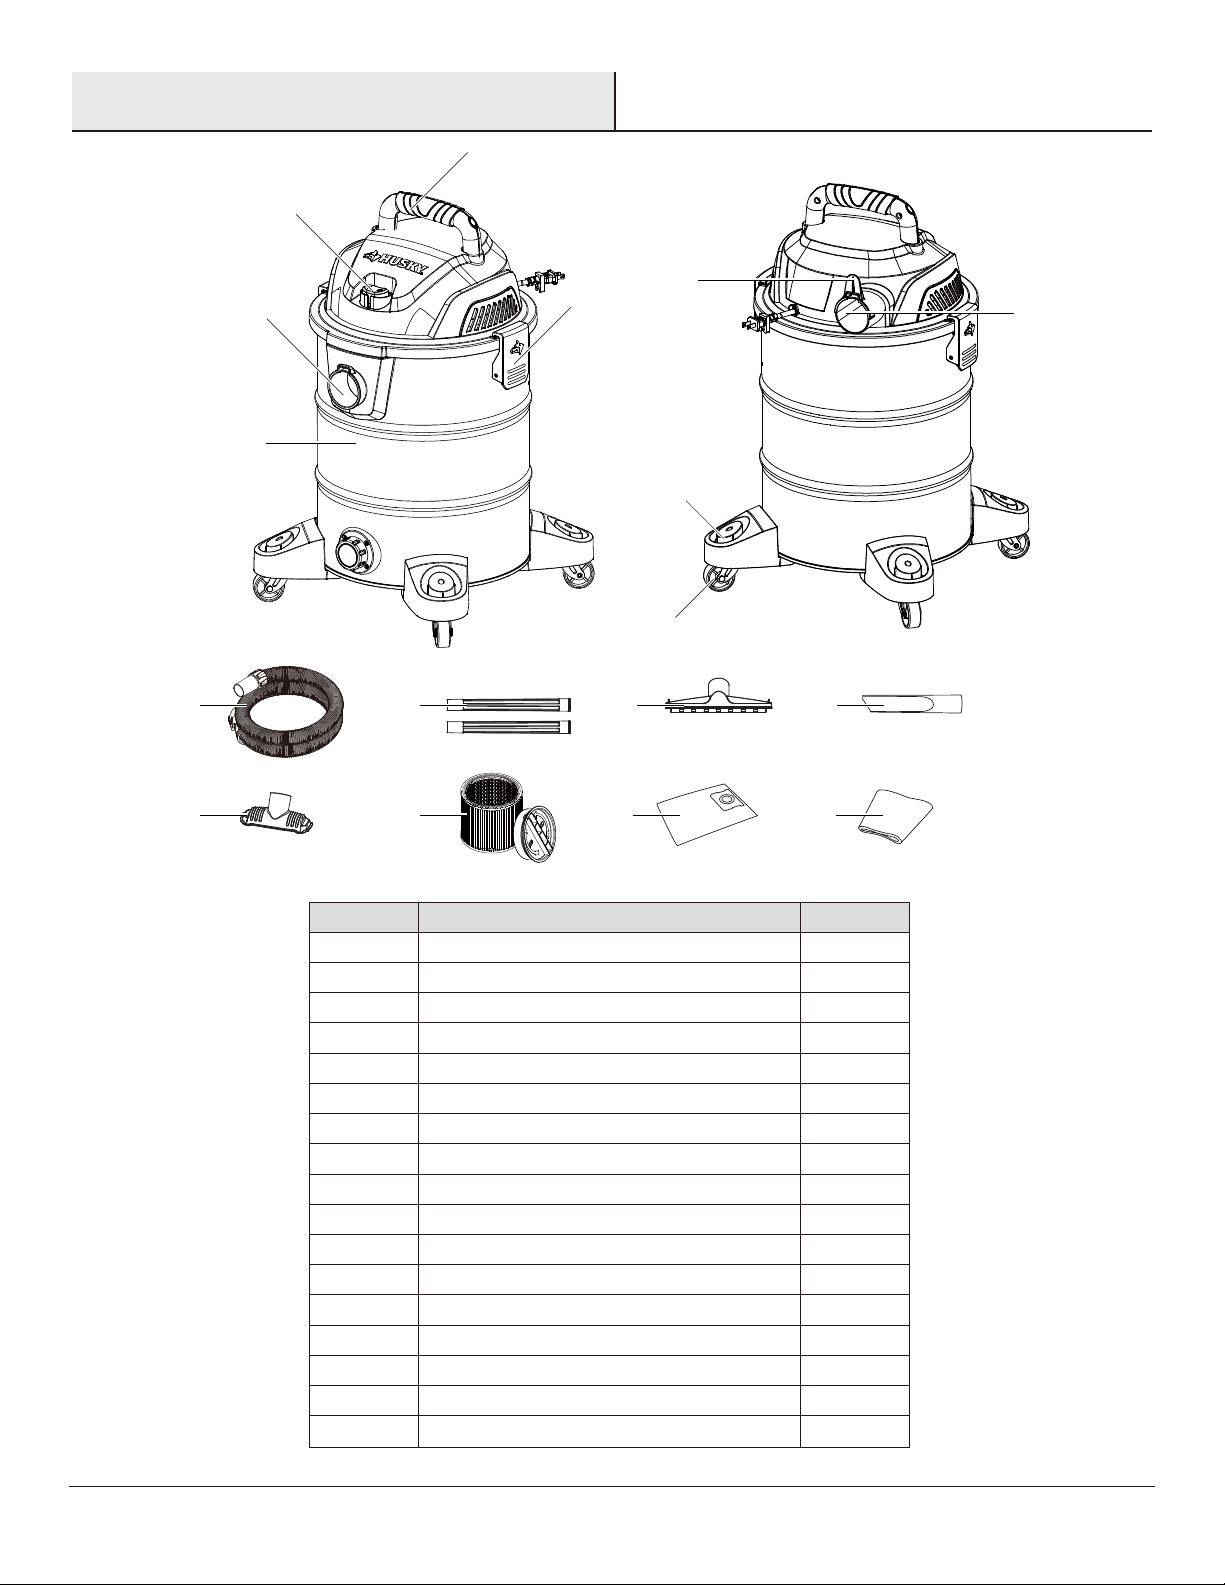
PACKAGE CONTENTS
A
G
F
J K L M
NOP Q
C
H
I
Part
A Handle
On/Off switch
Latch
Vacuum port inlet
Dust tank
Blower port
Power cord hook
Accessory holder
Caster
1-7/8 in. x 6 ft. Hose
Extension wand
Floor brush
Crevice nozzle
Utility nozzle
Cartridge filter
Disposable dust bag
B
C
D
E
F
G
H
I
J
K
L
M
N
O
P
1
1
2
1
1
1
1
4
4
1
2
1
1
1
1
1
Foam lter
Q 1
Description Quantity
B
D
E

5
Assembly
WARNING: To reduce the risk of re or explosion, do not operate this vacuum in areas with ammable gases, vapors or explosive
dust in the air. Flammable gases or vapors include but are not limited to: lighter uid, solvent-type cleaners, oil-based paints, gasoline,
alcohol or aerosol sprays. Explosive dusts include but are not limited to: coal, magnesium, aluminum, and grain or gun powder. Do not
vacuum explosive dust, ammable or combustible liquids or hot ashes. Do not use this vacuum as a sprayer for any ammable or
combustible liquid. To reduce the risk of health hazards from vapors or dusts, do not vacuum toxic materials.
WARNING: The operation of any utility vacuum can result in foreign objects being blown into the eyes, which can result in severe eye
damage. Always wear safety eyewear complying with ANSI Z87.1 (or in Canada, CSA Z94.3) before starting operation.
CAUTION: To reduce risk of hearing damage, wear ear protectors when using the vacuum for extended hours or when using it in a
noisy area. This 10 gallon/38 liter wet/dry vacuum is not fully assembled at the factory. You must install the casters and handle after
removing contents from the packaging. The unit is featured with vacuuming and blower functions. After fully assembling the vacuum,
plug the power cord into the wall receptacle, turn the unit “ON” by pushing the switch from position “O” to position “I”.
The “O” is the “OFF” position and the “I” is the “ON” position.
HUSKYTOOLS.COM
Please contact 1-888-HD-HUSKY for further assistance.
O = OFF
I = ON
□Insert the casters (I) into the accessory holders (H) as shown.
□Strong pressure is required. Listen for the click to ensure they are locked in place.
I
1Installing casters
H

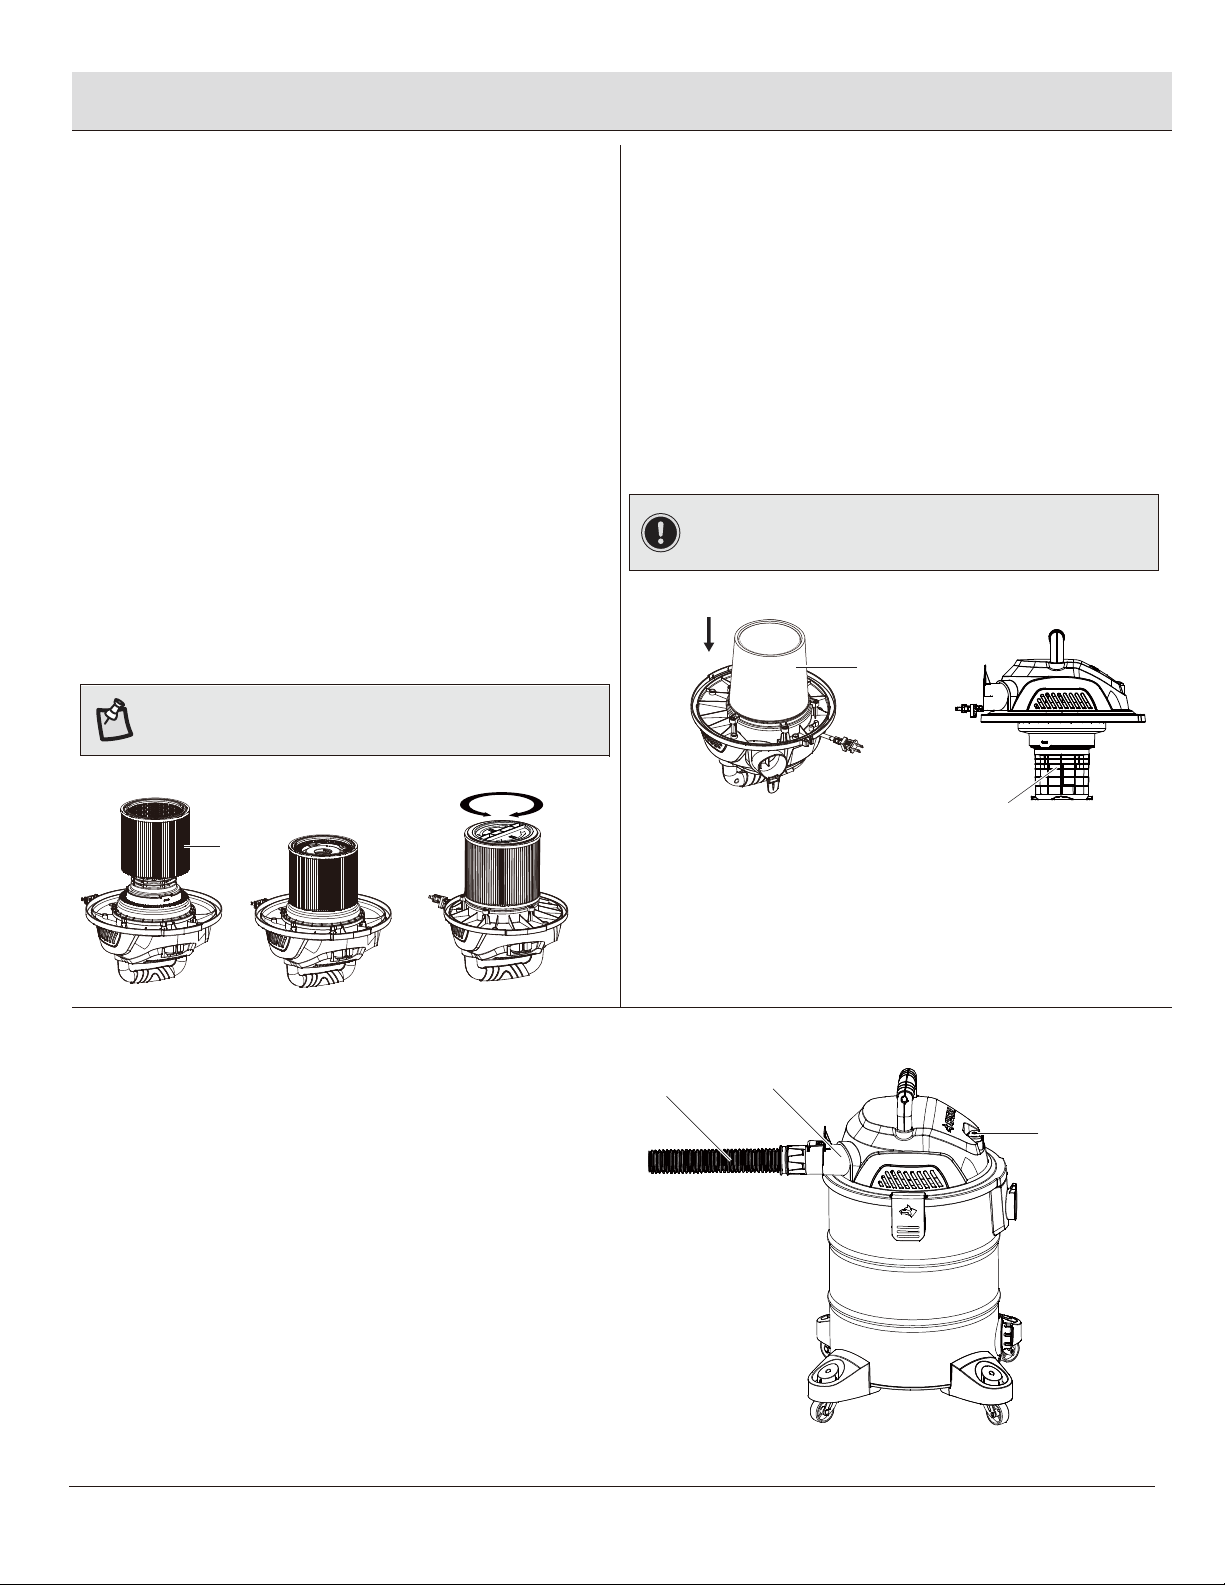
INSTALLING THE CARTRIDGE FILTER
Operation
1 2
□
□
□
□
3
□
□
□
6
Vacuuming dry
Using the blower function
The cartridge lter (O) can be used for wet or dry pickup.
Installation is the same for both.
With the power head in an upside down position, slide the
cartridge lter (O) down over the lid cage and push the
lter seals against the power head.
Place the lter retainer into the top of the cartridge lter,
hold the power head with one hand, and turn the handle on
the lter retainer clockwise to tighten, locking the lter into
place.
Vacuuming wet
To remove the lter for cleaning, hold the power
head and turn the lter retainer counterclockwise to
loosen and remove. Then remove the cartridge lter off the
lid cage.
To clean the cartridge lter, shake or brush off excess
dirt or rinse (from the inside of the lter) with water. Then
completely dry (approximately 24 hours) and re-install.
NOTE:
If the lter has been used for wet pickup, it must
be cleaned and dried before using for dry pickup.
IMPORTANT:
To reduce the risk of damage to the vacuum,
do not run the motor with the oat in raised position. Wet pick
up accessories should be washed periodically.
This vacuum features a blower port. Follow the steps below to
use the vacuum as a blower.
Locate the blower port (F) on the vacuum.
Insert one end of the 6 ft. x 1-7/8 in. hose (J) into
the blower port (F).
Turn the vacuum on/off switch (B) to “ON”.
O
Float in raised position
JF
□
□
Remove the cartridge lter (O) and replace it with the foam
lter (Q) when you do wet pickups.
This wet/dry vacuum is equipped with a oat mechanism
which will rise automatically to cut off the airow when the
liquid in the tank reaches a predetermined level. When this
happens, turn off the vacuum, unplug the power cord, and
empty the dust tank. You will know that the oat has shut
the airow off because the suction ceases and the motor
noise becomes higher in pitch due to increased motor
speed. The liquid capacity may vary with the rate of pickup.
Q
B

HUSKYTOOLS.COM
Please contact 1-888-HD-HUSKY for further assistance.
7
Maintenance
FILTER REPLACEMENT – REPLACE WITH MULTI-FIT CARTRIDGE FILTER SKU#332340
WARNING:
To reduce the risk of injury from accidental starting, unplug the power cord before changing or cleaning the lter. Your
lter should be cleaned often to maintain peak vacuum performance.
WARNING:
Do not remove the lter cage and oat. The oat prevents water from entering the impeller and damaging the motor.
The cage prevents ngers from touching the moving impeller.
IMPORTANT:
To avoid damage to the blower wheel and motor, always reinstall the reusable dry lter before using the vacuum for
dry pickups and always reinstall the foam lter before using the vacuum for wet pickups.
IMPORTANT:
After cleaning, check the lter for tears or small holes. Do not use a lter with holes or tears in it. Even a small hole
can cause dust to come out of your vacuum. Replace it immediately.
NOTE:
Before installing the lter on the vacuum, clean the area of the lid so that the clamp ring will seal the bag against the lid and
stop small particles from bypassing the lter bag. If the lter is clean and not damaged, replace it on the lter cage. If it cannot be
reused, place a new lter over the lter cage.
NOTE:
Clean the lter in an open area.
STORAGE
Before storing your vacuum, the dust tank should be emptied and cleaned.
The cord should be wrapped and hung on the unit and the accessories should be kept in the accessory holder
so they can be readily available.
The vacuum should be stored indoors.
□
□
□

Care and Cleaning
Troubleshooting
Minor problems often can be xed without calling customer service.
The vacuum does not run.
The tank is full.
The lter is clogged.
The hose is clogged.
The tank is full.
The lter is clogged.
The hose is clogged.
There is a loss of suction during wet
pickup.
There is a loss of suction during dry
pickup.
□
□
□
□
□
□
□
□
□
□
□
□
8
WARNING:
To reduce the risk of injury from accidental starting, unplug the power cord before emptying the dust tank.
WARNING:
To reduce the risk of injury from moving parts and/or electrical shock, turn power switch off and disconnect power plug
from electrical outlet before performing troubleshooting checks.
Problem Possible Cause Corrective Action
Drain and clean the tank.
Clean or replace the lter.
Remove the hose and clean out the debris.
Drain and clean the tank.
Clean or replace the lter.
Remove the hose and clean out the debris.
CLEANING
To keep your wet/dry vacuum looking its best, clean the outside with a cloth dampened with warm water and mild soap.
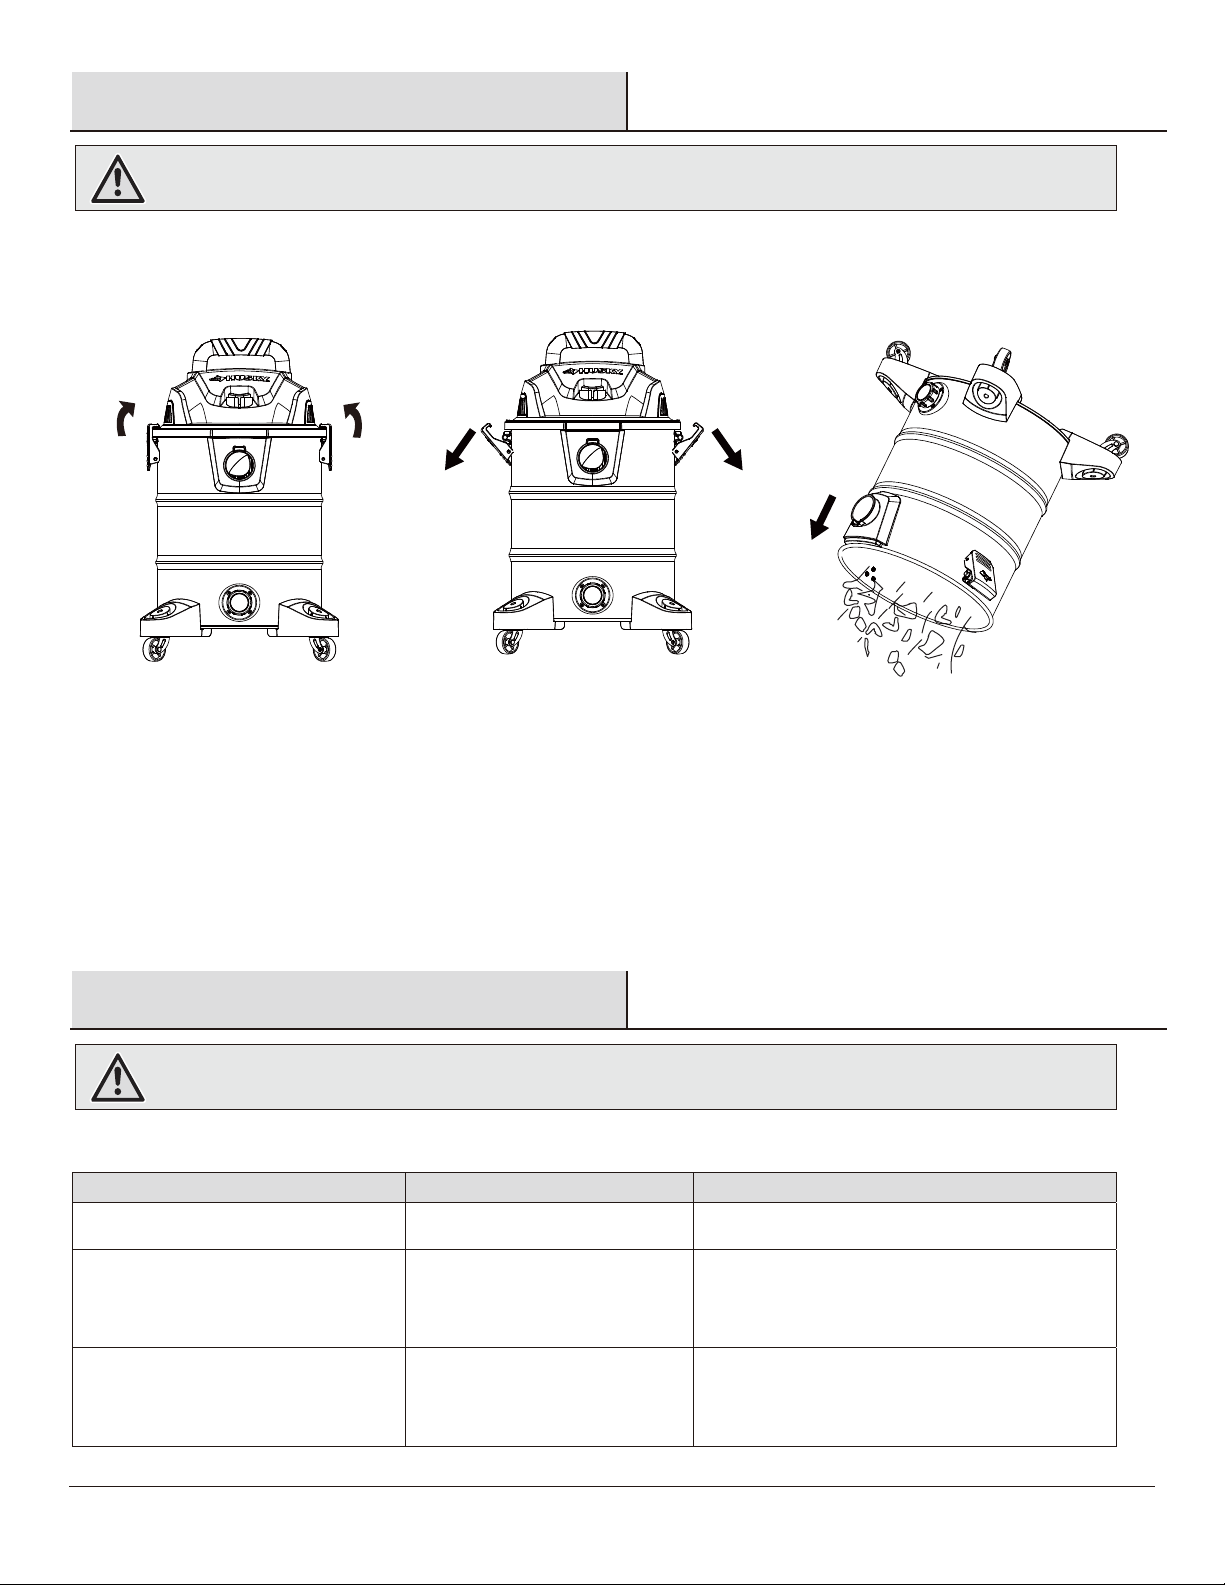
To clean the tank:
Dump out debris.
Wash the tank thoroughly with warm water and mild soap.
Wipe with a dry cloth.
□
□
□
Remove the power head assembly of the wet/dry vacuum by pulling outward on the lid clips located on each side of the vacuum. Lift off
the power head assembly.
Dump the tank contents into the proper waste disposal container.
□
□
No electricity. Make sure electrical outlet has voltage
(a qualied electrician may need to be contacted).
□□

9
Service Parts
HUSKYTOOLS.COM
Please contact 1-888-HD-HUSKY for further assistance.
Filter Cage
Latch
Dust Tank
Accessory holder
Caster
Vacuum Port
Drain
1
2
3
4
5
6
7
8
9
10
11
12
13
14
15
16
17
1
1
1
1
1
1
1
1
1
1
1
2
1
1
1
4
4
Handle
ON/OFF Switch
Wind Cover
Top Cover
Power Cord
Lower Lid
Air duct seal
Air duct sponge
Motor sealing ring
Motor
Part Description Quantity
1
2
3
4
6
7
14
15
16
8
9
10
11 17
5
12
13

Questions, problems, missing parts? Before returning to the store,
call Husky Customer Service
8 a.m. – 7 p.m., EST, Monday-Friday
9 a.m. – 6 p.m., EST, Saturday
1-888-HD-HUSKY
HUSKYTOOLS.COM
Retain this manual for future use.
Questo manuale è adatto per i seguenti modelli
1
Indice
Lingue:
Altri manuali Husky Aspirapolvere

Husky
Husky 8200441B Manuale utente

Husky
Husky Sprint Manuale utente

Husky
Husky 8200445 Manuale utente

Husky
Husky SOLSTICE Manuale utente

Husky
Husky 8200441 Manuale utente

Husky
Husky Flair Manuale utente

Husky
Husky AT18304-6B Manuale utente

Husky
Husky NANOOK Manuale utente

Husky
Husky HV02000 Manuale utente

Husky
Husky HV06000 Manuale utente