iHome iH12 Manuale utente

Model iH12
Dual Alarm Cube Clock
Radio For Your iPod
Questions? Visit www.ihomeaudio.com
Model:iH12(Rev1)
InstructionManual
Date:Jan3,2008
Printcolor:Blacktextonwhitepaper
Size:178Wx178Hmm

1
2
3
3
4
5
6
6
7
7
7
8
8
8
8
9
10
11
12
Quick Start
Controls and Indicators
iH12 Display
Install Clock Backup Battery
Using The Remote Control Unit
Install/Replace the Remote Control Battery
To check for iPod compatibility
Setting Up the iH12
Setting Time and Calendar
Using the Alarm
Charging you iPod
Listening to iPod
Listening to non-docking iPod or other portable audio devices
Dimme Operation
Listening to Radio
Sleep Operation
Click Sound Operation
3D Sound Operation
A Consumer Guide to Product Safety
Trouble Shooting
Solución De Problemas
Warranty Information
Table of Contents
• Place the unit on a level surface away from sources of direct sunlight or excessive heat.
• Protect your furniture when placing your unit on a natural wood and lacquered finish. A cloth or other protective material
should be placed between it and the furniture.
• Clean your unit with a soft cloth moistened only with mild soap and water. Stronger cleaning agents, such as Benzine, thinner
or similar materials can damage the surface of the unit.
Maintenance
This device complies with part 15 of the Federal Communications Commission Rules. Operation is subject to the condition
that this device does not cause.
FCC Information

1
Quick Start
2:inserts
Select the dock insert for your
iPod model from the table below
and place insert in dock.
Never dock an iPod without
an insert in place.
3:iPod
Insert iPod into dock with proper
insert (iPod must not be in a skin or
case). iPod will charge while docked.
Press the Play Button on the iH12 to play
iPod.
NOTE: If the insert for your iPod isn’t listed, please visit an Apple store or www.ihomeaudio.com
to purchase the proper insert.
iPod Touch
thin iPod with video (30 GB)
Insert 9
3rd Gen nano
insert 13
3rd Gen nano
iPod with video (60,80 GB)
Insert 10
thin (30 GB) iPod with video
thin (80GB) iPod classic
thick (60, 80 GB) iPod with video
thick (160 GB) iPod classic
iPod Touch
insert 14
For this iPod
Use this insert
1:power
Attach AC adaptor cable to jack on
back of the iH12 and plug the other
end into a wall socket.

Controls and Indicators
2
Back panel
Clock Adj Button
AM Loop
Antenna Socket
Line-in JACK
Time Zone Button
DST Switch
Front panel
Top panel
Alarm-1 Button
<< Button
Wake-to Button
Alarm-2 Button
Alarm Reset /
Power On/Off Button Volume + Button
Volume - Button
iPod Dock
Radio/Aux Button
Sleep Button
>> Button
iPod Play/Pause Button
Preset Button 1-4
Snooze/Dimmer Button

3
iH12 Display
Install Clock Backup Batteries
The iH12 uses 2 alkaline “AA” batteries to provide continuous alarm operation
and clock settings in the event of a power failure. If the backup batteries have
been installed and a power failure occurs or the AC cord is accidentally discon-
nected, the display backlight will not remain lit, but current time and alarm time
settings will be temporarily maintained. Otherwise, you must reset the time and
alarm settings.
1. Please make sure the AC adaptor is connected. Otherwise all settings may
be lost during battery replacement.
2. Open backup battery compartment door located on the bottom of the unit.
3. Insert 2 AA batteries, checking that the polarity (+ and – ends of the battery)
matches the drawing near the battery compartment. Close the compart-
ment door.
Note: Make sure you dispose of batteries properly (see your local regulations).
Installing Backup Batteries
PM Indicator
Line in Indicator
Wake-to Radio Indicator
Wake-to Buzzer Indicator
Daylight Saving Time
Indicator
Time Display
Wake-to Indicator
Sleep Indicator
Alarm 1 Indicator Alarm 2 Indicator
iPod Indicator
Battery Low Indicator
Radio Frequency
or Alarm Time Indicator
(AM, FM1 & FM2)
Radio band Indicator
(PM) Alarm Time Indicator

Install/Replace the Remote Control Battery
The remote control battery is already installed at the factory. When the
remote control stops operating or its range seems reduced, it is time
to replace the battery with a new one.
1. The battery door is located on the back end of the remote control.
2. Pull the battery door to release the battery door latch and take out
the battery.
3. Insert a CR2032 battery, checking that the + and – sides of the
battery matches the drawing inside the battery compartment.
4. Replace the battery door.
Note: Make sure you dispose of batteries properly (see your local regulations).
The Remote Control controls basic functions on the iH12 and certain iPod functions when the iPod is docked in the iH12.
For best results, aim remote control towards the remote sensor on the upper left corner of the unit.
To check for iPod compatibility
iH12 is an advanced system and supports most updated iPod features. To ensure your iPod works properly with the iH12,
please update your iPod firmware with the latest version, available on the Apple website (www.Apple.com).
Installing Remote Battery
4
Using The Remote Control Unit
Alarm Reset/
Power On/Off Button
3D Button
Volume - Button
<< Button >> Button
Volume + Button
Preset Button
iPod Play/Pause Button
Radio/Aux Button
Snooze/Dimmer Button

This unit is a PRESET Clock/Radio: the clock is preset for the correct Eastern Standard Time at the factory. Please follow the
steps below to match settings to your location.
1. Depending on your location and whether or not Daylight Saving Time (DST) is in effect, set the DST Switch located on
the back of the unit to +1 to add 1 hour or to -1 to subtract 1 hour. When set to +1 a DST icon will appear on the display,
indicating DST mode.
2. Press and hold the Time Zone Button located on the back of the unit until the current time zone at the lower part of the
display blinks. If needed, press the << or >> Button to select your time zone.
3. Press Time Zone Button again (or if no button is pressed within 10 seconds) to exit the setting mode.
4. If the time showing is not correct, please see Setting Time and Calendar to set the clock.
Setting Time and Calendar
1. Press and hold the Clock Adj Button located on the back of the unit until the time display blinks. Press the << or >>
Button until the current time is displayed. Holding the button for a few seconds will advance or reverse rapidly. Remem-
ber to set the correct AM or PM. An icon in the upper right hand corner of the time digits is the PM Indicator; there is
no AM indicator.
2. Press the Clock Adj Button again to accept the current setting and set current year. Press the << or >> Button until
the current year is displayed. Press the Clock Adj Button to confirm year setting after adjustment.
3. The display will change to show the date blinking. Press the << or >> Button until the current date is displayed. Holding
the button for a few seconds will advance or reverse rapidly.
4. Press the Clock Adj Button again (or if no button is pressed within 10 seconds) to exit the time and date setting mode.
5
Setting Up the iH12

Setting the Alarms
1. Press and hold the Alarm-1 or Alarm-2 Button until the alarm time blinks in the lower part of the display. Press the <<
or >> Button to set the alarm time. Holding the button for a few seconds will advance or reverse rapidly. Remember to
set the correct AM or PM time.
2. Press the Wake-to Button to select iPod, Radio or Buzzer alarm source. You can set different alarm sources for each
alarm.
3. Press the Alarm Button again or wait for 10 seconds. Alarm is now armed, indicated by the numbered alarm clock icon.
Review, Arming and Disarming Alarm (Turn Alarm Function On and Off)
1. Press Alarm 1 (or Alarm 2) Button once. The unit will show the alarm time on the bottom part of the display for alarm
time review.
2. During alarm review, press the Alarm 1 or Alarm 2 button again to arm or disarm the alarm. When the alarm is armed,
the related alarm icon appears in display.
Resetting the Alarm to Come on the Next Day
1. When the alarm is sounding, press the Alarm Reset/Power On/Off Button to stop the alarm and reset it to come on
the following day at the same time.
Snooze
1. Press the Snooze/Dimmer Button after the alarm sounds. The alarm will be silenced and come on again 9 minutes
later. Snooze can be press several times during the 1 hour alarm cycle.
Sure Alarm
The iH12 has a sure alarm feature. If backup batteries are installed (see page 3) the buzzer alarm will still sound in the event
of a power failure.
6
Using the Alarms
Note: Please make sure you are using the correct insert for your iPod (see Install iPod Insert) and that it is properly docked
into the iH12. Failure to do so may damage your iPod.
1. While your iPod is docked in the unit and the unit is connected to AC power, it recharges (until fully charged). Note that
non-docking iPods will NOT charge.
Charging your iPod

During normal operation, press the Snooze/Dimmer Button to control the brightness of the LCD display.
1. Dock the already playing iPod. The iH12 will automatically turn on and you will hear the music playing from your iPod.
Note: If the playing song/music loudness is too low on the iPod itself, iH12 may not detect iPod is in play mode. Press
the Play/Pause Button on main unit or remote control twice to play it.
2. When the iPod is docked and in standby mode, press the Play/Pause Button on the iH12 or on the remote control to
play it. The iPod Icon will appear on the display, showing iPod playing mode.
3. Press the iPod Play/Pause Button again to pause play; press again to resume it.
4. Press the Volume+ and Volume– Button on the iH12 or on the remote control to adjust the system volume.
5. Press >> or << Button on the iH12 or on the remote control to go to the next or previous track. Press and hold while
track is playing for high speed forward or reverse music search of the current track.
6. To turn off the unit, press the Alarm Reset/Power On/Off Button on the iH12 or on the remote control to turn it off.
Your iPod will continue charging while in the dock.
7
Listening to iPod
If you are using an iPod without a docking port or other MP3 player or portable audio device, you can play it through the iH12
via the Line-in Jack.
1. Plug one end of an audio patch cord (available at www.ihomeaudio.com) into the headphone or line-out jack on your
device and the other end of the patch cord into the iH12 Line-in Jack, located on the back of the unit.
2. Press the Radio/Aux Button on the iH12 or on the remote until the Line-in Icon appears on the right hand lower corner
of the display, indicating Line-in playing mode.
3. Turn on and play your device.
4. Press the Volume+ and Volume– Button on the iH12 or on the remote control to adjust the system volume. You may
need to adjust your device volume, too.
5. To turn off the unit, press the Alarm Reset/Power On/Off Button on main unit or remote control to turn it off. Please
remember to turn off your device, too.
Listening to non-docking iPod or other portable audio devices
Dimmer Operation

Setting up Antenna
1. Plug the AM antenna cable into the AM Loop Antenna Socket on the back of unit. Move antenna 12” away from unit
for best reception.
2. Extend FM wire antenna fully for best reception. Do not strip, alter or attach to other antennas.
Tuning and Playing the Radio
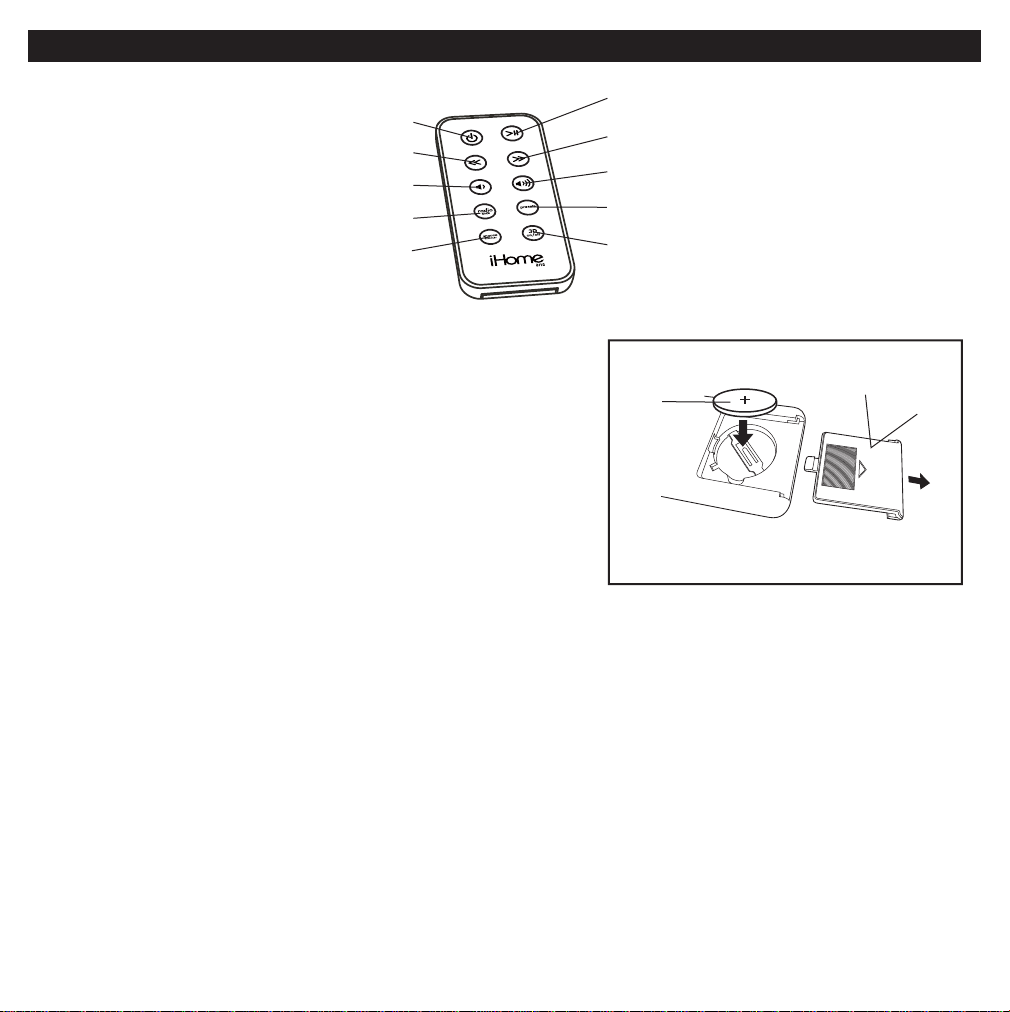
1. Press the Radio Button to select radio play mode. Press as needed to select AM, FM1 or FM2 radio band.
2. Press << or >> Button to tune radio to a desired station.
3. To memorize the current station as a preset, press and hold Preset Button 1, 2, 3 or 4. Repeat step 1-3 to preset up
to 12 stations (4 AM and 8 FM). To listen to a preset station at any time, simply press the desired preset button.
4. Press the Volume+ and Volume– Button on the iH12 or on the remote control to adjust the system volume.
5.
To turn off the unit, press the Alarm Reset/Power On/Off Button on
the iH12 or on the
remote control to turn it off.
During normal operation, press and hold the Wake-to Button to set button click sound on or off. After the display shows
“CLC”, press << or >> Button to set click sound on or off, then wait around 5 seconds to exit the setting mode.
8
Listening to Radio
Sleep mode lets you sleep to your iPod or the radio, gradually lowering the volume until the unit shuts off at the selected
time.
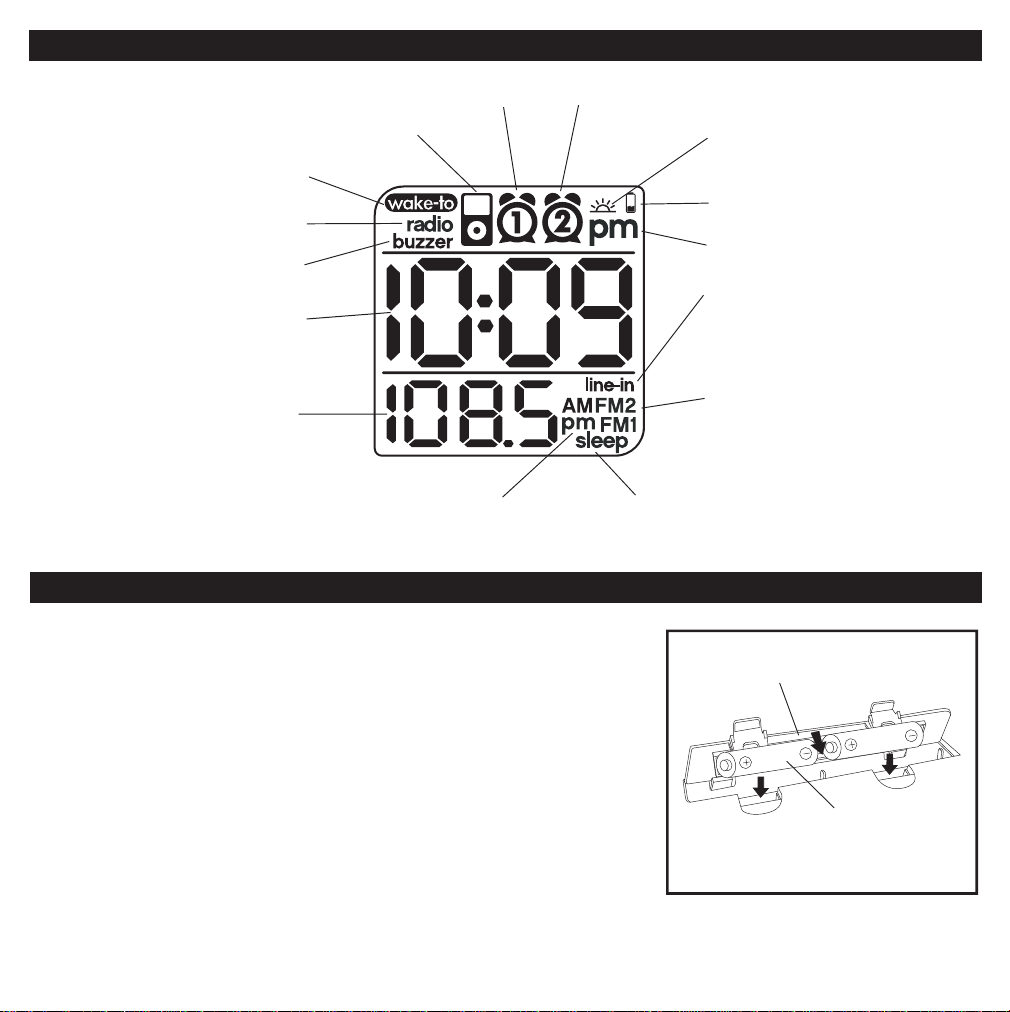
1. Press the Sleep Button to enter sleep mode. The Sleep Icon will appear on the display to indicate the unit is in sleep
mode. The unit will automatically turn off after the selected time. Sleep mode has a Gentle Sleep feature which gradually
lowers the volume 15 seconds before auto power off.
2. You can adjust the sleep timer from 120, 90, 60, 30 or 15 minutes by pressing the Sleep Button again.
3. When the display changes back to show the real time, press the Sleep Button once to show the sleep time remaining.
Pressing it again will change the sleep time to the next lowest increment.
4. The iH12 has independent volume setting for sleep mode so you can adjust the sleeping volume without affecting the
alarm volume. Press the Volume+ and Volume– Button on main unit or remote control to adjust the sleep volume. The
sleep volume will remain at that level the next time you enter sleep mode until controls are changed.
5. To stop listening at any time, press the Alarm Reset/Power On/Off Button on the iH12 or on the remote control to
turn it off.
Sleep Operation
Click Sound Operation
Repeatedly press the 3D Button on the remote to set 3D wide sound effect on or off, then wait around 5 seconds to exit the
setting mode.
3D Sound Operation
Indice
Altri manuali iHome Radiosveglia

iHome
iHome iBT31 Manuale utente

iHome
iHome iD83 Manuale utente

iHome
iHome IA100 Manuale utente

iHome
iHome iDL46EU Manuale utente

iHome
iHome iDL46 Manuale utente

iHome
iHome iHome iBN20 Manuale utente

iHome
iHome iP230 Manuale utente

iHome
iHome iBT38 Manuale utente

iHome
iHome iDL44 Manuale utente

iHome
iHome iBT29 Manuale utente

iHome
iHome iPL8XH Manuale utente

iHome
iHome iWBT5 Manuale utente

iHome
iHome HDL99 Manuale utente

iHome
iHome iBN180 Manuale utente

iHome
iHome iBT31 Manuale utente

iHome
iHome iHM50R Manuale utente

iHome
iHome HiH60 Manuale utente

iHome
iHome IP43 IP43 Manuale utente

iHome
iHome iBT29 Manuale utente

iHome
iHome iH27 Manuale utente


